SPEEDLINK medusa 5 1 home sl 8796 Owner's manual
- Category
- Headsets
- Type
- Owner's manual
This manual is also suitable for

Medusa 5.1 Surround Home
SL-8796
User‘s Guide
Bedienungsanleitung
Mode d‘emploi
Instrucciones de manejo
Manuale di istruzioni
Page is loading ...
Page is loading ...
Page is loading ...
Page is loading ...
Page is loading ...
Page is loading ...
Page is loading ...
Page is loading ...
Page is loading ...
Page is loading ...

GB
IMPORTANT SAFETY INFORMATION
Important!
Before using this product, read the instruction manual for important safety information. Please
retain this manual for future reference and warranty information.
Excemption from Liability
No liability will attach to Jöllenbeck GmbH if any damage, injury or accident is attributable to
inattentive, inappropriate, negligent or incorrect operation of the machinery whether or not caused
deliberately.
Troubleshooting & Servicing
Do not attempt to service or repair the device yourself. Refer all servicing to qualifi ed service per-
sonnel. Do not attempt to modify the device in any way. Doing so could invalidate your warranty.
Moisture and heat sources
Do not use this apparatus near water (for example, sinks, baths, pools) or expose it to rain, mois-
ture, or dripping or splashing liquids. Do not expose the unit to high temperatures, high humidity or
direct sunlight.
Cleaning
When cleaning the device, please use a soft, dry cloth. Never use benzine, paint thinner, or other
chemicals on the device.
Location
Place the device in a stable location, so it will not fall causing damage to the device or bodily harm.
Intended use
• The product may only be used with the original parts intended for it.
• The product may only be used in closed and dry rooms.
• The intended use includes adherence to the specifi ed installation instructions. The manufactu-
rer accepts no liability for damage arising due to improper use.
12

GB
13
Introduction
Congratulations on your purchase of the Medusa 5.1 Home Edition Headset. Enjoy a world of
sound that puts you right at the centre of the action - listen as a door shuts behind you to your left
or experience the sound of a car as is speeds past you from the right.
Please read this manual carefully before you connect up your equipment. Please also keep this
manual in a handy place for your future reference.
Features
Medusa 5.1 headset with amplifi er allowing connection to a 5.1 soundcard and a DVD player
at the same time
Additional connectivity for a 5.1 speaker system - simply switch between the two unit outputs
High quality removable microphone for crystal clear speech input
Padded and height adjustable headband
Retractable padded headphone cups
In-line remote with controls for front, rear, centre and bass
Medusa can be hung on the amp box – saving space
On/off switch with blue LED
All necessary cables and the mains adapter are included in the delivery.
Setup Requirements
You require a 5.1 source like a PC with 5.1 soundcard or a DVD player to connect to your Medusa
Headset.
Important notes about connecting
This headset is designed exclusively for connection to a 5.1 soundcard or DVD/CD player.
It can only be connected to a games console indirectly through a 5.1 amplifi er.
You do not need to install a driver.
The headset can not be operated using the optical output of a DVD/CD player or soundcard.
The description in this manual on how to connect up your equipment has been designed in
such a way that allows both a PC, as well as a DVD player, to be connected to the amp box at
the same time.

GB
14
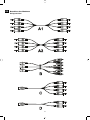
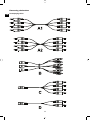
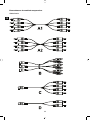
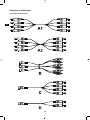
Connecting the headset
Accompanying cables

GB
15
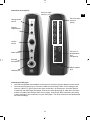
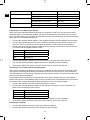
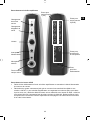
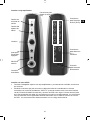
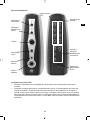
Connections on the amp box
Connecting to a DVD player
Connect the supplied mains adapter to the amp box and then plug the adapter into the mains.
Connect the four jack plugs on one end of cable A1 (according to their colour coding) to the
inputs on “INPUT II“ (green plug to the green socket etc.) on the amp box. Connect cable B
to cable A2 and DVD player as follows: Connect the three jack plugs on cable A2 to the three
sockets on cable B according to their colour coding. Connect the RCA connectors according
to their markings to the connectors on your DVD player. The RCA connectors are labelled with
two-letter markings.
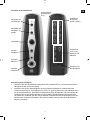
Change audio
source
Change
output device
Volume
control
Power switch
External
microphone
Headset port
Ports for audio
source 2
(DVD)
Ports for 5.1
loudspeakers
and
microphone
Mains adapter
jack
Ports for audio
source 1 (PC)

GB
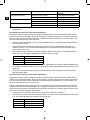
16
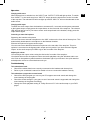
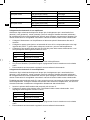
RCA Marking Connector on DVD player
Green jack plug FR (red RCA connector) Front Right
FL (white RCA connector) Front Left
Black jack plug RR (red RCA connector) Rear Right
RL (white RCA connector) Rear Left
Red jack plug WF (red RCA connector) Subwoofer
CE (white RCA connector) Centre
Connect the headset connector to the 9 pin socket “G9“ on the front side of the amp box.
Connecting to a 5.1 soundcard to the amp box
Note: Every soundcard has different methods of connection for the front, rear and centre audio
channels. Before connecting the headset you should fi rst identify the connectors on your sound-
card. This will enable you to connect your headset correctly fi rst time around. The instructions that
came with your soundcard can help you.
Connect the supplied mains adapter to the amp box and then plug the adapter into the mains.
Connect the four jack plugs on one end of cable A2 (according to their colour coding) to the
inputs on “INPUT I” (green plug to the green socket etc.) on the rear side of the amp box.
Connect the other four jack plugs on cable A2 to the relevant connectors on your soundcard.
The cable uses the following colour coding:
Green Front speaker
Black Rear speaker
Red Subwoofer und Centre speaker
Pink Microphone
Connect the headset connector to the 9 pin socket on the front side of the amp box.
You can use the test program supplied with your soundcard to test the headset.
If necessary, adjust the volume using the volume control on the in-line remote.
Connecting to a 5.1 soundcard without using the amp box
Note: Every soundcard has different methods of connection for front, rear and centre audio chan-
nels. Before connecting the headset you should fi rst identify the connectors on your soundcard.
This will enable you to connect your headset correctly fi rst time around. The instructions that came
with your soundcard can help you.
It is possible that some older 5.1 soundcards will not be able to support the use of the headset
without the amp box. If the headset does not work correctly when connected directly to the sound-
card then please connect the headset using the amp box to the soundcard instead.
Connect the headset connector to the 9 pin socket on cable C.
Connect the four jack plugs on cable C to the relevant connectors on your soundcard. The
cable uses the following colour coding:
Green Front speaker
Black Rear speaker
Red Subwoofer und Centre speaker
Pink Microphone
You can use the test program supplied with your soundcard to test the headset.
If necessary, adjust the volume using the volume control on the in-line remote.
Connecting to a CD player
Connect the headset connector to the 9 pin socket on cable D.
Connect the speaker jack plugs to the sockets on the CD player

GB
17
Operation
Changing audio source
When the amp box is switched on, the “INPUT” and “OUTPUT” LEDs will light up blue. To switch
from “INPUT 1” to the audio source on “INPUT II” simply press the input button on the front side
of the amp box. The relevant LED will now light up red and “INPUT II” will now be selected as the
audio source.
Changing audio output
To switch the audio output from the headset to an external 5.1 surround sound system connected
to the bypass output, simply press the output button on the front side of the amp box. The relevant
LED will now light up red. If you want to return audio output back to the headset, simply press the
output button again.
Connecting an external microphone
Bypassing the headset microphone
You can connect an external microphone to the “MIC“ socket on the front side of the amp box. This
automatically deactivates the microphone on the Medusa Headset.
External microphone for bypass audio output
You can connect an additional external microphone to the rear side of the amp box. This mic-
rophone is connected to the bypass audio output and only works if you have selected “Bypass
Output“ as the audio output (red LED lit up) on the front side of the amp box.
Adjusting the volume
You can adjust the output volume using the dial on the front side of the amp box.
You should fi ne tune the microphone volume and audio playback using the Windows audio cont-
rols. Click on the speaker symbol located on the bottom right of your screen in the quick start list
and adjust the volume to a level that best suits you.
Troubleshooting
The headset doesn’t work
Check if the cables have been correctly connected to the headset and the amp box.
Refer to your soundcard’s manual for details on how to connect the headset correctly.
The headset does not reproduce surround sound
Check if the DVD program you use on your PC supports surround sound and change the
sound settings in the program.
Check the sound settings in your game to see if surround sound is supported and change the
sound settings in the game accordingly.
Change the audio playback setting to “Dolby Surround 5.1” in the audio setup on your DVD
player.

GB
18
Technical Data
Amp box
Power supply: 7.5 DC
Microphone data:
Condensor microphone: Ø 9.7mm
Directivity: Omni-directional microphone
Impedence: 2200 Ω
Sensitivity: -60dB ± 2dB
Frequency response: 30Hz~16kHz
Operating voltage: 4.5V
Speaker data:
Surround speaker (centre/rear): Ø30mmx2, 32Ω, 20Hz-20kHz.
Front speaker: Ø40mmx2, 64Ω, 20Hz-20kHz.
Subwoofer: Ø 32mmx2, 8Ω, 20Hz-120Hz.
Warranty
We guarantee this product to be free of defects in workmanship and materials for a period of two
(2) years from the original date of purchase
.
Should you need assistance...
Our technical support team will be happy to help with any technical problems. The hotline number
can be found on the back of this manual.
Page is loading ...
Page is loading ...
Page is loading ...
Page is loading ...
Page is loading ...
Page is loading ...
Page is loading ...
Page is loading ...
Page is loading ...
Page is loading ...
Page is loading ...
Page is loading ...
Page is loading ...
Page is loading ...
Page is loading ...
Page is loading ...
Page is loading ...
Page is loading ...
Page is loading ...
Page is loading ...
Page is loading ...
Page is loading ...
Page is loading ...
Page is loading ...
Page is loading ...

SL-8796
© 2005 Jöllenbeck GmbH. All rights reserved. All product names mentioned in this manual
may be trademarks or registered trademarks and are the property of their respective
owners. Information contained herein is subject to change without notice. This publication or
parts of it may not be reproduced without the express consent of the publisher.
Jöllenbeck GmbH, Kreuzberg 2,
D-27404 Weertzen, Germany
Phone: +49 (0) 4287 125 133
Web: www.speed-link.com
-
 1
1
-
 2
2
-
 3
3
-
 4
4
-
 5
5
-
 6
6
-
 7
7
-
 8
8
-
 9
9
-
 10
10
-
 11
11
-
 12
12
-
 13
13
-
 14
14
-
 15
15
-
 16
16
-
 17
17
-
 18
18
-
 19
19
-
 20
20
-
 21
21
-
 22
22
-
 23
23
-
 24
24
-
 25
25
-
 26
26
-
 27
27
-
 28
28
-
 29
29
-
 30
30
-
 31
31
-
 32
32
-
 33
33
-
 34
34
-
 35
35
-
 36
36
-
 37
37
-
 38
38
-
 39
39
-
 40
40
-
 41
41
-
 42
42
-
 43
43
-
 44
44


SPEEDLINK medusa 5 1 home sl 8796 Owner's manual
- Category
- Headsets
- Type
- Owner's manual
- This manual is also suitable for
Ask a question and I''ll find the answer in the document
Finding information in a document is now easier with AI
in other languages
Related papers
-
SPEEDLINK SL-8231 User manual
-
-
-
-
-
-
-
SPEEDLINK MEDUSA NX Installation guide
-
-
Other documents
-
Hama 00057164 Owner's manual
-
LumiSource LS-MEDUSA BKBU Assembly Instructions
-
-
 Xtensions Carbon XS-445 User manual
-
Silvercrest KH 6778 Owner's manual
-
Cyber Acoustics CA-5001 Owner's manual
-
Speed-Link Medusa NX 5.1 SL-8793-BK User manual
-
Kompernass KH 6508 Owner's manual
-
Kompernass Portable DVD Player KH 6777 User manual
-
Wentronic 96291 User manual
