EINHELL GC-CG 7,2 Li User manual
- Category
- Power hedge trimmers
- Type
- User manual
This manual is also suitable for

GC-CG 7,2 Li
Art.-Nr.: 34.104.73 I.-Nr.: 11016
7
D Originalbetriebsanleitung
Akku-Gras- und Strauchschere
GB Original operating instructions
Cordless grass and shrub shears
F Instructions d’origine
Taille-herbes et taille-haies sans fi l
I Istruzioni per l’uso originali
Forbici a batteria per erba ed
arbusti
DK/ Original betjeningsvejledning
N Akku-græs- og buskklipper
S Original-bruksanvisning
Batteridriven gräs-/häcksax
NL Originele handleiding
Accugras- en struikschaar
E Manual de instrucciones original
Tijera cortacésped y recortasetos
de batería
P Manual de instruções original
Aparador de relva e corta-sebes
sem fi o
FIN Alkuperäiskäyttöohje
Akku-ruoho-ja pensassakset
RUS Оригинальное руководство по
эксплуатации
Аккумуляторные ножницы для
газона и кустарника
GR Πρωτότυπες Οδηγίες χρήσης
Κοπτικο χλοης και θαμνων
μαπταριας
Anl_GC_CG_7_2_Li_SPK7.indb 1Anl_GC_CG_7_2_Li_SPK7.indb 1 05.09.2016 07:20:2505.09.2016 07:20:25
Page is loading ...
Page is loading ...
Page is loading ...
Page is loading ...
Page is loading ...
Page is loading ...
Page is loading ...
Page is loading ...
Page is loading ...
Page is loading ...
Page is loading ...
Page is loading ...

GB
- 14 -
Danger! - Read the operating instructions to reduce the risk of injury
Keep all other persons away from the danger zone.
Important! The cutter blades continue to run after the motor is switched off . Wait for the blades to come
to a standstill. Risk of injury!
Protect the tool from the damp and never expose it to rain.
Store the battery only in dry rooms with an ambient temperature of +10°C to +40°C. Place only charged
batteries in storage (charged at least 40%-60%).
For use in dry rooms only.
Protection class II
Guaranteed sound power level
85
Anl_GC_CG_7_2_Li_SPK7.indb 14Anl_GC_CG_7_2_Li_SPK7.indb 14 05.09.2016 07:20:5705.09.2016 07:20:57

GB
- 15 -
Danger!
When using the equipment, a few safety pre-
cautions must be observed to avoid injuries and
damage. Please read the complete operating
instructions and safety regulations with due care.
Keep this manual in a safe place, so that the in-
formation is available at all times. If you give the
equipment to any other person, hand over these
operating instructions and safety regulations as
well. We cannot accept any liability for damage
or accidents which arise due to a failure to follow
these instructions and the safety instructions.
1. Safety regulations
The corresponding safety information can be
found in the enclosed booklet.
Danger!
Read all safety regulations and instructions.
Any errors made in following the safety regula-
tions and instructions may result in an electric
shock, fi re and/or serious injury.
Keep all safety regulations and instructions
in a safe place for future use.
This equipment is not intended to be used by
children, persons with reduced physical, sensory
or mental capacities or with a lack of experience
and knowledge, or persons who are not familiar
with the instructions.
Children should be supervised so that they do not
play with the equipment. Children are not allowed
to carry out cleaning or maintenance work.
2. Layout and items supplied
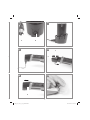
2.1 Layout (Fig. 1/2)
1 Grass cutter blade
2 Safety lock-off s
3 On/Off switch
4 Battery
5 Blade release mechanism
6 Shrub blade
7 Grass cutter blade guard
8 Shrub cutter blade guard
9 Charging unit
2.2 Items supplied
Please check that the article is complete as
specifi ed in the scope of delivery. If parts are
missing, please contact our service center or the
sales outlet where you made your purchase at
the latest within 5 working days after purchasing
the product and upon presentation of a valid bill
of purchase. Also, refer to the warranty table in
the service information at the end of the operating
instructions.
•
Open the packaging and take out the equip-
ment with care.
•
Remove the packaging material and any
packaging and/or transportation braces (if
available).
•
Check to see if all items are supplied.
•
Inspect the equipment and accessories for
transport damage.
•
If possible, please keep the packaging until
the end of the guarantee period.
Danger!
The equipment and packaging material are
not toys. Do not let children play with plastic
bags, foils or small parts. There is a danger of
swallowing or suff ocating!
•
Original operating instructions
•
Safety instructions
3. Proper use
The equipment is designed for cutting the edges
of lawns and small areas of grass in private and
hobby gardens. The tool can be used to trim small
hedges and shrubs.
Tools for private and hobby gardens are not sui-
table for use in public facilities, parks and sport
centers, along roadways, on farms or in the fore-
stry sector. For the tool to be used properly it is
imperative to follow the instructions set out in the
manufacturer’s directions for use.
Warning! It is prohibited to use the tool to
chop material for composting because of the
potential danger to persons and property.
The machine is to be used only for its prescribed
purpose. Any other use is deemed to be a case
of misuse. The user / operator and not the manu-
facturer will be liable for any damage or injuries of
any kind caused as a result of this.
Please note that our equipment has not been de-
signed for use in commercial, trade or industrial
Anl_GC_CG_7_2_Li_SPK7.indb 15Anl_GC_CG_7_2_Li_SPK7.indb 15 05.09.2016 07:20:5805.09.2016 07:20:58

GB
- 16 -
applications. Our warranty will be voided if the
machine is used in commercial, trade or industrial
businesses or for equivalent purposes.
4. Technical data
Speed n0 .............................................1200 min
-1
Cutting width of grass shears .................... 90 mm
Cutting length of shrub shears ................ 130 mm
Cutting thickness of shrub shears ............... 8 mm
Max. operating time ...................................80 min
Battery ................ Lithium-ion / 7.2 V d.c. / 1.5 Ah
Charging time ................................................. 2 h
Sound pressure level LpA .................... 63 dB (A)
Sound power level LWA ........................ 83 dB (A)
Uncertainty K ................................................3 dB
Vibration ah .............................................5.5 m/s
2
Uncertainty K ..........................................1.5 m/s
2
Sound pressure level at the operator‘s ear . 77 dB
(A)
Uncertainty K ................................................3 dB
Charging unit
Mains voltage ....................100-240 V ~ 50-60 Hz
Output
Rated voltage .......................................... 9 V d. c.
Rated current ....................................... 1000 mA
•
The vibration emission level has been measu-
red in accordance with a set of standardized
criteria and can be used to compare one po-
wer tool with another.
•
The specified emission level can also be
used to make an initial assessment of the ex-
posure to vibrations.
Important!
The vibration value changes according to the
area of application of the electric equipment and
may exceed the specifi ed value in exceptional
circumstances.
Keep the noise emissions and vibrations to a
minimum.
•
Only use appliances which are in perfect wor-
king order.
•
Service and clean the appliance regularly.
•
Adapt your working style to suit the appliance.
•
Do not overload the appliance.
•
Have the appliance serviced whenever ne-
cessary.
•
Switch the appliance off when it is not in use.
•
Wear protective gloves.
Caution!
Residual risks
Even if you use this electric power tool in
accordance with instructions, certain resi-
dual risks cannot be rules out. The following
hazards may arise in connection with the
equipment’s construction and layout:
1. Lung damage if no suitable protective dust
mask is used.
2. Damage to hearing if no suitable ear protec-
tion is used.
3. Health damage caused by hand-arm vib-
rations if the equipment is used over a pro-
longed period or is not properly guided and
maintained.
5. Before starting the equipment
5.1. Charging the battery (Fig. 3a-4a)
•
Connect the charger to the battery. Make sure
that the bead (A) of the plug is inserted into
the bottom notch (B) of the battery. You can
charge the battery when it has been removed
(Fig. 3b) but also when it is still installed (Fig.
3c). For safety reasons it is not possible to
work with the battery while it is being charged.
•
Check that your mains voltage is the same
as that marked on the rating plate. Plug the
battery charger into a socket-outlet. The LED
(Fig. 4a / Item C) will light up to indicate that
charging voltage is available.
•
The battery pack is being charged. An empty
battery pack requires a maximum charging
period of 2 hours. The temperature of the bat-
tery pack may rise slightly during the charging
operation. This is normal.
•
As soon as the battery pack is fully charged,
the LED (Fig. 4a/Item C) will no longer be lit.
If the battery pack fails to charge, check:
•
whether there is voltage at the socket outlet
If the battery pack still fails to charge, send
•
the charging unit
•
and the battery pack
to our customer service center.
Anl_GC_CG_7_2_Li_SPK7.indb 16Anl_GC_CG_7_2_Li_SPK7.indb 16 05.09.2016 07:20:5805.09.2016 07:20:58

GB
- 17 -
To ensure that the battery pack provides long ser-
vice, you should take care to recharge it promptly.
You must recharge the battery pack when you
notice that the power of the cordless hedge trim-
mer drops. Never fully discharge the battery pack.
This will cause it to develop a defect.
5.2 Fitting the battery (Fig. 4a/4b)
Push the battery (4) into the battery mount pro-
vided on the tool. Make sure that the battery
latches audibly in place in the tool. To take out the
battery, press the pushlock buttons (D) on both
sides and remove the battery.
Warning!
The switching devices installed on the tool
by the manufacturer are not allowed to be
removed or bypassed, e.g. by fi tting a swit-
ching button to the handle, as this may result
in risk of injury and the tool will no longer
switch off automatically.
6. Operation
The area to be cut must fi rst be cleared of stones
and other solid objects. The safety lock-off (Fig. 1/
Item 2) prevents the tool being started unintenti-
onally.
Switching on
Activate the safety lock-off by pressing it and
pressing the ON/OFF switch at the same time.
Switching off
To switch off the equipment, let go of the ON/OFF
switch.
6.1 Cutting grass
Allow the grass cutter to glide above the ground.
The best results are achieved when the lawn is
dry.
When you notice a drop in cutting performance,
re-charge the tool immediately so that the battery
does not become fully discharged.
To prevent injuries, slide the blade guard
over the blade.
6.2 Trimming hedges
The tool can be used to trim small hedges and
shrubs.
Hold the tool slightly tilted in relation to the hedge
you want to cut.
First cut the sides from the bottom up, then cut
the top.
Watch out for foreign objects in or on the hedge
which could damage the blades.
To prevent injuries, slide the blade guard
over the blade.
When is the best time to trim hedges?
•
As a general rule, hedges which lose their
leaves in the autumn should be trimmed in
June and October.
•
Hedges which do not lose their leaves should
be cut in April and August.
6.3 Changing the blades
Warning! Risk of injury!
Remove the battery from the tool whenever you
carry out any work on the tool (e.g. changing the
blade, carrying out maintenance, etc.). Risk of
injury!
Caution! When the blade release mechanism is
pressed (Fig. 1/Item 5), the blade will drop out!
To remove the blade, push the blade release me-
chanism fi rst downwards (Fig. 5a) and then to the
rear. The blade can then be pulled out (Fig. 5b).
Once you have removed the blade you will be
able to see the toothed wheels of the gear unit
(Fig. 6). Make sure that no dirt gets into the gear
unit when you change the blade.
When you fi t the hedge cutter blade
check the position of the eccentric (Fig. 6 /Item E).
Take the hedge cutter blade and slide the eccen-
tric mount (Fig. 7/Item H) into position so that the
eccentric pin and the eccentric mount fi t together
precisely when assembled. Press the blade re-
lease mechanism (Fig. 1/Item 5) downwards and
then to the rear. Press the blade against the tool
housing. Slot the hedge cutter blade onto the gui-
de pins (Fig. 6 /Item F). Release the blade release
mechanism. The blade is locked in place.
When you fi t the grass cutter blade
check again the position of the eccentric (Fig. 6 /
Item E).
Shift the eccentric mount (Fig. 8 /Item K) on the
grass cutter blade to the left or the right to fi nd the
position at which the eccentric (Fig. 6/Item E) and
the eccentric mount (Fig. 8 /Item K) fi t together.
Press the blade release mechanism (Fig. 1/Item
5) downwards and then to the rear. Press the
Anl_GC_CG_7_2_Li_SPK7.indb 17Anl_GC_CG_7_2_Li_SPK7.indb 17 05.09.2016 07:20:5805.09.2016 07:20:58

GB
- 18 -
blade against the tool housing. Slot the hedge
cutter blade onto the guide pins (Fig. 6 /Item F).
Release the blade release mechanism. The blade
is locked in place.
7. Cleaning, maintenance and orde-
ring of spare parts
Remove the battery from the tool whenever you
carry out any work on the tool (e.g. changing the
blade, carrying out maintenance, etc.). Risk of
injury from dangerous moving parts!
7.1 Cleaning
•
Keep all safety devices, air vents and the
motor housing free of dirt and dust as far as
possible. Wipe the equipment with a clean
cloth or blow it with compressed air at low
pressure.
•
We recommend that you clean the device
immediately each time you have finished
using it.
•
Clean the equipment regularly with a moist
cloth and some soft soap. Do not use
cleaning agents or solvents; these could
attack the plastic parts of the equipment. En-
sure that no water can seep into the device.
•
A few drops of oil (e.g. sewing machine oil)
will improve the cutting performance of the
blades, but never apply any grease to the
blades.
•
To ensure constant exact cutting it is also
important to remove grass remnants and dirt
from between the upper and lower blade.
Caution!
Never clean the tool under running water
- and particularly never with high pressure -
because of the potential danger to persons
and property. Keep your cordless grass
cutter and hedge trimmer in a dry and frost-
proof place. Choose a place that children are
unable to enter.
7.2 Maintenance
•
To achieve good results you should keep the
blades sharp at all times. In particular we re-
commend that you immediately level off any
jags or ridges caused by stones or the like.
The tool should be thoroughly cleaned both
before and after use.
•
There are no parts inside the equipment
which require additional maintenance.
7.3 Ordering replacement parts:
Please quote the following data when ordering
replacement parts:
•
Type of machine
•
Article number of the machine
•
Identification number of the machine
•
Replacement part number of the part required
For our latest prices and information please go to
www.isc-gmbh.info
8. Disposal and recycling
The unit is supplied in packaging to prevent its
being damaged in transit. This packaging is raw
material and can therefore be reused or can be
returned to the raw material system.
The unit and its accessories are made of various
types of material, such as metal and plastic. De-
fective components must be disposed of as spe-
cial waste. Ask your dealer or your local council.
Anl_GC_CG_7_2_Li_SPK7.indb 18Anl_GC_CG_7_2_Li_SPK7.indb 18 05.09.2016 07:20:5805.09.2016 07:20:58

GB
- 19 -
For EU countries only
Never place any electric power tools in your household refuse.
To comply with European Directive 2012/19/EC concerning old electric and electronic equipment and
its implementation in national laws, old electric power tools have to be separated from other waste and
disposed of in an environment-friendly fashion, e.g. by taking to a recycling depot.
Recycling alternative to the return request:
As an alternative to returning the equipment to the manufacturer, the owner of the electrical equipment
must make sure that the equipment is properly disposed of if he no longer wants to keep the equipment.
The old equipment can be returned to a suitable collection point that will dispose of the equipment in
accordance with the national recycling and waste disposal regulations. This does not apply to any ac-
cessories or aids without electrical components supplied with the old equipment.
The reprinting or reproduction by any other means, in whole or in part, of documentation and papers
accompanying products is permitted only with the express consent of the iSC GmbH.
Subject to technical changes
Anl_GC_CG_7_2_Li_SPK7.indb 19Anl_GC_CG_7_2_Li_SPK7.indb 19 05.09.2016 07:20:5905.09.2016 07:20:59

GB
- 20 -
Service information
We have competent service partners in all countries named on the guarantee certifi cate whose contact
details can also be found on the guarantee certifi cate. These partners will help you with all service re-
quests such as repairs, spare and wearing part orders or the purchase of consumables.
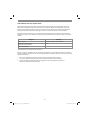
Please note that the following parts of this product are subject to normal or natural wear and that the
following parts are therefore also required for use as consumables.
Category Example
Wear parts* Carbon brushes, Battery
Consumables* Blade
Missing parts
* Not necessarily included in the scope of delivery!
In the eff ect of defects or faults, please register the problem on the internet at www.isc-gmbh.info. Ple-
ase ensure that you provide a precise description of the problem and answer the following questions in
all cases:
•
Did the equipment work at all or was it defective from the beginning?
•
Did you notice anything (symptom or defect) prior to the failure?
•
What malfunction does the equipment have in your opinion (main symptom)?
Describe this malfunction.
Anl_GC_CG_7_2_Li_SPK7.indb 20Anl_GC_CG_7_2_Li_SPK7.indb 20 05.09.2016 07:20:5905.09.2016 07:20:59

GB
- 21 -
Warranty certifi cate
Dear Customer,
All of our products undergo strict quality checks to ensure that they reach you in perfect condition. In the
unlikely event that your device develops a fault, please contact our service department at the address
shown on this guarantee card. You can also contact us by telephone using the service number shown.
Please note the following terms under which guarantee claims can be made:
1. These guarantee terms apply to consumers only, i.e. natural persons intending to use this product
neither for their commercial activities nor for any other self-employed activities. These warranty
terms regulate additional warranty services, which the manufacturer mentioned below promises to
buyers of its new products in addition to their statutory rights of guarantee. Your statutory guarantee
claims are not aff ected by this guarantee. Our guarantee is free of charge to you.
2. The warranty services cover only defects due to material or manufacturing faults on a product which
you have bought from the manufacturer mentioned below and are limited to either the rectifi cation of
said defects on the product or the replacement of the product, whichever we prefer.
Please note that our devices are not designed for use in commercial, trade or professional applica-
tions. A guarantee contract will not be created if the device has been used by commercial, trade or
industrial business or has been exposed to similar stresses during the guarantee period.
3. The following are not covered by our guarantee:
- Damage to the device caused by a failure to follow the assembly instructions or due to incorrect
installation, a failure to follow the operating instructions (for example connecting it to an incorrect
mains voltage or current type) or a failure to follow the maintenance and safety instructions or by ex-
posing the device to abnormal environmental conditions or by lack of care and maintenance.
- Damage to the device caused by abuse or incorrect use (for example overloading the device or the
use or unapproved tools or accessories), ingress of foreign bodies into the device (such as sand,
stones or dust, transport damage), the use of force or damage caused by external forces (for ex-
ample by dropping it).
- Damage to the device or parts of the device caused by normal or natural wear or tear or by normal
use of the device.
4. The guarantee is valid for a period of 24 months starting from the purchase date of the device. Gu-
arantee claims should be submitted before the end of the guarantee period within two weeks of the
defect being noticed. No guarantee claims will be accepted after the end of the guarantee period.
The original guarantee period remains applicable to the device even if repairs are carried out or
parts are replaced. In such cases, the work performed or parts fi tted will not result in an extension
of the guarantee period, and no new guarantee will become active for the work performed or parts
fi tted. This also applies if an on-site service is used.
5. To make a claim under the guarantee, please register the defective device at: www.isc-gmbh.info.
Please keep your bill of purchase or other proof of purchase for the new device. Devices that are
returned without proof of purchase or without a rating plate shall not be covered by the guarantee,
because appropriate identifi cation will not be possible. If the defect is covered by our guarantee,
then the item in question will either be repaired immediately and returned to you or we will send you
a new replacement.
Of course, we are also happy off er a chargeable repair service for any defects which are not covered by
the scope of this guarantee or for units which are no longer covered. To take advantage of this service,
please send the device to our service address.
Also refer to the restrictions of this warranty concerning wear parts, consumables and missing parts as
set out in the service information in these operating instructions.
Anl_GC_CG_7_2_Li_SPK7.indb 21Anl_GC_CG_7_2_Li_SPK7.indb 21 05.09.2016 07:20:5905.09.2016 07:20:59
Page is loading ...
Page is loading ...
Page is loading ...
Page is loading ...
Page is loading ...
Page is loading ...
Page is loading ...
Page is loading ...
Page is loading ...
Page is loading ...
Page is loading ...
Page is loading ...
Page is loading ...
Page is loading ...
Page is loading ...
Page is loading ...
Page is loading ...
Page is loading ...
Page is loading ...
Page is loading ...
Page is loading ...
Page is loading ...
Page is loading ...
Page is loading ...
Page is loading ...
Page is loading ...
Page is loading ...
Page is loading ...
Page is loading ...
Page is loading ...
Page is loading ...
Page is loading ...
Page is loading ...
Page is loading ...
Page is loading ...
Page is loading ...
Page is loading ...
Page is loading ...
Page is loading ...
Page is loading ...
Page is loading ...
Page is loading ...
Page is loading ...
Page is loading ...
Page is loading ...
Page is loading ...
Page is loading ...
Page is loading ...
Page is loading ...
Page is loading ...
Page is loading ...
Page is loading ...
Page is loading ...
Page is loading ...
Page is loading ...
Page is loading ...
Page is loading ...
Page is loading ...
Page is loading ...
Page is loading ...
Page is loading ...
Page is loading ...
Page is loading ...
Page is loading ...
Page is loading ...
Page is loading ...
Page is loading ...
Page is loading ...
Page is loading ...
Page is loading ...
Page is loading ...
Page is loading ...
Page is loading ...
Page is loading ...
Page is loading ...
Page is loading ...
Page is loading ...
Page is loading ...
Page is loading ...
Page is loading ...
Page is loading ...
Page is loading ...
Page is loading ...
Page is loading ...
Page is loading ...
Page is loading ...
Page is loading ...
-
 1
1
-
 2
2
-
 3
3
-
 4
4
-
 5
5
-
 6
6
-
 7
7
-
 8
8
-
 9
9
-
 10
10
-
 11
11
-
 12
12
-
 13
13
-
 14
14
-
 15
15
-
 16
16
-
 17
17
-
 18
18
-
 19
19
-
 20
20
-
 21
21
-
 22
22
-
 23
23
-
 24
24
-
 25
25
-
 26
26
-
 27
27
-
 28
28
-
 29
29
-
 30
30
-
 31
31
-
 32
32
-
 33
33
-
 34
34
-
 35
35
-
 36
36
-
 37
37
-
 38
38
-
 39
39
-
 40
40
-
 41
41
-
 42
42
-
 43
43
-
 44
44
-
 45
45
-
 46
46
-
 47
47
-
 48
48
-
 49
49
-
 50
50
-
 51
51
-
 52
52
-
 53
53
-
 54
54
-
 55
55
-
 56
56
-
 57
57
-
 58
58
-
 59
59
-
 60
60
-
 61
61
-
 62
62
-
 63
63
-
 64
64
-
 65
65
-
 66
66
-
 67
67
-
 68
68
-
 69
69
-
 70
70
-
 71
71
-
 72
72
-
 73
73
-
 74
74
-
 75
75
-
 76
76
-
 77
77
-
 78
78
-
 79
79
-
 80
80
-
 81
81
-
 82
82
-
 83
83
-
 84
84
-
 85
85
-
 86
86
-
 87
87
-
 88
88
-
 89
89
-
 90
90
-
 91
91
-
 92
92
-
 93
93
-
 94
94
-
 95
95
-
 96
96
-
 97
97
-
 98
98
-
 99
99
-
 100
100
-
 101
101
-
 102
102
-
 103
103
-
 104
104
-
 105
105
-
 106
106
-
 107
107
-
 108
108


EINHELL GC-CG 7,2 Li User manual
- Category
- Power hedge trimmers
- Type
- User manual
- This manual is also suitable for
Ask a question and I''ll find the answer in the document
Finding information in a document is now easier with AI
in other languages
- italiano: EINHELL GC-CG 7,2 Li Manuale utente
- français: EINHELL GC-CG 7,2 Li Manuel utilisateur
- español: EINHELL GC-CG 7,2 Li Manual de usuario
- Deutsch: EINHELL GC-CG 7,2 Li Benutzerhandbuch
- русский: EINHELL GC-CG 7,2 Li Руководство пользователя
- Nederlands: EINHELL GC-CG 7,2 Li Handleiding
- português: EINHELL GC-CG 7,2 Li Manual do usuário
- dansk: EINHELL GC-CG 7,2 Li Brugermanual
- svenska: EINHELL GC-CG 7,2 Li Användarmanual
- suomi: EINHELL GC-CG 7,2 Li Ohjekirja
Related papers
-
Einhell Classic TC-CD 18-2 Li (1x1,5Ah) User manual
-
EINHELL GC-CG 18-1 Li User manual
-
-
Einhell Classic TC-SR 18 Li BT - Solo User manual
-
Einhell Classic GC-EH 5550 User manual
-
EINHELL TE-CP 18 Li USB-Solo User manual
-
 Einhell Professional TE-CI 18 Li Brushless-Solo User manual
-
-
EINHELL Expert TE-DS 20 E User manual
-
Einhell Classic Deltaschleifer TC-DS 19 User manual

Other documents
-
AL-KO Grass and Shrub Shear GS 3.7 Li Multicutter User manual
-
 Einhell Royal 34.104.90 Operating instructions
-
Medion MD 16904 User manual
-
Parkside PABH 18 LI A1 Operating instructions
-
Parkside PABSW Operation and Safety Notes
-
-
FLORABEST FAT 18 B3 Operating instructions
-
-
Hurricane HB 51 R HW E Original Operating Instructions
-
Wolf Garten Accu BS 60 Comfort Owner's manual
