Sony CDX-L280 User manual

Category
Car media receivers
Type
User manual

This manual is also suitable for

2
Welcome !
Thank you for purchasing this Sony Compact
Disc Player. You can enjoy its various features
even more with:
Optional controller accessory
Card remote commander RM-X114
This label is located on the bottom of the
chassis.
CAUTION INVISIBLE
DO NOT STARE INTO BEAM OR
VIEW DIRECTLY WITH OPTICAL INSTRUMENTS
LASER RADIATION WHEN OPEN
This label is located on the drive unit’s internal
chassis.
3
Table of Contents
Location of controls ............................................. 4
Precautions ............................................................ 6
Notes on discs ....................................................... 6
Getting Started
Resetting the unit ................................................. 7
Detaching the front panel ................................... 8
Setting the clock ................................................... 9
CD Player
Playing a disc ........................................................ 9
Display items ...................................................... 10
Playing tracks repeatedly
— Repeat Play ............................................... 10
Playing tracks in random order
— Shuffle Play ............................................... 10
Radio
Storing stations automatically
— Best Tuning Memory (BTM) ................... 11
Storing only the desired stations ..................... 11
Receiving the stored stations ............................ 12
Other Functions
Adjusting the sound characteristics ................ 13
Quickly attenuating the sound ........................ 13
Cancelling the beep sound ............................... 13
Selecting the sound position
— My Best sound Position (MBP) .............. 14
Boosting the bass sound
— D-bass ........................................................ 14
Additional Information
Maintenance ........................................................ 15
Removing the unit ............................................. 16
Specifications ...................................................... 17
Troubleshooting.................................................. 18
Error displays/Messages .................................. 19
4
qf Number buttons 13
(3) REP 10
(4) SHUF 10
11, 12
qg BTM (Best Tuning Memory) button 11
qh DSPL (display mode change) button
9, 10
qj OFF button* 8, 9
qk SEEK/AMS +/– button
9
11, 12
* Warning when installing in a car
without an ACC (accessory) position
on the ignition key switch
Be sure to press (OFF) on the unit for
2 seconds to turn off the clock display
after turning off the engine.
Otherwise, the clock display does not turn
off and this causes battery drain.
Location of controls
1 Volume +/– button 9, 13
2 Receptor for the card remote
commander
3 MODE button
11, 12
4 SRC (SOURCE) (TUNER/CD) button
9, 11, 12
5 SEL (select) button 9, 13, 14
6 Display window
7
MBP (My Best sound Position) button
14
8 D (D-BASS) button 14
9 Z (eject) button 9
q; RELEASE (front panel release) button 8
qa RESET button (located on the front side of
the unit, behind the front panel) 7
qs ATT (attenuate) button 13
qd SENS button 12
CDX-L280
SEL
MODE
SRC
SOURCE
RELEASE
1AT T
SENS
OFF
D-BASS
MBP
65432
BTM DSPL
D
REP SHUF
SEEK
AMS
Refer to the pages listed for details.
: During playback : During radio reception
CD RADIO
CD
RADIO
RADIO
CD
RADIO
5
DISC
ATTOFF
DSPL MODE
SOURCE
DISC
+
VOL
+
PRESET
+
SEEK
+
SEEK
PRESET –
SOUND
E
N
T
E
R
MENU
LIST
The corresponding buttons of the card
remote commander control the same
functions as those on this unit.
1 DSPL button
2 MENU* button
3 SOURCE button
4 SEEK (</,) buttons
5 SOUND button
(used as 5 SEL button for this unit)
6 OFF button
7 VOL (+/–) buttons
8
MODE button
9 LIST* button
q; DISC*/PRESET (M/m) buttons
qa ENTER* button
qs ATT button
* Not available for this model
Note
If the unit is turned off by pressing (OFF) for 2
seconds, it cannot be operated with the card
remote commander unless (SRC) on the unit is
pressed, or a disc is inserted to activate the unit
first.
Tip
Refer to “Replacing the lithium battery” for details
on how to replace the batteries (page 16).
Card remote commander RM-X114
(optional)
6
Precautions
If your car was parked in direct sunlight,
allow the unit to cool off before operating it.
Power aerials will extend automatically
while the unit is operating.
If you have any questions or problems
concerning your unit that are not covered in
this manual, please consult your nearest Sony
dealer.
Moisture condensation
On a rainy day or in a very damp area,
moisture condensation may occur inside the
lenses and display of the unit. Should this
occur, the unit will not operate properly. In
such a case, remove the disc and wait for about
an hour until the moisture has evaporated.
To maintain high sound quality
Be careful not to splash juice or other soft
drinks onto the unit or discs.
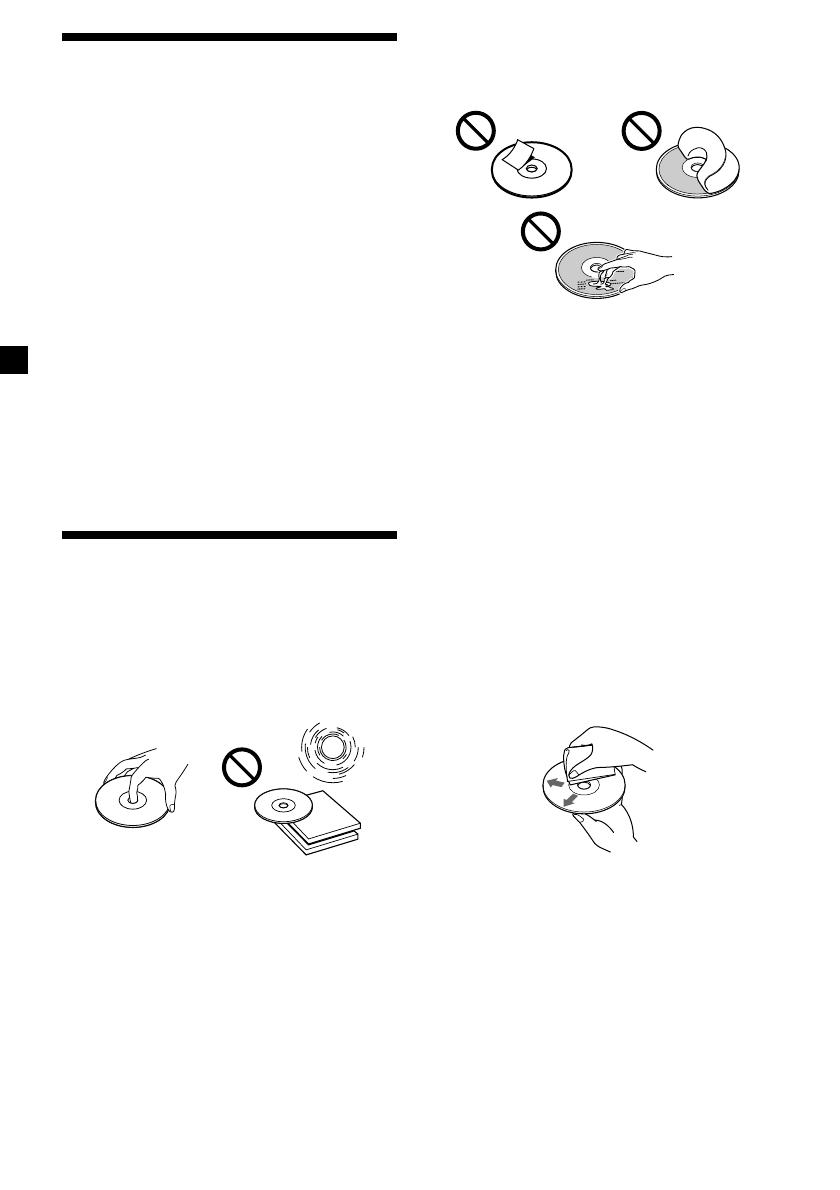
Notes on discs
To keep the disc clean, do not touch the
surface. Handle the disc by its edge.
Keep your discs in their cases or disc
magazines when not in use. Do not subject
the discs to heat/high temperature. Avoid
leaving them in parked cars or on
dashboards/rear trays.
Do not attach labels, or use discs with sticky
ink/residue. Such discs may stop spinning
when used, causing a malfunction, or may
ruin the disc.
Do not use any discs with labels or stickers
attached.
The following malfunctions may result from
using such discs:
Inability to eject a disc (due to a label or
sticker peeling off and jamming the eject
mechanism).
Inability to read audio data correctly (e.g.,
playback skipping, or no playback) due to
heat shrinking of a sticker or label causing
a disc to warp.
Discs with non-standard shapes (e.g., heart,
square, star) cannot be played on this unit.
Attempting to do so may damage the unit.
Do not use such discs.
You cannot play 8 cm CDs.
Before playing, clean the discs with a
commercially available cleaning cloth. Wipe
each disc from the centre out. Do not use
solvents such as benzine, thinner,
commercially available cleaners, or antistatic
spray intended for analog discs.
7
Getting Started
Resetting the unit
Before operating the unit for the first time or
after replacing the car battery, you must reset
the unit.
Remove the front panel and press the RESET
button with a pointed object, such as a
ballpoint pen.
Note
Pressing the RESET button will erase the clock
setting and some stored contents.
RESET button
Notes on CD-R/CD-RW discs
You can play CD-Rs (recordable CDs)/CD-
RWs (rewritable CDs) designed for audio use
on this unit.
Look for these marks to distinguish CD-Rs/
CD-RWs for audio use.
These marks denote that a disc is not for
audio use.
Some CD-Rs/CD-RWs (depending on the
equipment used for its recording or the
condition of the disc) may not play on this
unit.
You cannot play a CD-R/CD-RW that is not
finalized*.
* A process necessary for a recorded CD-R/CD-RW
disc to be played on the audio CD player.
8
Attaching the front panel
Attach part A of the front panel to part B of
the unit as illustrated and push the left side
into position until it clicks.
Note
Do not put anything on the inner surface of the
front panel.
Detaching the front panel
You can detach the front panel of this unit to
protect the unit from being stolen.
Caution alarm
If you turn the ignition switch to the OFF
position without removing the front panel, the
caution alarm will beep for a few seconds.
If you connect an optional amplifier and do not
use the built-in amplifier, the beep sound will
be deactivated.
1 Press (OFF)*.
CD playback or radio reception stops (the
key illumination and display remain on).
* If your car has no ACC position on the
ignition switch, be sure to turn the unit off by
pressing (OFF) for 2 seconds to avoid car
battery drain.
2 Press (RELEASE), then pull it off towards
you.
Notes
If you detach the panel while the unit is still
turned on, the power will turn off automatically
to prevent the speakers from being damaged.
Do not drop or put excessive pressure on the
front panel and its display window.
Do not subject the front panel to heat/high
temperature or moisture. Avoid leaving it in
parked cars or on dashboards/rear trays.
Tip
When carrying the front panel with you, use the
supplied front panel case.
(OFF)
(RELEASE)
A
B
9
Setting the clock
The clock uses a 12-hour digital indication.
Example: To set the clock to 10:08
1 Press (DSPL) for 2 seconds.
The hour indication flashes.
1 Press either side of the volume +/–
button to set the hour.
2 Press (SEL).
The minute indication flashes.
3 Press either side of the volume +/–
button to set the minute.
2 Press (DSPL).
The clock starts. After the clock setting is
completed, the display returns to normal
play mode.
CD Player
Playing a disc
Insert the disc (labelled side up).
Playback starts automatically.
If a disc is already inserted, press (SRC)
repeatedly until “CD” appears to start
playback.
To Press
Stop playback Z or (OFF)
Eject the disc Z
Skip tracks (SEEK/AMS) (./>)
– Automatic [once for each track]
Music Sensor
Fast-forward/ (SEEK/AMS) (m/M)
reverse [hold to desired point]
– Manual Search
Note
When the last track on the disc is over, playback
restarts from the first track of the disc.
10
Display items
When the disc/track changes, any prerecorded
title of the new disc/track is automatically
displayed.
To Press
Switch display (DSPL)
item
Source
Displayable items
Clock
Elapsed playing time
Track number
Playing tracks repeatedly
— Repeat Play
The current track will repeat itself when it
reaches the end.
During playback, press (3) (REP) until
“REP” indicator appears in the display.
Repeat Play starts.
To return to normal play mode, press (3)
(REP) again.
Playing tracks in random
order
— Shuffle Play
You can select to play the tracks on the current
disc in random order.
During playback, press (4) (SHUF) until
“SHUF” indicator appears in the display.
Shuffle Play starts.
To return to normal play mode, press (4)
(SHUF) again.
11
Radio
The unit can store up to 6 stations per band
(FM1, FM2, FM3, AM1, and AM2).
Caution
When tuning in stations while driving, use
Best Tuning Memory to prevent accidents.
Storing stations
automatically
— Best Tuning Memory (BTM)
The unit selects the stations with the strongest
signals within the selected band, and stores
them in the order of their frequency.
1 Press (SRC) repeatedly to select the
radio.
2 Press (MODE) repeatedly to select the
band.
3 Press (BTM) for 2 seconds.
The unit stores stations in the order of their
frequencies on the number buttons. A beep
sounds when the setting is stored.
Notes
If only a few stations can be received due to
weak signals, some number buttons will retain
their former settings.
When a number is indicated in the display, the
unit starts storing stations from the one currently
displayed.
Storing only the desired
stations
You can manually preset the desired stations
on any chosen number button.
1 Press (SRC) repeatedly to select the
radio.
2 Press (MODE) repeatedly to select the
band.
3 Press either side of (SEEK/AMS) to tune
in the station that you want to store.
4 Press the desired number button ((1) to
(6)) until “MEM” appears.
The number button indication appears in
the display.
Note
If you try to store another station on the same
number button, the previously stored station will
be erased.
12
Receiving the stored
stations
1 Press (SRC) repeatedly to select the
radio.
2 Press (MODE) repeatedly to select the
band.
3 Press the number button ((1) to (6)) on
which the desired station is stored.
If preset tuning does not work
— Automatic tuning/Local Seek Mode
Automatic tuning:
Press either side of (SEEK/AMS) to search
for the station.
Scanning stops when the unit receives a
station. Press either side of (SEEK/AMS)
repeatedly until the desired station is
received.
Local Seek Mode:
If the automatic tuning stops too
frequently, press (SENS) repeatedly until
“LCL” indicator appears in the display.
Only the stations with relatively strong
signals will be tuned in.
Tip
If you know the frequency of the station you want
to listen to, press either side of (SEEK/AMS) until
the desired frequency appears (manual tuning).
If FM stereo reception is poor
— Monaural Mode
During radio reception, press (SENS)
repeatedly until “MONO” indicator
appears in the display.
The sound improves, but becomes
monaural (“ST” disappears).
To return to normal mode, press (SENS)
again.
“LCL” indicator is displayed.
“MONO” indicator is displayed.
13
Other Functions
Adjusting the sound
characteristics
You can adjust the bass, treble, balance, and
fader.
1 Select the item you want to adjust by
pressing (SEL) repeatedly.
Each time you press (SEL), the item
changes as follows:
BAS (bass) t TRE (treble) t
BAL (left-right) t FAD (front-rear)
2 Adjust the selected item by pressing
either side of the volume +/– button.
Note
Adjust within 3 seconds after selecting the item.
Quickly attenuating the
sound
Press (ATT).
“ATT” appears in the display.
To restore the previous volume level, press
(ATT) again.
Cancelling the beep sound
Press (6) while pressing (SEL) down.
To activate the beep sound again, press these
buttons again.
Note
If you connect an optional power amplifier and do
not use the built-in amplifier, the beep sound will
be deactivated.
14
Selecting the sound
position
— My Best sound Position (MBP)
When you drive without passengers, you can
enjoy the most comfortable sound
environment with “My Best sound Position.”
“My Best sound Position” has two presets,
which adjust the sound level of balance and
fader. You can select one very easily with the
MBP button.
Press (MBP) repeatedly for the desired
listening position.
The mode of “My Best sound Position” is
shown in the display in order of the table.
If you want to adjust the sound level of
balance and fader more precisely, you can
do it using the (SEL) button. (page 13)
Notes
• When the BAL (balance) or FAD (fader) in
“Adjusting the sound characteristics” (page 13) is
adjusted, the MBP setting returns OFF.
When MBP is set to OFF, the BAL and FAD setting
is activated.
Display
window
MBP-A
MBP-B
MBP-OFF
Right Left Front Rear
Balance Level Fader Level
– 4dB
0
0
0
– 4dB
0
0
0
0
– 4dB
– 4dB
0
Boosting the bass sound
— D-bass
You can enjoy a clear and powerful bass
sound. The D-bass function boosts the low
frequency signal and high frequency signal
with a sharper curve than conventional bass
boost.
You can hear the bass line more clearly even
while the vocal volume remains the same. You
can emphasize and adjust the bass sound
easily with the (D) (D-BASS) button.
Adjusting the bass curve
Press (D) (D-BASS) repeatedly to select
the desired bass curve.
As the D-BASS number increases so does
the effect.
Note
The bass sound may distort at same volume. If the
bass sound distorts, select less effective bass curve.
0dB
D.BASS-3
D.BASS-2
D.BASS-1
D.BASS-3
D.BASS-2
D.BASS-1
Level
Frequency (Hz)
15
Additional
Information
Maintenance
Fuse replacement
When replacing the fuse, be sure to use one
matching the amperage rating stated on the
original fuse. If the fuse blows, check the
power connection and replace the fuse. If the
fuse blows again after replacement, there may
be an internal malfunction. In such a case,
consult your nearest Sony dealer.
Warning
Never use a fuse with an amperage rating
exceeding the one supplied with the unit as
this could damage the unit.
Cleaning the connectors
The unit may not function properly if the
connectors between the unit and the front
panel are not clean. In order to prevent this,
detach the front panel (page 8) and clean the
connectors with a cotton swab dipped in
alcohol. Do not apply too much force.
Otherwise, the connectors may be damaged.
Main unit
Back of the front panel
Notes
For safety, turn off the ignition before cleaning
the connectors, and remove the key from the
ignition switch.
Never touch the connectors directly with your
fingers or with any metal device.
Fuse (10 A)
continue to next page t
16
Removing the unit
1 Remove the front cover
1 Detach the front panel (page 8).
2 Press the clip inside the front cover
with a thin screwdriver.
3 Repeat step 2 for the other side.
2 Remove the unit
1 Use a thin screwdriver to push in the
clip on the left side of the unit, then
pull out the left side of the unit until
the catch clears the mounting.
2 Repeat step 1 for the right side.
3 Slide the unit out of its mounting.
4 mm
Replacing the lithium battery
When the battery becomes weak, the range of
the card remote commander becomes shorter.
Replace the battery with a new CR2025 lithium
battery. Use of any other battery may present a
risk of fire or explosion.
x
+ side up
Notes on lithium battery
Keep the lithium battery out of the reach of
children. Should the battery be swallowed,
immediately consult a doctor.
Wipe the battery with a dry cloth to assure a
good contact.
Be sure to observe the correct polarity when
installing the battery.
Do not hold the battery with metallic
tweezers, otherwise a short-circuit may
occur.
WARNING
Battery may explode if mistreated.
Do not recharge, disassemble, or dispose of
in fire.
17
Specifications
CD player section
Signal-to-noise ratio 90 dB
Frequency response 10 – 20,000 Hz
Wow and flutter Below measurable limit
Tuner section
FM
Tuning range 87.5 – 108.0 MHz
Aerial terminal External aerial connector
Intermediate frequency 10.7 MHz
Usable sensitivity 11 dBf
Selectivity 75 dB at 400 kHz
Signal-to-noise ratio 65 dB (stereo),
68 dB (mono)
Harmonic distortion at 1 kHz
0.7 % (stereo),
0.5 % (mono)
Separation 33 dB at 1 kHz
Frequency response 30 – 15,000 Hz
AM
Tuning range 531 – 1,602 kHz
Aerial terminal External aerial connector
Intermediate frequency 10.7 MHz/450 kHz
Sensitivity 30 µV
Power amplifier section
Outputs Speaker outputs
(sure seal connectors)
Speaker impedance 4 – 8 ohms
Maximum power output 45 W × 4 (at 4 ohms)
General
Outputs Audio outputs (rear)
Power aerial relay control
terminal
Power amplifier control
terminal
Tone controls Bass ±9 dB at 100 Hz
Treble ±9 dB at 10 kHz
Power requirements 12 V DC car battery
(negative earth)
Dimensions Approx. 178 × 50 × 176 mm
(w/h/d)
Mounting dimensions Approx. 182 × 53 × 161 mm
(w/h/d)
Mass Approx. 1.2 kg
Supplied accessories Parts for installation and
connections (1 set)
Front panel case (1)
Optional accessories Card remote commander
RM-X114
Note
This unit cannot be connected to a digital
preamplifier or an equalizer.
Design and specifications are subject to change
without notice.
18
The power is continuously supplied to the
unit.
The car does not have an ACC position.
The power aerial does not extend.
The power aerial does not have a relay box.
CD playback
A disc cannot be loaded.
Another CD is already loaded.
The CD is forcibly inserted upside down or
in the wrong way.
Playback does not begin.
Dirty or defective disc.
CD-R/CD-RW that is not finalized.
You tried to playback a CD-R/CD-RW not
designed for audio use.
Some CD-Rs/CD-RWs may not play due
to its recording equipment or the disc
condition.
A disc is automatically ejected.
The ambient temperature exceeds 50°C.
CD will not be ejected.
The operation buttons do not function.
Press the RESET button.
The sound skips from vibration.
The unit is installed at an angle of more
than 60°.
The unit is not installed in a sturdy part of
the car.
The sound skips.
Dirty or defective disc.
Troubleshooting
The following checklist will help you remedy
problems you may encounter with your unit.
Before going through the checklist below,
check the connection and operating
procedures.
General
No sound.
Adjust the volume with volume + button.
Cancel the ATT function.
Set the fader control to the centre position
for a 2-speaker system.
The contents of the memory have been
erased.
The RESET button has been pressed.
t Store again into the memory.
The power cord or battery has been
disconnected.
The power connecting cord is not
connected properly.
No beep sound.
• The beep sound is cancelled (page 13).
• An optional power amplifier is connected
and you are not using the built-in
amplifier.
Indications disappear from/do not appear in
the display.
The clock display disappears if you press
(OFF) for 2 seconds.
t Press (OFF) again for 2 seconds to
display the clock.
Remove the front panel and clean the
connectors. See “Cleaning the connectors”
(page 15) for details.
Stored stations and correct time are erased.
The fuse has blown.
Makes noise when the ignition key is in the
ON, ACC, or OFF position.
The leads are not matched correctly with the
car’s accessory power connector.
No power is being supplied to the unit.
Check the connection. If everything is in
order, check the fuse.
The car does not have an ACC position.
t Press (SRC) (or insert a disc) to turn on
the unit.
19
Error displays/Messages
Error displays
The following indications will flash for about
5 seconds, and an alarm sound will be heard.
Err04
A CD is dirty or inserted upside down.
t Clean or insert the CD correctly.
Err99
The CD unit cannot be operated because of
some problem.
t Press the RESET button on the unit.
If these solutions do not help improve the
situation, consult your nearest Sony dealer.
Messages
” or “
You have reached the beginning or the end
of the disc and you cannot go any further.
Radio reception
Preset tuning is not possible.
Store the correct frequency in the memory.
The broadcast signal is too weak.
The stations cannot be received.
The sound is hampered by noises.
Connect a power aerial control lead (blue)
or accessory power supply lead (red) to the
power supply lead of a car’s aerial booster.
(Only when your car has built-in FM/AM
aerial in the rear/side glass.)
Check the connection of the car aerial.
The auto aerial will not go up.
t Check the connection of the power
aerial control lead.
Check the frequency.
Automatic tuning is not possible.
The local seek mode is set to “ON.”
t Set the local seek mode to “OFF” (page
12).
The broadcast signal is too weak.
t Perform manual tuning.
The “ST” indication flashes.
Tune in the frequency accurately.
The broadcast signal is too weak.
t Set to the monaural reception mode
(page 12).
A programme broadcast in stereo is heard
in monaural.
The unit is in monaural reception mode.
t Cancel monaural reception mode (page
12).
  • Page 1 1
  • Page 2 2
  • Page 3 3
  • Page 4 4
  • Page 5 5
  • Page 6 6
  • Page 7 7
  • Page 8 8
  • Page 9 9
  • Page 10 10
  • Page 11 11
  • Page 12 12
  • Page 13 13
  • Page 14 14
  • Page 15 15
  • Page 16 16
  • Page 17 17
  • Page 18 18
  • Page 19 19
  • Page 20 20
  • Page 21 21
  • Page 22 22
  • Page 23 23
  • Page 24 24
  • Page 25 25
  • Page 26 26
  • Page 27 27
  • Page 28 28
  • Page 29 29
  • Page 30 30
  • Page 31 31
  • Page 32 32
  • Page 33 33
  • Page 34 34
  • Page 35 35
  • Page 36 36
  • Page 37 37
  • Page 38 38
  • Page 39 39
  • Page 40 40
  • Page 41 41
  • Page 42 42
  • Page 43 43
  • Page 44 44
  • Page 45 45
  • Page 46 46
  • Page 47 47
  • Page 48 48
  • Page 49 49
  • Page 50 50
  • Page 51 51
  • Page 52 52
  • Page 53 53
  • Page 54 54
  • Page 55 55
  • Page 56 56
  • Page 57 57
  • Page 58 58
  • Page 59 59
  • Page 60 60
  • Page 61 61
  • Page 62 62
  • Page 63 63
  • Page 64 64
  • Page 65 65
  • Page 66 66
  • Page 67 67
  • Page 68 68
  • Page 69 69
  • Page 70 70
  • Page 71 71
  • Page 72 72
  • Page 73 73
  • Page 74 74
  • Page 75 75
  • Page 76 76
  • Page 77 77
  • Page 78 78
  • Page 79 79
  • Page 80 80
  • Page 81 81
  • Page 82 82
  • Page 83 83
  • Page 84 84
  • Page 85 85
  • Page 86 86
  • Page 87 87
  • Page 88 88
  • Page 89 89
  • Page 90 90
  • Page 91 91
  • Page 92 92

Sony CDX-L280 User manual

Category
Car media receivers
Type
User manual
This manual is also suitable for

Ask a question and I''ll find the answer in the document

Finding information in a document is now easier with AI