
EN
Instruction Manual
NL
Gebruiksaanwijzing
fr
Mode d’emploi
dE
Bedienungsanleitung
Es
Manual de instrucciones
pt
Manual de Instruções
pL
Instrukcje użytkowania
it
Istruzioni per l’uso
sV
Bruksanvisning
CH
Návod k použití
sK
Návod k použitiu
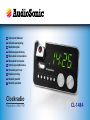
Clockradio
Projection - MW / FM CL-1484
Page is loading ...

9
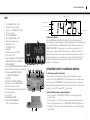
1 2 3 4 5 6 7 8
2425
1211 13 14 15 1716
212223
10
18
19
20
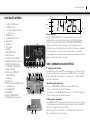
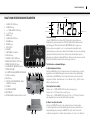
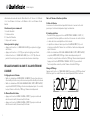
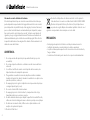
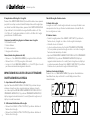
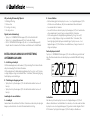
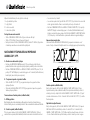
TIME Indicator
ALARM 2 IndicatorALARM 1 Indicator
STANDBY Indicator
PM Indicator
3
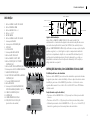
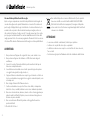
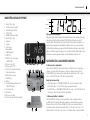
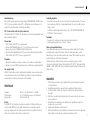
LOCATION OF CONTROLS
1. ALARM 1 ON / OFF button
2. ALARM SET button
3. << / YEAR–MONTH–DAY button
4. >> / DST button
5. MODE button
6. ALARM 2 ON / OFF button
7. VOLUME knob
8. TUNING knob
9. LED DISPLAY
10. SPEAKER
11. AM/FM BAND switch
12. ON / OFF button
13. SNOOZE / SLEEP / NAP button
14. PROJECTION TIME 180° FLIP button
15. PROJECTION ON / OFF button
16. ALARM RADIO / BUZZER switch
17. PROJECTION UNIT
18. FOCUS ADJUSTMENT FOR
PROJECTION UNIT
19. AUX IN jack
20. RESET button
21. DISPLAY LIGHT DIMMER LOW / HIGH
/ AUTO OFF switch
22. AC POWER CORD
23. FM ANTENNA
24. BATTERY COMPARTMENT
25. RATING LABEL (bottom of unit)
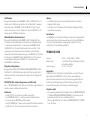
Power connection
Plug the AC POWER CORD (22) to a household outlet AC source. This unit is
equipped with a battery backup system, it requires a 3V CR2032 (flat) lithium
battery (not included). Insert the battery in the BATTERY COMPARTMENT (24),
making certain that the positive and negative (+ and -) battery terminals are
attached to the corresponding terminals on the plate in the battery compartment.
If an AC power failure occurs, the clock automatically switches to the battery
power supply, the clock and timer memory continue running. When the AC power
resumes, the clock switches back to AC again.
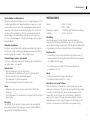
TIME, CALENDAR AND ALARM SETTINGS
A. Setting time and calendar
Press MODE button (5) in normal mode and keep depress over 2 seconds to enter
time set mode, after enter the setting mode, press MODE button (5) to change the
mode cycle as follows: Normal mode > Year > Month > Day > 12/24 H > RTC Hour
> RTC Min > Normal mode
Action (during data adjustment):
• Press << / YEAR-MONTH-DAY button (3) to adjust data backward.
• Press >> / DST button (4) to adjust data forward.
• Keep depress << / YEAR-MONTH-DAY button (3) or >> / DST button (4) button
for 2 seconds to enable auto backward/forward.
B. Setting alarm 1 and alarm 2
Press ALARM SET button (2) during normal mode and keep depress over 2 seconds
to enter the alarm set mode, after entering the setting mode, press the ALARM SET
button (2) to change the mode cycle as follows:
Normal mode > AL.1 Hour > AL.1 Min > AL.1 Weekday Alarm > AL.2 Hour > AL.2
Min > AL.2 Weekday alarm > Normal mode
EN
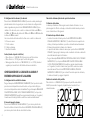
Instruction Manual

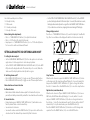
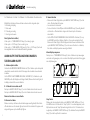
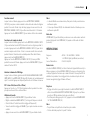
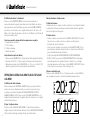
20 12
YEAR Indicator
0 1 0 1
MONTH Indicator DAY Indicator
Instruction Manual
4
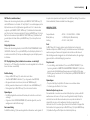
Select alarm weekday mode as follows
1-5 Monday to Friday
1-7 Whole week
6-7 Saturday and Sunday
1-1 One day of the week
Action (during data adjustment):
• Press << / YEAR-MONTH-DAY button (3) to adjust data backward.
• Press >> / DST button (4) to adjust data forward.
• Keep depress << / YEAR-MONTH-DAY button (3) or >> / DST button (4) button
for 2 seconds to enable auto backward/forward.
SETTING ALARM OUTPUT AND SWITCHING ALARM ON/OFF
A. Setting the alarm output
• Set the ALARM RADIO / BUZZER switch (16) to the radio position to select wake
up by radio or to the beep position to select wake up by buzzer.
• Set the DISPLAY LIGHT DIMMER LOW / HIGH / AUTO OFF switch (21) to the AUTO
OFF position (the display will switch off automatically in 15 seconds). When the
alarm sounds, the display will automatically switch on again.
B. Switching alarm on/off
• Press ALARM 1 ON / OFF button (1) to toggle on and off alarm output function.
• Press ALARM 2 ON / OFF button (6) to toggle on and off alarm output function.
Alarm duration and snooze function
A. Alarm duration
• Buzzer alarm or Radio alarm will continue output for 30 minutes if no key’s are
pressed, then it will stop automatically and wait for same alarm time on the next day.
B. Snooze function
• During alarming, press SNOOZE / SLEEP / NAP button (13) will enable snooze
function, buzzer alarm or radio alarm will stop.
• Snooze interval is 9 minutes
• Snooze will continue unless the ON/OFF button (12) is pressed to end the radio-
or buzzer alarm. The alarm will stop automatically after 30 minutes.
• Set the DISPLAY LIGHT DIMMER LOW / HIGH / AUTO OFF switch (21) to the AUTO OFF
position (the display will switch off automatically in 15 seconds). When the alarm sounds,
the display will automatically switch on again. Press the SNOOZE / SLEEP / NAP button
(13) to enable the snooze function, stopping the alarm and turning off the display.
Change display content
Press the << / YEAR-MONTH-DAY button (3) to switch to display the Year/Month/
Day, after 5 seconds timeout the display will switch back to time automatically.
Sleep function
When the radio is turned on, press the SNOOZE / SLEEP / NAP button (13) to turn
on the sleep mode. The sleep time will keep flashing for 10 seconds, during that
time press the SNOOZE / SLEEP / NAP button (13) again to change the duration
from 90 to 15 minutes. Press the ON/OFF button (12) to cancel the sleep function.
Nap function (countdown timer)
When the radio is turned off, press SNOOZE / SLEEP / NAP button (13) to turn on
NAP mode, the NAP time will keep flashing by 10 seconds, within 10 seconds
and press SNOOZE / SLEEP / NAP button (13) button can change the duration
from 90 min – 10 min. The alarm buzzer will sound for 30 min and then shut off
automatically. To stop the alarm buzzer, press the ON/OFF button (12).
Press the SNOOZE / SLEEP / NAP button (13) button has no effect during alarm
operation. Press the ON/OFF button (12) to cancel the NAP function.
Instruction Manual

Instruction Manual
5
Display light dimmer
When the radio is turned off, set the DISPLAY LIGHT DIMMER LOW / HIGH / AUTO
OFF (21) to the AUTO OFF mode, the LED display will automatically turn off in 15
seconds. Press any key button to turn the display on.
DST – Daylight Saving Time (summer- and wintertime)
Press the >> / DST button (4) and hold it for 3 seconds to toggle between the
summer- en wintertime.
Radio operation
• Press the ON / OFF button (12) to turn the radio on.
• Set the AM/FM BAND switch (11) to the desired waveband.
• Select the station by using the TUNING knob (8).
• Turn the VOLUME knob (7) to adjust volume as required.
• Press the ON / OFF button (12) again to turn the radio off.
Notes:
• The AM band uses an internal directional aerial, rotate the radio for best reception.
• Ensure that the FM antenna (23) is completely unrolled and extended for best
FM reception.
Aux in jack
The AUX IN jack (19) can be used to playback alternate audio signal sources on the
unit speakers. This AUX IN jack (19) requires a 3.5mm audio cable for an input signal
(3.5mm audio cable is not included).
SPECIFICATIONS
Frequency : AM 530 – 1600 kHz / FM 88 – 108 MHz
Battery backup : 1 x 3V CR2032 (flat) lithium battery (not included)
Power source : AC230V - 50Hz, 5W
Reset
The RESET button (20) is located on the back of the unit. Use a ballpoint pen to
press the RESET button (20) whenever you change the batteries, or when the unit
is not performing as expected. This will return all settings to the default value, you
will lose any stored data (alarm and clock settings).
Projection unit
• Focus setting: to adjust the brightness / focus of the PROJECTION UNIT (17) use
the FOCUS ADJUSTMENT FOR PROJECTION UNIT (18) until the projected time is
clearly shown on the ceiling or wall.
• To flip the projected image by 180°, press the PROJECTION TIME 180° FLIP button (14).
Notes:
• Projects time image on the ceiling or wall of a darkened room.
• Ideal projection distance is 3-9 feet/1-3 meters.
Alarm battery back-up system
This clock radio includes a alarm battery back-up circuit that can wake you up even
if the power is ‘off’ at the selected wake up time. The clock display will be off and
the radio will not operate, but a separate mini-buzzer will turn ‘on’ automatically to
wake you up, even if you had selected the ‘wake to radio’ option.
The alarm will sound for 30 seconds and then shut off automatically. To stop the
alarm buzzer immediately, press the power on/off button. Pressing the snooze
button has no effect during battery back-up alarm operation.
WARNING
1. No flame sources, such as lighted candles, should be placed on the apparatus.
2. Do not place the product in closed bookcases or racks without proper ventilation.
3. The mains plug is used as the disconnect device, the disconnect device shall
remain readily operable.
4. The ventilation should not be impeded by covering the ventilation openings
with items, such as newspapers, table-cloths, curtains, etc.
5. It shall not be exposed to dripping or splashing and that no objects filled with
liquids, such as vases, shall be placed on the apparatus.
6. Do not connect FM antenna to outside antenna.
7. The unit should not be exposed to direct sunlight, very high or low
temperature, moisture, vibrations or placed in dusty environment.
8. Do not use abrasive, benzene, thinner or other solvents to clean the surface
of the unit. To clean, wipe it will mild non-abrasive detergent solution and
clean soft cloth.
EN
Instruction Manual

Instruction Manual
Instruction Manual
6
9. Never attempt to insert wires, pins or other such objects into the vents or
opening of the unit.
10. Class I LED product.
Do not dispose of the device with the household waste. This product
must be disposed of according to EU directive 2002/96/EC-WEEE
(Waste Electrical and Electronic equipment). Return the device to a
collection point. Observe the applicable regulations. Contact your
municipality, if in doubt.
CAUTION
• Danger of explosion if battery is incorrectly replaced.
• Replace only with the same or equivalent type battery.
• Batteries shall not be exposed to excessive heat such as sunshine, fire or the like.
• Attention should be drawn to the environmental aspects of battery disposal.
Page is loading ...
Page is loading ...
Page is loading ...
Page is loading ...

9
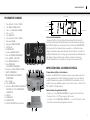
1 2 3 4 5 6 7 8
2425
1211 13 14 15 1716
212223
10
18
19
20
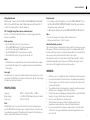
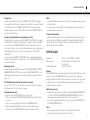
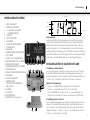
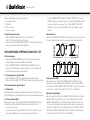
HEURE
Témoin ALARME 2 Témoin ALARME 1
Témoin VEILLE
Témoin Après Midi
Instruction Manual
11
DESCRIPTION
1. Touche ALARME 1 MARCHE / ARRET
2. Touche REGLAGE ALARME
3. Touche << / ANNEE-MOIS-JOUR
4. Touche >> / DST
5. Touche MODE
6. Touche ALARME 2 MARCHE / ARRET
7. Molette DE VOLUME
8. Molette DE REGLAGE DE FREQUENCE
9. AFFICHAGE LED
10. HAUT PARLEUR
11. Commutateur BANDE AM/FM
12. Touche MARCHE / ARRET
13. Touche REPETITION / SOMMEIL /
SIESTE
14. Touche RENVERSEMENT 180°
DE L’HEURE PROJETEE
15. Touche PROJECTION MARCHE/ARRET
16. Commutateur ALARME RADIO / SONNERIE
17. PROJECTEUR
18. REGLAGE NETTETE DU PROJECTEUR
19. Entrée AUX IN
20. Touche REMISE À ZERO
21. Commutateur AFFICHAGE LUMINEUX
FAIBLE / FORT / ARRÊT AUTO
22. CORDON ALIMENTATION CA
23. ANTENNE FM
24. COMPARTIMENT PILE
25. PLAQUE SIGNALETIQUE (sous l’appareil)
Connexion électrique
Brancher le CORDON ALIMENTATION CA (22) dans une prise électrique. Cet
appareil est équipé d’un système de secours qui fonctionne avec une pile lithium
3V CR2032 (plate) (non incluse). Insérer la pile dans le COMPARTIMENT PILE (24),
en vous assurant que les polarités (+ et -) de la pile soient reliées aux réceptacles
correspondants de la plaque du compartiment de la pile. En cas de coupure
d’électricité, le réveil passe automatiquement sur l’alimentation par pile et l’heure
et les réglages du réveil sont ainsi conservés. Lorsque l’alimentation électrique
revient, le réveil s’alimente à nouveau par cette source.
RÉGLAGES DE L’HEURE, DU CALENDRIER ET DE L’ALARME
A. Réglage de l’heure et du calendrier
Appuyer sur la touche MODE (5) en mode normal et garder cette touche appuyée
pendant environ 2 secondes pour accéder au mode réglage de l’heure. Une fois en
mode réglage, appuyer sur la touche MODE (5) pour accéder alternativement aux
modes suivants : Mode normal > Année > Mois > Jour > 12/24 H > Heure HTR >
Minutes HTR > Mode Normal
Action (pendant le réglage):
• Appuyer sur la touche << / ANNEE-MOIS-JOUR (3) pour ajuster les réglages
vers l’arrière.
• Appuyer sur la touche >> / DST (4) pour ajuster les réglages vers l’avant.
• Garder les touches << / ANNEE-MOIS-JOUR (3) ou >> / DST (4) enfoncées
pendant 2 secondes pour passer en mode retour/avance automatique.
B. Réglage alarme 1 et alarme 2
Appuyer sur la touche REGLAGE ALARME (2) en mode normal et gardez-la
enfoncée pendant 2 secondes pour passer en mode réglage alarme. Une fois
dans ce mode, appuyer sur la touche REGLAGE ALARME (2) pour accéder
fr
Mode d’emploi
Page is loading ...
Page is loading ...
Page is loading ...
Page is loading ...
Page is loading ...
Page is loading ...
Page is loading ...
Page is loading ...
Page is loading ...
Page is loading ...
Page is loading ...
Page is loading ...
Page is loading ...
Page is loading ...
Page is loading ...
Page is loading ...
Page is loading ...
Page is loading ...
Page is loading ...
Page is loading ...
Page is loading ...
Page is loading ...
Page is loading ...
Page is loading ...
Page is loading ...
Page is loading ...
Page is loading ...
Page is loading ...
Page is loading ...
Page is loading ...
Page is loading ...
Page is loading ...
Page is loading ...
Page is loading ...
Page is loading ...

Instruction Manual

CD-570LE-247802
DV-1821
www.tristar.eu
-
 1
1
-
 2
2
-
 3
3
-
 4
4
-
 5
5
-
 6
6
-
 7
7
-
 8
8
-
 9
9
-
 10
10
-
 11
11
-
 12
12
-
 13
13
-
 14
14
-
 15
15
-
 16
16
-
 17
17
-
 18
18
-
 19
19
-
 20
20
-
 21
21
-
 22
22
-
 23
23
-
 24
24
-
 25
25
-
 26
26
-
 27
27
-
 28
28
-
 29
29
-
 30
30
-
 31
31
-
 32
32
-
 33
33
-
 34
34
-
 35
35
-
 36
36
-
 37
37
-
 38
38
-
 39
39
-
 40
40
-
 41
41
-
 42
42
-
 43
43
-
 44
44
-
 45
45
-
 46
46
-
 47
47
-
 48
48


Ask a question and I''ll find the answer in the document
Finding information in a document is now easier with AI
in other languages
- italiano: AudioSonic CL-1484 Manuale utente
- français: AudioSonic CL-1484 Manuel utilisateur
- español: AudioSonic CL-1484 Manual de usuario
- Deutsch: AudioSonic CL-1484 Benutzerhandbuch
- Nederlands: AudioSonic CL-1484 Handleiding
- português: AudioSonic CL-1484 Manual do usuário
- slovenčina: AudioSonic CL-1484 Používateľská príručka
- polski: AudioSonic CL-1484 Instrukcja obsługi
- čeština: AudioSonic CL-1484 Uživatelský manuál
- svenska: AudioSonic CL-1484 Användarmanual