Hama EWS-2100 User manual

Category
Weather stations
Type
User manual
6
g
Operating Instruction
7
INSTRUCTION MANUAL
Congratulations on your purchase of this new Weather
Station with 3D projection icons. This unique product is
designed for everyday use for the home or offi ce and is
very useful. To Fully benefi t from all the features and
understand the correct operation of this product, please
read this instruction manual thoroughly.
Power Supply
AC adaptor
The supplied AC/DC adaptor is suitable for use on AC
mains supplying of 100-240V, 50/ 60Hz and should only be
connected to a mains supply with these parameters.
Cautions:
- The included AC/DC adaptor is for this unit only. Do not
use it with other equipment.
- When the unit is not going to be used for long, disconnect
the AC/DC adaptor from the AC outlet.
- When the AC/DC adaptor is plugged in, the apparatus is
not completely disconnected from the main power
source, even when the unit is turned off.
- To completely disconnect the power input, the AC/DC
the mains. As the disconnected device is the AC/DC
adaptor of apparatus.
- Be sure to use it near the wall outlet. If a malfunction
occurs, disconnect the plug from the wall outlet at once.
- Do not expose the AC/DC adapter to dripping or slashing;
do not place any objects fi lled with liquids, such as vases,
near the unit.
- The ventilation should not be impeded by covering the
ventilation openings with items, such as newspapers,
table-cloths, curtains, etc;
- No naked fl ame sources such as lighted candles should
be placed on the apparatus;
- Attention should be drawn to environmental aspects of
battery disposal;
- The marking information is located on the rear and
bottom enclosure.
The AC/DC adaptor of the apparatus should not be
obstructed or should be easily accessed during the
intended use. The normal function of the product may be
disturbed by strong electrostatic discharge interference. If
so the user can power reset the product to resume normal
operation by following the instruction manual.
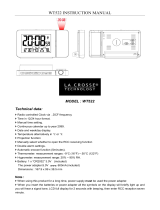
FUNCTIONS OF THE WEATHER STATION
This weather station measures the ambient temperature
and atmospheric pressure for weather forecasting.
Moreover, equipped with a 433MHz radio frequency (RF)
interface, it can receive data from up to three remote
sensors for outdoor temperature measurement with Long
Range in open space. The data is continuously updated and
displayed on the LCD display.
FEATURES: MAIN UNIT
1.Weather forecast icons
There are 4 icons to indicate the weather as sunny, slightly
cloudy, cloudy and rainy.
2. Crystal illumination indicator
When the illumination is turned ON, the corresponding
crystal will keep displaying for 18 seconds to indicate the
current weather.
3. Radio reception signal
The icon will be displayed to indicate that the unit has
received the radio signal.
4. Clock and calendar display
Display the current time and calendar.
5. Alarm time
Two alarm times are available for waking you up.
6. Temperature display
Display the indoor and out door temperature with 2
displaying format selectable.
7. Temperature Memory
Keep the memory of the Max and Min temperature.
8. Multi- Channel
There are 3 channels for outdoor sensors to display the
outdoor temperature.
9. Low battery indicator
Indicate that the battery is low and the displayed
information is imprecise.
10. Snooze function
Enable you to snooze for a little while when the alarm
sounds.
DESCRIPTION OF BUTTONS
1. Clock button
(a) In Clock mode, press to show the weekday, calendar,
alarm1and alarm2.
(b) In Clock mode, press and hold for 2 seconds to enter
clock, calendar and language setting mode.
(c) In Alarm mode (when Alarm icon blinks), press and
hold for 2 seconds to enter Alarm1 or Alarm2 setting
mode.
(d) In setting mode, press to confi rm the settings.
2. unit C˚/F˚ button
(a) In Clock mode, press to switch the temperature unit
between °C and °F
(b) In Clock mode, press and hold for 2 seconds to enter
the illumination setting mode.
3. up [ ] button
In setting mode, press to increase the value.
4. down [ ] button
(a) In setting mode, press to decrease the value.
(b) In Alarm mode, press to turn ON/OFF the Alarm.
5. Memory button
(a) Press to show the MAX and MIN temperature.
(b) Press and hold for 2 seconds to clear the Max/Min
temperature value when the Max/Min temperature is
displayed.
6. Channel button
(a) In Clock mode, press to cycle the display of
temperature from IN Channel1 Channel2
Channel3 Auto scroll all channels IN
(b) In RF register mode, press and hold for 2 seconds to
exit the register mode.
(c) In normal mode, press and hold for 2 seconds to enter
the Registration mode.
7. Illumination slide switch
Slide to select the display of the illumination between OFF,
AUTO and ON.
8. LCD BACKLIGHT slide switch
Slide to select the brightness of the LCD display between
OFF, DIM and BRIGHT.
9. Reset button
Press to restore all setting to factory default
10. LIGHT & SNOOZE button
(a) Press to turn ON the LCD backlight and illumination.
(b) Press to activate the snooze function when the alarm
sounds.
GETTING STARTED
This Weather Station is designed for easy set up. For best
operation, the following steps are required to be done in
the proper sequence.
1. CONNECT POWER ADAPTOR OR INSERT BATTERIES FOR
MAIN UNIT BEFORE DOING SO FOR THE SENSOR UNITS.
2. RECEIVING UNIT CANNOT BE PROGRAMMED
MANUALLY UNTIL THE WIRELESS REMOTE SENSOR
UNIT REGISTRATION PROCEDURE HAS BEEN
COMPLETED.
3. POSITION THE REMOTE UNIT AND MAIN UNIT WITHIN
EFFECTIVE TRANSMISSION RANGE.
Note:
Although the remote unit is weather resistant, it should be
placed away from direct sunlight, rain or snow.
BATTERY INSTALLATION FOR MAIN UNIT
1. Open the BATTERY COMPARTMENT by pressing the
tab on the cover to remove the compartment door.
2. Insert 4 AA batteries in accordance with the polarity
indicators inside the compartment.
3. Close the BATTERY COMPARTMENT by replacing the
compartment door and securing with the tab.
Note:
Replace the batteries when the low battery indicator
appears on the bottom left corner of the LCD.
WIRELESS REMOTE SENSOR REGISTRATION PROCEDURE
1. Connect power adaptor or insert 4 AA batteries fi rst to
the main unit, the temperature display the temperature
display will blink when selecting to display channel
1/2/3” and the wave icon keeps blinking for 2 minutes
to indicate that the unit is in Remote Sensor searching
mode.
00106990man_bg_de_el_en_fr_nl_rus.indd 6-700106990man_bg_de_el_en_fr_nl_rus.indd 6-7 14.12.10 12:3514.12.10 12:35
8
9
2. Insert the 2 AA batteries for the sensor unit. The LED
will start fl ashing at a rate of once per around 2
seconds.
3. While the LED is fl ashing, press the Channel button to
change the sensor channel to 2, which will change to 3
with one more press.
Note:
1. If the user does not press any key for 10 seconds, it will
exit the channel setting mode and transmit the RF
signal. The main unit will register the temperature
reading.
2. The [C/F] button on the bottom of the Wireless Remote
Sensor can only function on another version which has
an LCD display.
REMOTE CHANNEL AUTO-SCROLLING
This device is equipped with an auto-scroll function. While
the auto-scroll function is set, the unit will automatically
cycle to display the temperature of each remote sensor
for 6 seconds.
1. To retrieve manually the specifi c sensor temperature
reading, short press the CHANNEL button until your
desired channel number is displayed.
2. When channel 3 is displayed, press the CHANNEL
button can enable the “auto-scroll all channels”
function.
DCF -77 RADIO CONTROLLED CLOCK
The remote sensor receives the time signal transmitted
from Physikalisch-Technische Bundesanstalt (PTB) in Ger-
many. PTB continuously transmits the time signal (DCF77,
77.5 kHz) from Mainfl ingen, 25 km southeast of Frankfurt
(am Main). It is expected that the signal can cover a
distance of 1,500 km from the transmitter. Then the remote
sensor transmits the time signal to the weather station to
display the accurate time. However, there are many envi-
ronment factors may affect the RCC reception, i.e. nearby
computer monitors or other electronic devices, put on any
metal surface, surrounded by any tall buildings and so on.
The user had better place the remote sensor away from
metallic structures and face the transmitter in
Mainfl ingen-near Frankfurt, Germany.
SETTING TIME & CALENDAR &LANGUAGE
1. Press and hold the CLOCK button for 2 seconds to enter
the clock setting mode. Flashing 24 hours will appear.
2. Press the up [ ] or down [ ] button to switch
between 12Hr/24Hr time format, press the CLOCK
button to confi rm.
3. The hour digits will fl ash. Press the up [ ] or down
[ ] button to set your desired hours. Press and
hold to fast increase the value. Press the CLOCK button
to confi rm.
4. The minute digits will fl ash. Press the up [ ] or down
[ ] button to set your desired minutes. Press and
hold to fast increase the value. Press the CLOCK button
to confi rm.
5. The year digit will fl ash. Press the up [ ] or down
[ ] button to set your desired year. Press the CLOCK
button to confi rm.
6. The ‘D’ and ‘M’ icons will fl ash. Press the up [ ] or
down [ ] button to select D M (Date Month) or M D
(Month Date) format. Press the CLOCK button to
confi rm.
7. The ‘Month’ digits will fl ash. Press the up [ ] or
down [ ] button to set your desired month. Press the
CLOCK button to confi rm. Do the same to set Date.
8. The ‘E’ digit will fl ash. Press the up [ ] or down
[ ] button to switch the language display between
English, German, French, Spanish and Italian. (See
table 1). Press the CLOCK button to confi rm.
Note:
1. The weekday will be automatically calculated and
displayed for the date set above.
2. If there is no key pressed during the setting mode for
10 seconds, it will automatically save the current
setting and exit to normal display.
Table 1
SETTING RCC/OFF SELECTION
Press and hold the CLOCK button for 2 seconds to enter the
RCC setting mode, and the radio reception icon will
ash on the LCD display. Press the up [ ] or down [ ]
button to switch between RCC and OFF selection, the
corresponding icon and fl ashes on the LCD
display. Press the CLOCK button to confi rm.
Note:
If there is no key pressed during the setting mode for 10
seconds, it will automatically save the current setting and
exit to normal display.
SETTTING ALARM TIME
1. In clock time display mode, press the CLOCK button to
switch to display the alarm time. The alarm icon will be
showed.
2. Press and hold the CLOCK button for 2 seconds to enter
the alarm setting mode.
3. The hour digits will fl ash, the up [ ] or down [ ]
button to set your desired hours. Press and hold to fast
increase the value. Press the CLOCK button to confi rm.
4. The minute digits will fl ash. Press the up [ ] or down
[ ] button to set your desired minutes. Press and
hold to fast increase the value. Press the CLOCK button
to confi rm and exit the setting.
SETTING CRYSTAL ILLUMINATION
1. Press and hold the UNIT button for 2 seconds, the
digits of the illumination cycle for the crystal weather
icon start to fl ash.
2. Press the up [ ] or down [ ] button to select the
duration from 5 minutes, 10 minutes, 20 minutes,
30 minutes and 60 minutes.
3. The ‘ON’ digit will fl ash. Press the up [ ] or down
[ ] button to set the crystal weather icon
illumination cycle between ON and OFF. Press the UNIT
button to confi rm and exit the setting.
SPECIFICATIONS
Main Unit
Displayed Indoor temperature range :
-10°C to +60.0°C (14°F to 140.0°F)
Proposed operating range :
0°C to +50.0°C (32.0°F to 122.0°F)
Temperature resolution : 0.1°C (0.2°F)
Displayed Outdoor temperature range :
-20.0°C to +60.0°C (-4.0°F to 140.0°F)
Temperature resolution : 0.1°C (0.2°F)
Batteries : Use 4 pieces UM-3 AA size 1.5V alkaline battery
Wireless Remote Unit
Displayed range :
-20.0°C to +60.0°C (-4.0°F to 140.0°F)
Proposed operating range :
-10.0°C to +50.0°C (14.0°F to 122.0°F)
Temperature resolution : 0.1°C (0.2°F)
RF Transmission Frequency : 433 MHz
Temperature sensing cycle : 60 - 75 seconds
Batteries :
Use 2 pieces UM-4 AAA size 1.5V alkaline battery
The
he
he
he
he
he
e
e
e
h
h
The
he
he
he
he
he
he
e
e
e
m
The
he
he
he
he
he
he
e
e
y
and
and
and
an
and
and
and
n
n
n
n
on
on
n
on
on
on
on
n
t
t
th
th
t
t
t
t
me
e
e
e
e
e
e
e
e
to
t
t
t
t
t
t
The
he
he
he
he
he
he
e
e
1
1
1
as
s
s
s
s
s
s
s
s
h.
h
h
h
h
h
h
h
h
ng
ng
ng
ng
g
ng
ng
g
g
g
m
m
m
i
ng 2
ng
ng
ng
ng
ng
ng
g
g
g
io
o
o
o
o
o
o
o
o
n i
n
n
n
n
n
n
wi
w
wi
wi
wi
wi
ll
ll
ll
ll
ll
l
ll
l
The
he
he
he
he
he
e
e
e
m
on
n
n
n
t
to
t
t
t
The
he
he
he
he
he
e
e
e
to
ent
e
py
w
een
R
a
nd O
F
00106990man_bg_de_el_en_fr_nl_rus.indd 8-900106990man_bg_de_el_en_fr_nl_rus.indd 8-9 14.12.10 12:3514.12.10 12:35
40
41
c
Česky
[Czech]
Tímto fi rma Hama GmbH & Co. KG potvrzuje, že tento přístroj odpovídá základním
požadavkům a ostatním relevantním předpisům směrnice 1999/5/ES. Prohlášení o
shodě podle směrnice R&TTE 99/5/ES najdete na internetových stránkách
www.hama.com
v
Slovensky
[Slovak]
Spoločnosť Hama GmbH & Co. KG týmto prehlasuje, že tento prístroj zodpovedá
základným požiadavkám a ostatným relevantným ustanoveniam Smernice 1999/5/
ES. Vyhlásenie o zhode podľa smernice R&TTE 99/5/ES si môžete pozrieť na adrese
www.hama.com.
t
Türkiye
[Turkish]
Hama GmbH & Co. KG bu cihazın 1999/5/EC Direktifi ’nin ilgili talimatlarına ve bu
direktif tarafından istenen koşullara uygunluğunu beyan eder. R&TTE Direktifi 99/5/
EC’ye göre uygunluk beyanı için www.hama.com adresine bakınız.
s
Svenska
[Swedish]
Hama GmbH & Co. KG försäkrar härmed att den här apparaten överensstämmer med
de grundläggande kraven och övriga relevanta bestämmelser i direktivet 1999/5/EG.
Försäkran om överensstämmelse enligt R&TTE-direktivet 99/5/EG hittar du på
www.hama.de
m Suomi
[Finnish]
Hama GmbH & Co. KG vakuuttaa täten, että tämä laite on direktiivin 1999/5/EY
perusvaatimusten ja muiden oleellisten säännösten mukainen. Radio- ja telepää-
telaitteita koskevan direktiivin 99/5/EY mukainen vaatimustenmukaisuusvakuutus
löytyy osoitteesta www.hama.com
r România
[Romanian]
Hama GmbH & Co. KG, declară prin prezenta ca acest aparat este în conformitate cu
cerinţele esenţiale şi celelalte hotărâri relevante ale Directivei 1999/5/EC. Declaraţia de
conformitate conform Directivei R&TTE 99/5/EC o găsiţi în Internet la
www.hama.com
j Danmark
[Danish]
Hama GmbH & Co. KG erklærer hermed, at dette apparat er i overensstemmelse med de
grundlæggende krav og de øvrige, relevante bestemmelser i direktiv 1999/5/EF.
Overensstemmelseserklæringen i henhold til direktivet om radio og teleterminaludstyr
99/5/EF kan du fi nde på www.hama.com
n Norge
[Norwegian]
Med dette erklærer Hama GmbH & Co. KG at dette apparatet er i overensstemmelse med
grunnleggende krav og relevante bestemmelser i direktiv 1999/5/EF. Du fi nner
samsvarserklæringen i henhold til R&TTE-direktiv 99/5/EF under www.hama.com
d Deutsch
[German]
Hiermit erklärt Hama GmbH & Co. KG, dass sich dieses Gerät in Übereinstimmung mit
den grundlegenden Anforderungen und den übrigen einschlägigen Bestimmungen der
Richtlinie 1999/5/EG befindet. Die Konformitätserklärung nach der R&TTE
Richtlinie 99/5/EG finden Sie unter www.hama.com
g English Hama GmbH & Co. KG hereby declares that this device is in compliance with the basic
requirements and other relevant regulations of the 1999/5/EC guideline. You will fi nd
the declaration of conformity with R&TTE directive 99/5/EC on the internet at www.
hama.com
f Français
[French]
La société Hama GmbH & Co. KG certifi e que cet appareil est conforme aux exigences
de base et aux dispositions de la directive 1999/5/ en vigueur. Vous trouverez la
déclaration de conformité à la directive R&TTE 99/5/CE sur www.hama.de.
e Español
[Spanish]
Mediante la presente, Hama GmbH &Co. KG declara que este aparato cumple con los
requisitos básicos y los demás reglamentos relevantes de la directiva 1999/5/CE. La
declaración de conformidad según la directiva R&TTE 99/5/CE la encontrará en
www.hama.com
i Italiano
[Italian]
Hama GmbH & Co. KG dichiara che questo apparecchio soddisfa i requisiti fonda-
mentali ed è conforme alle norme vigenti della direttiva 1999/5/CE. La dichiarazione di
conformità secondo la direttiva R&TTE 99/5/CE è disponibile sul sito www.hama.com
p Português
[Portuguese]
A Hama GmbH & Co. KG declara, deste modo, que este aparelho respeita as
exigências básicas e restantes requisitos relevantes da directiva 1999/5/CE. Pode
consultar a declaração de conformidade, segundo a directiva R&TTE 99/5/CE, em
www.hama.com
u
Россия
[Russian]
Компания Hama GmbH & Co. KG настоящим подтверждает, что данное изделие
полностью соответствует основным требованиям, а также предписаниям и
положениям нормативов 1999/5/EG. Заявление о соответствии товара нормам
R&TTE 99/5/EG см. на вебузле www.hama.com
o Neder-
lands
[Dutch]
Hiermee verklaart Hama GmbH & Co. KG, dat dit apparaat voldoet aan de vereisten
en de overige relevante voorschriften van de richtlijn 1999/5/EG. De verklaring van
overeenstemming conform de R&TTE-richtlijn 99/5/EG vindt u op internet onder
www.hama.com
q Polski
[Polish]
Hama GmbH & Co. KG oświadcza niniejszym, że urządzenie to spełnia podstawowe
wymagania i pozostałe właściwe postanowienia dyrektywy 1999/5/WE. Deklaracja
zgodności wg dyrektywy 99/5WE dotyczącej urządzeń radiowych i
telekomunikacyjnych dostępna jest na stronie www.hama.com
h Magyar
[Hungarian]
A Hama GmbH & Co. KG ezúton kijelenti, hogy a jelen készülék összhangban van az
1999/5/EK irányelv alapvető követelményeivel és az egyéb vonatkozó
rendelkezésekkel. A 99/5/EK R&TTE irányelv szerinti megfelelőségi nyilatkozatot a
www.hama.com címen találja meg.
k
Ελληνική
[Greek]
Η εταιρία Hama GmbH & Co. KG δηλώνει πως η συσκευή αυτή εκπληρώνει τις βασικές
απαιτήσεις και τις λοιπές σχετικές διατάξεις της οδηγίας 1999/5/EG Τη δήλωση
συμμόρφωσης σύμφωνα με την οδηγία R&TTE 99/5/ΕΚ θα τη βρείτε στη διεύθυνση
www.hama.de.
00106990man_bg_de_el_en_fr_nl_rus.indd 40-4100106990man_bg_de_el_en_fr_nl_rus.indd 40-41 14.12.10 12:3514.12.10 12:35
  • Page 1 1
  • Page 2 2
  • Page 3 3
  • Page 4 4
  • Page 5 5
  • Page 6 6
  • Page 7 7
  • Page 8 8
  • Page 9 9
  • Page 10 10
  • Page 11 11
  • Page 12 12
  • Page 13 13
  • Page 14 14
  • Page 15 15
  • Page 16 16
  • Page 17 17
  • Page 18 18
  • Page 19 19
  • Page 20 20
  • Page 21 21

Hama EWS-2100 User manual

Category
Weather stations
Type
User manual

Ask a question and I''ll find the answer in the document

Finding information in a document is now easier with AI