Kicker 2009 iKICK iK501 User manual
- Category
- Docking speakers
- Type
- User manual
This manual is also suitable for
Page is loading ...

2
iK501STEREOSYSTEM
DIGITALSTEREOSYSTEMFORiPhone
®
ANDiPod
®
Owner’sManual
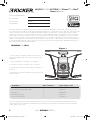
The Kicker iKICK iK501 Digital Stereo System for iPhone and iPod is designed for “Livin’ Loud” with your iPod in the
home environment. The iK501 is fully featured with dual full-range 5” (`127mm) Kicker drivers and 3/4” (20mm) silk dome
tweeters driven by a powerful stereo amplifi er with digital signal processing. The 6” (152mm) square passive radiator
(subwoofer) on the back of the iK501 balances the sonic output, adding the punchy low-frequency response that put
Kicker subwoofers on the map. The rotary control and infrared remote allow simple, streamlined control of your iK501
Stereo System. The iK501 can be used with any 4th generation or newer iPod. In addition, the iK501 boasts a wide
range of connectivity options including stereo RCA outputs, composite video output, and an 1/8” stereo auxiliary input for
incorporating additional audio devices with your iK501 Stereo System. Note: 3rd Generation and older iPods must use
the auxiliary input instead of the Docking Bay.
Authorized KICKER Dealer:
Purchase Date:
Model Number:
Serial Number:
iPod Model Apple
®
Adapter # iK501 Adapter Label
1. iPod Nano (2nd Gen) 2GB, 4GB & 8GB 11 NANO
2. iPod Nano (3rd Gen) 4GB & 8GB 13 NANO 3G
3. iPhone 3G 15 iPHONE 3G
4. iPod Nano (4th Gen) 16 NANO 4G
5. iPod Touch (2nd Gen) 17 TOUCH 2G
iK501
1. Choose the dock adapter that best fi ts your iPod or use
the universal adapter that came with your iPod. See the
table below.
2. Attach the adapter to the iK501’s docking bay.
3. Connect your iPod to the iK501’s dock connector.
4. Plug the power cable into the DC input on the back of
the iK501.
5. Plug the 2-prong electrical plug into a surge protected
electrical outlet.
DOCKINGYOURiPod
Figure 1
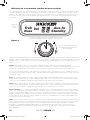
The iK501 docking station has been optimized to match the sonic output of the iPod with the iPod’s EQ in the “Off”
setting. The iPod’s “Sound Check” should also be off; otherwise you may experience poor bass response and lower
volume levels in your music.
2009 iK501 Multilingual d01.indd 22009 iK501 Multilingual d01.indd 2 4/23/2009 11:50:12 AM4/23/2009 11:50:12 AM

3
IMPORTANTSAFETYINSTRUCTIONS
Read and follow all the instructions listed in this manual. Follow all safety and procedural recommendations to prevent
damage to your self, your Kicker product, or your portable entertainment device.
The iK501 should not be used near water or in an environment where exposure to liquids is possible. This includes but is
not exclusive to areas where splashing, dripping, leaks, spills, and exposure to rain can occur. Liquid containers should
not be placed on or near the iK501 Stereo System. The iK501 Stereo System should not be cleaned with liquid cleaners.
Use only a dry cloth to clean the iK501. Only use the iK501 in areas with adequate open ventilation allowing at least 4”
of space on all sides of the iK501. Do not set the iK501 on any surface or cover the iK501 with any object that could
impede the airfl ow to and from the iK501 Stereo System. The iK501 should not be placed near any source of heat. This
includes but is not limited to stoves, radiators, heating elements, electronic heat sources, and areas where excessive
solar heat can be generated. Do not install the iK501 near any fl ame or place any fl ammable objects near the device.
The power outlet used to provide power to the iK501 should be accessible at all times. The polarized 2-prong electrical
plug has a wide blade and narrow blade that should fi t into the corresponding wide and narrow receiving connections
of your electrical outlet. Do not force the plug into the outlet. If the plug provided with the unit does not fi t, consult with
an electrician to upgrade the electrical outlet accordingly. The power cord should be situated in a way that protects it
from being pinched, walked on, tripped over, or accidentally pulled from the electrical outlet or the electrical input on the
iK501. Do not run the cable through doorways or underneath objects that could damage the wire or tear the insulating
material surrounding the wire. Only use the manufacturer supplied power supply with the iK501. We recommend using a
surge protector/power conditioner and unplugging the iK501 during any electrical storms or situations that could cause
voltage fl uctuations in the electrical system.
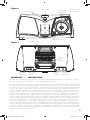
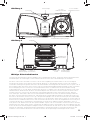
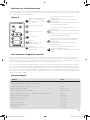
Figure 2
Figure 3
Transport Handle
1/8” Stereo
Auxiliary Input
DC Power
22 Volts
IR Remote Receiver.
LCD Display
Docking Bay
Rotary Control
Vibration
Isolation
Pad
5” (127mm) Full-
Range Drivers
3/4” (20mm) Silk
Dome Tweeters
Skid-Resistant, Non-Marking Feet
Stereo RCA
Outputs
Passive
Square
Radiator
Composite
Video Output
2009 iK501 Multilingual d01.indd 32009 iK501 Multilingual d01.indd 3 4/23/2009 11:50:13 AM4/23/2009 11:50:13 AM

4
iK501STEREOSYSTEM
Treb
Bass
Vol
Aux-In
Standby
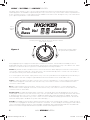
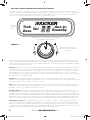
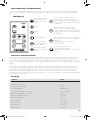
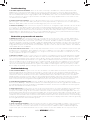
USINGTHESYSTEMMENUROTARYCONTROL
The iK501 Stereo System’s rotary control provides an intuitive user interface. The System Menu options listed on the
LCD display below are available for adjustment by the rotary control. The rotary control knob is used as a push-button to
power on the iK501 and to scroll through the menus available on the LCD screen. Turning the rotary control knob allows
you to adjust the parameters of the selected menu.
iK501
System
Menu
Use the push-button selector to turn on the iK501 and to
make menu selections.
Turn the rotary control to adjust
the system menu parameters.
After plugging the power supply into the DC input on the back of the iK501, the unit will be in “Standby” mode, as
displayed by the LCD screen on the System Menu. Turn the power on by pushing the rotary control button once. When
the power is on, both the “Kicker” logo and “Vol” will be displayed on the System Menu.
Volume: By default, the iK501 will be in volume control mode and “Vol” will be displayed on the LCD screen. Turn the
rotary knob to adjust the volume up or down. The rotary control will automatically revert to volume control mode after a
short time period if any other menus have been selected.
To scroll through the other menus, simply use the rotary control as a push-button. Each single button push will take you
from one menu to the next, rotating through Treb>Bass>Aux-In>Vol and back to the “Treb” treble control.
Treble: To adjust the treble on the iK501, use the rotary control as a push-button to scroll through the menus until the
“Treb” menu is displayed on the LCD screen. Turn the rotary control knob clockwise to increase treble and counter-
clockwise to reduce treble.
Bass: To adjust the bass level on the iK501, use the rotary control as a push-button to scroll through the menus
until the “Bass” menu is displayed on the LCD screen. Turn the rotary control knob clockwise to increase bass and
counterclockwise to reduce bass.
Auxiliary Input: To enable the auxiliary input on the iK501, an external device must be plugged into the 1/8” stereo
auxiliary input on the back of the unit. Use the rotary control as a push-button and scroll through the menus until “Aux-In”
is displayed. Turn the rotary control clockwise to enable the auxiliary input. When the auxiliary is enabled, the system
menu will display “ON”. Turn the rotary control counter-clockwise to disable the auxiliary input and return to iPod mode.
When the auxiliary input is disabled, the system menu will display “--”.
Standby: In “Standby” mode, the iK501 will be powered down, but your docked iPod will continue to charge as long as
a power source is plugged into the DC input on the back of the iK501. To enter standby mode simply press and hold the
rotary control button until the unit turns off and “Standby” is displayed. Note: 3rd Generation iPods are compatible with
the iK501 but will not charge while docked or respond to remote control playback functions.
Figure 4
2009 iK501 Multilingual d01.indd 42009 iK501 Multilingual d01.indd 4 4/23/2009 11:50:14 AM4/23/2009 11:50:14 AM

5
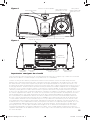
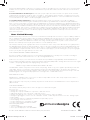
Volume Up
Volume Down
Play/Pause
Skip Forward
(Hold down to Fast
Forward)
Skip Backward
(Hold down to
Rewind)
Mute iK501 Output
(Hold down to turn
the iK501 on/off)
Navigate upward through the iPod
menu directory or increase values
within the iK501 System Menu.
Press the up arrow while in the Aux-
In Menu to enable the Aux input.
Navigate downward through the iPod
menu directory or reduce values
within the iK501 System Menu.
Press the down arrow while in the
Aux-In Menu to disable the Aux input.
Navigate toward iPod root directory.
Hold down to enter the iK501
System Menu.
Navigate within the iK501 System
Menu. Treble>Bass>Aux-In
Make selections and enter sub-
directories within the iPod.
Use the enter button to exit the
iK501 System Menu.
Figure 5
USINGTHEREMOTECONTROL
The Infrared Remote Control enables you to control your iPod and access the iK501 System Menu from a convenient
location. With the fully featured remote control it is easy to access all of your iPod’s music and/or video content.
Model: iK501
Speaker Design 2 - Way
Woofer Size, in (mm) 5 (127)
Tweeter Size, in (mm) 3/4 (20)
Tweeter Design Silk Dome
Passive Radiator Size, in (mm) 6 X 6 (152 X 152)
RMS Power, Watts @ 1% Total Harmonic Distortion 2 X 20
Effective Frequency Range, Hz 50-20K
Power Supply, Volts (Ampere) 22 (2.7)
Height, in (mm) 8.5 (216)
Width, in (mm) 19.2 (488)
Depth, in (mm) 8.4 (214)
Weight, lb (kg) 9.2 (4.2)
VOL
MENU
VOL
iKICK
CONNECTINGEXTERNALDEVICES
To connect an external video display to the iK501, make sure the video output is enabled on your iPod device. Connect
a standard RCA composite video cable from the composite video output on the back of the iK501 to the RCA video
input on your external video display. See Figure 3. This is a pass-through connection. If there are any problems with your
external video display, refer to the iPod device manual or the instructions packaged with your external video display.
To connect an external audio device to the iK501, enable Aux-In mode with the rotary control as described in the Auxiliary
Input section on the previous page. Connect your line level device to the 1/8” stereo input on the back of the iK501 with
the included auxiliary cable. See Figure 2. If the sound is distorted, you may be overdriving the auxiliary input. Try turning
down the external device until the sound is no longer distorted. Note: 1st – 3rd Generation iPods require the use of the
auxiliary input for audio playback.
PERFORMANCE
2009 iK501 Multilingual d01.indd 52009 iK501 Multilingual d01.indd 5 4/23/2009 11:50:15 AM4/23/2009 11:50:15 AM
Page is loading ...
Page is loading ...
Page is loading ...
Page is loading ...
Page is loading ...
Page is loading ...
Page is loading ...
Page is loading ...
Page is loading ...
Page is loading ...
Page is loading ...
Page is loading ...

18
iK501STEREOSYSTEM
Troubleshooting
1. No audio output from the iK501? Make sure the volume is turned up to an audible level on both the iK501 and the audio
playback device connected to the iK501. Make sure the system is not muted. Check power connections. Make sure the iK501 is
turned on and functioning properly. Try resetting the iK501 by unplugging the unit, waiting 10 seconds and plugging it back in to the
wall. Check Auxiliary Mode If you are trying to playback audio from an auxiliary device, make sure that Aux-In mode is enabled and the
device is connected to the 1/8” stereo input on the back of the iK501. If you are trying to playback audio from a docked iPod, make
sure that Aux-In mode is disabled.
2. Remote Control isn’t working? Check for objects blocking the remote sensor on the bottom left corner of the right speaker
grille. See Figure 2. Check the remote battery and replace if necessary. Open the battery compartment of the remote and replace the
CR2025 3V Lithium battery. Make sure the iPod is functioning properly, if not, refer to item 3, below.
3. iPod not responding? Make sure the iPod is not paused or in Hold mode. The high bass output of the iK501 can cause the iPod
to freeze due to acoustic vibrations. Reboot the iPod by pressing and holding the play/pause button for approximately six seconds.
Press any button to turn the iPod back on. If this doesn’t work, reset the iPod by connecting the iPod to the iK501 dock connector.
Put the iPod in Hold Mode and then slide the Hold switch back to the Off position. Finally, simultaneously press and hold the Center
and Menu buttons for approximately six seconds. To reset an original iPod with a dock connector (with four buttons below the display),
simultaneously press and hold the Play/Pause and Menu buttons to reset an original iPod.
Detección y reparación de averías
1. El iK501 no suena. Tanto el volumen del iK501 como el del dispositivo de reproducción de sonido conectado al iK501 deben
estar lo sufi cientemente altos como para que sean audibles. Asegúrese de que el sistema no esté silenciado. Revise las conexiones
de alimentación. El iK501 debe estar encendido y funcionando correctamente. Restablezca el iK501 desenchufando la unidad,
esperando 10 segundos y volviendo a enchufarla. Verifi que la modalidad auxiliar. Si está intentando reproducir sonido de un dispositivo
auxiliar, la modalidad de entrada auxiliar debe estar habilitada y el dispositivo debe estar conectado a la entrada estereofónica de 1/8
de plg. ubicada en la parte de atrás del iK501. Si está intentando reproducir el sonido de un iPod montado en la base, la modalidad de
entrada auxiliar debe estar deshabilitada.
2. El control remoto no funciona. Vea que no haya objetos bloqueando el sensor remoto en la esquina inferior izquierda de la rejilla
del altavoz derecho. Vea la Figura 2. Revise la pila del control remoto y cámbiela si es necesario. Abra el compartimiento de la pila
del control remoto y cambie la pila de litio CR2025 de 3 V. Asegúrese de que el iPod esté funcionando correctamente. De no ser así,
consulte el apartado 3 que aparece a continuación.
3. El iPod no responde. Asegúrese de que el iPod no esté en pausa o en modalidad de retención. La alta salida de bajos del iK501
puede hacer que el iPod se bloquee debido a las vibraciones acústicas. Instalar la almohadilla de aislamiento de vibraciones adjunta
como se muestra en la Figura 2 puede evitar que el iPod se bloquee. Reinicie el iPod oprimiendo y manteniendo oprimido el botón de
reproducción y pausa durante aproximadamente seis segundos. Oprima cualquier botón para volver a encender el iPod. Si esto no
funciona, mrestablezca el iPod conectándolo al conector de la base del iK501. Ponga el iPod en modalidad de retención y luego pase
el selector de retención a la posición de apagado (Off). Por último, oprima y mantenga oprimidos simultáneamente el botón central y
el botón de menú durante aproximadamente seis segundos. Para restablecer un iPod original con un conector de base (con cuatro
botones debajo de la pantalla), oprima y mantenga oprimidos simultáneamente el botón de reproducción y pausa y el botón de menú.
Problembehebung
1. Kein Sound vom iK501? Vergewissern Sie sich, dass die Lautstärke sowohl beim iK501 als auch bei dem daran angeschlossenen
Audiowiedergabegerät auf einen hörbaren Pegel eingestellt ist,. Vergewissern Sie sich, dass die Stummschaltung nicht aktiviert ist.
mStromanschlüsse prüfen. Vergewissern Sie sich, dass das iK501 eingeschaltet ist und richtig funktioniert. Versuchen Sie, das iK501
zurückzusetzen, indem Sie das Gerät vom Netz trennen, 10 Sekunden warten und es dann wieder an die Steckdose anschließen.
AUX-Modus prüfen. Wenn Sie versuchen, Audio von einem Zusatzgerät wiederzugeben, müssen Sie sicherstellen, dass der Aux-In-
Modus aktiviert und das Gerät an den 1/8-Zoll-Stereoeingang auf der Rückseite des iK501 angeschlossen ist. Wenn Sie versuchen,
Audio von einem iPod in der Docking-Station wiederzugeben, müssen Sie sicherstellen, dass der Aux-In-Modus deaktiviert ist.
2. Fernbedienung funktioniert nicht? Prüfen Sie, ob Objekte den Fernbedienungssensor unten links am Lautsprechergrill
blockieren. Siehe Abbildung 2. Überprüfen Sie die Batterie der Fernbedienung und ersetzen Sie diese ggf. Öffnen Sie das Batteriefach
der Fernbedienung und ersetzen Sie die CR2025 3V-Lithiumbatterie. Prüfen Sie, ob der iPod korrekt funktioniert; ansonsten folgen Sie
bitte dem unten in Punkt 3 beschriebenen Verfahren.
3. iPod reagiert nicht? Vergewissern Sie sich, dass der iPod sich nicht im Pausen- oder Wartemodus befi ndet. Der hohe Basspegel
des iK501 kann zu akustischen Vibrationen führen, die den iPod einfrieren lassen. Verwenden Sie das beiliegende Vibrations-
Isolierpolster wie in Abb. 2 gezeigt, um dies zu verhindern. Starten Sie den iPod erneut, indem Sie die Wiedergabe/Pause-Taste ca. 6
Sekunden lang gedrückt halten. Drücken Sie dann eine beliebige Taste, um den iPod wieder einzuschalten. Wenn das nicht hilft, setzen
Sie den iPod zurück, indem Sie ihn an den iK501-Docking-Anschluss anschließen. Stellen Sie auf dem iPod den Hold-Modus ein und
schieben Sie den Hold-Schalter wieder in die Aus-Position. Halten Sie dann die mittlere Taste und die Menü-Taste ca. 6 Sekunden lang
gedrückt. Um den Original-iPod mit einem Docking-Anschluss (mit vier Tasten unter dem Display) zurückzusetzen, halten Sie gleichzeitig
die Wiedergabe/Pause-Taste und die Menütaste gedrückt.
Dépannage
1. Aucun son émis par le iK501 ? Vérifi ez que le bouton de volume est réglé à un niveau audible sur le iK501 comme sur le lecteur
audio raccordé au iK501. Vérifi ez que le mode sourdine du système n’est pas activé. Vérifi ez les branchements de l’alimentation.
Vérifi ez que le iK501 est sous tension et qu’il fonctionne correctement. Essayez de réinitialiser le iK501 en débranchant l’appareil de
sa prise murale, puis en le rebranchant au bout de 10 secondes. Vérifi ez le mode d’entrée auxiliaire. Si vous essayez d’écouter la
2009 iK501 Multilingual d01.indd 182009 iK501 Multilingual d01.indd 18 4/23/2009 11:50:27 AM4/23/2009 11:50:27 AM

19
musique d’un appareil auxiliaire, vérifi ez que le mode Aux-In est activé et que l’appareil est raccordé à l’entrée stéréo de 3 mm à l’arrière
du iK501. Si vous essayez d’écouter la musique d’un baladeur iPod présent dans la station d’accueil, vérifi ez que le mode Aux-In est
désactivé.
2. La télécommande ne fonctionne pas ? Vérifi ez qu’il n’y a pas d’objet entre la télécommande et le capteur de télécommande
en bas à gauche de la grille de l’enceinte de droite. Voir la fi gure 2. Vérifi ez la pile de la télécommande, et remplacez-la si nécessaire.
Ouvrez le logement de la pile de la télécommande et remplacez la pile au lithium CR20253 V. Vérifi ez que le baladeur iPod fonctionne
correctement. Dans le cas contraire, consultez le paragraphe 3 ci-dessous.
3. Le baladeur iPod ne répond pas ? Vérifi ez que le baladeur iPod n’est pas en mode pause ou verrouillé. Les vibrations
acoustiques dues au niveau élevé de graves du iK501 peuvent entraîner le gel du baladeur iPod. L’utilisation du patin antivibratoire
inclus, comme le montre la fi gure 2, peut prévenir le gel du baladeur iPod. Redémarrez le baladeur iPod en appuyant pendant environ
six secondes sur la touche de lecture/pause. Appuyez sur une touche quelconque pour remettre le baladeur iPod sous tension. Si cela
ne fonctionne pas, mréinitialisez le baladeur iPod en le branchant au connecteur de la station d’accueil iK501. Mettez le baladeur iPod
en mode verrouillage, puis remettez le commutateur de verrouillage Hold en position Off (arrêt). Enfi n, appuyez simultanément pendant
environ six secondes sur la touche centrales et la touche Menu. Pour réinitialiser un baladeur iPod d’origine avec un connecteur de
station d’accueil (avec quatre touches sous l’affi cheur), appuyez simultanément pendant un certain temps sur la touche de lecture/
pause et la touche Menu.
Home Limited Warranty
KICKER warrants this product to be free from defects in material and workmanship under normal use for a period of ONE (1) YEAR from
date of original purchase with the orginal receipt from an Authorized KICKER Dealer. Should service be necessary under this warranty
for any reason due to manufacturing defect or malfunction during the warranty period, KICKER will repair or replace (at its discretion)
the defective merchandise with equivalent merchandise at no charge. Warranty replacements may have cosmetic scratches and
blemishes. Discontinued products may be replaced with more current equivalent products.
This warranty is valid only for the original purchaser and is not extended to owners of the product subsequent to the original purchaser.
Any applicable implied warranties are limited in duration to a period of the express warranty as provided herein beginning with the date
of the original purchase at retail, and no warranties, whether express or implied, shall apply to this product thereafter. Some states do
not allow limitations on implied warranties; therefore these exclusions may not apply to you. This warranty gives you specifi c legal rights;
however you may have other rights that vary from state to state.
WHAT TO DO IF YOU NEED WARRANTY OR SERVICE
Defective merchandise should be returned to your local Authorized KICKER Dealer for warranty service. Assistance in locating an
Authorized Dealer can be found at www.kicker.com or by contacting KICKER directly.
If it becomes necessary for you to return defective merchandise directly to Stillwater Designs (KICKER), call the KICKER Customer
Service Department at (405) 624-8510 for a Return Merchandise Authorization (RMA) number. Package all defective items in the original
container or in a package that will prevent shipping damage, and return to:
Stillwater Designs, 3100 North Husband Road, Stillwater, OK 74075
The RMA number must be clearly marked on the outside of the package. Include a copy of the original receipt with the purchase date
clearly visible, and a “proof-of-purchase” statement listing your name and return shipping address, the Dealer’s name and invoice
number, and product purchased. Warranty expiration on items without proof-of-purchase will be determined from the type of sale and
manufacturing date code. Freight must be prepaid; items sent freight-collect, or COD, will be refused.
HOW LONG WILL IT TAKE?
KICKER strives to maintain a goal of 72-hour service for all home and portable electronic returns. Delays may be incurred if lack of
replacement inventory or parts is encountered.
Failure to follow these steps may void your warranty. Any questions can be directed to the KICKER Customer Service Department at
(405) 624-8510.
WHAT IS NOT COVERED?
This warranty is valid only if the product is used for the purpose for which it was designed.
It does not cover:
o Damage due to improper use.
o Damage due to improper installation of components or audio/video devices.
o Subsequent damage to other components or audio/video devices.
o Damage caused by exposure to moisture, excessive heat, chemical cleaners, and/or UV radiation.
o Damage through negligence, misuse, fl ood, fi re, earthquake, accident, or abuse. Repeated returns for the same. Damage may be
considered abuse.
o Items previously repaired or modifi ed by any unauthorized repair facility or person.
o Return shipping on non-defective items.
o Products with tampered or missing barcode labels.
o Products returned without a Return Merchandise
Authorization (RMA) number.
o Freight Damage.
o The cost of shipping product to KICKER.
o Service performed by anyone other than KICKER.
stillwaterdesigns
P.O. Box 459 • Stillwater, Oklahoma 74076 • USA • (405) 624–8510
20090407-D+09iK501
2009 iK501 Multilingual d01.indd 192009 iK501 Multilingual d01.indd 19 4/23/2009 11:50:27 AM4/23/2009 11:50:27 AM
Page is loading ...
-
 1
1
-
 2
2
-
 3
3
-
 4
4
-
 5
5
-
 6
6
-
 7
7
-
 8
8
-
 9
9
-
 10
10
-
 11
11
-
 12
12
-
 13
13
-
 14
14
-
 15
15
-
 16
16
-
 17
17
-
 18
18
-
 19
19
-
 20
20


Kicker 2009 iKICK iK501 User manual
- Category
- Docking speakers
- Type
- User manual
- This manual is also suitable for
Ask a question and I''ll find the answer in the document
Finding information in a document is now easier with AI
in other languages
Related papers
-
Kicker 2009 iK350 Owner's manual
-
-
-
-
-
-
-
-
Brookstone iKICK iK100 Owner's manual
-
Other documents
-
Sony RDP-X50IP Operating instructions
-
Apple Universal Dock User manual
-
Trust Tytan Stage 2.1 Installation guide
-
TDK T78339 Datasheet
-
Akai ADI-18K User manual
-
Lenco Speakerball for iPod Owner's manual
-
-
Coby CSMP145 User manual
-
-
Coby Vitruvian CSMP175 User manual