Speaker
SP-S4046
Quick Start Guide / Guide de démarrage rapide
Guida rapida / / Schnellstartanleitung
Guía de inicio rápido /
Printed in China
Rev, 1
S401/S461
Contents
• Speaker x 2 • Speaker wire (1500mm) • Mounting bracket x 4 • Extension block for S401 x 4
• Speaker screws (10mm length) x 12 • Quick Start Guide • Pad x 2 • Clamp x 2
Follow these steps to connect the speaker to your LCD monitor
1. Turn off the power to the LCD monitor.
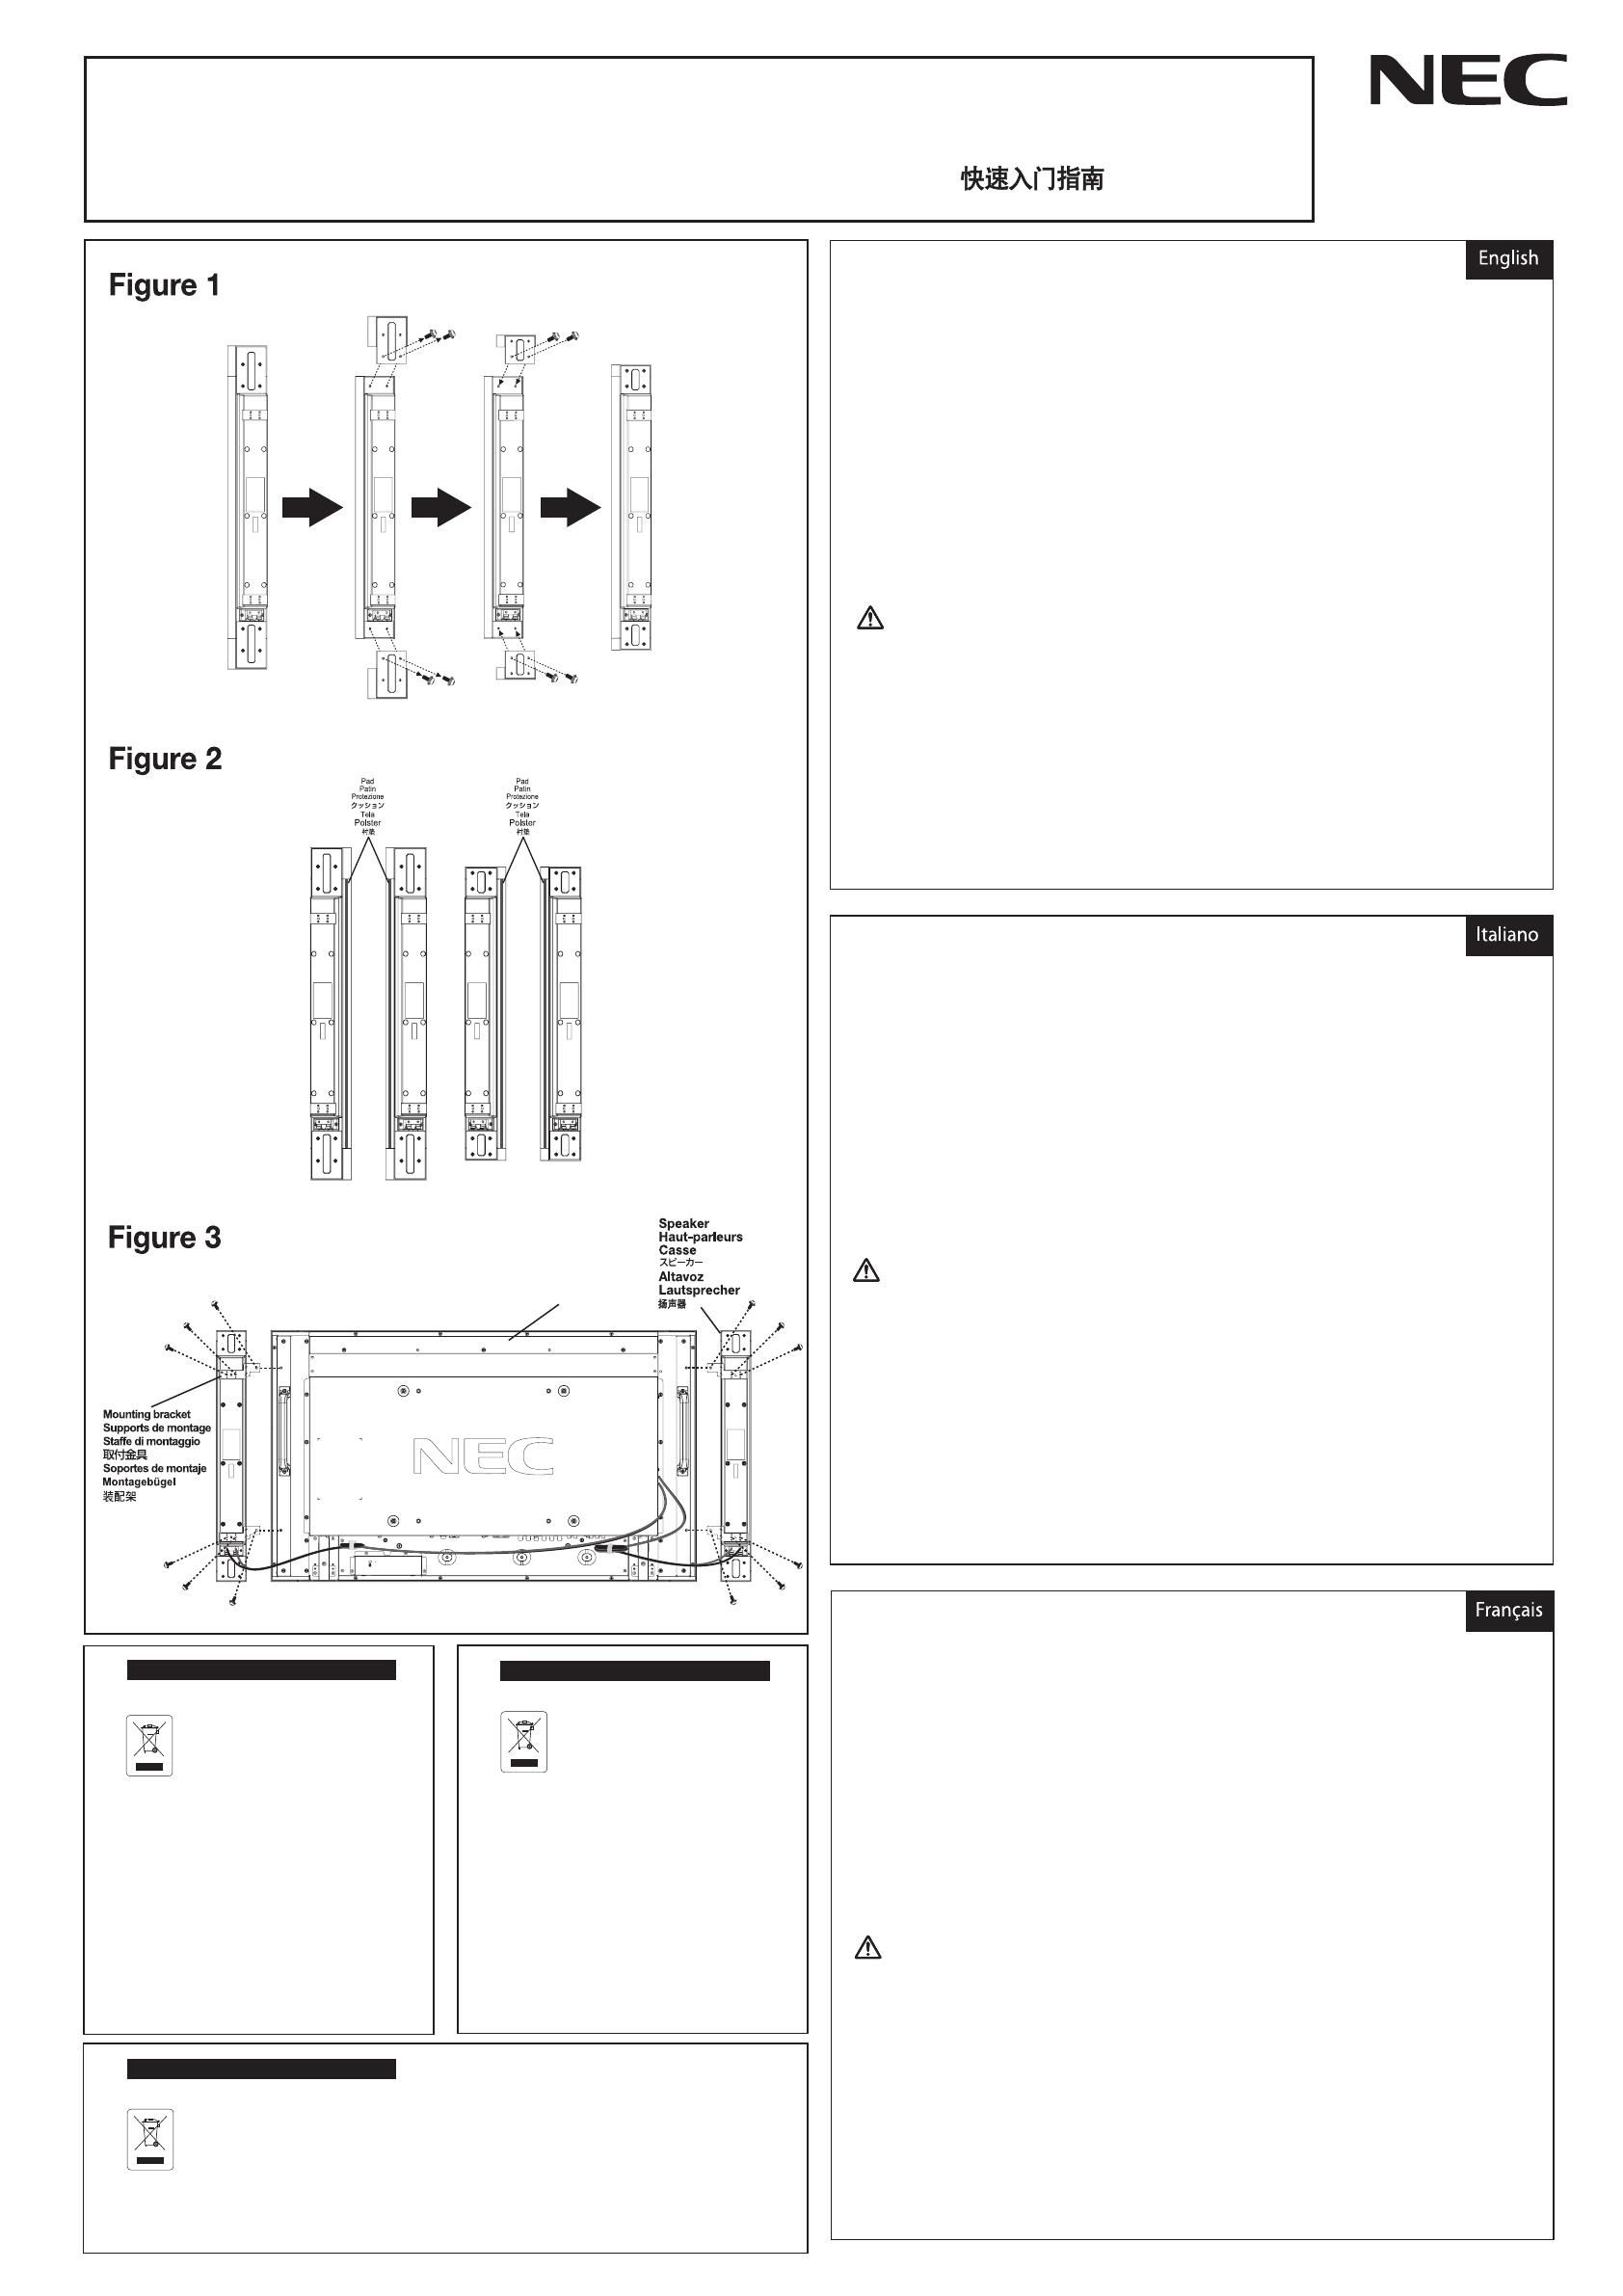
2. If mounting speakers on the S461, proceed to step 3. If the speakers will be mounted on the S401, you
will need to change the extension blocks on the ends. Remove the four screws attached to the speaker
and extension blocks. Use the same screws to attach the extension blocks for S401 to the speaker.
Repeat for other block. (Figure1)
3. Attach the pad to each speaker. (Figure2)
4. Screw appropriate mounting brackets into appropriate position on each speaker (2 brackets per speaker).
Use the brackets labeled (R) on the right speaker and brackets labeled (L) on the left speaker.
5. Attach mounting bracket / speakers to the LCD monitor using one (1) black 10mm screw (included)
per bracket. (Figure3)
6. Once both speakers are attached to the LCD monitor, connect the speaker wires first to the terminals on the
LCD and then to the terminals on the attached speakers. (Figure3)
The red wire (+) connects to the red (+) terminal on the speaker.
The black wire (-) connects to the black (-) terminal on the speaker.
To manage excess speaker wire, coil the speaker wire and wrap it using included clamp.
7. Turn the LCD monitor power on.
Do not hold the display by the speakers when moving or shifting the display.
Troubleshooting
No speaker sound
• Check that the speaker wire is correctly attached to the LCD monitor and to each speaker terminal.
• Check the volume setting.
• Check the mute button.
Cleaning the Cabinet
• Follow the “Recommended Use” in the display’s user manual.
Specifications
• Power 15W + 15W@8 ohm
• Frequency response 100Hz - 25kHz
• Dimension* (Net) 70.0mm(W) x 655.8mm(H) x 59.0mm(D) / 2.9(W) x 25.8(H) x 2.3(D) inch
• Weight* (Net) 1.4 kg / 3.0 lbs
*Measurements shown are for each individual speaker
Contenuti
• 2 Casse • Cavo casse (1.500 mm) • 4 Staffe di montaggio • Modulo di espansione per S401 x 4
• 12 Viti casse (da 10 mm) • Guida rapida • 2 Protezioni • 2 fermagli
Attenersi alle seguenti istruzioni per collegare le casse al monitor LCD
1. Disattivare l’interruttore d’alimentazione del monitor LCD.
2.
Se si stanno montando le casse sul modello S461, passare al punto 3. Se si vogliono montare le casse sul S401, è
necessario cambiare i moduli di espansione situati all’estremità delle casse. Rimuovere le quattro viti che fissano la
cassa e i moduli di espansione. Usare le stesse quattro viti per attaccare i moduli di espansione per S401 alla cassa.
Ripetere con l'altro modulo. (Figura 1)
3. Attaccare la protezione su ciascuna cassa. (Figura 2)
4. Montare le staffe di montaggio nella posizione corretta su ciascuna cassa (2 staffe per cassa).
Usare le staffe contrassegnate con (R) della cassa destra e le staffe contrassegnate con (L) della cassa sinistra.
5. Montare il gruppo staffa/cassa sul monitor LCD usando una (1) vite da 10 mm (fornito) per staffa. (Figura 3)
6. Una volta che entrambe le casse sono attaccate al monitor LCD, collegare i cavi delle casse ai terminali sul
monitor LCD e poi ai terminali delle casse. (Figura 3)
Il cavo rosso (+) si collega al terminale rosso (+) della cassa.
Il cavo nero (-) si collega al terminale nero (-) della cassa.
Per gestire il cavo in eccesso: arrotolare il cavo e fermarlo usando il fermaglio fornito in dotazione.
7. Accendere il monitor LCD
Quando si sposta il monitor, non afferrarlo per le casse.
Risoluzione dei problemi
Assenza sonoro casse
• Controllare che il cavo delle casse sia collegato in modo corretto, ed ai terminali corretti del monitor LCD e delle
casse.
• Controllare il volume delle casse.
• Controllare il tasto Mute.
Pulizia del mobile
• Seguire le raccomandazioni d’uso del Manuale.
Specifiche
• Potenza 15W + 15W a 8 ohm
• Risposta di frequenza 100Hz - 25kHz
• Dimensioni* (Netto) 70,0 mm (L) x 655,8 mm (A) x 59,0 mm (P) / 2,9 (L) x 25,8 (A) x 2,3 (P) pollici
• Peso* (Netto) 1,4 kg / 3.0 libbre
*Le misure indicate fanno riferimento ad ogni singola cassa
Disposing of your old NEC product
Smaltimento del prodotto NEC usato
Within the European Union
EU-wide legislation, as implemented in each
Member State, requires that waste electrical
and electronic products carrying the mark
(le) must be disposed of separately from
normal household waste. is includes monitors and
electrical accessories, such as single cables or power
cords. When you need to dispose of your NEC display
products, please follow the guidance of your local
authority, or ask the shop where you purchased the
products, or if applicable, follow any agreements made
between yourself and NEC.
e mark on electrical and electronic products only
applies to the current European Union Member States.
Outside the European Union
If you wish to dispose of used electrical and electronic
products outside the European Union, please contact
your local authority so as to comply with the correct
disposal method.
Nell'Unione Europea
La legislazione in vigore nell'UE e applicata dal
singolo Stato Membro prevede che i prodotti
elettrici ed elettronici dismessi che recano il
simbolo illustrato a sinistra debbano essere
smaltiti separatamente rispetto agli altri riuti domestici.
Questo comprende i monitor e gli accessori elettrici, come i
cavi segnali o di alimentazione. Per smaltire i monitor NEC,
pertanto, occorre informarisi presso gli enti locali oppure
Elimination des anciens produits NEC
Au sein de l’Union Euroréenne
La législation en vigueur dans tous les états membres
de l’Union Euroréenne exige que tous les déchets
électriques et électroniques portant le symbole ci-
contre (à gauche) ne soient pas mélangés au reste des
déchets ménagers lors de leur élimination. Ceci inclut notamment les
moniteurs et accessoires électriques, tels que les câbles-signaux et les
cordons d’alimentation. Lorsque vous devez vous débarrasser de vos
produits d’achage NEC, des autorités veuillez suivre les
recommandations locales ou demander conseil auprès du revendeur
qui vous a vendu le produite en question. Vous pouvez aussi respecter
tout accord passé entre NEC et vous-même, le cas échéant. Ce
symbole présent sur les produits électriques et électroniques ne
s’applique qu’aux membres actuels de l’Union Européenne.
En dehors de l’Union Européenne
Si vous souhaitez vous débarrasser de produits électriques ou
électroniques usagés en dehors de l’Union Euroréenne, veuillez
contacter les autorités locales concernées pour respecter les modes de
traitement acceptés.
chiedere al punto vendita dove è stato acquistato il prodotto;
in alternativa, occorre attenersi a quanto contenuto nei
contratti stipulati tra voi e NEC.
Il contrassegno sui prodotti elettrici ed elettronici viene
applicato unicamente ai paesi che fanno parte dell'Unione
Europea.
Fuori dall'Unione Eurorea
Se si desidera smaltire dei prodotti elettrici ed elettronici
fuori dall'Unione Europea, contattare gli enti locali
competenti al ne di applicare il metodo corretto di
smaltimento.
For S461
For S401
For S461
For S401
Contenu
•
Haut-parleur x 2
•
Fil de haut-parleur (1500mm)
•
Support de montage x 4
•
Bloc d’extension du S401 x 4
• Vis de haut-parleurs (longueur 10mm) x 12 • Guide de démarrage rapide • Patin x 2 • Attache x 2
Suivez ces étapes pour brancher les haut-parleurs sur votre moniteur LCD
1. Éteignez le bouton d’alimentation du moniteur LCD.
2. Si vous devez fixer les haut-parleurs au S461, passez à l’étape 3. Si les haut-parleurs doivent être installés sur
le S401, vous devrez changer les blocs d’extension des extrémités. Retirez les quatre vis fixées au haut-parleur
et aux blocs d’extension. Utilisez ces mêmes vis pour fixer les blocs d’extension du S401 au haut-parleur.
Répétez l’opération pour l’autre bloc. (Figure 1)
3. Fixez le patin sur chaque haut-parleur. (Figure 2)
4. Vissez les supports de montage appropriés à leur position prévue sur chaque haut-parleur (2 supports par haut-parleur).
Utilisez les supports étiquetés (R) sur le haut-parleur droit et les supports étiquetés (L) sur le haut-parleur gauche.
5.
Vissez les supports de montage/haut-parleurs sur le moniteur LCD à l’aide d’une (1) vis noire de 10mm (incluse) par support. (Figure3)
6. Une fois que les deux haut-parleurs sont fixés au moniteur LCD, branchez les fils des haut-parleurs sur les
bornes du moniteur LCD puis sur les bornes des haut-parleurs attachés. (Figure3)
Le fil rouge (+) se branche sur la borne rouge (+) du haut-parleur.
Le fil noire (-) se branche sur la borne noire (-) du haut-parleur.
Pour gérer le surplus de fil de haut-parleur, enroulez-le et faites-en une bobine à l’aide de l’attache fournie.
7. Allumez l’alimentation du moniteur LCD.
Ne tenez pas l’écran par les haut-parleurs lorsque vous le déplacez.
Dépannage
Aucun son dans les haut-parleurs
• Vérifiez que le fil du haut-parleur est correctement attaché au moniteur LCD et que chaque haut-parleur est
branché sur chaque borne de haut-parleur.
• Vérifiez le réglage de volume sur les haut-parleurs.
• Vérifiez le bouton de coupure du son.
Nettoyage du boîtier
• Suivez l’utilisation recommandée dans le mode d’emploi de l’écran.
Spécifications
• Puissance 15W + 15W@8 ohms
• Réponse en fréquences 100Hz - 25kHz
• Dimensions* (Nettes) 70,0mm(L) x 655,8mm(H) x 59,0mm(P) / 2,9(L) x 25,8(H) x 2,3(P) pouces
• Poids* (Net) 1,4 kg / 3,0 livres
*Les dimensions indiquées correspondent à chaque haut-parleur
