PRISM HARDSCAPES Porto User manual

Type
User manual

PRISM HARDSCAPES Porto is a versatile and durable door accessory designed to provide a seamless and functional connection between your door and its frame. With its sturdy construction and easy installation process, the Porto unit is ideal for both residential and commercial applications. The included brackets and hinges make it simple to attach the unit to your door, ensuring a secure and stable fit.

PRISM HARDSCAPES Porto is a versatile and durable door accessory designed to provide a seamless and functional connection between your door and its frame. With its sturdy construction and easy installation process, the Porto unit is ideal for both residential and commercial applications. The included brackets and hinges make it simple to attach the unit to your door, ensuring a secure and stable fit.

Porto
Replacement Door
Installation Manual
There are two sets of metal pieces that connect the Porto unit to the door. One set goes on the unit
itself and the other goes on the door, then these sets connect to each other to make the door
functional. There are also two screws per piece (included)
If brackets are not on already on unit, lightly screw them into their designated areas (do not tighten,
leave very loose!) using the screws provided (two per bracket). If brackets are already installed, loosen
them to make it easier to install door.
Bracket installed directly on unit
Hinge installed on door
5/8 flathead
machine screws
Before bracket installation
After bracket installation
Door Hinge Installation
On the door there are two predesignated areas for the hinges and their corresponding screws, these you
may tighten fully. Lift door carefully, it is heavy!
Carefully lift the door and install on unit by hooking the bottom hinge first and then the top.
On the door hinge you will notice there are two small bars with a clip on the outer end that opens when
pinched.
The two bars will fit into the two hooks on the bracket, hook the side opening into the hook as shown
Before hinge installation
After hinge installation
How to position hinge and screws
Bars
Clip
Hook 1
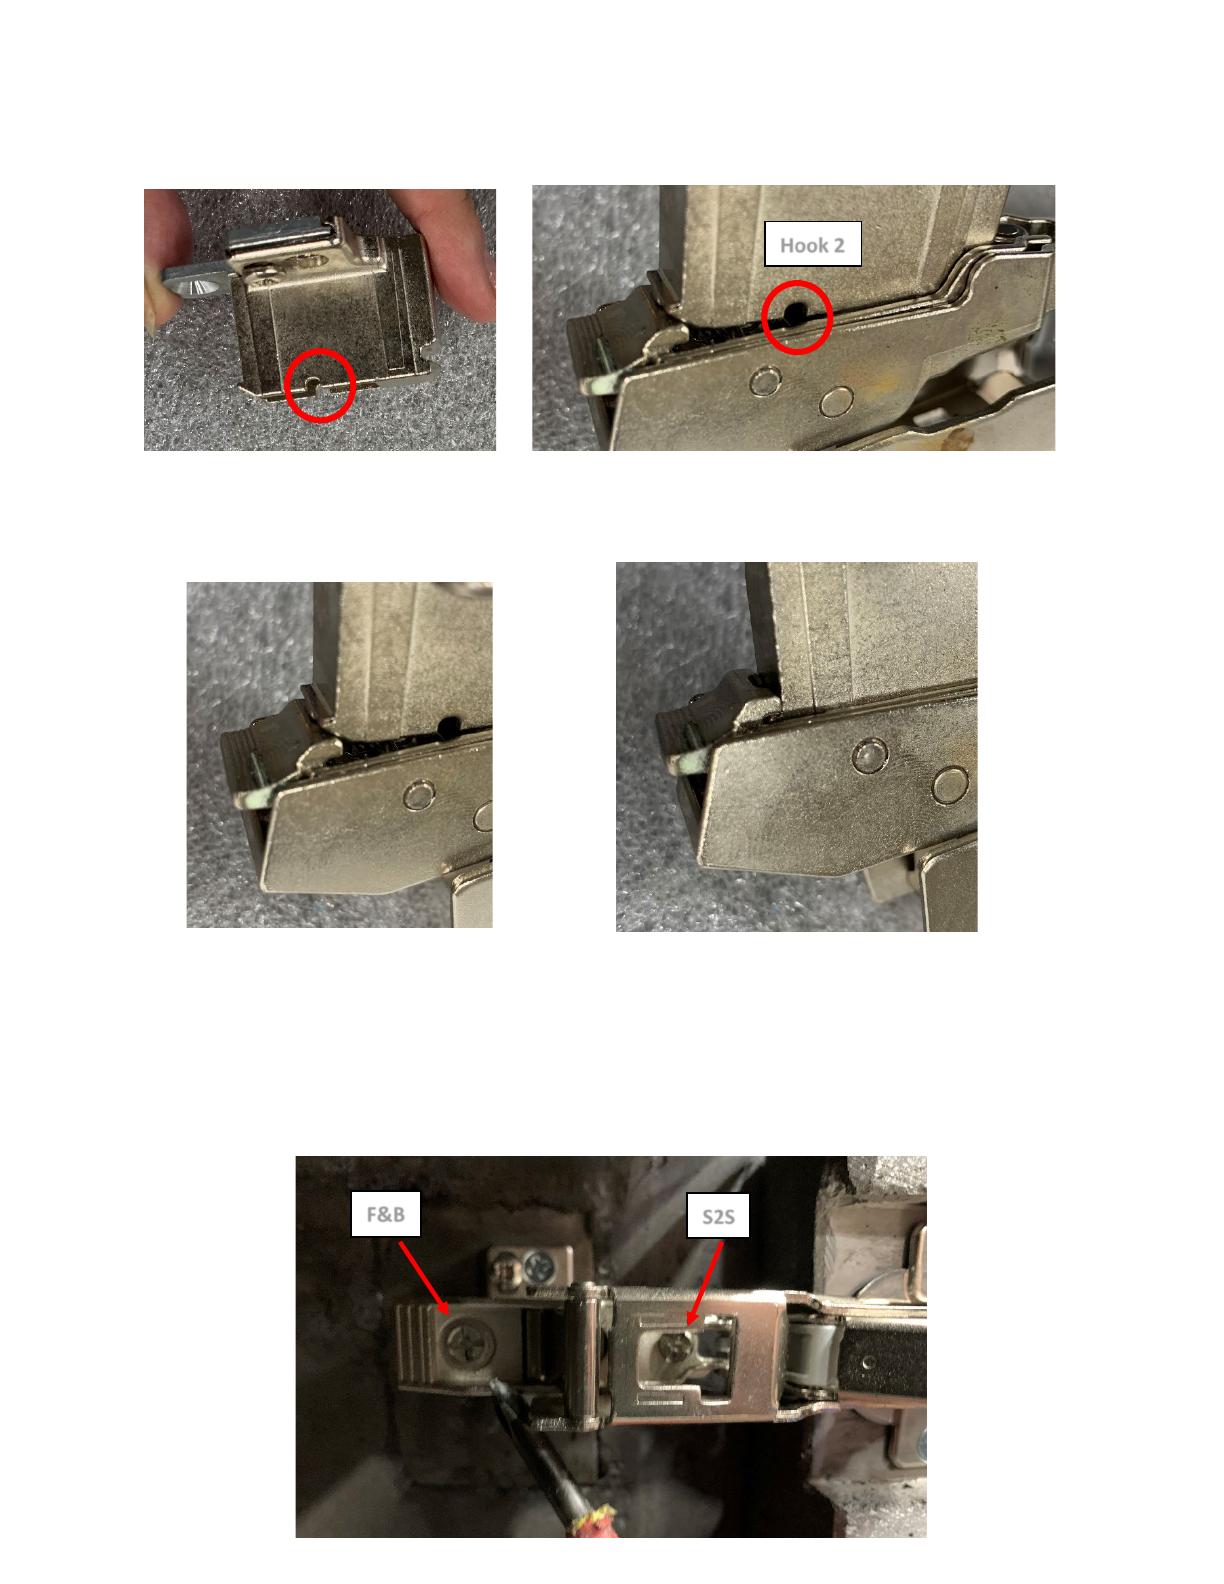
Then push the hinge into the bracket. The second hook should line up to the second bar in the hinge.
You’ll notice the lip on the bracket lines up with the clip on the hinge. Apply light pressure and the clip
will open and close around this lip.
Once you have latched both hinges to their corresponding brackets, you may now fully tighten the
mounting screws on the brackets- be careful not to overtighten!
Next, you will need to adjust the door into its final position. There are two screws on the hinge, one will
move the door forwards and backwards and the other side to side. First tighten the F&B screw, turn a
few times until can longer easily turn, and do not overtighten!
Hook 2
S2S
Now you will need to insert your screwdriver into the opening on the hinge to find the side-to-side
screw. This will move the door further away from the unit to avoid rubbing and damage. This screw may
not need to be tightened all the way. Adjust both the top hinge and bottom hinge screws at the same
pace. Carefully and slowly close the door until it cleanly fits into its space.
You may need to adjust all screws several times to make the door flush with the unit. Be careful not to
overtighten any screws. Do not ever lean or rest on the door, it is not built to take any weight.
  • Page 1 1
  • Page 2 2
  • Page 3 3
  • Page 4 4
  • Page 5 5
  • Page 6 6

PRISM HARDSCAPES Porto User manual

Type
User manual

PRISM HARDSCAPES Porto is a versatile and durable door accessory designed to provide a seamless and functional connection between your door and its frame. With its sturdy construction and easy installation process, the Porto unit is ideal for both residential and commercial applications. The included brackets and hinges make it simple to attach the unit to your door, ensuring a secure and stable fit.

Ask a question and I''ll find the answer in the document

Finding information in a document is now easier with AI