Page is loading ...

FR-NL
SCD720


English
1
8 9 10 11
6
7
2 3 4 5
1
6
English

Introduction
Go to www.philips.com/welcome to register your product and to read the
detailed user manual.
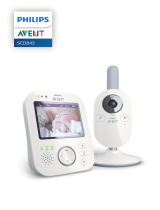
Display of the parent unit (Fig. 1)
1 Signal strength indicator
2 Night dim mode symbol
3 Cry alert indicator
4 Mute symbol
5 Battery status indicator
6 Navigation arrow
7 Temperature symbol
8 Microphone sensitivity indicator
9 Nightlight symbol
10 Lullaby symbol
11 Timer or timer repeat symbol
Preparing for use
IMPORTANT: Read the safety instructions carefully before you use the
baby monitor and keep them for future reference.
Baby unit
We advise you to use the baby unit connected to the mains. To guarantee
automatic power backup in case of mains failure, you can insert four 1.5V AA
alkaline batteries (not included).
Do not use rechargeable batteries. The baby unit does not have a charging
function and rechargeable batteries discharge slowly when they are not in
use.
Parent unit
The parent unit runs on a battery pack that is supplied with the baby
monitor. Charge the parent unit before you use it for the first time and when
the batteries are low.
Please note that for the SCD720, you have to charge the parent unit for
the full 10 hours to have a cordless operating time of 18 hours.
Note: When you start using the baby monitor, it takes 4 charge and
discharge cycles before the battery pack reaches its full capacity.
7
English

Using the baby monitor
Positioning the baby monitor
Keep the baby unit out of the reach of the baby. Never place the
baby unit inside the baby’s bed or playpen.
-
Because the cord of the baby unit presents a potential strangulation
hazard, make sure that the baby unit and its cord are at least 1 metre/3.5
feet away from your baby.
-
To prevent a high-pitched sound from one or both units, make sure that
the parent unit is at least 1 metre/3.5 feet away from the baby unit.
Linking parent unit and baby unit
1 Press and hold the button on the baby unit for 2 seconds until the
power-on light goes on.
2 Press and hold the button on the parent unit for 2 seconds until the
display lights up. The 'link' light on the parent unit starts flashing red and
the message 'I AM LINKING' appears on the display.
When the parent unit and baby unit are linked, the 'link' light turns solid
green. The signal strength indicator and the message 'LINKED' appear on
the display.
If no connection is established, the message 'NOT LINKED' is displayed
and the parent unit starts and the parent unit starts to beep.
What to do if no link is established
-
If the parent unit is out of range, place it closer to the baby unit, but not
closer than 1 metre/3.5 feet.
-
If the baby or parent unit is too close, <2 m/6.5 ft away from another
DECT appliance (e.g. a cordless phone), switch off this appliance or move
the unit away from this appliance.
-
If the baby unit is switched off, switch it on.
Operating range
-
The operating range is 330 metres/1000 feet outdoors and up to 50
metres/150 feet indoors.
-
The operating range of the baby monitor varies depending on the
surroundings and factors that cause interference. Wet and moist
materials cause so much interference that the range loss is up to 100%.
For interference from dry materials, see the table below.
Dry materials Material thickness Loss of range
Wood, plaster, cardboard,
glass (without metal, wires
or lead)
< 30 cm (12 in) 0-10 %
Brick, plywood < 30 cm (12 in) 5-35 %
Reinforced concrete < 30 cm (12 in) 30-100 %
8
English

Dry materials Material thickness Loss of range
Metal grilles or bars < 1 cm (0.4 in) 90-100 %
Metal or aluminium sheets < 1 cm (0.4 in) 100 %
Functions and feedback on the baby unit
Nightlight
The nightlight produces a soft glow that comforts your baby.
1 Press the button on the baby unit to switch the nightlight on or off.
Lullaby function
1 Press the button on the baby unit to play the last selected lullaby. The
selected lullaby repeats for 15 minutes.
2 Press the button to select another lullaby from the list.
3 To adjust the sound level of the lullaby, press the volume + or the volume
– button the baby unit.
Note: You can only set the loudspeaker volume on the baby unit when a
lullaby is playing. If you set the volume for the lullaby higher, the sound
will also be louder when you use the talk function on the parent unit.
4 To stop lullaby playing, press the button on the baby unit.
Paging the parent unit
If you have lost the parent unit, you can use the FIND button on the baby
unit to locate the parent unit. This function only works when the parent unit
is switched on and within range.
9
English

1 Press FIND on the baby unit. The parent unit produces a paging alert
tone.
2 To stop the paging alert tone, press FIND on the baby unit again or press
any button on the parent unit. The paging alert tone stops automatically
after 2 minutes.
Battery status light
1 The battery status light is solid green when the baby unit is operating on
battery power and the batteries contain enough energy.
2 The battery status light flashes red quickly when the batteries run low
while the baby unit is operating on battery power. Replace the batteries
when they run low.
Functions and feedback on the parent unit
Volume
The volume can be set if the menu is not active. There are seven volume
levels and a 'volume off' setting.
Setting the volume level
1 Press the + button or the - button once.
The current volume level appears on the display.
2 Press the + button to increase the volume or press the - button to
decrease the volume.
If no button is pressed for more than 2 seconds, the volume level
indication disappears from the display and the volume setting is saved.
Volume off
Below the lowest volume setting, there is a 'volume off' setting.
1 Press the + button or the - button once.
The current volume level appears on the display.
2 Press and hold the - button for more than 2 seconds to set the volume to
off.
The message 'MUTE' and the mute symbol appear on the display. Only
the sound level lights show that the baby produces sounds.
10
English

Talk function
1 If you want to comfort your baby, press TALK on the parent unit and talk
clearly into the microphone on the front from a distance of 15-30 cm
(0.5-1 ft).
The 'link' light starts flashing green and 'TALK' appears on the display.
Note: If you have set the volume of the lullaby higher on the baby unit,
the sound will also be louder when you use the talk function on the
parent unit.
2 Release TALK when you have finished talking.
Night dim mode
In night dim mode, the light intensity of the lights and the display is reduced
and the volume of alert sounds is decreased.
1 Press the button to activate the night dim mode. The night dim mode
symbol appears on the display.
2 Press the button again to switch back to normal operating mode.
Baby unit battery low alert
1 When the baby unit runs on battery power and its batteries are low, the
parent unit beeps and the text 'BABY UNIT CHANGE BATTERIES' appears
on the display.
2 If you do not replace the batteries in time, the link with the baby unit will
be lost.
Battery status indications
Battery low
When the rechargeable batteries are low, 'BATTERY LOW' appears on the
display, the status indicator is empty and flashes, and the parent unit beeps.
The remaining operating time is at least 30 minutes.
Battery empty
1 If the battery is almost empty, the battery status light flashes red quickly.
2 If you do not connect the parent unit to the mains, it switches off.
11
English

Menu of the parent unit
Navigating the menu
Note: Some menu functions only work when the baby unit and the parent
unit are linked.
1 Press the MENU button to open the menu and to make the first menu
option appear.
2 Use the + button to go to the next option or the - button to go to the
previous option. The arrow on the display indicates in which direction
you can navigate.
3 Press OK to confirm your selection.
Note: Press the MENU button if you want to leave the menu without making
any changes. If there is no input in the menu for more than 20 seconds, the
menu closes automatically.
12
English

Sensitivity
This option in the parent unit menu allows you to set the microphone
sensitivity of the baby unit.
The microphone sensitivity determines what noise level the baby unit picks
up, e.g. you will want to hear when your baby cries, but you may be less
interested in its babbling.
1 Select ‘Sensitivity’ in the menu with the + and - buttons and press OK to
confirm.
2 Use the + and - buttons to increase or decrease the microphone
sensitivity. The number of filled segments shows the sensitivity level
selected. Press OK to confirm the setting.
Sensitivity levels and indications
Icon Sensitivity Description
highest Hear everything from your baby.
The speaker of the parent unit is
continuously on.
high Hear all sounds from soft
babbling and louder. If your
baby does not make any sound,
the speaker of the parent unit is
off.
medium Hear sounds from soft cries and
louder. If your baby makes softer
sounds, the speaker of the
parent unit does not go on.
low The speaker of the parent unit
only goes on if the baby makes
loud sounds, for instance
because it is crying.
Smart Eco
Smart Eco is a standard feature on this baby monitor. It automatically
reduces the DECT signal from the baby unit to save energy.
Nightlight
1 To switch the nightlight on the baby unit on, select 'Nightlight' in the
menu with the + and - buttons and press OK to confirm.
2 Use the + and - buttons to choose 'Turn On'. The nightlight symbol
appears on the display.
3 When the nightlight is on and you want to switch it off, select 'Nightlight'
in the menu and press OK to choose 'Turn Off'.
13
English

Lullaby
1 To play one or more lullabies on the baby unit, select 'Lullaby' in the
menu with the + and - buttons. Press OK to confirm.
2 Press OK again to play the first lullaby. Use the + and - buttons to select
one of the lullabies or 'Play all'.
The display shows the lullaby symbol and the number of the lullaby that
is playing. The selected lullaby repeats continuously for 15 minutes,
unless you select 'stop' in the menu.
If you select 'Play all', all pre-stored lullabies are played for 15 minutes.
The display shows the number of the lullaby that is playing.
3 To stop playing, select 'Stop' in the menu and press OK to confirm.
Feed timer
You can set the feed timer to alert you that it is time to feed your baby. The
timer can be set from 1 minute to 23 hours and 59 minutes.
1 To open the feed timer submenu, select 'Feed Timer' in the menu. Press
OK to confirm.
2 Select 'Set Timer' in the feed timer submenu. Press OK to start setting the
timer.
3 Set the hour and the minutes and press OK to confirm.
4 To start the feed timer, select 'xx:xx Start' in the feed timer submenu.
Press OK to confirm. The timer symbol appears on the display and the
timer starts counting down.
5 When the timer has reached 00:00, the feed timer alert goes off, the
timer symbol starts flashing on the display and the message 'TIMER END'
scrolls across the display.
6 To stop the timer, select 'Stop & Reset' in the feed timer submenu and
press OK to confirm.
Setting the feed timer repeat
1 To make the feed timer go off after the same set time, select ‘Timer
repeat’ in the feed timer submenu after you have set the timer. Press OK
to confirm.
2 Choose ‘Repeat ON’ or ‘Repeat OFF’ and press OK to confirm. The timer
repeat symbol appears on the display.
3 If ‘Repeat ON’ is set, the feed timer starts counting down again after you
stop the alert.
14
English

Setting a feed timer alert
1 To set an alert, select 'Timer Alert' in the feed timer submenu. Press OK to
confirm.
2 Choose one of the alert options. The options available are sound only,
sound and vibration and vibration only.
3 Press any key to stop the alert or the alert stops automatically after 2
minutes.
4 To stop the timer, select 'Stop & Reset' in the feed timer submenu and
press OK to confirm.
Room temperature
A baby sleeps comfortably at a temperature between 16°C/61°F and
20°C/68°F. You can set a minimum and a maximum temperature range
and an alert.
1 To open the temperature submenu, select 'Temperature' in the menu.
Press OK to confirm.
2 Select 'Temp Range' in the temperature submenu and press OK to
confirm.
3 Use the + and - buttons to set the minimum temperature range between
10°C/50°F and 19°C/66°F and the maximum temperature range
between 22°C/72°F and 37°C/99°F. Press OK to confirm.
4 Select 'Alert' in the temperature submenu. Press OK to confirm.
5 Choose one of the alert options. The options available are sound only,
sound and vibration,vibration only and display only. Press OK to confirm.
The temperature alert symbol appears on the display.
6 Select 'Temp Scale' in the temperature submenu. Press OK to confirm.
7 Select 'Celsius' or 'Fahrenheit' and press OK to confirm. The temperature
in the set scale appears on the display.
If the temperature is within the set range, the temperature alert symbol
has two segments.
If the temperature is below or above the set range, the temperature alert
symbol on the display has only one segment and flashes. The message
'TOO COLD' or 'TOO HOT' appears on the display.
Cry alert
You can set a cry alert to warn you that the baby is crying.
1 Select 'Cry alert' in the menu with the + and - buttons. Press OK to
confirm.
15
English

2 When the display shows 'Vibration ON', press OK to confirm. The cry alert
indicator appears on the display.
The cry alert goes off when the sound in the baby room is loud enough to
make the fourth sound level light go on. The parent unit vibrates and the
message 'Cry alert' appears on the display for 4 seconds. The cry alert
repeats every 8 seconds until the sound becomes less loud or you
deactivate the cry alert.
3 To deactivate the cry alert, select 'Cry alert' in the menu. When the
display shows 'Vibration OFF', press OK to confirm.
Clock
The default setting for the clock is hidden. You can choose to show the clock
and set the clock time in the menu of the parent unit.
1 Select 'Set clock' in the menu with the + and - buttons. Press OK to
confirm.
2 Select 'Show Time' and press OK to confirm.
3 Select 'Set the time' and press OK to confirm.
4 Set the hour and the minutes and press OK to confirm.
The clock time alternates with other indications in the message field of
the display.
Language
You can use this menu option to change the language setting.
1 Select ‘Set language’ in the menu with the + and - buttons. Press OK to
confirm.
2 Use the + and - buttons to select your language and press OK to confirm.
Key lock
You can activate the key lock to prevent the buttons from being pressed
accidentally while you carry the parent unit around.
1 To activate the key lock, press OK.
2 Press the + button within 2 seconds.
Note: If you do not press the + button within 2 seconds, the instruction
remains on the display.
3 After you have pressed the + button, the message 'Keys locked' appears
on the display.
4 To deactivate the key lock, press OK. When the display shows the
instruction message, press the + button within 2 seconds.
Notes:
-
When you press a button other than OK while the key lock is active, the
display goes on and the second line on the display tells you how to
deactivate the key lock.
-
When you press OK while the key lock is active, the second line on the
display tells you what second step is necessary to unlock the buttons.
16
English

Warranty and support
If you need information or support, please visit www.philips.com/support or
read the international warranty leaflet.
< >
< >
< >
>
<
>
< >
<
< >
>
< >
< >
< >
<
>
<
< > >
<
<
Sensitivity
Cry Alert
Feed Timer
Temperature
Set Clock
Set Language >
Press OK = < =
Timer Alert
Vibrate On?
Vibrate O?
xx:yy Start?
Set Timer
Timer Repeat
Temp Range
Temp Alert
Temp Scale
Show/Hide
Set The Time
English
...
Русский
<
<
<
<
<
<
<
<
>
>
>
>
>
>
>
>
>
>
>
Minimum XXºF
Hr 00:00
Hr 00:00
Repeat ON
Repeat OFF
Sound only
Sound & Vibe
Vibrate only
Sound only
Sound & Vibe
Vibrate only
Screen only
O
>
< >
<
<
>
< >
>
<
Play 1?
Play 2?
...
Play 5?
Play All?
Celsius
Fahrenheit
Hide Clock
Show Clock
Maximum YYºF
00:30 Min
00:00 Min
< >
< >
Nightlight
Lullaby
Turn On?
Turn O?<
>
SCD720
> =
17
English

Español
1
8 9 10 11
6
7
2 3 4 5
1
18
Español

Introducción
Vaya a www.philips.com/welcome para registrar su producto y leer el
manual de usuario detallado.
Pantalla de la unidad para padres (Fig. 1)
1 Indicador de intensidad de la señal
2 Símbolo de modo de atenuación nocturna
3 Indicador de alerta de llanto
4 Símbolo del modo silencio
5 Indicador de estado de la batería
6 Flecha de desplazamiento
7 Símbolo de temperatura
8 Indicador de sensibilidad del micrófono
9 Símbolo de luz nocturna
10 Símbolo de canción de cuna
11 Temporizador o símbolo de repetición del temporizador
Preparación para su uso
IMPORTANTE: Lea atentamente las instrucciones de seguridad antes de
usar el monitor de bebé y consérvelas para futuras consultas.
Unidad para el bebé
Le recomendamos que use la unidad de bebé conectada a la corriente
eléctrica. Para garantizar el respaldo automático de energía en caso de
fallos en la corriente eléctrica, puede usar cuatro baterías alcalinas AA de 1.5
V (no incluidas).
No use baterías recargables. La unidad de bebé no tiene una función de
carga y las baterías recargables se descargan lentamente cuando no están
en uso.
Unidad para padres
La unidad para padres funciona con un paquete de baterías suministrado
con el monitor de bebé. Cargue la unidad para padres antes de usarla por
primera vez y cuando las baterías estén bajas.
Tenga en cuenta que para el modelo SCD720 se tiene que cargar la unidad
para padres durante 10 horas completas para tener un tiempo de
operación autónoma (sin cable) de 18 horas.
Nota: Cuando comienza a usar el monitor de bebé, se requiere 4 ciclos de
carga y descarga antes de que el paquete de baterías alcance su capacidad
completa.
19
Español

Uso del monitor para bebés
Ubicación del monitor para bebés
Mantenga la unidad de bebé fuera del alcance del bebé. Nunca
coloque la unidad del bebé en el interior de la cuna o el corral.
-
El cable de la unidad del bebé presenta posibles riesgos de
estrangulación, por lo que debe asegurarse de que la unidad para el
bebé y su cable estén por lo menos a 1metro (3.5pies) del bebé.
-
Para evitar que el sonido de una o ambas unidades sea muy agudo,
asegúrese de que la unidad para padres esté por lo menos a 1metro
(3.5pies) de la unidad del bebé.
Conexión de la unidad para padres y la unidad del bebé
1 Mantenga pulsado el botón de la unidad del bebé durante 2segundos
hasta que la luz de encendido se ilumine.
2 Mantenga pulsado el botón de la unidad para los padres durante
2segundos hasta que la luz de la pantalla se ilumine. La luz 'link' de la
unidad para padres comienza a parpadear y el mensaje 'I AM LINKING'
(Estoy conectando) aparece en la pantalla.
Cuando la unidad para padres y la unidad para bebés están conectadas,
la luz de conexión se ilumina en verde de forma permanente. El indicador
de intensidad de la señal y el mensaje 'LINKED' (Conectado) aparecen en
la pantalla.
De no establecerse la conexión, el mensaje 'NOT LINKED' (Sin conexión)
aparece en la unidad para padres y emite un sonido.
Qué hacer si no se establece la conexión
-
Si la unidad para padres está fuera del rango de alcance, colóquela más
cerca de la unidad del bebé, pero a una distancia mínima de 1 metro (3.5
pies).
-
Si la unidad del bebé y la unidad para padres están demasiado cerca, <2
metros (6.5 pies) de otro aparato DECT (por ejemplo, un teléfono
inalámbrico), apague este aparato o aleje la unidad del mismo.
-
Si la unidad del bebé está apagada, enciéndala.
Radio de alcance
-
El alcance de funcionamiento es de hasta 330metros (1000pies) en
exteriores y de hasta 50metros (150pies) en interiores.
-
El alcance de funcionamiento del monitor para bebés varía dependiendo
del entorno y de los factores que causan interferencia. Los materiales
húmedos causan tanta interferencia que la pérdida de alcance puede
alcanzar el 100%. Para información sobre la interferencia de los
materiales secos, vea la siguiente tabla.
20
Español

Materiales secos Grosor del material Pérdida de alcance
Madera, yeso, cartón,
cristal (sin metal, cables o
plomo)
< 30 cm (12 pulgadas) 0-10 %
Ladrillo, madera laminada < 30 cm (12 pulgadas) 5-35 %
Hormigón armado < 30 cm (12 pulgadas) 30-100 %
Rejas o barras metálicas < 1 cm (0.4 pulgadas) 90-100 %
Láminas de metal o
aluminio
< 1 cm (0.4 pulgadas) 100 %
Las funciones y los comentarios en la unidad del
bebé
Luz nocturna
La luz nocturna produce un resplandor suave que tranquiliza al bebé.
1 Presione el botón en la unidad del bebé para encender o apagar la luz
nocturna.
Función de canciones de cuna
1 Presione el botón en la unidad del bebé para reproducir la última
canción de cuna seleccionada. La canción seleccionada se repite por 15
minutos.
2 Presione el botón para seleccionar otra canción de la lista.
21
Español

3 Para ajustar el nivel del sonido de la canción, presione el botón del
volumen + o – de la unidad del bebé.
Nota: Sólo puede ajustarse el volumen del altavoz en la unidad del bebé
durante la reproducción de una canción de cuna. Si pone el volumen de
la canción más alto, cuando use la función del intercomunicador en la
unidad para padres el sonido también será más alto.
4 Para detener la canción, presione el botón en la unidad del bebé.
Localización de la unidad para padres
Si perdió la unidad para padres, puede utilizar el botón FIND (Localizar) de
la unidad del bebé para localizarla. Esta función solo trabaja cuando la
unidad para padres está encendida y dentro del rango de alcance.
1 Presione FIND (Localizar) en la unidad del bebé. La unidad para padres
emite un tono de alerta de localización.
2 Para detener el tono de alerta de localización, pulsede nuevo FIND en la
unidad del bebé o cualquier botón de la unidad para padres. El tono de
alerta de localización se apaga automáticamente después de 2 minutos.
Luz del estado de la batería
1 La luz del estado de las baterías es verde cuando la unidad del bebé
funciona con la energía de las baterías y las baterías tienen energía
suficiente.
2 La luz del estado de carga de las baterías destella en color rojo
rápidamente si las baterías están bajas cuando la unidad del bebé está
funcionando con la energía de las baterías. Sustituya las baterías cuando
se estén agotando.
Funciones y comentarios en la unidad para padres
Volumen
El volumen puede establecerse si el menú no está activo. Hay siete niveles
de volumen y una opción de 'volumen apagado'.
Ajuste del nivel de volumen
1 Pulse el botón + o el botón - una vez.
El nivel del volumen actual aparece en la pantalla.
2 Pulse el botón + para aumentar el volumen o presione el botón -
durante para reducir el volumen.
Si ningún botón se presiona por más de 2 segundos, la indicación del
nivel de volumen desaparece de la pantalla y el ajuste de volumen se
guarda.
22
Español

Volumen apagado
El ajuste de 'volumen apagado' se encuentra debajo de los ajustes de
volumen más bajos.
1 Pulse el botón + o el botón - una vez.
El nivel del volumen actual aparece en la pantalla.
2 Mantenga pulsado el botón - por más de 2 segundos para establecer el
volumen en apagado.
El mensaje 'MUTE' (Silencio) y el símbolo de silencio aparecen en la
pantalla. Solo las luces del nivel de sonido muestran que el bebé
produce sonidos.
Función de intercomunicador
1 Si desea confortar a su bebé, pulse TALK (Intercomunicador) en la unidad
para padres y hable con claridad al micrófono que se encuentra en la
parte frontal a una distancia de 15 a 30 centímetros (0.5 a 1 pies).
La luz 'link' comienza a parpadear en color verde y aparece 'TALK'
(Intercomunicador) en la pantalla.
Nota: Si puso el volumen de la canción de cuna más alto en la unidad del
bebé, el sonido también será más alto cuando use la función del
intercomunicador en la unidad para padres.
2 Cuando haya terminado de hablar, suelte el botón TALK.
Modo de atenuación nocturna
En el modo de atenuación nocturna, la intensidad de las luces y de la
pantalla disminuye y baja el volumen de los sonidos de alerta.
1 Pulse el botón para activar el modo de atenuación nocturna. El
símbolo del modo de atenuación nocturna aparece en la pantalla.
2 Pulse el botón de nuevo para volver al modo de operación normal.
Alerta de batería baja de la unidad del bebé
1 Cuando la unidad del bebé funciona con baterías y estas están bajas, la
unidad para padres emite un sonido y el texto 'BABY UNIT CHANGE
BATTERIES' (Cambiar baterías de la unidad del bebé) aparece en la
pantalla.
23
Español
/