Page is loading ...

Copyrights 2008 Victron Energy B.V.
All Rights Reserved
This publication or parts thereof may not be reproduced in any form, by any
method, for any purpose.
For conditions of use and permission to use this manual for publication in
other than the English language, contact Victron Energy B.V.
VICTRON ENERGY B.V. MAKES NO WARRANTY, EITHER EXPRESSED
OR IMPLIED, INCLUDING BUT NOT LIMITED TO ANY IMPLIED
WARRANTIES OF MERCHANTABILITY OR FITNESS FOR A PARTICULAR
PURPOSE, REGARDING THESE VICTRON ENERGY PRODUCTS AND
MAKES SUCH VICTRON ENERGY PRODUCTS AVAILABLE SOLELY ON
AN “AS IS” BASIS.
IN NO EVENT SHALL VICTRON ENERGY B.V. BE LIABLE TO ANYONE
FOR SPECIAL, COLLATERAL, INCIDENTAL, OR CONSEQUENTIAL
DAMAGES IN CONNECTION WITH OR ARISING OUT OF PURCHASE OR
USE OF THESE VICTRON ENERGY PRODUCTS. THE SOLE AND
EXCLUSIVE LIABILITY TO VICTRON ENERGY B.V., REGARDLESS OF
THE FORM OF ACTION, SHALL NOT EXCEED THE PURCHASE PRICE
OF THE VICTRON ENERGY PRODUCTS DESCRIBED HERE IN.
Victron Energy B.V. reserves the right to revise and improve its products as it
sees fit. This publication describes the state of this product at the time of its
publication and may not reflect the product at all times in the future

1
BATTERY CHARGER Impulse S12/S16
IMPULSE S12 / S16
You now have the instruction manual in front of you that comes with the IMPULSE S
charger of VICTRON ENERGY B.V. with a rated current of 12 or 16 A.
Depending on the present setting, the IMPULSE S can charge lead-acid batteries with a
nominal voltage of 12V
or 24 V.
The IMPULSE S is a full automatic, computer controlled and safeguarded charger.
The safety of the IMPULSE S (IP21) is guaranteed by means of the quality mark TÜV/GS.
In addition the
IMPULSE S has been designed with double insulation.
We advise you to carefully read this instruction manual as well as to observe the Safety
Instructions (Chapter 3)
before taking the IMPULSE S into operation.
Contents
1. SYMBOLS........................................................................... 4
2. DESIGN / SPECIFICATIONS .............................................. 5
3. SAFETY INSTRUCTIONS ................................................... 6
4. BATTERY INSTRUCTIONS ................................................ 6
5. SETUP OF TH CHARGER ....................................... 7
6. CONNECTING CONDITIONS ............................................. 7
7. TAKING THE CHARGER INTO OPERATION .................... 7
8. INDICATIONS .................................................................. 8
9. FAILURE REPORT INDICATIONS ..................................... 8
10. CLEANING AND MAINTENANCE ...................................... 9
11. CONTACTING SERVICE .................................................... 9

2
EN NL FR DE
1. SYMBOLS
The followings show the symbols used.
A triangle containing an exclamation mark indicates important information in these
operating instructions
which is to be strictly followed.
Read instruction manual.
Double insulation
Apparatus containing hazardous substances are marked by this symbol. This symbol also
indicate that it is prohibited to dispose of these apparatus in the household waste. You can
return these apparatus free of charge to the collection points in your community. You thus
fulfill the legal requirements and make your contribution to the protection of the
environment!
This equipment is CE-tested and thus meets the EMC directive
89/336/EEC and the low-voltage directive 73/23/EEC.

3
The GS-symbol (Geprüfte Sicherheit) is a German certification mark, indicating, that the
apparatus satisfies the "Gerätesicherheitsgezetz" (law for safety of apparatus). This has
been tested by TÜV Rheinland.

4
EN NL FR DE
2. DESIGN / SPECIFICATIONS
Primary voltage : 230 Vac - 50/60 Hz - 1-phase
Secondary nominal voltage : 12V or 24V *)
Secondary maximum voltage : 35 V
Secondary current : max. 12 A for Impulse S 12 *)
max. 16 A for Impulse S 16 *)
Battery type : Lead acid: Gel/Wet/AGM *)
Battery capacity : *)
Min. Max.
(in order to charge
80% capacity
Within 8 hours)
Impulse S12 80 Ah 125 Ah
Impulse S16 120 Ah 165 Ah
Protective devices : - protected against reversed polarity
- protected against high temperatures
Input power 450 W with Impulse S12
600 W with Impulse S16
Efficiency : min. 80% (at full load)
Ambient temperature : 0 °C to +40 °C
Dimensions cabinet : Height 80 x Width 180 x Depth 220 mm
Safety class : II
International Protection class : IP 21
Overall weight : 1.6 kg
Transport and storage
Ambient temperature storage : -15°C … +50°C.
Relative air humidity max. : 90 %
(non condensing)
*) can be set by the supplier/dealer
3. SAFETY INSTRUCTIONS
Carefully read the manual and the Safety Instructions.
The IMPULSE S should never be exposed to the rain or be stored in a humid room.
The IMPULSE S is exclusively for indoor application.
Explosion hazard!
Avoid sparking or fire in the immediate environment of the battery.

5
During charging the battery should be placed in a well vented place.
The IMPULSE S contains parts such as switches and relays that may produce sparks.
If charging takes place in a garage or a similar place then the charger should be placed in
such a position that sparking causes no risk.
Never use the charger in a demounted (open) condition. This may be life threatening if
any parts under voltage are touched!
Note: It is never allowed to attempt to charge batteries that cannot be charged.
Never touch the battery clamps if the charger is in operation.
Never move the charger if it is in operation.
Do not use the charger in combination with a faulty cable or plug or if the charger itself is
damaged.
If the mains lead needs replacing this must be done by the service department of your
supplier/dealer.
If the charger does not operate properly then you should first note which failure indication
you observe, next you should remove the plug from the socket and subsequently contact
the service department of your supplier/dealer.
Never attempt to demount or repair the charger yourself. In order to make sure that the
repair is reliable and safe we advise you strongly to have any repairs executed by the
service department of your supplier/dealer.
If this safety instruction, as well as the instruction manual, is ignored then VICTRON
ENERGY B.V. will not be liable for any failure, in addition a possible guarantee
cannot be claimed.
4. BATTERY INSTRUCTIONS
Just after some charge cycles and usage will new battery reach full capacity.
The battery may be charged after being used, regardless the depth of discharge.
Charging overnight is possible.
When only the green LED is lit, the batteries may be disconnected from the charger. Only if
very necessary, the charge cycle may be interrupted (disconnect the mains cable first and
disconnect the charge cable after that). In this case keep in mind, that the batteries are not
full. If the green LED lights and the battery is not disconnected, the battery is kept in
optimal full state.
If the battery is not frequently used, it is recommended to charge it once a month at
least (due to the self-discharge of the batteries). It is also possible to let the batteries
continuously connected to the charger.
Although the charger can charge deep discharged batteries, it is recommended not to
discharge batteries very deep, because this shortens battery life. However, if this
happens, it is recommended to charge the batteries as soon as possible in order to reduce
battery damage.

6
EN NL FR DE
The charger has been adjusted for only one battery type and capacity.
If another battery is connected to the charger, this battery can be damaged and/or
dangerous situations may occur. Therefore if batteries are changed, you must
contact your supplier/dealer, to adjust the charger to the correct battery type and
capacity.
In case of any questions, you can contact your supplier/dealer
5. SETUP OF THE CHARGER.
When placing the charger it should be observed that it has sufficient ventilation all
around. A space of at least 10 cm should be allowed. When used under normal
circumstances the built-in ventilator will be activated during charge. If there is not
sufficient ventilation or the temperature is high, the charger will lower the output current
(resulting in longer charge time) or if the temperature rises over a maximum value, the
charger will stop charging.
The cabinet is made of plastic and suitable as a table model.

7
6. CONNECTING CONDITIONS
6.1 Connection to 1-phase network
The charger is suitable for a mains voltage of 230V - 50/60Hz, 1-phase and has been
fitted with a 1.5 meter mains lead and plug.
NOTE: Check whether the mains voltage is in accordance with the voltage the charger was
designed for. The mains plug should be plugged into a wall socket.
6.2 Connection charging cables
On the output (secondary) side the chargers have been fitted with a 2.5 meter 3-wire
charging cable. Since the charger counts on the losses due to cabling, it is not allowed to
replace this cable with a cable of different length and/or diameter without adaptation by the
supplier/dealer. Shortening the cable is not allowed either!
The positive and negative terminals should be connected to the corresponding battery
poles. If the battery is connected to the charger with reversed polarity, the charger will not
start charging and does not show any failure indication.
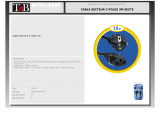
Impulse S12
The charge cable is fitted with an XLR-charging connector, whereby pin 1 of the XLR-
charging connector is the positive pole (+) and pin 2 is the negative pole (-) and pin 3 is the
drive inhibit signal (unless this is altered by your supplier/dealer) .
Figure 1 XLR-charging connector
Impulse S16
The charge cable is fitted with a connector that is specific for the application. Always follow
the instructions of your dealer and remember to observe polarity when connecting the
battery.

8
EN NL FR DE
7. TAKING THE CHARGER INTO OPERATION
The charger can now be connected.
First of all you should plug the mains plug into the wall socket.
The charger enters the ‘STAND-BY’-condition after flashing a combination of LED’s..
Both LED’s (yellow and green) are lighting.
Subsequently you can connect the battery and charging will start automatically. Only
the yellow LED is now lighting. At deep discharged batteries, first the battery is
charged with a small current (precharge). After that the battery is charged with the
nominal current (main charge). At last the battery is charged with a declining current
(post charge). The magnitude of these currents depends on the adjusted battery type.
When the yellow LED is switched off and the green LED on, the battery is full and can
now be disconnected. If the battery is not disconnected then the battery is kept in
optimal full state by a very low current.
When the battery is disconnected, it is allowed to let the mains plug in the wall socket.
The yellow and green LED’s will light.
8. INDICATIONS
Yellow LED Green LED
Charger off (mains not connected)
Charger just switched on and
showing the charge characteristics
Stand-by
Charging
Full
Failure
= Off
= On
= Blinking

9
9. FAILURE REPORT INDICATIONS
If the charger does not function (anymore), it can be restarted by pulling the mains plug
from the wall socket and putting it back in again. First of all you should however follow the
indications in the next paragraphs based on the failure report indications.
9.1 Not a single LED is lighting
There is no mains voltage.
First check whether the plug has been fitted in the wall socket. If this has been fitted in a
wall socket it should be checked whether there is any voltage on the wall socket. If there is
no mains voltage then you should check the safety fuses in the distribution cabinet or call a
technician.
9.2 Both LED’s light
If no battery is connected, this is a stand-by condition and no failure condition.
If a battery is connected however, one of the following failure conditions may
have occurred: There is no battery voltage present.
Check whether the battery has correctly been connected to the charger.
If it is not connected then the connection must be restored and the charging
process should be restarted.
The polarity of the battery connected to the charger is not correct.
Check whether the polarity of the charger corresponds with the polarity of
the battery. If it is connected correctly then you should consult your
supplier/dealer.
9.3 The yellow and green LED’s are blinking.
In case of a failure, both LED’s blink a number of times followed by one second rest.
This number indicates which failure has occurred.
Number of times the
LED’s blink followed
by a short rest
Failure description Remedy
4 Temperature too low or hardware problem 1)
5 Temperature too high 2)
1, 2, 3, 6, 7, 8 Other problem 3)
Remedy codes:
1. Move charger to a room with temperature above 0 °C and restart the charging process. If
temperature is above 0 °C and the failure report repeats
itself, then you should consult your supplier/dealer.
2. Allow the charger to cool down for some time and then the charging process should be

10
EN NL FR DE
restarted.
If the failure report repeats itself then you should consult
your supplier/dealer.
3. Consult your supplier/dealer.
10. CLEANING AND MAINTENANCE
The charger and the cables can be cleaned with a damp cloth. Do not use aggressive
cleaning agents. The charger is maintenance-free.
11. CONTACTING SERVICE
When contacting the service department of your supplier/dealer, please help us by
reporting the following data:
a) Type of charger (IMPULSE S12 or S16)
b) Under what condition did the problem occur?
c) What were the sympthoms/outcome?
d) What type of battery do you use in what application?

Victron Energy Blue Power
Distributor:
Serial number:
Version : 00
Date : 08 May 2013
Victron Energy B.V.
De Paal 35 | 1351 JG Almere
PO Box 50016 | 1305 AA Almere | The Netherlands
General phone : +31 (0)36 535 97 00
Customer support desk : +31 (0)36 535 97 03
Fax : +31 (0)36 535 97 40
www.victronenergy.com
/