Page is loading ...

36 LED SOLAR
SECURITY LIGHT
Model
98085
ASSEMBLY AND OPERATION INSTRUCTIONS
Diagrams within this manual may not be drawn proportionally.
Due to continuing improvements, actual product may differ slightly from the product described herein.
Distributed exclusively by Harbor Freight Tools
®
.
3491 Mission Oaks Blvd., Camarillo, CA 93011
Visit our website at: http://www.harborfreight.com
Read this material before using this product.
Failure to do so can result in serious injury.
SAVE THIS MANUAL.
Copyright
©
2008 by Harbor Freight Tools
®
. All rights reserved. No portion of this
manual or any artwork contained herein may be reproduced in any shape or form
without the express written consent of Harbor Freight Tools.
For technical questions or replacement parts, please call 1-800-444-3353.

Page 2SKU 98085 For technical questions, please call 1-800-444-3353.
SAVE THIS MANUAL
Keep this manual for the safety warn-
ings and precautions, assembly, operat-
ing, inspection, maintenance and cleaning
procedures. Write the product’s serial
number in the back of the manual near the
assembly diagram (or month and year of
purchase if product has no number). Keep
this manual and the receipt in a safe and
dry place for future reference.
IMPORTANT SAFETY
INSTRUCTIONS
In this manual, on the labeling, and all other
information provided with this product:
This is the safety alert
symbol. It is used to alert
you to potential personal
injury hazards. Obey all
safety messages that
follow this symbol to avoid
possible injury or death.
DANGER indicates
a hazardous
situation which, if not
avoided, will result in death or
serious injury.
WARNING
indicates a
hazardous situation which, if
not avoided, could result in
death or serious injury.
CAUTION, used
with the safety
alert symbol, indicates a
hazardous situation which, if
not avoided, could result in
minor or moderate injury.
NOTICE is used to
address practices
not related to personal injury.
CAUTION, without
the safety alert
symbol, is used to address
practices not related to
personal injury.
READ AND UNDERSTAND ALL INSTRUCTIONS
When using the Solar Security Light, safety
precautions should always be followed
including the following:
Work Area Safety
Dress Properly - Wear ANSI-ap-1.
proved safety goggles and heavy-
duty work gloves. Do not wear loose
clothing or jewelry. Wear protective
hair covering to contain long hair.
Stay Alert - Watch what you are do-2.
ing. Use common sense. Do not set
up the Solar Security Light when you
are tired. Keep work area clean and
well lit. Cluttered or dark areas invite
accidents.
Keep children and bystanders away 3.
while installing this product. Distrac-
tions can cause you to lose control.
Verify that the installation surface has 4.
no hidden utility lines before drilling or
driving screws.
Electrical Safety
Stay alert, watch what you are doing 1.
and use common sense when op-
erating the Solar Security Light. Do
not use this product while you are
tired or under the inuence of drugs,
alcohol or medication. A moment of

Page 3SKU 98085 For technical questions, please call 1-800-444-3353.
inattention while operating the Solar
Security Light may result in serious
personal injury.
Use the Solar Security Light only with 2.
specically designated battery packs.
Use of any other battery packs may
create a risk of injury and re.
When battery pack is not in use, keep 3.
it away from other metal objects, like
paper clips, coins, keys, nails, screws
or other small metal objects, that can
make a connection from one terminal
to another. Shorting the battery termi-
nals together may cause burns or a
re.
Ni-Cd batteries must be recycled or 4.
disposed of properly. Do not inciner-
ate.
Install Ni-Cd batteries only. 5.
Under abusive conditions, liquid may 6.
be ejected from the battery; avoid
contact. If contact accidentally oc-
curs, ush with water. If liquid con-
tacts eyes, additionally seek medical
help. Liquid ejected from the battery
may cause irritation or burns.
This product is not a toy. Keep it out 7.
of reach of children.
People with pacemakers should 8.
consult their physician(s) before use.
Electromagnetic elds in close prox-
imity to heart pacemaker could cause
pacemaker interference or pacemak-
er failure. In addition, people with
pacemakers should:
• Avoid operating alone.
• Do not use with power switch locked
on.
• Properly maintain and inspect to
avoid electrical shock.
• Any power cord must be properly
grounded. Ground Fault Circuit Inter-
rupter (GFCI) should also be imple-
mented – it prevents sustained elec-
trical shock.
General Safety
Do not use Solar Security Light for 1.
other than intended use.
Inspect before use. Do not use if 2.
parts are loose or damaged. Main-
tain labels and nameplates on the
Solar Security Light. These carry
important safety information. If un-
readable or missing, contact Harbor
Freight Tools for a replacement.
The warnings, precautions, and in-3.
structions discussed in this instruction
manual cannot cover all possible con-
ditions and situations that may occur.
It must be understood by the operator
that common sense and caution are
factors which cannot be built into this
product, but must be supplied by the
operator.
SAVE THESE
INSTRUCTIONS.

Page 4SKU 98085 For technical questions, please call 1-800-444-3353.
SPECIFICATIONS
Charge Time 6-8 hours
Power Source
(5), 1.2V, 600 mAh/6V, Ni-Cd
rechargeable battery pack
Range
Detects motion over a range of
120° at 16 feet.
Delay 5-60 seconds
Working
Conditions
14° - 131° F
<80% RH
UNPACKING
When unpacking, check to make sure
that the item is intact and undamaged. If
any parts are missing or broken, please
call Harbor Freight Tools at the number
shown on the cover of this manual as soon
as possible.
ASSEMBLY
Read the ENTIRE IMPORTANT
SAFEGUARDS section at the
beginning of this manual
including all text under
subheadings therein before set
up or use of this product.
Note: For additional information 1.
regarding the parts listed in the fol-
lowing pages, refer to the Assembly
Diagram near the end of this manual.
The Security Light should be set up 2.
at a location where you desire to
have extra lighting to detect persons
or objects moving at night or in the
dark.
Decide where you want to place the 3.
Lamp (1) and Solar Panel (2). The
Light is equipped with a connect-
ing wire, so the Lamp (1) and Solar
Panel (2) can be installed only as far
apart as the connecting wire allows.
Choose a location that receives full, 4.
direct sunlight a minimum of eight
hours a day. The location should not
be near nighttime light sources such
as porch lights or streetlights as this
will cause the Light to remain off.
During the day, the Solar Panel con-5.
verts sunlight into electricity which
recharges the batteries. The amount
of light the Solar Panel receives
depends on placement of the Light,
geographic location and weather. If
the weather is cloudy and the panel
did not receive a full charge, the Light
may not achieve full operating time.
Mount the Lamp (1) on a solid sur-6.
face capable of supporting the Lamp
(1) and secure enough so that it will
not move when exposed to vibration
or wind.
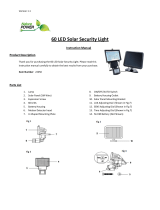
rear-
mounting
holes
inside-
mounting
holes
Figure 1
7. To mount the Lamp (1), the Screws
(5) can be inserted into either the
rear mounting holes or to the inside
mounting holes as shown in Fig. 1.
If using the inside mounting holes,

Page 5SKU 98085 For technical questions, please call 1-800-444-3353.
remove the Covers (3) to allow for
insertion of the Screws.
Set the Lamp (1) to the angle height 8.
Drill holes for the enclosed screws.
Make certain that the drilling path is
clear of obstacles such as cables,
gas and water pipes and electrical
lines. Insert anchors into the holes.
Thread in the enclosed Screws (5)
to secure the Lamp (1) in position.
NOTE: No anchors are needed if unit
is mounted on wall studs.
Before mounting the Panel, make 9.
certain that the connecting wire will
reach both the Lamp (1) and Panel
(2). Install the Solar Panel the same
way that you installed the Lamp in
step 8, using the mounting holes
located on the base of the Panel.
Insert Screws (4) through mounting
holes in the base.
Adjust the Motion Detector Head be-10.
low the light by moving it left or right
so that it faces the area where move-
ment will occur.
OPERATION
Read the ENTIRE IMPORTANT
SAFEGUARDS section at the
beginning of this manual
including all text under
subheadings therein before set
up or use of this product.
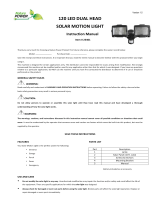
On/Off Button
Connecting
Wire (8)
Figure 2
1. Plug the Mounting Wire (8) into the
Lamp as shown in Figure 2.
Before it can operate to its full capac-2.
ity, the Security Light needs to be in
sunlight for two to three days. Turn
the On/Off Button (see Figure 2) to
the “OFF” position and wait two to
three days before use.
Turn the switch to the “ON” position 3.
and wait about a minute. The light
will turn itself on and then shut off
three times to calibrate itself.
Wait one minute after the self calibra-4.
tion. The use the adjustment knob on
the back of the motion sensor head to
adjust the time that the light will stay
on when the motion sensor detects
movement.
The light will turn on automatically at 5.
night when motion is detected by the
Motion Detector Head.
REV 08e

Page 6SKU 98085 For technical questions, please call 1-800-444-3353.
INSPECTION AND
MAINTENANCE
TO PREVENT
SERIOUS INJURY
FROM ACCIDENTAL
OPERATION OR ELECTRIC
SHOCK:
Before appliance inspection
or maintenance, make sure
the appliance’s switch is
turned off, and the unit has
cooled completely.
TO PREVENT SERIOUS
INJURY FROM APPLIANCE
FAILURE:
Do not use damaged
products.
BEFORE EACH USE, inspect
the general condition of the
Solar Security Light. Check for
loose screws, misalignment or
binding of moving parts, cracked
or broken parts, and any other
condition that may affect its safe
operation.
When storing your Light indoors for 1.
more than 2 or 3 days, turn the ON/
OFF Power Switch to “OFF”.
Store the Light in a dry location free 2.
of dust and debris. Make certain that
the Light is out of reach of children.
Storing the Light for prolonged pe-
riods may damage the light or de-
crease performance.
Keep the Solar Panel free from dirt 3.
and debris. A dirty Solar Panel will
keep the batteries from charging.
Clean regularly with a damp cloth.
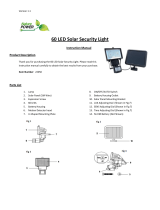
Replacing the Batteries
Lamp
Base
Battery
Pack
Figure 3
Motion
Detector
Head
1. The Battery Pack is located in the
Base of the Lamp (1). Remove the
screws that connect the base togeth-
er. Separate the base as shown in
Figure 3.
Replace with a Ni-Cd battery pack of 2.
the same type.
Connect base back together and at-3.
tach to Lamp, making certain that the
Motion Detector Head (see Figure
3) is facing in the correct direction.
Note: Be careful not to pinch wires
when re-assembling.

Page 7SKU 98085 For technical questions, please call 1-800-444-3353.
PLEASE READ THE FOLLOWING CAREFULLY
THE MANUFACTURER AND/OR DISTRIBUTOR HAS PROVIDED THE PARTS LIST AND ASSEMBLY DIAGRAM IN THIS MANUAL
AS A REFERENCE TOOL ONLY. NEITHER THE MANUFACTURER OR DISTRIBUTOR MAKES ANY REPRESENTATION OR
WARRANTY OF ANY KIND TO THE BUYER THAT HE OR SHE IS QUALIFIED TO MAKE ANY REPAIRS TO THE PRODUCT,
OR THAT HE OR SHE IS QUALIFIED TO REPLACE ANY PARTS OF THE PRODUCT. IN FACT, THE MANUFACTURER AND/
OR DISTRIBUTOR EXPRESSLY STATES THAT ALL REPAIRS AND PARTS REPLACEMENTS SHOULD BE UNDERTAKEN BY
CERTIFIED AND LICENSED TECHNICIANS, AND NOT BY THE BUYER. THE BUYER ASSUMES ALL RISK AND LIABILITY
ARISING OUT OF HIS OR HER REPAIRS TO THE ORIGINAL PRODUCT OR REPLACEMENT PARTS THERETO, OR ARISING
OUT OF HIS OR HER INSTALLATION OF REPLACEMENT PARTS THERETO.
PARTS LIST
Part Description Q’ty
1 Lamp - 36 LED 1
2 Solar Panel 1
3 Cover 1
4 Screw #6 x 1” 3
5 Screw #6 x 1-9/16” 2
6 Anchor 5
7 Battery Pack 1
8 Connecting Wire 1
ASSEMBLY DIAGRAM
1
2
3
7
8
5
4
6
/