HP ScanJet Enterprise Flow N9120 Document Flatbed Scanner Quick start guide
- Category
- Multifunctionals
- Type
- Quick start guide
This manual is also suitable for

6.5” x 9” FRONT COVER
Getting Started Guide
《入门指南》
HP Scanjet
N9120
Getting Started Guide

Argentina 0-800-555-5000
Argentina (Buenos Aires) 54-11-4708-1600
Australia 13 10 47
Australia (dialing internationally) +61 3 8877 5000
Brasil 0-800-709-7751
Brasil (São Paulo) 55-11-4004-7751
Canada 1-800-474-6836
Canada (Mississauga Area) (905) 206-4663
Centroamérica y Caribe www.hp.com/support
Chile 800-360-999
中国 86 8008108888
Colombia 01-8000-51-4746-8368
Colombia (Bogotá) 571-606-9191
Costa Rica 0-800-011-1046
Ecuador (Andinatel) 1-999-119 o 800-711-2884
Ecuador (Pacifitel) 1-800-225-528 o 800-711-2884
El Salvador 800-6160
Guatemala 1-800-711-2884
香港 +852-3002-8555
India 1800 112267
Indonesia +62-21-3503408
Jamaica 1-800-711-2884
대한민국 1588 3003
Malaysia 1800 88 8588
México 01-800-472-68368
México (Ciudad de México) 55-5258-9922
New Zealand 0800 449 553
Panamá 1-800-711-2884
Paraguay 009 800 54 1 0006
Perú 0-800-10111
Philippines 1800 1441 0094 / +63-2-867 3551
Puerto Rico 1-877-232-0589
Republica Dominicana 1-800-711-2884
Trinidad & Tobago 1-800-711-2884
Singapore +65-6272-5300
台灣 0800 010 055 / (02) 87228000
ประเทศไทย +66-2-353 9000
United States 1-(800)-474-6836
Uruguay 0004-054-177
Venezuela 0-800-474-68368
Venezuela (Caracas) 58-212-278-8666
Việt Nam +84 8 823 4530

HP Scanjet N9120
Getting Started Guide
English

Copyright and license
© 2008 Copyright Hewlett-Packard
Development Company, L.P.
Reproduction, adaptation or translation
without prior written permission is
prohibited, except as allowed under the
copyright laws.
The information contained herein is
subject to change without notice.
The only warranties for HP products
and services are set forth in the express
warranty statements accompanying
such products and services. Nothing
herein should be construed as
constituting an additional warranty. HP
shall not be liable for technical or
editorial errors or omissions contained
herein.
Trademark credits
ENERGY STAR is a U.S. registered
service mark of the United States
Environmental Protection Agency.
Microsoft and Windows are registered
trademarks of Microsoft Corporation.

Contents
1 Scanner set up
Set up the hardware...................................................................................................................2
Install the software......................................................................................................................3
2 Use the scanner
Scanner overview.......................................................................................................................6
Load original documents in the automatic document feeder......................................................8
Load an original on the scanner glass......................................................................................12
How to scan..............................................................................................................................12
Associate a quick start button with scanning software.............................................................13
Scan from scanning software...................................................................................................13
How to copy..............................................................................................................................14
3 Where to get additional information.....................................................................................15
4 Product care and support
Maintenance, troubleshooting, and support.............................................................................16
Installation troubleshooting.......................................................................................................16
Getting assistance....................................................................................................................18
5 Regulatory information and product specifications...........................................................20
1
English

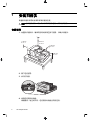
1 Scanner set up
Follow the unpacking instructions shipped with the scanner.
CAUTION: To avoid injury, use two people to unpack and lift the scanner.
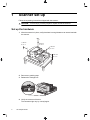
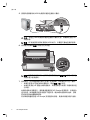
Set up the hardware
1. After the scanner is in place, verify that there is enough clearance to use and maintain
the scanner.
350 mm
13.78 in
130 mm
5.12 in
110 mm
4.33 in
105 mm
4.13 in
2. Remove any packing tape.
3. Release the carriage lock.
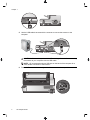
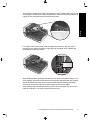
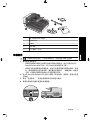
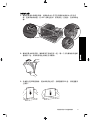
4. Verify the contents of the box:
The contents might vary by country/region.
2 HP Scanjet N9120

1
3
4
2
5
1 HP Scanjet N9120 scanner
2 Scanning software CDs
3 Power cable
4 USB cable
5 Getting Started Guide (this book)
Install the software
CAUTION: Do not connect the USB cable until you are prompted during the software
installation.
1. Decide what software to install.
• If you will be using the scanner with document-management and scanning
software that you already own, you only need to install the HP Scanjet Drivers
and Tools.
• If you do not already have document-management and scanning software, you
can use the software that is shipped with the scanner. Read the onscreen
descriptions of the software during the installation to decide what software to
install. (The software and the number of CDs that are shipped with the scanner
might vary by country/region.)
2. Insert the HP Scanning Software CD into the computer CD drive. Wait for the
installation dialog box to appear.
3. Click Install Software, and then follow the instructions on the screen.
4. Use the power cable to connect the scanner to an electrical outlet.
Install the software 3
English

5. Use the USB cable that came with the scanner to connect the scanner to the
computer.
CAUTION: Be sure that you install the HP scanning software before connecting
the scanner to your computer with the USB cable.
NOTE: HP recommends using a USB port on the back of the computer for a
more reliable connection to the scanner.
6. Press the Power switch on the right side of the scanner to the on position.
Chapter 1
4 HP Scanjet N9120

NOTE: After using the scanner, press the Power Save ( ) button on the scanner
front panel to put the scanner in Power Save mode.
7. Test the installation. Place a single document page in the automatic document feeder
(ADF), and then do one of the following:
• If you installed the HP Smart Document Scan Software, press the Scan (
)
button.
• If you did not install the HP Smart Document Scan Software, scan from the
software that you intend to use for scanning.
If the scan does not proceed as expected, uninstall and reinstall the HP Scanjet
utilities, and then try scanning again. If reinstalling the utilities does not work, see the
documentation for the scanning software for information on how to troubleshoot that
program.
For information on uninstalling and reinstalling the HP Scanjet utilities, see the
scanner user guide.
Install the software 5
English

2 Use the scanner
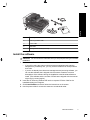
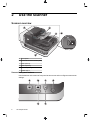
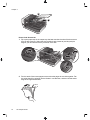
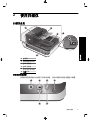
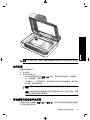
Scanner overview
1
5
6
3
4
2
1 Front panel
2 Automatic document feeder (ADF)
3 ADF input tray
4 ADF output tray
5 Latch for opening the ADF
6 Power switch
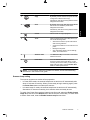
Scanner front panel buttons
Use the buttons on the scanner front panel to start a scan and to configure some scanner
settings.
1 2
3 5
4 6
6 HP Scanjet N9120

Icon Button name Description
1 Copy By default, print the number of copies currently
configured in HP Document Copy.
Alternatively, start the scanning software that is
assigned to this button.
2 Scan By default, start a scan that uses the HP Smart
Document Scan Software profile that is
assigned to this button.
Alternatively, start the scanning software that is
assigned to this button.
3 Cancel Cancel a scan or copy in progress.
4 Tools Open the HP Scanner Tools Utility where you
can do the following tasks:
•
Associate the scanner quick start buttons
with scanning software
•
Configure the buttons on the scanner front
panel
•
Manage the imprinter
•
View information about scanner settings,
status, and maintenance
5 Attention LED The Attention LED provides status information
about the scanner.
6 Power Save Press the Power Save button to put the
scanner in Power Save mode when you are
not using the scanner. When you are ready to
begin scanning again, press the Power Save
button to wake up the scanner.
NOTE: For information about the possible LED states, see the troubleshooting
information in the scanner user guide.
Scanner lamp setting
The scanner supports two modes of lamp operation:
• In Power Save mode, the scanner lamp times out and turns off automatically after
about 15 minutes of inactivity. When you are ready to begin scanning again, press
the Power Save button to wake up the scanner.
• In Instant Lamp On mode, the scanner lamp times out and turns off automatically
after about 15 minutes of inactivity, but it remains warm and ready to scan.
To switch from Power Save mode to Instant Lamp On mode, select the Enable Instant
Lamp On check box on the Buttons tab of the HP Scanner Tools Utility. To switch back
to Power Save mode, clear the Enable Instant Lamp On check box.
Scanner overview 7
English

Load original documents in the automatic document
feeder
You can scan up to 200 single- and double-sided document pages through the automatic
document feeder (ADF) at one time.
Document loading tips
• The ADF supports the following paper types.
Width: 70–300 mm (2.75–11.8 in)
Length: 148–864 mm (5.8–34 in)
Weight: 49–120 g/m
2
(13–32 lb)
NOTE: In the scanning software, set the page size to match the width and length
of the paper that you are scanning.
• Scanning the following types of documents might result in paper jams or damage to
the documents. To scan these documents, make a photocopy, and then scan the
copy instead.
Wrinkled or creased
documents
Curled documents
Torn documents Documents with paper
clips or staples
Carbon paper Coated paper
Extremely thin,
translucent paper
Paper with adhesive
notes or flags attached
Photos Overhead
transparencies
Papers that are stuck
together
Paper with wet
substances such as
glue or correction fluid
• Before loading documents, make sure that the ADF access doors are securely
latched.
• When loading a stack of documents, make sure that all of the documents are the
same size.
Chapter 2
8 HP Scanjet N9120

• The maximum capacity of the ADF is 200 sheets of 75 g/m
2
(20 lb) paper. When using
heavier paper, the maximum capacity is decreased. Use the fill line, shown below, as
a guide for the maximum height of the document stack.
• For small or narrow documents, load the edge that is less than 148 mm (5.8 in)
pointing into the feeder so that the longer edge can be pulled into the feeder and
passed along by the feed rollers.
• When loading small or lightweight documents, such as A6 cards (index cards) or U.S.
check carbons, load a stack of at least five documents to ensure that the ADF properly
detects and feeds the stack. When scanning fewer than five small or lightweight
documents, scan the documents by placing them on the scanner glass.
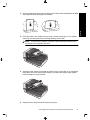
• When loading long documents that hang over the end of the input tray, pull out the
input tray extender (1), and then load the documents (2).
Load original documents in the automatic document feeder 9
English

1
2
How to load documents
1. Flip up the paper stop in the output tray that best matches the size of the documents
that you are scanning. Select the stop position that is closest to (and beyond) the
edge of your documents as they come out of the ADF.
2. Fan the stack of document pages to ensure that the pages do not stick together. Fan
the edge that will be pointing into the feeder in one direction, and then fan that same
edge in the opposite direction.
Chapter 2
10 HP Scanjet N9120

3. Align the edges of the documents by tapping the bottom of the stack against the table
top. Rotate the stack 90 degrees and repeat.
4. Place the stack in the middle of the input tray. Load the stack face up. For fastest
scanning, load the stack with the left edge leading into the ADF.
NOTE: In the scanning software, choose the layout setting that matches the
orientation of the originals in the ADF.
5. Adjust the paper guides to the width of the documents. Take care not to overtighten
the guides, which can restrict paper feeding, but make sure that the paper guides
touch the edges of the documents.
6. Gently push the stack forward to trip the tray sensor.
Load original documents in the automatic document feeder 11
English

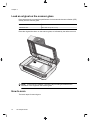
Load an original on the scanner glass
Place items that do not meet the specifications for the automatic document feeder (ADF)
directly onto the scanner glass.
Minimum size: Any size
Maximum size: 300 x 432 mm (11.8 x 17 in)
Place the original face down on the scanner glass, as indicated by the reference mark.
NOTE: In the scanning software, choose the layout setting that matches the
orientation of the original on the scanner glass.
How to scan
The basic steps for scanning are:
Chapter 2
12 HP Scanjet N9120

1. Load the originals.
2. Do one of the following:
• Press the Scan (
) button on the scanner front panel to start scanning with the
assigned software (and profile, if appropriate).
• On the computer, open the scanning software, and then select the ISIS or TWAIN
data source. Select the appropriate settings, and then initiate a scan.
TIP: To reduce paper jams, use scan settings that specify the actual dimensions
of the pages that you are scanning.
TIP: If you select duplex scanning or copying and you load the originals into the
automatic document feeder (ADF), the scanner processes both sides of a two-
sided original at the same time.
Associate a quick start button with scanning software
The scanner includes two quick start buttons, Scan ( ) and Copy ( ). You can
associate any button-aware scanning software with each of these buttons.
To associate a quick start button with scanning software, follow these steps:
1. Press the Tools (
) button on the scanner front panel to open the HP Scanner Tools
Utility. Click the Buttons tab.
2. In the Program to Start drop-down list for a button, select the scanning software that
you want this button to start.
3. Optionally, if you selected the HP Smart Document Scan Software, in the Profile
drop-down list, select a profile.
If you do not select a profile, pressing the button starts the HP Smart Document Scan
Software so that you can choose the scan settings each time that you start a new
scan.
NOTE: If you change the name of a profile that is assigned to a quick start button,
update the button information in the HP Scanner Tools Utility.
For information about HP Smart Document Scan Software profiles, see the HP Smart
Document Scan Software Help.
Scan from scanning software
You can scan an image or document directly into a software program if the program is
ISIS or TWAIN compliant. Generally, the program is compliant if it has a menu option
such as Acquire, Scan, Import New Object, or Insert. If you are unsure whether the
program is compliant or what the option is, see the documentation for that program.
Scan from scanning software 13
English

Scan from HP Smart Document Scan Software
1. Click Start, point to Programs or All Programs, point to HP, point to HP Smart
Document Scan, and then click HP Smart Document Scan Software.
2. Select a profile, and then click Scan.
TIP: A description of the selected profile is displayed below the list.
3. Follow the onscreen instructions to complete the scan.
For more information, see the HP Smart Document Scan Software Help.
Scan from ISIS- or TWAIN-compliant scanning software
1. Start the scanning software, and then select the ISIS or TWAIN data source.
2. Select the settings that are appropriate for the documents that you are scanning.
3. Carry out the appropriate actions to complete the scan.
For more information, see the online help for the scanning software.
How to copy
The basic steps for copying are:
1. Load the originals.
2. Do one of the following:
•Press the Copy (
) button on the scanner front panel to print the copies with the
current copy settings.
• Click Start, point to Programs or All Programs, point to HP, point to Scanjet,
point to N9120, and then click Document Copy.
Select print settings in the HP Document Copy dialog box.
NOTE: If you want to change the copy settings, start the copy from the HP
Document Copy software.
TIP: You can configure HP Document Copy to always prompt for copy settings
before starting to print. For information, see the HP Scanner Tools Utility help.
TIP: If you select duplex scanning or copying and you load the originals into the
automatic document feeder (ADF), the scanner processes both sides of a two-
sided original at the same time.
Chapter 2
14 HP Scanjet N9120

3 Where to get additional
information
Several sources of information describe using the scanner and the scanning software.
User Guide
The scanner User Guide is the primary source for scanner information. It provides
information about using, maintaining, and troubleshooting the scanner.
To open the user guide in the installed (system) language, click Start, point to
Programs or All Programs, point to HP, point to Scanjet, point to N9120, and then click
User Guide.
To open the User Guide in another language, follow these steps:
1. Insert the HP software CD that came with the scanner into the computer CD drive.
Wait for the installation dialog box to appear.
2. Click View or print guides.
A list of languages is displayed.
3. Click the language that you want.
HP Smart Document Scan Software Help
The HP Smart Document Scan Software Help explains how to use HP Smart Document
Scan Software features such as creating and editing profiles.
To open HP Smart Document Scan Software Help, double-click the HP Smart Document
Scan Software icon on the computer desktop, and then click Help on the menu bar.
HP Scanner Tools Utility help
The HP Scanner Tools Utility help explains the scanner settings, information about
scanner status and maintenance, and how to assign functionality to the scanner front
panel buttons.
To open HP Scanner Tools Utility help, press the Tools button on the scanner front panel,
and then click Help in the HP Scanner Tools Utility dialog box.
Technical Resources
Visit
www.hp.com/support for updated information about the scanner.
Where to get additional information 15
English

4 Product care and support
This section describes the options for product support.
Maintenance, troubleshooting, and support
Occasional cleaning of the scanner helps ensure higher-quality scans. The amount of
care necessary depends upon several factors, including the amount of use and the
environment. You should perform routine cleaning as necessary.
Routine cleaning and maintenance should include cleaning the scanner glass and the
automatic document feeder (ADF).
For in-depth instructions about maintaining the scanner, see the scanner user guide.
CAUTION: Avoid placing items that have sharp edges, paper clips, staples, wet
glue, correction fluid, or other substances in the scanner. Document pages should
not be curled, wrinkled, or stuck together.
Installation troubleshooting
If the scanner does not work after installation, you might see a message on the computer
screen that is similar to one of the following:
• The scanner could not be initialized.
• The scanner could not be found.
• An internal error has occurred.
• The computer cannot communicate with the scanner.
To fix the problem, check the scanner cables and software as described here.
NOTE: For information on how to solve problems with using the scanner, see the
troubleshooting information in the scanner user guide.
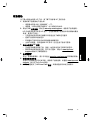
Check that the scanner has power
The power cable is connected between the scanner and a power outlet.
• Ensure that the power cable is securely connected between the scanner and a live
electrical outlet.
• If the power cable is connected to a surge protector, ensure that the surge protector
is plugged into an outlet and turned on.
• Ensure that the Power switch on the right side of the scanner is in the on position.
16 HP Scanjet N9120
Page is loading ...
Page is loading ...
Page is loading ...
Page is loading ...
Page is loading ...
Page is loading ...
Page is loading ...
Page is loading ...
Page is loading ...
Page is loading ...
Page is loading ...
Page is loading ...
Page is loading ...
Page is loading ...
Page is loading ...
Page is loading ...
Page is loading ...
Page is loading ...
Page is loading ...
Page is loading ...
Page is loading ...
Page is loading ...
Page is loading ...
Page is loading ...
Page is loading ...
Page is loading ...
Page is loading ...
Page is loading ...
Page is loading ...
Page is loading ...
Page is loading ...
Page is loading ...
-
 1
1
-
 2
2
-
 3
3
-
 4
4
-
 5
5
-
 6
6
-
 7
7
-
 8
8
-
 9
9
-
 10
10
-
 11
11
-
 12
12
-
 13
13
-
 14
14
-
 15
15
-
 16
16
-
 17
17
-
 18
18
-
 19
19
-
 20
20
-
 21
21
-
 22
22
-
 23
23
-
 24
24
-
 25
25
-
 26
26
-
 27
27
-
 28
28
-
 29
29
-
 30
30
-
 31
31
-
 32
32
-
 33
33
-
 34
34
-
 35
35
-
 36
36
-
 37
37
-
 38
38
-
 39
39
-
 40
40
-
 41
41
-
 42
42
-
 43
43
-
 44
44
-
 45
45
-
 46
46
-
 47
47
-
 48
48
-
 49
49
-
 50
50
-
 51
51
-
 52
52


HP ScanJet Enterprise Flow N9120 Document Flatbed Scanner Quick start guide
- Category
- Multifunctionals
- Type
- Quick start guide
- This manual is also suitable for
Ask a question and I''ll find the answer in the document
Finding information in a document is now easier with AI
in other languages
Related papers
-
HP ScanJet Enterprise Flow N9120 Document Flatbed Scanner User guide
-
HP N9120 User manual
-
HP Scanjet 3000 Sheet-feed Scanner series User guide
-
-
-
-
HP 7800 Owner's manual
-
-
-
