HP DesignJet 130 Printer series User guide

Type
User guide

This manual is also suitable for

HP DesignJet 130 Printer series combines high-quality output with affordability, allowing you to produce professional prints in-house. With print speeds of up to 22 seconds per D/A1 page, you can save time and increase productivity. Its compact size makes it ideal for small offices and home businesses, and it also features wireless printing capabilities for added convenience.

HP DesignJet 130 Printer series combines high-quality output with affordability, allowing you to produce professional prints in-house. With print speeds of up to 22 seconds per D/A1 page, you can save time and increase productivity. Its compact size makes it ideal for small offices and home businesses, and it also features wireless printing capabilities for added convenience.

HP LF Printing Knowledge Center
Printing in Black & White
Application: Adobe Illustrator CS
Printer: HP Designjet 30/90/130 series printers
Software: EFI Designer Edition for HP
Operating System: Windows
The simplest approach to creating a black and white image is taking a color image and convert it to
grayscale in a photo imaging program such as Photoshop or Illustrator. In addition, although
converting an image from color to grayscale is easy, the opposite operation is complex, in this case it
is better to have it in color in the first place.
There are different ways to print a black and white image, normally once the colors are converted to
grayscale, the black in the highlights and midtones is substituted for color inks. This occurs because a
six-color printer with light colorants (a CMYKcm configuration) is unbalanced in the sense that the
darkest ink, K (black), does not have a light counterpart like the C (cyan) and M (magenta) inks. As a
result, K ink must not be used in highlighted image areas in order to prevent a grainy appearance.
But, while you gain in print quality you lose in the neutrality of black.
This guide is focused to achieve a neutral black in the print, avoiding the black substitution.
1. First recommendations:
See the
Media type functionality & features and choose the most appropriate media.
It is essential to have the media type correctly calibrated with this printer and print mode,
consult the Calibrate my printer section.
2. Open the EFI Designer Edition RIP.
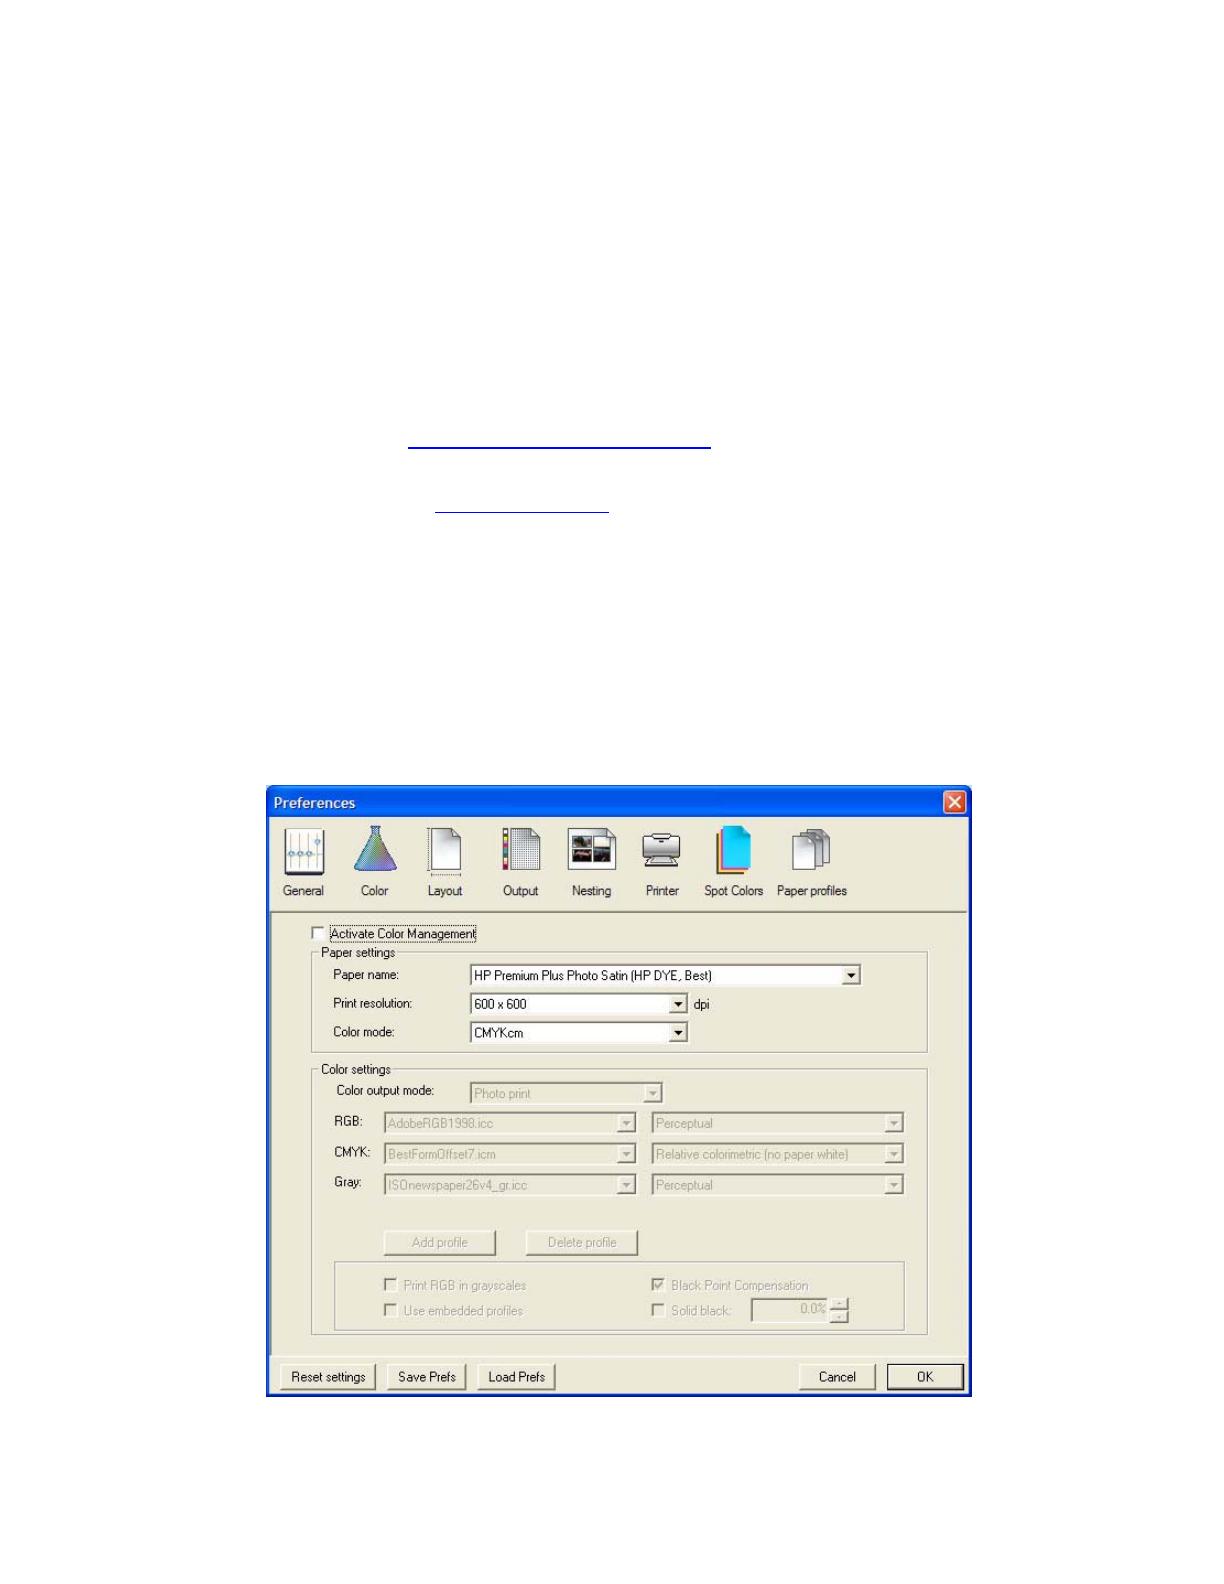
3. EFI Designer Edition RIP settings, Preferences:
Color:
o Uncheck the Active Color Management checkbox.
o Paper name: Select the paper type that is loaded on the printer (always
calibrated) and “Best” print quality.
o Print resolution: 600 x 600.
Click OK.
4. Open Adobe Illustrator CS.
2
5. Configure the Color Settings, Edit menu > Color Settings…:
Make sure the Advanced Mode check box is ticked.
Working Space > RGB: Adobe RGB (1998).
Working Space > CMYK: Euroscale Coated v2 (for Europe), U.S. Web Coated (SWOP)
v2 (for US) and Japan Standard v2 (for Japan).
Color Management Policies: Preserve the Embedded Profiles.
Profile Mismatches: check Ask When Opening and Ask When Pasting.
Missing Profiles: check Ask When Opening.
Conversion Options > Intent: Perceptual (for RGB images) or Relative Colorimetric (for
CMYK images).
Click OK
6. Open the image, File menu > Open…:
If the document has an embedded color profile that does not match the current working
space, select Use the embedded profile. Otherwise, select Assign working space.
3
Click OK
7. If you place an image, you should embed the image in the document. If it has an embedded
profile, it will be converted from the embedded color profile to the document color profile
preserving the color appearance. If it doesn’t have an embedded color profile, Illustrator will
assign the document color profile.
File menu > Place…: browse the image and uncheck the Link checkbox. If you are asked
How do you want to treat the data?, select Convert.
Click OK.
8. Make sure you have configured the Document Setup appropriately for your document, File
menu > Document Setup….
4
9. Printer settings, File menu > Print… > Setup… button:
Select Printer...: Select the printer (ex. EFI Designer Edition).
Preferences:
o Layout tab:
Orientation: Select the orientation of your document on the paper.
o Advanced…:
Paper/Output > Paper Size: Select the paper size of the media loaded
in the printer.
Document Options > Printer Features:
Paper Size: Setup
Select RIP’s Default on the others settings.
Click OK until the Illustrator Print dialog box.
10. Adobe Illustrator Print… settings:
General (left hand menu):
o Media > Size: Defined by Driver.
o Options: Select the scaling option you need.
Output (left hand menu):
o Mode: Composite.
Color Management (left hand menu):
o Print Space > Profile: Dot Gain 15%.
o Print Space > Intent: Perceptual.
5
Click Print.
6
For more information on HP Designjet products
www.hp.com/go/designjet
7
© 2005 Hewlett-Packard Development Company, L.P. The information contained
herein is subject to change without notice. The only warranties for HP products and
services are set forth in the express warranty statements accompanying such
products and services. Nothing herein should be construed as constituting an
additional warranty. HP shall not be liable for technical or editorial errors or
omissions contained herein.
Adobe Photoshop and PostScript are trademarks of Adobe Systems Incorporated.
PANTONE is Pantone, Inc.'s check-standard trademark for color.
Rev. 1.0, 09/2005
  • Page 1 1
  • Page 2 2
  • Page 3 3
  • Page 4 4
  • Page 5 5
  • Page 6 6
  • Page 7 7

HP DesignJet 130 Printer series User guide

Type
User guide
This manual is also suitable for

HP DesignJet 130 Printer series combines high-quality output with affordability, allowing you to produce professional prints in-house. With print speeds of up to 22 seconds per D/A1 page, you can save time and increase productivity. Its compact size makes it ideal for small offices and home businesses, and it also features wireless printing capabilities for added convenience.

Ask a question and I''ll find the answer in the document

Finding information in a document is now easier with AI