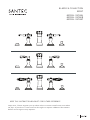
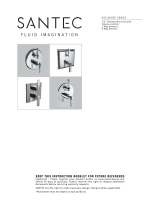
Santec KLASSICA 9570KT Operating instructions
- Category
- Sanitary ware
- Type
- Operating instructions
This manual is also suitable for

KLASSICA COLLECTION
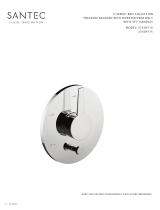
MODEL: 9570KL
KEEP THIS INSTRUCTION BOOKLET FOR FUTURE REFERENCE
Important : Please register your product online at www.santecfaucet.com within
30 days of purchase. Santec reserves the right to request additional documents
before servicing warranty requests.
0 1
MODEL: 9570KR
MODEL: 9570KT
BIDET

02
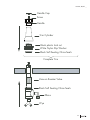
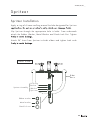
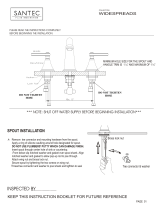
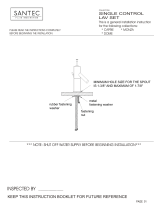
Vacuum Br eaker
NOTE: See diagram on next page for removing and reinstalling the
complete trim.
Remove the complete trim from the Vacuum Breaker valve.
Insert Vacuum Breaker valve up from below and reinstall complete trim
except for the handle cap. Make sure to install the black plastic lock
nut in the position shown in the diagram on the next page. Snugly
tighten down the black plastic lock nut and trim cylinder by hand
tightening only.
until it stops. Pop the handle cap into the handle with the “spritzer”
icon facing frontwards or at the 6 o’clock position (see handle cap
diagram below).
supply lines.
Hole size for the spout and Handle Trim is a minimum of 1-1/4” and a
maximum of 1-1/2”.
Vacuum Breaker Installation
6
1 2
3
9
Spritzer
Handle Cap
9570 KL, KR, KT _ _

03
9570 KL, KR, KT _ _
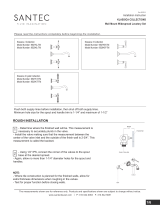
Black plastic lock nut
Trim Cylinder
Handle
Screw
Handle Cap
Black Soft Seating China Seals
Black Soft Seating China Seals
White Nylon Slip Washer
Vacuum Breaker Valve
Elbow
Wye
Complete Trim

04
9570KL, KR, KT _ _
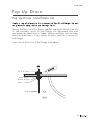
Han dle Tr i m
Remove the Valve Body Mounting Hardware from the valve body. Slip
appropriate hole next to the vacuum breaker (HOT-left & COLD-right).
Apply a ring of silicone caulking around the handle hole on the bidet
top. DO NOT USE PLUMBER’S PUTTY, WHICH CAN DAMAGE FINISH.
Connecting Hoses toward Wye Connector.
For proper handle turning direction, install the handle with the “COLD”
blue label at the right side of the sink (front view) and the handle with
the “HOT” red label at the left side of the sink.
HANDLE TRIM IS READY FOR DROP-IN INSTALLATION. DO NOT
DISASSEMBLE HANDLE TRIM.
Handle Trim Installation (1)
Valve Body
Mounting Hardware
Washer
Brass Lock Nut
Wye c onnecting hoses

0 5
9570KL, KR, KT _ _
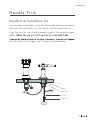
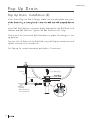
From beneath of the bidet, screw the Valve Body Mounting Hardware
back onto the valve body. First the washer, then the brass lock nut.
Align the lever or cross handle properly against the vacuum breaker
the Inlet Hoses to the Supply Lines. Tighten to avoid leakage.
Han dle Tr i m
Washer
Brass lock nut
Handle Trim Installation (2)
Inlet Hose
Supply Line

0 60 6
9570KL, KR, KT _ _
Sprit z e r
Apply a ring of silicone caulking around the hole designated for Spritzer
Slip Spritzer through the appropriate hole in bidet. From underneath
attach the Rubber Washer, Metal Washer and Shank Lock Nut. Tighten
Attach 24” hose from Spritzer to bidet elbow and tighten both ends
Spritzer Installation
Bidet
Basin
Rubber washer
Shank lock nut
Metal washer
Hou sin g
Basket
Wash e r
Spritzer Assembly
Spri tzer
Front View

07
9570KL, KR, KT _ _
Pop U p Drai n
Remove Drain Flange and Drain Plug from pop-up assembly.
Apply a ring of silicone caulking to underside of Drain Flange. Do not use
Insert the threaded end of the assembly up from below and into the pop up
drain hole.
Completely thread the drain body into the Drain Flange and align with the Ball
Rod Hole facing back. Then tighten lock nut from below. Clean excess silicone
with paper towel.
Pop Up Drain Installation (1)
Drain Plug
Drain Flange
Ball Rod Hole
Gasket
Washer
Lock nut

08
9570KL, KR, KT _ _
Remove the Brass Lock Nut, Rubber Washer and Metal Washer from the
lift rod assembly. Insert Lift Rod Flange into designated hole and
reassemble the Metal Washer, Rubber Washer and Brass Lock Nut from
below the bidet basin. Firmly tighten the Brass Lock Nut to secure Lift
Rod Flange.
Insert the Lift Rod into Lift Rod Flange from above.
P op Up D rai n
Pop Up Drain Installation (2)
Metal Washer
Rubber Washer
Brass Lock Nut
Lift Rod
Lift Rod Flange

09
9570KL, KR, KT _ _
Insert Drain Plug into Drain Flange. Make sure the adjustable eye-screw
it.
Insert Ball Rod Washer into drain body followed by the Ball Rod, 2nd
Washer and Ball Rod Nut. Tighten the Ball Rod Nut until snug.
Gently push the Horizontal Ball Rod down to place the plunger in the
up position.
Connect the Lift Rod with the Ball Rod using the Pop-up connection and
tighten securely with screwdriver.
Test Pop-up for smooth operation and adjust if necessar y.
Drain plug
Drain tube
Lift rod
Pop-up connection
Pop Up Dr a i n
Pop Up Drain Installation (2)
Ball rod
assembly
(ball rod, ball rod
nut, & 2 washers)

10
9570KL, KR, KT _ _
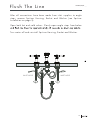
Flu s h T h e Lin e
After all connections have been made from inlet supplies to angle
stops, remove Spritzer Housing, Basket and Washer (see Spritzer
Installation on page 5).
Open both hot and cold valves. Slowly open angle stops from below
Turn water off and reinstall Spritzer Housing, Basket and Washer.
INLET HOSEINLET HOSE

WARNING
: Do not clean your SANTEC product with ammonia (Window cleaner), bleach, soaps, acids,
abrasives, harsh polishes, harsh cleaners, a coarse surfaced cloth, coarse sponge, or any type of scouring
Polished & Satin 24K Gold :
The Karat mark states the percentage of pure gold -- 24K is 100 percent gold. As one of
the Earth's most precious metals, gold is the most supple and malleable of all metals. Gold-plated faucets scratch easily. To
clean, wipe down with a dry soft cloth after each use. Gold surfaces should be coated with a thin layer of non-abrasive carnauba
wax or liquid car wax up to 3 or 4 times per year. This will prevent water spotting and water deposit buildup. We recommend
using SANTEC’s Polish which has been formulated to clean and seal, leaving behind a protective coating th
at will resist
tarnishing and improve water repellency.
Antique Bronze :
Antique bronze simulates the antiquity of Old-World craftsmanship with a golden base color and a blend
of dark undertones. To clean, wipe down with a dry soft cloth after each use. Antique Bronze should be coated with a thin layer
of non-abrasive carnauba wax or liquid car wax up to 3 or 4 times per year. We recommend using SANTEC’s Polish which has
been formulated to clean and seal, leaving behind a protective coating that will resist tarnishing and improve water repellency.
Oil Rubbed Bronze :
Oil-rubbed bronze simulates the antiquity of Old-World craftsmanship with its warm, dark brown
color and copper undertones. To clean, wipe down with a dry soft cloth after each use. Oil-rubbed bronze should be coated with
a thin layer of non-abrasive carnauba wax or liquid car wax up to 3 or 4 times per year. We recommend using SANTEC Polish
which has been formulated to clean and seal, leaving behind a protective coating that will resist tarnishing and improve water
repellency.
Polished Chrome:
use. A non-abrasive all-metal cleaner can then be applied to restore the shine. The surface can also be coated with a thin layer of non-abrasive
carnauba wax or liquid car wax. This will prevent water spotting and water deposit buildup. We recommend using SANTEC’s Polishwhich
has been formulated to clean and seal, leaving behind a protective coating that will resist tarnishing and improve water repellency.
Polished and Satin Nickel
Thank you for making SANTEC a part of your lifestyle and luxury spa experience. Our products have been created as works of
CLE AR CO ATED F I N ISHES
N O N-CLE AR COATED FINISHE S
F INISH C ARE INFORMATIO N
PLEASE REGISTER YOUR PRODUCT ONLINE FOR WARRANTY SERVICES
www.santecfaucet.com/registration
SANTEC
SANTEC
A non-abrasive all-metal cleaner can then be applied to restore the shine. The surface can also be coated with a thin layer of non-abrasive
carnauba wax or liquid car wax. This will prevent water spotting and water deposit buildup. We recommend using SANTEC’s Polishwhich
has been formulated to clean and seal, leaving behind a protective coating that will resist tarnishing and improve water repellency.
:
use.

This warranty does not cover:
SANTEC res
erves the right to examine any product claimed defective prior to any warranty claim being accepted or processed,
o
state.
Damage due to negligence, accident, abuse, improper installation, or improper maintenance such as, but not limited to: heat
from soldering during installation, the use of plumber’s putty, damage from tools used during installation, the use or exposure
to chemicals or cleaning products either abrasive or non-abrasive, or the use of any cleaning tool or product other than a
altered or used in a manner not typical for the product.
Loss, damages, or expense, incidental or consequential whatsoever, originating from the purchase, installation, use, repair,
failure, or replacement of any
SANTEC pro
duct or part, allowed by law.
Commercial and/or Industrial installations and use of the product.
This warranty does not include labor, travel charges, or any costs incurred for repair, removal, installation, servicing,
diagnosing, or handling of either defective or replacement parts.
1.
2.
3.
4.
5.
SANTEC is committed to enhancing your bathroom experience by creating luxury products that will provide enduring
satisfaction. Every
effort has been made to satisfy the highest standards of design and production, to create lasting peace of
mind for our customers. We provide the following limited warranties on our products:
Limited Warranty against all manufacturer’s defects and tarnish.
Finishes:
Mechanical:
A Lifetime Limited Warranty is provided on parts to be free from failure related to defects in materials and
workmanship.
SANTEC
cartridges carry a Five (5) Year Limited Warranty against manufacturer’s defects.
This warranty extends to the original consumer purchaser only and extends for as long as the original purchaser owns the
product and the home in which the product is installed.
Please read ‘WHAT IS COVERED BY OUR WARRANTY’ and ‘EXCLUSIONS AND LIMITATIONS OF WARRANTY’ sections to
understand what is and what is not covered. Please have ready the proof of purchase (original sales receipt), description of the
problem, and carefully package the product or defective part with postage prepaid.
Then, please contact your local
SANTEC
Showroom or write to
SANTEC
Technical Services.
L IFET I ME LIMITE D WARRANTY
L ENGTH OF WA RRAN TY & WHO IS COVE RED BY O U R WARRANTY
WHAT IS COVERED BY OUR WA RRANTY
E X C LUSIO NS AND LI MITATIONS OF WARRANTY
T O OB TAIN WARRAN TY SER VICE
SANTEC
Access should be provided to the roman tub valves for future service or repair to valves and piping. Under no
circumstances will Santec Faucet, Inc. be liable for anycosts associated with the removal of materials for future
access to the tub valves or piping for service or repair.
-
 1
1
-
 2
2
-
 3
3
-
 4
4
-
 5
5
-
 6
6
-
 7
7
-
 8
8
-
 9
9
-
 10
10
-
 11
11
-
 12
12


Santec KLASSICA 9570KT Operating instructions
- Category
- Sanitary ware
- Type
- Operating instructions
- This manual is also suitable for
Ask a question and I''ll find the answer in the document
Finding information in a document is now easier with AI
Related papers
-
 Santec Widespread 9220ED Installation guide
-
 Santec Alexis 2380HA Installation guide
-
 Santec Monza Series General Installation Instructions
-
 Santec 9527KL-TM Installation guide
-
 Santec Designer Series Operating instructions
-
Santec 9220ED75 Installation guide
-
 Santec E-Series Operating instructions
-
 Santec TH-8010 Installation guide
-
 Santec 2780EL10 Installation guide
-
 Santec E-Series Operating instructions


