
Contact Caple on 0117 938 7420 for spare parts or www.caple.co.uk
Dishwasher
Instruction Manual
DI642

Instruction manual Di6422 Please keep this instruction manual for future reference
CONTENTS
Safety Instructions 3
Environmental Protection 8
Quick Operation Guide 9
Control Panel 10
Product Overview 12
Water Softener 13
Loading the Salt into the Softner 14
Rinse Aid Dispenser 16
Detergent Dispenser 18
Loading the Dishwasher Baskets 20
Wash Cycle Table 27
Programming the Dishwasher 28
Auto-open 29
Cleaning and Maintenance 30
Installation Instructions 35
Troubleshooting 44
Technical Information 47
Caple Contact Details 48

Instruction manual Di642 3
Please keep this instruction manual for future reference
SAFETY INSTRUCTIONS
- This product is not designed for commercial use, it is a
household appliance only. It is not intended to be
used in:
• Staff kitchen areas in shops, offices and other
working environments.
• Bed and breakfast type environments.
• By clients in hotels, motels and other residential
type environments.
- This appliance can be used by children aged from 8
years and above and persons with reduced physical,
sensory or mental capabilities or lack of experience
and knowledge if they have been given supervision or
instruction concerning use of the appliance in a safe way
and understand the hazards involved. Children shall not
play with the appliance. Cleaning and user maintenance
shall not be made by children without supervision.
- This appliance is not intended for use by persons
(including children) with reduced physical, sensory or
mental capabilities, or lack of experience and knowledge,
unless they have been given supervision or instruction
concerning use of the appliance by a person responsible
for their safety.
- This appliance is for indoor household use only.
- To protect against the risk of electrical shock, do not
immerse the unit, cord or plug in water or other liquid.
- Please unplug before cleaning or performing
maintenance on the appliance.

Instruction manual Di6424 Please keep this instruction manual for future reference
- Use a slightly moistened soft cloth with mild soap, and
then use a dry cloth to wipe it again.
- This appliance must be earthed. In the event of a
malfunction or breakdown, earthing will reduce the risk
of an electric shock by providing a path of less resistance
of electric current. This appliance is equipped with a
cord having an equipment-earthing conductor and a
grounding plug.
- The plug must be plugged into an appropriate outlet
that is installed and earthed in accordance with all local
codes and regulations.
- Improper connection of the equipment-earthing
conductor can result in the risk of an electric shock.
- Check with a qualified electrician or Caple service
representative if you are in doubt whether the appliance
is properly grounded.
- Do not modify the plug provided with the appliance;
If it does not fit the outlet.
- Have a proper outlet installed by a qualified electrician.
- Do not abuse, sit on, or stand on the door or dish rack of
the dishwasher.
- Do not operate your dishwasher unless all enclosure
panels are properly in place.
- Open the door very carefully when the dishwasher is
operating, there is a risk of water squirting out.
- Do not place any heavy objects on or stand on the door
when it is open. The appliance could tip forward.

Instruction manual Di642 5
Please keep this instruction manual for future reference
- When loading items to be washed:
• Locate sharp items so that they are not likely to
damage the door seal.
• Warning: Knives and other utensils with sharp points
must be loaded in the basket with their points down or
placed in a horizontal position.
- Check that the detergent powder is empty after
completion of the wash cycle.
- Do not wash plastic items unless they are marked
dishwasher safe or the equivalent.
- For plastic items not marked, check the manufacturer’s
recommendations.
- Use only detergent and rinse additives designed for an
automatic dishwasher.
- Never use soap, laundry detergent, or hand washing
detergent in your dishwasher.
- Children should be supervised to ensure that they do not
play with the appliance.
- The door should not be left open, since this could
increase the risk of tripping.
- The appliance may only be used with correctly adjusted
door springs.
- If the supply cord is damaged, it must be replaced by
Caple, its service agent or a similarly qualified person in
order to avoid a hazard.
- During installation, the power supply must not be
excessively or dangerously bent or flattened.
- The dishwasher must not be installed under a hob.

Instruction manual Di6426 Please keep this instruction manual for future reference
- Do not tamper with controls.
- The appliance is to be connected to the water mains
using new hose sets and that old hose-sets should not
be reused.
- To save energy, in stand by mode, the appliance will
switch off automatically while there is no any operation
in 30 minutes.
ELECTRICAL CONNECTION
WARNINGS:
- For personal safety:
- Do not use an extension cord or an adapter plug with
this appliance.
- Do not, under any circumstances, cut or remove the
earthing connection from the power cord.
ELECTRICAL REQUIREMENTS
- Please look at the rating label to know the rating voltage
and connect the dishwasher to the appropriate power
supply. Use the required 10 amp fuse, time delay fuse
or circuit breaker recommended and provide separate
circuit serving only this appliance.
ELECTRICAL CONNECTION
- Ensure the voltage and frequency of the power being
corresponds to those on the rating label. Only insert the

Instruction manual Di642 7
Please keep this instruction manual for future reference
plug into an electrical socket which is earthed properly.
If the electrical socket to which the appliance must be
connected is not appropriate for the plug, replace the
socket, rather than using a adapter as they could cause
overheating and burns.
GROUNDING INSTRUCTIONS
- This appliance must be earthed. In the event of a
malfunction or breakdown, earthing will reduce the risk
of electric shock by providing a path of least resistance
for the electric current. This appliance is equipped
with a cord having an equipment-earthing conductor
and an earthing plug. The plug must be plugged into
an appropriate outlet that is installed and earthed in
accordance with all local standards and requirements.
WARNING :
- Improper connection of the equipment grounding
conductor can result in the risk of an electric
shock. Check with a qualified electrician or service
representative if you are in doubt whether the appliance
is properly grounded. Do not modify the plug provided
with the appliance; If it is not fit for the outlet. Have a
proper outlet installed by a qualified electrician.

Instruction manual Di6428 Please keep this instruction manual for future reference
ENVIRONMENTAL PROTECTION
Waste electrical products should not be disposed of with household waste. Please recycle where
facilities exist. Check with your Local Authority or retailer for recycling advice. This appliance is
marked according to the European Directive on Waste Electrical and Electronic Equipment (WEEE).
By ensuring this product is disposed of correctly, you will help prevent potential negative
consequences for the environment and human health, which could otherwise be caused by
inappropriate waste handling of this product. The symbol on the product indicates that this
product may not be treated as household waste. Instead it shall be handed over to the applicable
collection point for the recycling of electrical and electronic equipment. Disposal must be carried
out in accordance with local environmental regulations for waste disposal.
For more detailed information about treatment, recovery and recycling of this product, please
contact your local council, your household waste disposal service or the retailer where you
purchased the product.
CE DECLARATIONS OF CONFORMITY
This appliance has been manufactured to the strictest standards and complies with all applicable
legislation, Low Voltage Directive (LVD) and Electromagnetic Compatibility (EMC).
TECHNICAL FICHE
This appliance conforms to all current and applicable energy regulations. To view the Technical
Fiche that supports the energy labelling data, please visit the product page on our website
www.caple.co.uk
WARRANTY:
Your new appliance is covered by warranty. The warranty card is enclosed - if it is missing, you
must provide the following information to your retailer in order to receive a replacement: date
of purchase, model and serial number (placed on the inside of the appliance storage drawer).
Registration can also be completed online by visiting www.caple.co.uk.
Ensure you keep your warranty card safe, you may need to show it to Caple Service together with
proof of purchase.
If you fail to show your warranty card you will incur all repair charges.
Spare parts are only available from Caple Service and spare parts authorised centres.

Instruction manual Di642 9
Please keep this instruction manual for future reference
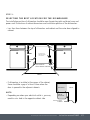
QUICK OPERATION GUIDE
QUICK OPERATION GUIDE
5
2
Remove large residue on the cutlery
3
Load the baskets
4
Fill the dispenser
Select a programme and run
the dishwasher
Inside Outside
1
Install the dishwasher
5
2
Remove large residue on the cutlery
3
Load the baskets
4
Fill the dispenser
Select a programme and run
the dishwasher
Inside Outside
1
Install the dishwasher
5
2
Remove large residue on the cutlery
3
Load the baskets
4
Fill the dispenser
Select a programme and run
the dishwasher
Inside Outside
1
Install the dishwasher
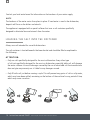
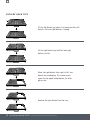
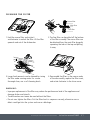
1. Install the dishwasher.
2. Remove large residue on the cutlery.
4. Fill the dispenser.
3. Load the baskets.
5. Select a programme and run
the dishwasher.
QUICK OPERATION GUIDE
5
2
Remove large residue on the cutlery
3
Load the baskets
4
Fill the dispenser
Select a programme and run
the dishwasher
Inside Outside
1
Install the dishwasher
5
2
Remove large residue on the cutlery
3
Load the baskets
4
Fill the dispenser
Select a programme and run
the dishwasher
Inside Outside
1
Install the dishwasher
5
2
Remove large residue on the cutlery
3
Load the baskets
4
Fill the dispenser
Select a programme and run
the dishwasher
Inside Outside
1
Install the dishwasher
1. Install the dishwasher.
2. Remove large residue on the cutlery.
4. Fill the dispenser.
3. Load the baskets.
5. Select a programme and run
the dishwasher.
1. Install the dishwasher.
2. Remove large food residue from plates
and cutlery.
4. Fill the dispenser.
3. Load the baskets.
5. Select a programme and run the dishwasher.

Instruction manual Di64210 Please keep this instruction manual for future reference
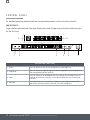
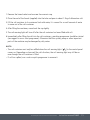
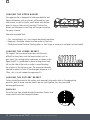
CONTROL PANEL
For detailed operating method read the corresponding content on the instruction manual.
IMPORTANT:
To get the best performance from your dishwasher, read all operating instructions before using it
for the first time.
1
2
3 4 5 7
5 6
OPERATION (BUTTON)
1 - Power Press this button to turn on your dishwasher, the screen lights up.
2 - Programme
Press this button to toggle through and select the appropriate washing programme.
The corresponding indicator will be lit.
3 - Delay
Press this button to set the delayed hours for washing. You can delay the start of
washing up to 24 hours. One press on this button delays the start of washing by
one hour.
4 - Half-load
For smaller loads, you can choose this function to save energy and water. NOTE: It
can only be used with Intensive, Universal, ECO, Glass and 90 min.

Instruction manual Di642 11
Please keep this instruction manual for future reference
DISPLAY
5 - Display Screen
To show the selected programme.
To show the remaining time, delay time and error codes etc.
6 - Programme Screen
INTENSIVE
Heavily soiled items include pots and pans. With dried on food.
UNIVERSAL
For normally soiled loads, such as pots, plates, glasses and lightly soiled
pans.
ECO
This is the standard programme suitable for normally soiled loads, such
as pots, plates, glasses and lightly soiled pans.
GLASS
For lightly soiled crockery and glass.
90 MIN
For normally soiled loads that need a quick wash.
RAPID
A shorter wash for lightly soiled loads that do not need drying.
PREWASH
To rinse dishes that you plan to wash later that day.
7 - Warning Indicator
RINSE AID
If the “ ” indicator is lit, it means the dishwasher is low on dishwasher
rinse aid and requires a refill.
SALT
If the “ ” indicator is lit, it means the dishwasher is low on dishwasher
salt and needs to be refilled.

Instruction manual Di64212 Please keep this instruction manual for future reference
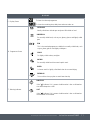
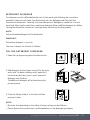
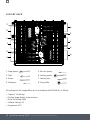
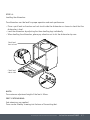
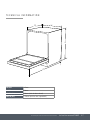
PRODUCT OVERVIEW
Top spray arm
Dispenser
Salt container
Filter assembly
Lower spray arm
Inner pipe
Upper spray arm
Upper basket Lower basket
Cup rack
Cutlery rack
NOTE:
Images are for reference only.
PRIOR TO USING FOR THE FIRST TIME
Before using your dishwasher for the first time:
› Set the water softener.
› Add 1.5Kg dishwasher salt and then fill the salt container with water.
› Fill the Rinse Aid dispenser.
› Fill in detergent.

Instruction manual Di642 13
Please keep this instruction manual for future reference
WATER SOFTENER
The water softener must be set manually, using the water hardness dial.
The water softener is designed to remove minerals and salts from the water, which would have a
detrimental or adverse effect on the operation of the appliance.
The higher the content of these minerals and salts, the harder your water is.
The softener should be adjusted according to the hardness of the water in your area. Your local
Water Authority can advise you on the hardness of the water in your area.
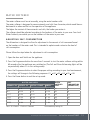
ADJUSTING SALT CONSUMPTION
The dishwasher is designed to allow for adjustment in the amount of salt consumed based
on the hardness of the water used. This is intended to optimise and customise the level of
salt consumption.
Please follow the steps below for adjustment in salt consumption:
1. Open the door and Switch on the appliance.
2. Press the Programme button for more than 5 seconds to start the water softener setting within
60 seconds after the appliance was switched on (The Salt and Rinse Aid warning lights will be
on periodically when it is in this setting mode).
3. Press the Programme button to select the proper setting according to your local environment,
the settings will change in the following sequence: H1 H2 H3 H4 H5 H6
4. Press the Power button to end the set up mode.
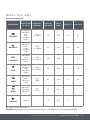
WATER HARDNESS WATER
SOFTENER
LEVEL
SALT
CONSUMPTION
(GRAM/CYCLE)
GERMAN °DH FRENCH °FH BRITISH °CLARKE MMOL/L
0~5 0~9 0~6 0~0.94 H1 0
6-11 10-20 7-14 1.0-2.0 H2 9
12-17 21-30 15-21 2.1-3.0 H3 12
18-22 31-40 22-28 3.1-4.0 H4 20
23-34 41-60 29-42 4.1-6.0 H5 30
35-55 61-98 43-69 6.1-9.8 H6 60
°dH=1.25 °Clarke=1 1.78°fH=0.178mmol/l The manufactory setting: H3

Instruction manual Di64214 Please keep this instruction manual for future reference
LOADING THE SALT INTO THE SOFTENER
Always use salt intended for use with dishwashers.
The salt container is located beneath the lower basket and should be filled as explained in
the following:
ATTENTION:
› Only use salt specifically designed for the use in dishwasher. Every other type
of salt not specifically designed for the use in a dishwasher, especially table salt, will damage
the water softener. In case of damages caused by the use of unsuitable salt the manufacturer
does not give any warranty nor is liable for any damages caused.
› Only fill with salt just before running a cycle. This will prevent any grains of salt or salty water,
which may have been spilled, remaining on the bottom of the machine for any period of time,
which may cause corrosion.
Contact your local water board for information on the hardness of your water supply.
NOTE
The hardness of the water varies from place to place. If hard water is used in the dishwasher,
deposits will form on the dishes and utensils.
The appliance is equipped with a special softener that uses a salt container specifically
designed to eliminate lime and minerals from the water.

Instruction manual Di642 15
Please keep this instruction manual for future reference
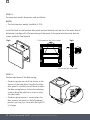
1. Remove the lower basket and unscrew the reservoir cap.
2. Place the end of the funnel (supplied) into the hole and pour in about 1.5kg of dishwasher salt.
3. Fill the salt container to its maximum limit with water, It is normal for a small amount of water
to come out of the salt container.
4. After filling the container, screw back the cap tightly.
5. The salt warning light will turn off after the salt container has been filled with salt.
6. Immediately after filling the salt into the salt container, a washing programme should be started
(we suggest to use a short programme). Otherwise the filter system, pump or other important
parts of the machine may be damaged by salty water.
NOTE:
› The salt container must only be refilled when the salt warning light ( ) in the control panel
comes on. Depending on how well the salt dissolves, the salt warning light may still be on
even though the salt container is filled.
› If salt has spilled, run a soak or quick programme to remove it.

Instruction manual Di64216 Please keep this instruction manual for future reference
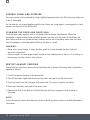
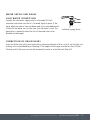
1. Remove the rinse
reservoir cap by lifting
up the handle.
2. Pour the rinse aid into
the dispenser, being
careful not to overfill.
3. Close the cap.
WHEN TO REFILL THE RINSE AID DISPENSER
The regularity of the dispenser needing to be refilled depends on how often dishes are
washed and the rinse aid setting used.
The Low Rinse Aid indicator ( ) will be lit when more rinse aid is needed.
Do not overfill the rinse aid dispenser.
FILL THE RINSE AID DISPENSER
3
Close the cap.
1
2
Remove the rinse reservoir cap by
lifting up the handle.
Pour the rinse aid into the dispenser,
being careful not to overfill.
RINSE AID DISPENSER
The Rinse Aid is released during the final rinse to prevent water from forming droplets on your
dishes, which can leave spots and streaks. It also improves drying by allowing water to roll off the
dishes. Your dishwasher is designed to use liquid Rinse Aids.
FUNCTION OF RINSE AID
Rinse Aid is automatically added during the last rinse, ensuring thorough rinsing, and spot and
streak free drying.
ATTENTION:
Only use branded Rinse Aid for dishwasher. Never fill the Rinse Aid dispenser with any other
substances (e.g. Dishwasher cleaning agent, liquid detergent). This would damage the appliance.
WHEN TO REFILL THE RINSE AID DISPENSER
The regularity of the dispenser needing to be refilled depends on how often dishes are washed
and the rinse aid setting used.
› The Low Rinse Aid indicator (
WHEN TO REFILL THE RINSE AID DISPENSER
The regularity of the dispenser needing to be refilled depends on how often dishes are
washed and the rinse aid setting used.
The Low Rinse Aid indicator ( ) will be lit when more rinse aid is needed.
Do not overfill the rinse aid dispenser.
FILL THE RINSE AID DISPENSER
3
Close the cap.
1
2
Remove the rinse reservoir cap by
lifting up the handle.
Pour the rinse aid into the dispenser,
being careful not to overfill.
) will be lit when more rinse aid is needed.
› Do not overfill the rinse aid dispenser.
FILL THE RINSE AID DISPENSER

Instruction manual Di642 17
Please keep this instruction manual for future reference
ADJUST RINSE AID DISPENSER
To achieve a better drying performance with limited rinse aid, the dishwasher is designed to adjust
the consumption by user. Follow the below steps.
1. Open the door, switch on the appliance.
2. Within 60 seconds after step 1, press the Programme button for more than 5 seconds,
and then press the Delay button, the rinse aid light will blink.
3. Press the Programme button to select your desired setting. The settings will change in the
following sequence: D1->D2->D3->D4->D5->D1. The higher the number, the more rinse aid
the dishwasher uses.
4. If there is no operation for 5 seconds, the setting will be successful.
NOTE:
Press the power button to cancel the setting.

Instruction manual Di64218 Please keep this instruction manual for future reference
DETERGENT DISPENSER
FUNCTION OF DETERGENT
The chemical ingredients that compose the detergent are necessary to remove, crush and dispense
all dirt out of the dishwasher. Most of the commercial quality detergents are suitable for this
purpose.
ATTENTION:
Proper Use of Detergent: Use only detergent specifically made for the use in dishwashers. Keep
your detergent fresh and dry. Don’t put powdered detergent into the dispenser until you’re ready
to wash dishes.
DETERGENTS
There are 3 sorts of detergents:
1. With phosphate and with chlorine
2. With phosphate and without chlorine
3. Without phosphate and without chlorine
Normally new powdered detergent is without phosphate. Thus the water softener function of
phosphate is not given. In this case we recommend to fill salt in the salt container even when the
hardness of water is only 6 dH. If detergents without phosphate are used in the case of hard water
often white spots appear on dishes and glasses. In this case please add more detergent to reach
better results. Detergents without chlorine do only bleach a little. Strong and coloured spots will
not be removed completely. In this case please choose a programme with a higher temperature.
DETERGENT TABLETS
Detergent tablets of different brands dissolve at different speeds. For this reason some detergent
tablets cannot dissolve and develop their full cleaning power during short programmes. Therefore
please use long programmes when using detergent tablets, to ensure the complete removal of
detergent residuals.

Instruction manual Di642 19
Please keep this instruction manual for future reference
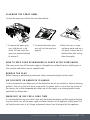
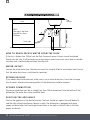
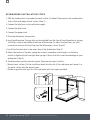
1. Open the cap by pressing down the release catch.
2. Add detergent into the larger cavity (A) for the main
wash cycle. For better cleaning result, especially if
you have very dirt items, pour a small amount of
detergent onto the door.
The additional detergent will activate during the
pre-wash phase.
3. Close the flap by sliding it to the front and then
pressing it down.
NOTE:
› Be aware that depending on the soiling of water, setting may be different.
› Please observe the manufacturer’s recommendations on the detergent packaging.
12
2
1 Open the cap by pressing down the
release catch.
Add detergent into the larger cavity
(A) for the main wash cycle.
For better cleaning result, especially if
you have very dirt items, pour a small
amount of detergent onto the door.
The additional detergent will activate
during the pre-wash phase.
3
Close the flap by sliding it to the
front and then pressing it down.
A
Press down
B
NOTE :
Be aware that depending on the soiling of water, setting may be different.
Please observe the manufacturer's recommendations on the detergent packaging.
DETERGENT DISPENSER
The dispenser must be refilled before the start of each wash cycle following the instructions
provided in the wash cycle table. Your dishwasher uses less detergent and Rinse Aid than
conventional dishwashers. Generally, only one tablespoon of detergent is needed for a normal
wash load. More heavily soiled items need more detergent. Always add the detergent just before
starting the dishwasher, otherwise it could get damp and will not dissolve properly.
NOTE:
Only use branded detergent aid for dishwasher.
WARNING:
Dishwasher detergent is corrosive.
Take care to keep it out of reach of children.
FILL THE DETERGENT DISPENSER

Instruction manual Di64220 Please keep this instruction manual for future reference
LOADING THE DISHWASHER BASKETS
RECOMMENDATION
› Consider buying utensils which are identified as dishwasher-proof.
› Use a mild detergent that is described as ‘kind to dishes’. If necessary, seek further information
from the detergent manufacturers.
› For particular items, select a programme with as low a temperature as possible.
› To prevent damage, do not take glass and cutlery out of the dishwasher immediately after the
programme has ended.
THE FOLLOWING CUTLERY / DISHES:
ARE NOT SUITABLE
› Cutlery with wood, horn china or mother-of-pearl handles.
› Plastic items that are not heat resistant.
› Older cutlery with glued parts that are not temperature resistant.
› Bonded cutlery items or dishes.
› Pewter or copper items.
› Crystal glass.
› Steel items subject to rusting.
› Wooden platters.
› Items made from synthetic fibres.
ARE OF LIMITED SUITABILITY
› Some types of glasses can become dull after a large number of washes.
› Silver and aluminium parts have a tendency to discolour during washing.
› Glazed patterns may fade if machine washed frequently.
Page is loading ...
Page is loading ...
Page is loading ...
Page is loading ...
Page is loading ...
Page is loading ...
Page is loading ...
Page is loading ...
Page is loading ...
Page is loading ...
Page is loading ...
Page is loading ...
Page is loading ...
Page is loading ...
Page is loading ...
Page is loading ...
Page is loading ...
Page is loading ...
Page is loading ...
Page is loading ...
Page is loading ...
Page is loading ...
Page is loading ...
Page is loading ...
Page is loading ...
Page is loading ...
Page is loading ...
Page is loading ...
-
 1
1
-
 2
2
-
 3
3
-
 4
4
-
 5
5
-
 6
6
-
 7
7
-
 8
8
-
 9
9
-
 10
10
-
 11
11
-
 12
12
-
 13
13
-
 14
14
-
 15
15
-
 16
16
-
 17
17
-
 18
18
-
 19
19
-
 20
20
-
 21
21
-
 22
22
-
 23
23
-
 24
24
-
 25
25
-
 26
26
-
 27
27
-
 28
28
-
 29
29
-
 30
30
-
 31
31
-
 32
32
-
 33
33
-
 34
34
-
 35
35
-
 36
36
-
 37
37
-
 38
38
-
 39
39
-
 40
40
-
 41
41
-
 42
42
-
 43
43
-
 44
44
-
 45
45
-
 46
46
-
 47
47
-
 48
48


Ask a question and I''ll find the answer in the document
Finding information in a document is now easier with AI
Related papers
Other documents
-
Teka DW8 40 FI EU User manual
-
Proline IDW12PU Use and Maintenance Manual
-
 IAG IDF6SE3 Operating instructions
-
Haier HEC9AFMS Instructions For Use Manual
-
Candy CDI 2T1047 User manual
-
Logik LF674WN User manual
-
BOMANN GSP 7409 Operating instructions
-
BOMANN GSP 7410 Operating instructions
-
Amica EGSPU 500 910 E Quick start guide
-
Candy CDI 1L952 User manual
