
6021810/020
I
D
E
NL
P
F
GB
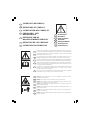
SCARIFIER - SCARIFICATORE
VERITIKUTIERER - SCARIFICATEUR
VERTICUTEERMACHINE
ESCARIFICADORE - AREJADOR
Leggereattentamentelepresentiistruzioniprimadelprimoimpiego.
Readthisoperatormanual carefully before the first use.
Lireavec attentionces instructions avant la premièreutilisation
VorderAnwendungdievorliegendenAnweisungenaufmerksamlesen.
Leesaandachtigdezeinstructiesdooralvorens het apparaat voor heteerst in gebruik te nemen.
Leer con cuidado estasinstruccionesantesde la primerautilización.
Leiacomatençãoestasinstruçõesantesdeutilizarpelaprimeiravez o aparelho.
D
NL
E
P
I
GB
F
ÜBERSETZUNG DER ORIGINALBETRIEBSANLEITUNG

SIGNIFICATO DEI SIMBOLI
DEFINITIONS OF SYMBOLS
SIGNIFICATION DES SYMBOLES
ERKLÄRUNG DER
WARNSYMBOLE
BETEKENIS VAN DE
WAARSCHUWINGSSYMBOLEN
DEFINICION DE LOS SIMBOLOS
SIGNIFICADO DOS SÍMBOLOS
ENG.
I
F
D
NL
E
P
AVVERTENZE!
WARNINGS!
AVERTISSEMENT!
WARNUNG!
WAARSCHUWINGEN!
ADVERTENCIAS!
ADVERTENCIAS!
ENG.
F
D
NL
E
P
I
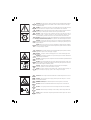
Chiunque utilizzi l’arieggiatore deve prima leggere attentamente il manuale di istruzioni e
manutenzione e familiarizzarsi completamente con i comandi per un uso corretto dell’arieggiatore
Read the Operating and Service Instructions carefully before using the aerator. Be throroughly
familiar with its controls before any use.
Lire soigneusement la notice d’emploi et d’entretien avant d’utiliser l’aérateur à gazon. Se
familiariser complètement avec le fonctionnement de ses commandes avant toout emploi.
Jeder, der den Vertikutierer benutzt, muss zunächst sorgfältig die Betriebs- und Wartungsanleitung
durchlesen und sich für einen korrekten Gebrauch mit allen Bedienungsteilen vertraut machen.
Alle personen die de ventilatiemachine gebruiken dienen eerst de handleiding voor gebruik en
onderhoud zorgvuldig door te lezen, om volledig vertrouwd te raken met de instructies voor een
correct gebruik van de ventilatiemachine.
Cualquier persona, antes de utilizar el aireador, tiene que leer atentamente el presente manual
de instrucciones y mantenimiento y familiarizarse bien con los mandos. Sólo así se puede
garantizar un empleo correcto del aireador.
Antes de usar arejador leia atentamente o manual de instruções e manutenção e familiarize
completamente com os comandos para usar correctamente o arejador.
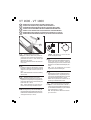
PERICOLO - Non mettere in moto e non usare l’arieggiatore in prossimità di persone,
specialmente bambini o animali.
DANGER: Do not start the aerator when children, people or pets are nearby.
DANGER - Ne pas mettre en marche et ne pas utiliser l’aérateur à gazon quand des enfants,
des personnes ou des animaux se trouvent à proximité.
GEFAHR - Den Vertikutierer nicht in Betrieb setzen, wenn sich in der Nähe Personen und
insbesondere Kinder aufhalten.
GEVAAR - De ventilatiemachine niet starten of gebruiken in de nabijheid van personen, met
name kinderen en dieren.
PELIGRO - No poner en marcha ni utilizar el aireador si hay personas, especialmente niños, o
animales en los alrededores.
PERIGO - Não ponha a trabalhar nem utilize o arejador próximo de pessoas, especialmente de
crianças e de animais.
ENG.
F
D
NL
E
P
I
ENG.
F
D
NL
E
P
I

PERICOLO - Non porre le mani o i piedi in prossimità o al di sotto delle parti rotanti. Mantenersi
sempre distanti dall’apertura di scarico dell’erba. I denti accuminati continuano a ruotare dopo
aver spento il motore.
DANGER - Do not put hands or feet near or under rotating parts. Keep clear off the discharge
opening at all times. The sharp tines continues to rotate after the unit is switched off.
DANGER- Eloigner les mains et les pieds des pièces rotatives. Ne jamais s’approcher de l’orifice
de décharge. Les dents aiguisées continues de tourner après l’arrêt du moteur.
GEFAHR - Achten Sie darauf, nicht mit Händen oder Füßen in die Nähe oder unter die
rotierenden Teile zu geraten. Bewahren Sie stets angemessenen Abstand von der
Grasauswurföffnung. Die Messer laufen auch noch nach Abschalten des Gerätes weiter.
GEVAAR - Plaats de handen en voeten niet in de nabijheid van of onder de roterende delen. Blijf
altijd op veilige afstand van de opening voor de grasafvoer. De mesbladen blijven doordraaien
nadat u de machine heeft uitgeschakeld.
PELIGRO - No poner nunca las manos ni los pies cerca o debajo de la cuchilla. Mantenerse
siempre lejos de la abertura de descarga de la hierba. Las
cuchillas siguen girando después de
apagar la máquina.
PERIGO - Não colocar as mãos ou os pés nas proximidades ou debaixo das partes rotatórias.
Manter-se sempre distante da abertura de descarregamento da grama. As lâminas continuam
a rodar após desligar o aparelho.
ENG.
F
D
NL
E
P
I
ENG.
F
D
NL
E
P
I
PERICOLO - Disconnettere sempre la macchina dalla rete elettrica prima di pulirla, esaminarla,
aggiunstarla o quando il cavo si danneggia o si impiglia.
DANGER – Sharp tines - beware of cutting fingers or toes - Remove electrical plug before
maintenance.
DANGER - Dents aiguisées - Attention aux coupures des doigts ou des orteils - Débrancher le
,cable électrique avant l’entretien
GEFAHR – Vor dem Reinigen, Prüfen, Reparieren oder Hi bei verheddertem Speisekabel stets den
Netzstecker ziehen.
GEVAAR - Zet de machine altijd eerst uit en haal de stekker uit het stopcontact voordat u hem
gaat schoonmaken, onderdelen gaat verwijderen of de machine gaat repareren. Doe dit ook als
het snoer beschadigd is of beklemd is geraakt.
PELIGRO – Desenchufar siempre la máquina de la línea eléctrica antes de limpiarla,
examinarla, ajustarla o cuando el cable se averíe o enganche.
PERIGO – Desligue a máquina da rede eléctrica antes de efectuar qualquer operação de
limpeza, manutenção ou inspecção, quando o cabo se estragar ou ficar preso.
PERICOLO - Tenere sempre il cavo lontano dalle lame e controllare sempre dove esso si trova.
DANGER – Always keep the electrical supply cable away from the sharp tines – be aware
of their position at all times.
DANGER – Gardez toujours le câble électrique loin de dents aiguisées;
à tout moment,
sachez où ils se trouvent.
GEFAHR - Halten Sie das Kabel beim Arbeiten stets im Auge und fern von den Messern.
GEVAAR – Let er goed op dat het snoer nooit in aanraking kan komen met de mesbladen.
PELIGRO - Mantener siempre el cable lejos de las cuchillas y controlar siempre dónde está.
PERIGO – Manter o cabo eléctrico sempre longe das lâminas e verificar sempre onde o mesmo
se encontra.
ENG.
F
D
NL
E
P
I
Page is loading ...
Page is loading ...
Page is loading ...
Page is loading ...

6
BASIC SAFETY PRECAUTIONS
KNOW YOUR MACHINE
Read this manual carefully, observing all
recommended Safety Precautions (WARNINGS)
before, during and after using your machine, and
maintain your machine in good working order.
Familiarise yourself with the controls on your
machine before attempting to operate it, but
above all, be sure that you know how to stop your
machine in an emergency. Retain this manual
and all literature supplied with your machine for
future reference.
SAFETY PRECAUTIONS WARNINGS:
E1. Always disconnect your machine from the
electrical supply before cleaning, inspecting or
repairing any part of it, or if the supply cable has
become damaged or entangled.
E2. To protect your feet, always wear stout shoes or
boots. Freshly cut grass is damp and slippery. Do
not use the aerator barefoot or in open sandals.
E3. Always check that your lawn or cutting path is
clear of all sticks, stones, wire or other debris.
Contact with such debris may damage your
machine and could be thrown by the blade.
E4. Wear long trousers to protect your legs - any
debris left on the lawn or cutting path may be
thrown by the blade.
E5. Do not use your machine in the rain and do not
allow it to get wet. Avoid using the machine in wet
grass.
E6. Before using your machine disconnect from the
electrical supply and visually inspect the blade
and rotating parts for damage.
Damaged blades and worn bolts are major
hazards. Also check that the blade is securely
clamped. Check all nuts and bolts frequently.
E7. Do not operate your machine if any parts are
defective. Remove all defective parts and fit new
parts before use. Always be sure that your
machine is in a safe operating condition. Only fit
original replacement parts. Parts not produced
by the manufacturer may cause poor fit and
possible injury.
ENG
E8. Do not allow children, animals or other adults get
near your machine when in use - always keep at
least 6m (20ft) away from the cutting area.
E9. Start your machine carefully with feet well away
from the blades.
E10. When the motor is running the safety distance,
given by the handle, must always be maintained.
E11. Do not leave your machine unattended whilst
it is connected to the electrical supply.
E12. Never allow children or people unfamiliar with
these instructions to use the aerator. Local
regulations may restrict the age of the operator.
E13. Keep in mind that the operator or user is
responsible for accidents or hazards occurring to
other people or their property.
E14. This aerator is fitted with a blade brake which
stops the blade from rotating within 3 seconds
after the switch has been released.
Never try to turn your machine over onto its side,
for any reason whatsoever, or even to stop the
blades while they are still turning. Always allow
them to stop.
E15. If the blade strikes an object, release the switch
lever at once, disconnect your machine from the
electrical supply and, when the blade is stationary,
turn your machine on to its side and examine the
blade and nut for damage and have specialised
service station to repair the damage before
restarting and operating the aerator.
E16. Always disconnect your machine from the
electrical supply before lifting or carrying.
E17. Stop the engine (thus the blade) if the aerator
has to be tilled for transportation when crossing
surfaces other than grass, and when carrying it to
and from the area to be aerated.
E18. Do not tilt the aerator when switching on the
motor, except if it has to be tilted for starting. In
this case, do not tilt it more than absolutely
necessary and lift only the part which is away
from the operator.
E19. Do not pull your machine towards you or walk
backwards when aerating.

7
ENG
E20. Walk, never run.
E21. Always aerate across the face or slopes, never
up and down. Put extreme caution when changing
direction on slopes. Do not aerate excessively
steep slopes and always wear non-slip foot wear.
E22. Aerate only in daylight or in good artificial light.
E23. Never use the aerator without the grass-bag in
place.
E24. Check grass bag frequently for wearing parts
or damage.
E25. Switch the motor off and wait until the blade
comes to a complete stop before removing the
grass catcher or unclogging chute.
E26. Do not switch on the motor when standing in
front of the discharge chute.
E27. Do not put hands or feet near or under rotating
parts. Keep clear off the discharge opening at all
times.
E28. If the equipment should start to vibrate
abnormally, switch off the motor and check
immediately for the cause. Vibration is generally
a warning of trouble.
E29. Care should be taken when doing any repair
work on or around the blades. To prevent any
injury, it is recommended that gloves should be
worn when working on the blade.
E30. Do not use solvent or cleaning fluids to clean
your machine - use a blunt scraper to remove
grass and dirt. Always disconnect from the
electrical supply before cleaning.
E31. Store your machine in a dry place when not in
use, preferably out of the reach of children.
ELECTRICAL SAFETY
E32. Your machine is designed for use on a.c.
(mains) electrical supplies only - do not attempt
to use on any other supply. Plug your machine
into a power point - not a light socket.
E33. MDOUBLE INSULATION
Your machine is double insulated. This means
that all external metal parts are electrically isolated
from the power supply. This is achieved by placing
an extra insulation barrier between the electrical
and mechanical parts. Double insulation means
greater electrical safety and obviates the
necessity of having the machine earthed.
E34. Always keep the electrical supply cable away
from the blades - be aware of its position at all
times.
E35. The extension cable should always be secured
firmly on the supporting hook (situated at the top
of the handlebar) to prevent it from being damaged
while the aerator is in use.
E36. Never carry your machine by the cable or jerk
the cable to separate the connectors. keep the
cable away from heat sources, oils or sharp
edges. Check the condition of your cable before
use and do not use if damaged.
E37. Your machine should always be switched off
the electrical supply, before disconnecting the
plug and socket connector, or extension cables.
E38. WARNING:
DO NOT USE AN EXTENSION CABLE WHICH
SHOWS SIGNS OF DAMAGE. FIT A NEW
CABLE COMPLETE - DO NOT MAKE ANY
PERMANENT OR TEMPORARY REPAIRS.
BASIC SAFETY PRECAUTIONS
Page is loading ...
Page is loading ...
Page is loading ...
Page is loading ...
Page is loading ...
Page is loading ...
Page is loading ...
Page is loading ...
Page is loading ...
Page is loading ...

18
ENG.
I
F
D
NL
E
P
Sui tappeti erbosi ogni anno si creano
muschio ed erbacce; questo compor-
ta un infeltrimento del terreno.
Arieggiando si elimina la superficie incrostata
e il prato riprende a respirare e ad assimilare
le sostanze nutritive, l’ossigeno e l’acqua.
Prima di arieggiare tagliare l’erba ad un’altez-
za di circa 40 mm.
Utilizzare l’arieggiatore solo con il prato asciut-
to.
Il periodo migliore per l’arieggiamento è du-
rante tutta la stagione di vegetazione, da fine
aprile fino a settembre.
Arieggiare almeno una volta l’anno.
Al fine di ottenere un tappeto verde, vi consi-
gliamo di utilizzare un fertilizzante subito dopo
aver arieggiato.
I
ENG.
F
D
Tous les ans, la mousse et les
mauvaises herbes envahissent les
tapis d’herbe, ce qui rend le terrain très
compact.
En aérant, vous éliminez la surface asphyxiée
et votre pelouse recommence à respirer et à
assimiler les substances nutritives, l’oxygène
et l’eau.
Avant d’aérer, coupez l’herbe à une hauteur
d’environ 40 mm.
N’utilisez l’aérateur à gazon que quand la
pelouse est sèche.
La meilleure période pour procéder à l’aération
est pendant toute la période de croissance,
c’est-à-dire de fin avril à septembre.
Aérez au moins une fois par an.
Afin d’obtenir un tapis vert, nous vous
conseillons d’utiliser un engrais tout de suite
après avoir aéré.
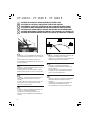
Each year and on every lawn, moss
and weeds take hold, which cause
the ground to become matted.
By aerating, the hard surface is cut, allowing
the grass to breathe and take up nutritional
substances, oxygen and water.
Before aerating, mow the lawn to a height of
about 40 mm (an inch).
Only use the aerator when the lawn is dry.
The best period for aerating is during the
growing season, from the end of April to the
end of September.
Do this work at least once a year.
To get a nice green effect, we recommend
using a fertiliser immediately after having used
the aerator.
Auf jeder Rasenfläche bilden sich Jahr
für Jahr Moos und Wildkräuter, was
zum Verfilzen des Bodens führt.
Durch das Lüften beseitigt man die verkrustete
Oberfläche und der Rasen fängt wieder zu
atmen an, da Sauerstoff, Wasser und
Nährstoffe besser den Wurzelbereich
erreichen.
Vor dem Vertikutieren den Rasen auf eine
Höhe von ca. 40 mm mähen.
Den Vertikutierer nur auf trockenem Rasen
verwenden.
Die beste Zeit für das Vertikutieren ist während
der Wachstumszeit, von Anfang April bis
September.
Mindestens einmal jährlich lüften.
Um einen grünen Rasenteppich zu erzielen,
raten wir Ihnen dazu, unmittelbar nach dem
Vertikutieren den Rasen zu düngen.
ARIEGGIARE
AERATION
AÉRER
VERTIKUTIEREN
VENTILEREN
AIREAR
AREJAR
Page is loading ...

20
ENG.
I
F
D
NL
E
P
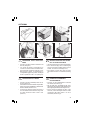
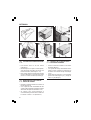
MONTAGGIO MANUBRIO
ASSEMBLING THE HANDLE
MONTAGE DU GUIDON
MONTAGE DES GRIFFS
MONTAGE VAN HET HANDSTUK
MONTAJE DEL MANILLAR
MONTAGEM DO GUIADOR
I
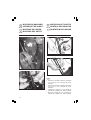
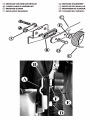
• Montare il manubrio inferiore fissandolo
con la vite (A) e la manopola (B) come
illustrato
• Montare il manubrio superiore fissandolo
con la vite (C) e la manopola (D) come
illustrato
• Collegare la staffa (E) con il tirante (F)
tramite vite e galletto. (VT 1600-VT 1800)
• Bloccare il tirante (F) con il tirante (G)
tramite vite e galletto. (VT 1600-VT 1800)
C
D
F
E
F
G
A
B


21
ENG. F
D
NL
E P
• Montez le guidon inférieur en le xant à
l’aide de la vis (A) et de la poignée (B)
comme illustré.
• Montez le guidon supérieur en le xant à
l’aide de la vis (C) et de la poignée (D)
comme illustré.
• Solidarisez la patte d’attache (E) et le tirant
(F) au moyen de la vis et de l’écrou papillon.
• Bloquez le tirant (F) avec le tirant (G) au
moyen de la vis et de l’écrou papillon.
• Monteer het onderste handstuk door dit
met de schroef (A) en de knop (B) te
bevestigen, zoals de afbeelding toont
• Monteer het bovenste handstuk door dit
met de schroef (C) en de knop (D) te
bevestigen, zoals de afbeelding toont
• Verbind de beugel (E) met de trekstang (F),
met behulp van de schroef en de
vleugelmoer.
• Blokkeer de trekstang (F) met de trekstang
(G) met behulp van de schroef en de
vleugelmoer
• Fit the lower handle xing it with screw (A)
and knob (B) as illustrated.
• Fit the upper handle xing it with screw (C)
and knob (D) as illustrated.
• Connect the bracket (E) with tie rod (F)
using the bolt and wing nut.
• Lock tie rod (F) with tie rod (G) using the bolt
and wing nut. (VT 1600-VT 1800)
• Den unteren Gri mit der Schraube (A) und
den Drehknopf (B) wie dargestellt montieren
• Den oberen Gri mit der Schraube (C) und
den Drehknopf (D) wie dargestellt montieren
• Den Bügel (E) mit Hilfe der Schraube und
der Flügelmutter mit der Zugstange (F)
v
erbinden. (VT 1600-VT 1800)
• Die Zugstange (F) mit Hilfe der Schraube
und der Flügelmutter mit der Zugstange (G)
blockieren. (VT 1600-VT 1800)
• Montar el manillar inferior jándolo con el
tornillo (A) y la empuñadura (B) como
ilustrado
• Montar el manillar superior jándolo con el
tornillo (C) y la empuñadura (D) como
ilustrado
• Conectar el estribo (E) con la varilla (F)
mediante tornillo y tuerca de mariposa.
• Bloquear la varilla (F) con la varilla (G)
mediante tornillo y tuerca de mariposa.
• Montar o guiador inferior xando-o com o
parafuso (A) e manípulo (B) tal como
ilustrado na gura.
• Montar o guiador superior xando-o com o
parafuso (C) e o manípulo (D) tal como
ilustrado na gura.
• Ligar a peça de suporte (E) com o tirante (F)
através do parafuso de orelha.
• Bloquear o tirante (F) com o tirante (G)
através do parafuso de orelha.
(VT 1600-VT 1800)
(VT 1600-VT 1800)
(VT 1600-VT 1800)
(VT 1600-VT 1800)
(VT 1600-VT 1800)
. (VT 1600-VT 1800)
(VT 1600-VT 1800)
(VT 1600-VT 1800)
(VT 1600-VT 1800)

22
ENG.
I
F
D
NL
E
P
RIPIEGATURA MANUBRIO
FOLDING THE HANDLE
POUR REPLIER LE GUIDON
ZUSAMMENLEGEN DES
GRIFFS
TERUGVOUWEN VAN HET
HANDSTUK
PLEGADO DEL MANILLAR
DOBRAGEM DO GUIADOR
F
E
F
G
C
D
B

23
I
• Scollegare il tirante (F) dalla staa (E)
• Ripiegare il tirante (F) con il tirante (G)
allentando la vite e il galletto
• Togliere la manopola (B) e ripiegare in
avanti il manubrio .(VT 1600-VT 1800)
• Allentare la manopola (D) con la vite (C) e
ripiegare il manubrio superiore sul manu-
brio inferiore come in gura.
(VT 1600-VT 1800)
ENG.
• Disconnect tie rod (F) from the bracket (E).
• Fold tie rod (F) with tie rod (G) by slackening
the bolt and wing nut.
• Remove the knob (B) and fold the handle
forward.(VT 1600-VT 1800)
• Loosen knob (D) with screw (C) and fold the
upper handle onto the lower handle, as
shown in the illustration.
(VT 1600-VT 1800)
F
• Désolidarisez le tirant (F) et la patte d’attache
(E).
• Repliez le tirant (F) avec le tirant (G) en
desserrant la vis et l’écrou papillon.
• Enlever la poignée (B) et replier le guidon
en avant. (VT 1600-VT 1800)
• Desserrez la poignée (D) par l’intermédiaire
de la vis (C) et repliez le guidon supérieur
sur le guidon inférieur comme illustré sur la
gure.(VT 1600-VT 1800)
D
• Die Zugstange (F) vom Bügel (E) lösen
• Die Zugstange (F) mit der Zugstange (G)
nach Lösen der Schraube und der
Flügelmutter zusammenklappen
• Den Drehknopf (B) entfernen und den Holm
nach vorne klappen. (VT 1600-VT 1800)
• Den Drehknopf (D) mit der Schraube (C)
lockern und den oberen Gri, wie auf der
Abbildung zu sehen, auf den unteren Gri
klappen. (VT 1600-VT 1800)
NL
• Koppel de trekstang (F) los van de beugel
(E)
• Buig trekstang (F) terug met trekstang (G),
door de schroef en de vleugelmoer losser
te draaien
• Verwijder de vleugelmoer (B) en vouw het
handstuk naar voren.(VT 1600-VT 1800)
• Draai knop (D) losser met schroef (C) en
vouw het bovenste handstuk op het onderste
handstuk, zoals de afbeelding toont
E
• Desconectar la varilla (F) del estribo (E)
• Plegar la varilla (F) con la varilla (G) aojando
el tornillo y la tuerca de mariposa
• Quitar la empuñadura (B) y volver a plegar
el manillar hacia adelante.
(VT 1600-VT 1800)
• Aojar la empuñadura (D) con el tornillo (C)
y plegar el manillar superior sobre el manillar
inferior como en la ilustración
(VT 1600-VT 1800)
P
• Desligar o tirante (F) do suporte (E)
• Dobrar o tirante (F) com o tirante (G)
desapertando o parafuso de orelha
• Retirar o manípulo (B) e dobrar o guiador
para a frente. (VT 1600-VT 1800)
• Folgar o manípulo (D) com o parafuso (C)
e dobrar o guiador superior sobre o guiador
inferior como ilustrado na gura
(VT 1600-VT 1800)
(VT 1600-VT 1800)

24
MESSA IN MOTO E ARRESTO
STARTING AND STOPPING
MISE EN MARCHE ET ARRET
ANLASSEN UND ANHALTEN
ENG.
I
F
D
NL
E
P
STARTEN EN STOPPEN
PUESTA EN MARCHA Y
DETENCION
COLOCAÇAO EM MOVI-
MENTO E PARADA
I ENG.
1
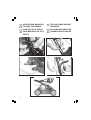
MESSA IN MOTO E ARRESTO
Questo arieggiatore è provvisto di interruttore
elettrico di sicurezza contro avviamenti acci-
dentali. Tenere prima premuto il pulsante di
siurezza quindi tirare la leva (Fig. 1) contro il
manubrio.
Sul manubrio è applicato un anello di aggancio
per il cavo di prolunga. Vincolare il cavo (Fig.
2) per proteggere spina e presa dagli strappi
accidentali.
STARTING AND STOPPING
This aerator is provided with an electric safety
switch against accidental starts.
Push the safety lock-off button on the switch-
box, then pull the switch lever towards the
handle(Fig. 2).
The top handle is equipped with a hooked ring
which holds the extension cable. Hook the
cable (Fig. 1) to protect socket and plug from
accidental tears.
2
Page is loading ...

26
ENG.
I
F
D
NL
E
P
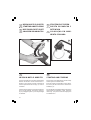
• Muovere la leva (x) in avanti
• Regolare l’altezza delle lame girando la
manopola verso sinstra per aumentare la
profondità di lavoro o verso destra per
diminuirla (1x = 1mm)
N.B: Fare penetrare le lame nel terreno di
circa 3 mm.
ENG.
I
F
D
NL
E
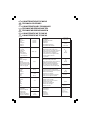
SISTEMA DI ALZATA E REGOLAZIONE ALTEZZA LAME
SYSTEM FOR LIFTING & ADJUSTING THE BLADE HEIGHT
SYSTÈME DE LEVÉE ET DE RÉGLAGE DE LA HAUTEUR DES LAMES
SYSTEM FÜR DAS ANHEBEN UND REGULIEREN DER MESSERHÖHE
SYSTEEM VOOR OPHEFFING EN HOOGTE-INSTELLING VAN DE MESBLADEN
SISTEMA DE ALZADO Y REGULACIÓN DE LA ALTURA DE LAS CUCHILLAS
SISTEMA DE LEVANTAMENTO E REGULAÇÃO DA ALTURA DAS LÃMINAS
• Move the lever (x) forwards.
• Adjust the height of the blades by turning
the knob to the left to increase the working
depth or to the right to reduce it (1 turn = 1
mm).
N.B. : Make the blades cut into the earth by
about 3 mm.
• Déplacez le levier (x) en avant.
• Réglez la hauteur des lames en tournant la
poignée vers la gauche pour augmenter la
profondeur de travail ou vers la droite pour
la diminuer (1x = 1mm)
N.B. : faites pénétrer les lames dans le
terrain sur 3 mm de profondeur environ.
• Beweeg de hendel (x) naar voren
• Stel de hoogte van de mesbladen in door de
knop naar links te draaien, zodat de
werkdiepte vergroot wordt, of naar rechts te
draaien voor een kleinere werkdiepte (1x =
1mm)
N.B: Laat de mesbladen het terrein
ongeveer 3 mm binnendringen.
• Mover la palanca (x) hacia adelante
• Regular la altura de las cuchillas girando la
empuñadura hacia la izquierda para au-
mentar la profundidad de trabajo o hacia la
derecha para disminuirla (1x = 1mm)
Nota: Hacer penetrar
las cuchillas en el
terreno aproximadamente 3 mm.
• Den Hebel (x) nach vor bewegen
• Für die Regulierung der Messerhebel gilt
folgendes: bei Drehen des Drehknopfs nach
links erhöht sich die Arbeitstiefe, nach rechts
verringert sie sich (1x = 1mm)
X
MERKE : Die Messer ca. 3 mm in den
Boden eindringen lassen.
P
• Deslocar a alavanca (x) para a frente
• Regular a altura das lâminas rodando o
manípulo para a esquerda para aumentar a
profundidade de trabalho, ou para a direita
para a diminuir (1x = 1 mm)
N.B: Fazer penetrar as lâminas no terreno
por cerca 3 mm.
VT 1600 - VT 1800

27
ENG.
I
F
D
NL
E
P
ENG.
I
F
D
E
SISTEMA DI ALZATA E REGOLAZIONE ALTEZZA LAME
SYSTEM FOR LIFTING & ADJUSTING THE BLADE HEIGHT
SYSTÈME DE LEVÉE ET DE RÉGLAGE DE LA HAUTEUR DES LAMES
SYSTEM FÜR DAS ANHEBEN UND REGULIEREN DER MESSERHÖHE
SYSTEEM VOOR OPHEFFING EN HOOGTE-INSTELLING VAN DE MESBLADEN
SISTEMA DE ALZADO Y REGULACIÓN DE LA ALTURA DE LAS CUCHILLAS
SISTEMA DE LEVANTAMENTO E REGULAÇÃO DA ALTURA DAS LÃMINAS
P
1
2
3
4
5
6
•Posizione 1: lame completamente sollevate per
il tra-sferimento della macchina e per l'avviamen-
to.
•Posizione da 2 a 6: posizioni di lavoro con
incrementidella profondità di taglio di circa 5 mm
per ogni posizione
•Position 1: blades completely lifted for moving
themachine and for starting.
•Positions from 2 to 6: work positions - cutting
depthincreases by about 5 mm for each position.
•Position 1: Messer vollständig angehoben, für
Trans-port und Start der Maschine.
•Position 2 bis 6: Arbeitspositionen mit um
jeweils ca.5 mm ansteigender Schneidtiefe pro
Position.
•Position 1 : lames totalement relevées pour le
transfertde la machine et pour la mise en
marche.
•Position de 2 à 6: positions de travail avec des
aug-mentations de la profondeur de coupe
d’environ 5 mmpar position.
•Posição 1: lâminas completamente elevadas
para atransferência da máquina e para o
arranque.
•Posição de 2 a 6: posições do trabalho com
aumentosda profundidade de corte de
aproximadamente 5 mmpara cada posição.
•Stand 1: mesbladen helemaal omhoog om de
machinete verplaatsen en te starten.
•Stand 2 t/m 6: werkstanden met snijdiepte die
elkestand ongeveer 5 mm toeneemt.
•Posición 1: cuchillas completamente
levantadas parael traslado de la máquina y
para el arranque.
•Posición de 2 a 6: posiciones de trabajo con
incremen-tos de la profundidad de corte de
unos 5 mm para cadaposición.
VT 1300 E - VT 1600 E - VT 1800 E
NL

28
MONTAGGIO SACCO RACCOGLI-
ERBA
• Inserire la struttura metallica all’interno del
tessuto (disegno 1)
• Con l’aiuto del manico arrotondato di un
comune cucchiaio inserire la struttura all’in-
terno dei bordi di aggancio (disegni 2-3-4)
• Nell’eseguire questo accoppiamento è
consigliabile agganciare prima i lati lunghi
A e B e quindi i lati corti C e D (disegno 5)
I
INSTRUCTIONS FOR THE ASSEM-
BLY OF GRASSCATCHERS
• Insert metal frame into cloth-bag (drawing1)
• Fix it inside clamping rims of cloth-bag by
means of a simple rounded-off toll - a spoon
handle, for instance (drawings2-3-4)
• We suggest to clamp long sides A and B
first and short sides C and D after (drawing
5)
MONTAGE DU SAC-HERBE
• Insérez la structure métallique dans le sac
en tissu (dessin 1)
• A l’aide du manche arrondi d’une simple cuiller,
insérez la structure métallique à l’intérieur des
bords de fixation (dessins 2-3-4)
• Lorsque vous effectuez cette manoeuvre, il
est conseillé de fixer d’abord les long côtes
A et B et ensuite les côtes courts C et D
(dessin 5)
MONTAGE RASENMAHER
GRASSFANGSAC
• Stecken Sie die Metallstruktur innerhalb
des Stoffes (Zeichnung 1)
• Mit der Hilfe des gerundeten Holm eines
gemeinen Löffel, stecken Sie die Struktur innen
der Kupplungsrändern (Zeichnungen 2-3-4)
• Wann sie diese Kupplung machen, raten
wir Ihnen, vorher die langen Seiten A und B
und danach die kurten Seiten C un D zu
verbinden (Zeichnung 5)
ENG.
F D
OPTIONAL
1
2
3
4
5
Page is loading ...

CARATTERISTICHE TECNICHE
TECHNICAL FEATURES
CARACTERISTIQUES TECHNIQUES
TECHNISCHE EIGENSCHAFTEN
TECHNISCHE EIGENSCHAPPEN
CARACTERISTICAS TECNICAS
CARACTERÍSTICAS TÉCNICAS
ENG.
I
F
D
NL
E
P
30
Potenza
Power
Puissance
Kraft
Vermogen
Potencia
Potência
N° di giri
N° of revs
Nb de tours
Drehzahl
Aantal toeren
N° revoluciones
N° de rotaçõnes
Tensione di allaccia-
mento
Supply voltage.
Voltage.
Anschlussspannung.
Aansluitingsspanning
Tensión de conexión.
Tensão de ligação.
Peso
Weight
Poids
Gewicht
Gewicht
Peso
Peso
Sacco
Catcher
Sac
Sack
Zak
Bolsa
Saco
Larghezza di lavoro
Work width
Largeur de travail
Arbeitsbreite
Werkbreedte
Anchura de trabajo
Largura do trabalho
Profondità di lavoro
Work depth
Profondeur de travail
Arbeitstiefe
Werkdiepte
Profundidad de trabajo
Profundidade de trabalho
Livello potenza sonora garantito
Guaranteed sound power level
Niveau puissanc eacoustiq ugearanti
Garantierter Schalleistungspeg el
Niveau akoestisch vermogen
Nivel potencia sonora garantizado
Nível de potência sonora
com garantia
Livello potenza sonora misurato
Measured sound power level
Niveau de puissance sonore mesuré
Ermittelter Schalleistungspegel
Gemeten geluidsvermogenniveau
Nivel potencia sonora detectado
Nível de potência sonora detectado
Pressione sonora
Sound pressure at the operator position
Pression acoustique au postew de l’operateur
Schaldruck am Arbeitsplatz
Geluidsdruk po de werkplek
Presión sonora en el puesto del operador
Pressão sonora no lugar do operador
Vibrazione al manico
Vibration on the handle
Vibration au niveau du manche
Vibrationenzum Griff
Trilling op de handgreep
Vibración en elmango
Vibração no cabo
Trasmissione
Transmission
Transmission
Getriebe
Overdracht
Transmisión
Transmissão
1300 W
1600 W
1800 W
2850 rpm
230 V
VT 1600-VT1800
25 kg
VT 1300 E-VT1600 E-
VT 1800 E
23 kg
40
l
VT 1600-VT1800
360 mm
VT 1300 E-VT1600 E-
VT 1800 E
300 mm
0 ÷20 mm
0÷25 mm
L
wa
80
dB(A)
L
wa
78
dB(A)
L
pa
65
dB(A)
5 m/s
EN 12096
K=0,5
EN ISO 3744:2009
EN ISO 3744:2009
K
pa
=0,5
K
wa
=0,5
2
_a mezzocinghia trapezoidale
_through “V”- belt
_parcourroie trap ézoidale
_mit Keilrieman
_door enn trapeziumriem
_con correatrapezoidal
_mediante correiatrapezoidal
VT 1600-VT1800
VT 1300 E-VT1600 E-
VT 1800 E

note ________________________________________________________________________
______________________________________________________________________________
________________________________________________________________________________
________________________________________________________________________________
______________________________________________________________________________
________________________________________________________________________________
________________________________________________________________________________
______________________________________________________________________________
________________________________________________________________________________
________________________________________________________________________________
______________________________________________________________________________
________________________________________________________________________________
________________________________________________________________________________
______________________________________________________________________________
________________________________________________________________________________
________________________________________________________________________________
______________________________________________________________________________
________________________________________________________________________________
________________________________________________________________________________
______________________________________________________________________________
________________________________________________________________________________
________________________________________________________________________________
______________________________________________________________________________
________________________________________________________________________________
________________________________________________________________________________

note ________________________________________________________________________
______________________________________________________________________________
________________________________________________________________________________
________________________________________________________________________________
______________________________________________________________________________
________________________________________________________________________________
________________________________________________________________________________
______________________________________________________________________________
________________________________________________________________________________
________________________________________________________________________________
______________________________________________________________________________
________________________________________________________________________________
________________________________________________________________________________
______________________________________________________________________________
________________________________________________________________________________
________________________________________________________________________________
______________________________________________________________________________
________________________________________________________________________________
________________________________________________________________________________
______________________________________________________________________________
________________________________________________________________________________
________________________________________________________________________________
8 003031 321146

ATTESTAZIONE DI CONFORMITA’ ALLE
NORME CEE
Noi SANDRIGARDEN srl, via Manzoni 22, 36027
ROSA (VI) ITALIA, dichiariamo, sotto nostra responsa-
bilità, che i prodo tti tipo VT 1600/VT 1800 /VT 1300
E
VT 1600 E/VT 1800 E, sono conformi ai fondamen-
tali requisti di sicurezza e di incolumità indicati dalla
Direttiva98/37/CE(EN13684+A2:2009) fino al
28/12/2009,
2006/42/CE(EN13684+A2:2009)dal 29/12/2009
2004/108/CE,
2006/95/CE, 2000/14/CE, allegato V.
Livello di potenza sonora rilevato Lwa: 78 dB(A)
Livello di potenza sonora garantito Lwa: 80 dB(A)
EC DECLARATION OF CONFORMITY
We SANDRIGARDEN srl, via Manzoni 22,
36027 ROSÀ (VI) ITALIA, hereby declare, assuming
full responsibility, that products type VT 1600/VT
1800/VT 1300 E/VT 1600 E/VT 1800 E are conform
to the basic health and safety requirements laid down
by directive98/37/EC(EN13684+A2:2009)up to
28/12/2009,
2006/42/EC(EN 13684+A2:2009) as from 29/12/2009,
2004/108/EC, 2006/95/EC, 2000/14/EC Annex V.
Measured Sound Power Level Lwa: 78 dB(A)
Guaranteed Sound Power Level Lwa: 80 dB(A)
DECLARATION DE CON FORMITE AUX
NORMES CE
Nous, SANDRIGARDEN srl, via Manzoni 22, 36027
ROSÀ (VI) ITALIA, déclarons sous notre respon-
sabilité que les produits type
VT 1600 / VT 1800 /
VT1300 E/VT 1600 E/VT 1800 E, sont conformes aux
prescriptions fondamentales de sécurité et de santé
visées par la directive 98/37/CE
(EN 13684+A2:2009)
jusqu’à 28/12/2009, 2006/42/CE (
EN13684+A2:2009)
à partir du 29/12/2009, 2004/108/CE,2006/95/CE,
2000/14/CE Annex V.
Niveau de puissance sonore mesuré Lwa:78 dB(A)
Niveau de puissance sonore garanti Lwa:80 dB(A)
KONFORMITÄTSERKLÄRUNG
Wir SANDRIGARDEN srl, via Manzoni 22,
36027 ROSÅ (VI) ITALIA, erklären in Alleinverant-
wortlichkeit, da ß folgende
Vertikutierer VT1600
VT 1800/VT 1300 E/VT 1600 E/VT 1800 E,
auf die sich diese Bescheinigung bezieht, den
grundlegenden Gesundheits und Sicherheits-
anforderungen der Richtlinie 98/37/CE
(EN 13684+A2:2009)bis zum 28.12.2009, 2006/42/
CE (EN 13684+A2:2009) aus der 29/12/2009,
2004/108/CE, 2006/95/CE, 2000/14/CE Annex V
Ermittelter Schallleistungspegel Lwa: 78 dB(A)
Garantierter Schallleistungspegel Lwa: 80 dB(A)
I
NL
ENG
EEG CONFORMITEITSVERKLARING
Wij SANDRIGARDEN srl, via Manzoni 22,
36027 ROSA’ (VI) ITALIA, verklaren onder onze veran-
twoordelijkheid dat de volgende maaimachine met
één mes, VT 1600/VT 1800 /VT 1300 E/VT 1600 E/
VT 1800 E, waar deze verklaring betrekking op heeft,
in overeenstemming zijn met de fundamentele eisen
voor de veiligheid zoalas die zijn geformuleerd in de-
richtlijn 98/37/EG(EN 13684+A2:2009)tot en met 28/12/2009,
2006/42/EG (EN 13684+A2:2009) uit de 29/12/2009,
2004/108/CE ,2006/95/EG, 2000/14/ EG, bijlage V.
Gemeten geluidsvermogenniveau Lwa: 78 dB (A)
Gegarandeerd geluidsvermogenniveau Lwa: 80 dB (A)
CERTIFICADO DE CONFORMIDAD CON
LAS NORMAS DE LA CE
Nosot ros SANDRIGARDEN srl, via Manzoni 22, 36027
ROSÀ (VI) ITAL IA, declaramo s, bajo nuestra propia re-
sponsabilidad , que los produ ctos VT 1600/VT 1800/VT
1300 E/VT 1600 E/VT 1800 E, cumplen todos los re-
quisitos en materia de seguridad y protección indicado s
por la directiva 98/37/CE(EN 13684+A2:2009) hasta 28/12/2009
2006/42/CE (
EN 13684+A2:2009) desde el 29/12/2009,
2004/108CE, 2006/95/CE , 2000/14/CE A nnex V.
Nivel de potencia sonora detectado Lwa: 78 dB(A)
Nivel de potencia sonora garantizado Lwa: 80 dB(A)
CERTIFICAÇÃO DE CONFORMIDADE
COM AS NORMAS CEE
Nós, SANDRIGARDEN srl, via Manzoni 22, 36027
ROSÁ (VI) ITALIA, declaramos, com total responsa-
bilidade, que os produtos VT 1600/VT 1800/VT 1300
E/VT 1600 E/VT 1800 E, est em conformidade com
os requerimentos b ásicos de saúde e seguran ça
da directiva 98/37/CE(
EN 13684+A2:2009)hasta 28/12/2009,
2006/42/CE (
EN13684+A2:2009) desde el 29/12/2009,
2004/108CE, 2006/95/CE , 2000/14/CE Annex V.
Nível de potência sonora detectado Lwa: 78 dB(A)
Nível de potência sonora garantido Lwa: 80 dB(A)
F
D
E
P
30 - 10 - 2009
SANDRI GARDEN
srl
Direttore Generale
Alberto Cattaneo
Sede legale: via Manzoni, 22 - 36027 - ROSÀ (VI) - ITALIA
Uffici: via Verdi, 13 - 23847 - MOLTENO (LC) - ITALIA
Tel. 031/3570411 - Fax.031/35704435

note ______________________________
_________________________________________________
____________________________________________________
_________________________________________________
___________________________________________________
___________________________________________________
_________________________________________________
____________________________________________________
_________________________________________________
___________________________________________________
___________________________________________________
_________________________________________________
____________________________________________________
_________________________________________________
___________________________________________________
___________________________________________________
_________________________________________________
____________________________________________________
_________________________________________________
___________________________________________________
___________________________________________________
_________________________________________________
____________________________________________________
_________________________________________________
___________________________________________________
Page is loading ...
Page is loading ...
Page is loading ...
-
 1
1
-
 2
2
-
 3
3
-
 4
4
-
 5
5
-
 6
6
-
 7
7
-
 8
8
-
 9
9
-
 10
10
-
 11
11
-
 12
12
-
 13
13
-
 14
14
-
 15
15
-
 16
16
-
 17
17
-
 18
18
-
 19
19
-
 20
20
-
 21
21
-
 22
22
-
 23
23
-
 24
24
-
 25
25
-
 26
26
-
 27
27
-
 28
28
-
 29
29
-
 30
30
-
 31
31
-
 32
32
-
 33
33
-
 34
34
-
 35
35
-
 36
36
-
 37
37
-
 38
38
-
 39
39
-
 40
40


Ask a question and I''ll find the answer in the document
Finding information in a document is now easier with AI
in other languages
- italiano: VERCIEL S1600E Manuale del proprietario
- français: VERCIEL S1600E Le manuel du propriétaire
- español: VERCIEL S1600E El manual del propietario
- Deutsch: VERCIEL S1600E Bedienungsanleitung
- Nederlands: VERCIEL S1600E de handleiding
- português: VERCIEL S1600E Manual do proprietário


