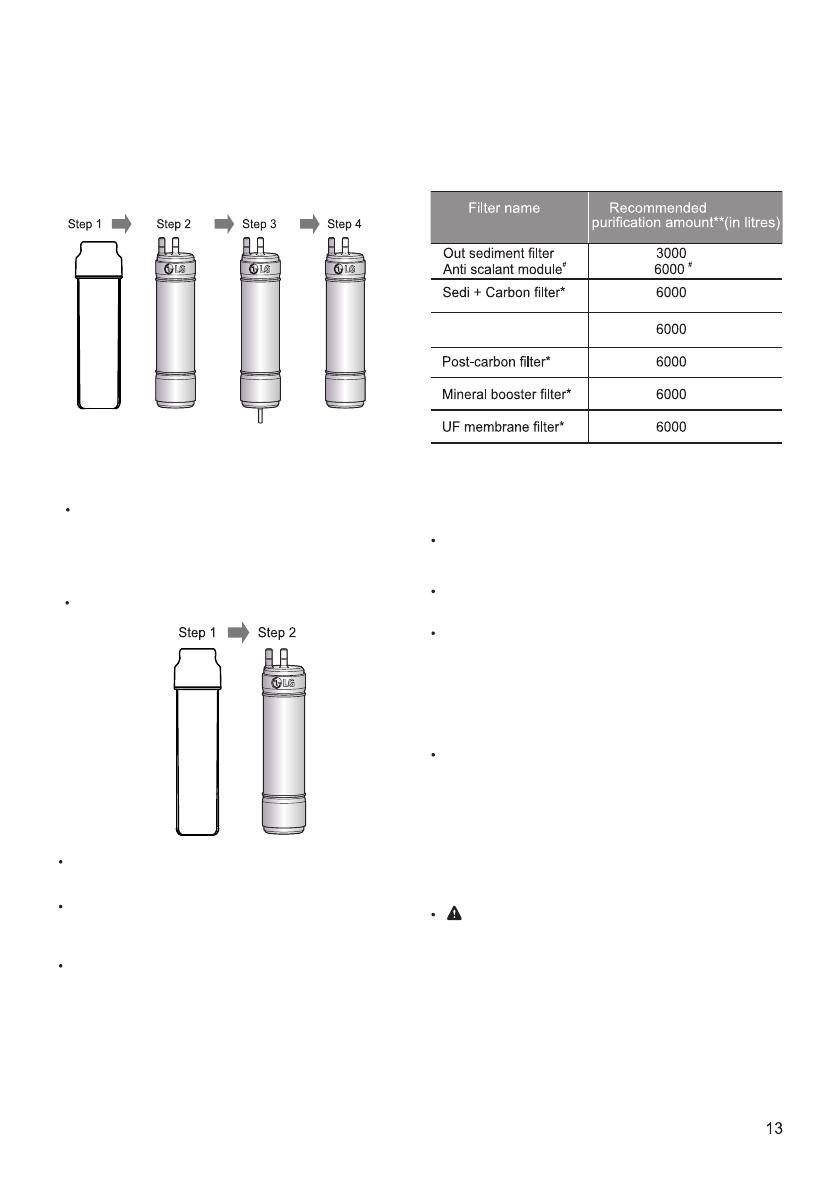
LG WW140NP Owner's manual

Type
Owner's manual

This manual is also suitable for

MFL66990819
Rev. 18_220221
Copyright © 2020-2021 LG Electronics Inc. All Rights Reserved.
Please read this manual carefully before operating
your set and retain it for future reference.
WATER
PURIFIER
OWNER’S MANUAL
ENGLISH
HINDI
This manual may contain images or content in addition
to the model purchased.
This manual may be subjected to revision by the
manufacturer.
TABLE OF CONTENTS
Parts and Function ...............................................................................
Notes for Installation .............................................................................
Installing water purifier ..........................................................................
SAFETY INSTRUCTIONS ....................................................
INSTALLATION .....................................................................
OPERATION .........................................................................
MANAGEMENT .....................................................................
TROUBLESHOOTING ..........................................................
WATER PIPING DIAGRAM ..................................................
PRODUCT SPECIFICATION ................................................
Notes for Operation ..............................................................................
Using Control Panel .............................................................................
Operation .............................................................................................
Cleaning ...............................................................................................
Maintaining the filter .............................................................................
06
08
08
03
06
09
11
14
15
18
09
09
10
11
12
CAUTION - This indicates that the failure to follow the instructions can cause minor
injury or damage the product.
Do not modify Power Cord length. Do not use any extension board or multiple socket outlet.
Also, Do not share the same power socket outlet with other appliances. Otherwise it will
cause electric shock or fire due to heat generation.
Do not touch the power plug with wet hands, it may cause electric shock
Manufacturer is not responsible for accidents caused by the user as a result of not following the Instruction
Manual.
Only an authorized person from LG Electronics service center should install the product.
Contact LG Electronics service center if you move the product, improper installation/service
may cause injury, electric shock or fire.
Power Supply cord should not be bend or pressed under heavy object. It may damage the
power cord to cause Fire or Electric shock.
The following safety guidelines are intended to prevent unforeseen risks or damage from unsafe or
incorrect operation of the appliance.
The guidelines are separated into ‘ WARNING and ‘CAUTION’ as described below.
WARNING - This indicates that the failure to follow the instructions can cause serious
injury or death.
This symbol is displayed to indicate matters and operations that can cause risk. Read the part
with this symbol carefully and follow the instruction in order to avoid risk.
WARNING
To reduce the risk of explosion, fire, death, electric shock, injury or scalding to persons
when using this product, follow basic precautions, including the following:
TECHNICAL SAFETY
POWER
Plug the power plug in the outlet tightly after removing the moisture and dust completely.
It will cause electric shock or fire due to heat generation.
When pulling out the power plug from an outlet, hold the power plug, not the cable. it will cause
electric shock or fire due to heat generation at damaged supply cord area. If the power cable or
Power Plug is damaged, It must be replaced by a Original Spare part provided by the
manufacturer or Contact LG Electronics Service.
Do not plug and unplug the power plug repeatedly It may loosen the holes of Outlet socket to
cause Fire or Electric shock.
SAFETY INSTRUCTIONS
CAUTION
Connect the input water pipe of the product to tap water only. Water other than tap water is not
recommended. It may cause health issues.
Do not spray/use or store flammable or combustible substance (ether, benzene, alcohol,
chemical, LPG, combustible spray, insecticide, air freshener, cosmetics etc.)near/inside the
product , it may cause health related issues.
For counter-top installation, install the product on a solid and horizontally leveled surface. If the
product is installed on an non-horizontally leveled surface, it can generate vibrations and noise
or cause misalignment of the product.
Avoid installing the water purifier in outdoor place, damp area and keep away from direct sunlight,
dust and direct water splashing. This could cause product malfunctioning.
For optimum performance of product, installation condition should be followed as per
page no. 18.
OPERATION
Installation
In case of flood, stop using the product and contact LG Electronics service center.
Do not place heavy or fragile objects, liquids, combustible substance, or flammable objects
(such as lit candles and lamps) on or inside the product. It may cause fire, injury or damage.
If moisture penetrates inside the product, unplug the power plug and contact LG Electronics
service center. It may cause electric shock.
Do not move the product while the product is plugged in. It may damage the power supply
cord and Cause Electric shock or injury.
Do not allow anyone to hang from or climb on the product. Be particularly cautious of children
operating the product. It may cause injury.
If water is leaking from the inside of the product or water has collected near the product, close
the water supply valve, unplug the power plug, and contact LG Electronics service center. It
may cause electric shock.
When cleaning the product, unplug the power plug.It may cause electric shock.
To reduce the risk of minor injury to persons, malfunction, or damage to the product or
property when using this product, follow basic precautions, including the following:
Never start up an appliance showing any signs of damage. If in doubt, consult your dealer.
This may cause damage or injury.
Do not clean the product with brushes, cloths or sponges with rough surfaces or which are made of
metallic material. It may cause scratches and cracks on the product.
There can be sharp edges in a disassembled set, special care to be taken while handling. It may
cause electric shock.
Keep ventilation openings, in the appliance enclosure or in the built-in structure, clear of
obstruction.This may cause damage.
Do not place any article on water tray assembly except water glass. It may fall and cause
damage & injury
Remarks: Filter to be changed by authorized LG Service personnel only.
Unplug the power plug during thunder or lightning or when not in use for more than 2 days.
This could cause product malfunctioning.
Take care against the possibility of damaging the pipe (inlet, outlet) in order to prevent water
leakage. It may cause injury or damage to the product and property.
Immediately unplug the power plug and contact LG Electronics service center if you detect
any abnormal noise, odour or smoke.
Operation
Replace the filter with a LG standard filter periodically according to the replacement period.
Older filters can multiply bacteria or change the taste of the water. The filter replacement
period varies according to the usage, place of usage, season and water quality.
6.35 mm Ø tube*
6.35 mm valve*
06
Parts and Function (For WW182/172 Series)
Front & Rear
Purified water level indicator
Touch Lever
Water supply hose Power cord
˄*
Filter change indicator
Drain hose
UV Sterilizing indicator*
Filter cover
(Floral pattern*)
Top cover
(Floral pattern*)
Cleaning water for fruits &
veggies*
Accessories
Owners Manual Mounting Guide Installation Guide
Water Tray
Quick Reference
Guide
Water Tray Cover
Out sediment filter with
anti scalant module
Screw kit : Screw (6 nos.)
Anchor (6 nos.) &
Teflon Tape (1 roll)
Mount plate (2 nos.)
Hose assembly :
Hose (2 nos.)
Connectors (3 nos.)
lockers (2 nos.)
Connector Pipe (1 no.)
Mounting bracket Adaptor
˄ Applicable for Out-sediment filter
* For selected models only
INSTALLATION
07
Parts and Function (For WW151/140/130 Series)
Front & Rear
Tank full indicator
Water supply hose
Drain hose
Top cover
Power cord
Touch Lever
Power Indicator
Filter cover
˄*
Filter change indicator
UV Indicator*
Owners Manual
Mounting Guide
Owners
Manual
Mounting
Guide
Installation
Guide
QRG
Quick Reference
Guide
Installation Guide
Mounting Bracket Adaptor
Out sediment filter with
anti scalant module
Mount plate (2 nos.)
Screw kit : Screw (6 nos.),
Anchor (6 nos.) & Teflon
tape (1 roll)
Hose assembly :
Hose (2 nos.)
Connectors (3 nos.)
Lockers (2 nos.)
^ Applicable for Out-sediment filter
* For selected models only
INSTALLATION
Accessories
Important Note: All models can only be installed with water supply from overhead storage tank. No other
water supply should be used for installaon of these models.
Model no’s 151 , WW140NP and WW130NP WW NP
can only be wall mounted.
08
White
Hose
Blue
Hose
For best usage of product, it is recommended
to have surrounding temperature range of
(4°C to 45°C).Not doing so can cause product
malfunctioning.
Avoid installing the water purifier in a place with a
non-leveled horizontal surface, relative humidity
of >85%, direct sunlight, dust and direct water
splashing.
After installation, discharge water for the first
time when water tank is full. Same process is to
be followed after every filter change or digital
sterilization. Approximate time taken to fill the
tank to the fullest is 1 hour, depending on water
pressure, temperature etc.
Over 1 Metre
Keep a distance of 10cm from all sides of the
product.
Handle all packaging materials (such as plastic
bags and thermocol) to keep away from children.
The packaging materials can cause suffocation.
CAUTION
When connecting the water hose, do not connect
it to the hot water pipe. Doing so may cause
malfunctions.
Check the pipe and hose connections for leaks.
Water can leak and cause electric shock or
injury.
When transporting the product, do not tilt the
product over 30 degrees. Doing so can cause
malfunctions.
Height between immediate Water reservoir tank
to Water purifier inlet should be more than
1 meter for effective working of the product.
Connect the product hoses as shown below.
Connect the white (water supply) hose to tap
water.
Install the blue (drain) hose on the sink.
Connect the power cord to an appropriate
socket.
Open the water supply valve.
Notes for Installation Installing water purifier
( WW )For 151/140/130 Series
The reverse osmosis contains a replaceable
treatment component critical for the effective
reduction of total dissolved solids and that
product water shall be tested periodically
(during service engineer visit) to verify that the
system is performing properly.
If the product will not be used for 2 or more
days, unplug the power plug and drain the
water inside of water filtration system
completely.
09
If product has not been used for 2 or more
days, discharge the stored water from water
purifier tank.
Do not use purified water for replacing water
in the humidifier or fishbowl.
Open the water supply valve. The water purifier
operates normally only when water is supplied
properly.
It is very important to replace the filter periodically
in order to drink clean water. When using an
expired filter, the performance of water filtration
system can deteriorate. Always abide by the filter
replacement period.
Use the product only after closing the product
cover completely. Otherwise, insects or other
foreign substance may get in.
Do not use with water that is microbiologically
unsafe or of unknown quality, without adequate
disinfection before or after the system.
* For selected models only
(For WW182/172 Series)
Water level indicator
The water level of the storage tank is
displayed in 3 levels.
The icon is divided into 3 levels according to
the water level, and as more indication Light
turn on, The water level becomes higher.
However, The water level cannot be
adjusted discretionally.
UV Sterilizing indicator*
Purified water is sterilized by the UV LED.
Blue color indicates that UV sterilization is
ON & white color indicates that UV
sterilization is OFF.
For WW151NP, UV indicator will glow.
(When tank cover is open, UV LED will be
automatically turned OFF for your safety.)
OPERATION
Notes for Operation Using Control Panel
Note
Suggestion for energy saving
Important note for all models:
It operates for 75 minutes in every 6 hours.
10
x
#
Caution : Open this lever to 90° only.
#
Opening more than 90° may cause it to
malfunction/damage.
Valve open Valve close
All models of water purifier comes with a unique flow sensor (To protect the product from running
without water supply) which turns on only if there is running water supply to water purifier. If
no/lower water supply than specified limit is available, then water purifier will stop for 15 minutes and
later, runs again for few seconds to check water supply.
If water supply is detected, then water purifier will work normally otherwise it will repeat to check
cycle again. If water supply is available & you want to start water purifier immediately, just turn off the
power supply and wait until the Display gets turned off, and turn on the power again.
The UV LED operates in any of the following 2
cases.
It operates for 75 minutes after approximately 2
seconds when power is turned on following a
power failure.
Filter Change indicator*^
Power indicator*
Tank Full Indicator*
The Power LED glows to indicate
ON condition of Water Purifier.
When the color of indicator changes from
blue to amber, this indicates that it is time
for preventive maintenance service. Please
call LG customer care for service.
When the water storage tank gets filled up
completely then Tank full indicator will turn
ON.
Using the fruit & vegetable cleaning
water*
Open the valve. You can rinse fruits and
vegetables, wash dishes.
The function discharges water while the
valve is opened.
NOTE
Do not use this water for drinking and
cooking.
^ Applicable for Out Sediment filter
* For selected models only
When you press the touch lever, purified water
will come out.
NOTE
Operation
Using purified water
NOTE
If you wish to discharge continuously, lift the touch
lever upward.
(For WW182/172 Series)
(For WW151/140/130 Series)
Wipe the surface of the storage tank with soft
clean cloth.
Rinse the storage tank with purified water and
drain the water completely.
CAUTION :
CAUTION :
Avoid touching any interconnecting
part inside water tank. it may cause
damage to the product.
WARNING :
CAUTION:
Take care of water spattering, it may
cause electric shock.
11
MANAGEMENT
Cleaning
How to clean the storage tank
Close the water supply valve.
Drain water inside the storage tank
completely using the drain hose and the
water outlet.
(For WW182/172 Series)
(For WW151/140/130 Series)
Unplug the power cord.
Open the top cover by lifting it upward,
and then unlock the storage tank cover.
Handle with care, sharp
edges may cause injury.
Do not put pressure or weight on tank
cover, it may cause damage or injury.
CAUTION: Handle with care, sharp edges may
cause injury.
WARNING: Unplug the power cord when
cleaning the storage tank.It may cause
electric shock.
CAUTION: Clean the tank by only using
purified water. Do not use chemical or
detergent for cleaning the storage tank.
Chemical or detergent will not be washed
away completely, it can be harmful to the
human body.
After installation, filter change or digital
sterilization when tank is full, discharge
water for the first time. (approximately time
taken to fill the tank to fullest is 1 hour,
depending on water pressure, temp etc)
Separate the Water tray cover by pulling it
upwards.
Separate the Water tray cover by pulling it
forward.
Note- Clean the water tray assembly periodically.
How to clean water tray assembly
Place the Water tray cover on the water tray
adhere it to the front side of the product closely,
and gently push it to install.
12
Insert and lock the storage tank cover.
Close the top cover, plug in the power cord
and open the water supply valve.
NOTE
How to clean water outlet
Clean the water outlet periodically using a
soft clean brush. Fur or foreign substances
may accumulate in the water outlet.
* For selected models only.
Clean it with water.
Wipe the surface of the water tray with a soft
clean cloth.
Install the water tray on the product.
NOTE
Caution should be taken. If a large amount of
water is in the water tray, water can spill out
when separating the water tray.
Maintaining the filter
Process of Purification
Drinking Water
Step 1:
Out sediment filter with anti scalant module
Removes big particles, rust stains, mud etc.
and reduces input water hardness to enhance
filter life.
Step 2:
Sedi + Carbon filter
Removes unseen dregs and other contamination
& removes invisible fine particles, residual
chlorine, VOC (Volatile Organic Compounds) etc.
Step 3:
RO membrane filter* / RO recovery plus*
Removes dissolved impurities and removes heavy
metals, bacteria, viruses, VOC etc. from water.
TDS Reduction upto 90% ppm of Source Water.
Step 4:
(For WW140/151/182/172 models)
Mineral booster filter
Removes odour, add minerals in the purified
water without mixing impure water.
Cleaning water for fruits & veggies*
(Only with WW182EP)
Step 1:
Out sediment Filter with antiscalant module.
Removes big particles, rust stains, mud etc.
and reduces input water hardness to
enhance filter life.
Step 2:
UF membrane filter*
Removes only bacteria and fine particle
substance.
NOTE
Do not use water drained from the product for
drinking or cooking.
Use the water instead for cleaning the bathroom
and house, gardening or for other various
purposes.
Activated carbon inside the lter may
sometimes flow in the storage tank. If so, a fine
powder of activated carbon used in the post-
carbon filter has come out, and it is harmless to
the human body. If found, drain out the water
from tank completely.
* For selected models only.
** As per LGEIL standard.
# Anti-scalant module is applicable with out sediment filter
only for WW130/140/151/182/172 models.
Filter replacement period
The filter replacement period refers to the period
that the purification performance of the filter is
maintained. And, the replacement period is lesser
in the case of a place with poor water quality or a
large purification amount.
If you wish to replace the filter, contact LG
Electronics service centre.
NOTE
After replacing the filter, check if there is a leak
from the product.
After installation, discharge water for the first
time when water tank is full. Same process is to
be followed after every filter change or digital
sterilization. Approximate time taken to fill the
tank to the fullest is 1 hour, depending on water
pressure, temperature etc.
For RO Membrane Filter, aroud 25% of supplied
water (based on the tap water pressure of 3.5
2
kgf/cm at water temp. of 25°C ) will be purified.
While for RO Recovery Plus, around 50% of
supplied water (based on the tap water pressure
2
of 1.5kgf/cm , 750ppm TDS at water temp. of
25°C) will be purified and remainder will be
drained.
CAUTION : Outsediment lter may get
choked in abnormal turbidity (Sand & mud)
condition, it is suggested to switch ON water
purifier after 1-2 hour of overhead tank filling so
that sand/mud will get settled. Outsediment filter
should be cleaned regularly to prevent choking
in above condition for better performance.
RO Membrane filter*
RO Recovery Plus*
(For WW130 model)
Post-carbon filter
Removes odour & improves taste of water.
Have you left the water purifier
for a period of 2 or more days
without using it?
The taste of water may change as it
ages. Contact LG Service.
Use the water purifier after
discharging the tank one time in
case issue persists please contact
LG service.
14
Install the product in a place with
horizontally leveled surface.
TROUBLESHOOTING
Symptoms Reason Solution
Water tastes strange
Has it been a long time since you
installed and replaced the filter?
If an expired filter is used, the
purification performance may decline.
It is recommended to replace the filter
according to the filter replacement
period.
The purification amount
has reduced suddenly.
Is it time to replace the filter?
Is the water supply valve closed?
Request for filter replacement.
Open the water supply valve.
Water does not come
out.
Did you miss the filter
replacement period?
Is the water supply valve closed?
Is the power plug unplugged from
the outlet?
Does water not come out when
you press the discharge lever?
Request filter replacement.
Open the water supply valve.
Plug the power plug in the outlet
correctly.
Contact LG Electronics service centre.
The product is
noisy and generates
abnormal sounds.
Is the product installed on a weak
floor or not installed on a stable
surface?
Is an article placed on top of the
product?
Remove the article placed on top
of the product.
Fine particles occur in
the purified water.
Did water bubbles form? Water bubbles may form in the
draining process. It is safe for you
to drink.
If fine particles exist continuously
after you receive water from the
water purifier and several minutes
have passed, cut off the tap water
supply and power supply and
contact LG Electronics service
centre.
WW182EP
RO
Recovery
Plus
Mineral
Booster
Filter
15
WATER PIPING DIAGRAM
Water for normal
use piping diagram
Purified
water
Water cock
(mechanical type)
Source
water
Flow Sensor
Cleaning water for
fruits & veggies
Electrolysis Sterilizing Care
Water piping diagram
Sterilized water
Normal water
Water cock
(mechanical type)
Source
water
Flow Sensor
Electronic water
sterilization Kit
Water tank
(Approx. 8 litres)
UV LED
Water level
sensor
Drain water
Flow Restrictor
250 ml/min
Water tank
(Approx. 8 litres)
UV LED
Water level
sensor
Sedi +
Carbon
Filter
UF
filter
Out
sediment
filter
with
anti
scalant
module
Booster
pump
Valve Valve
Sedi +
Carbon
Filter
Out
sediment
filter
with
anti
scalant
module
WW172EP
RO
Recovery
Plus
Mineral
Booster
Filter
16
Water for normal
use piping diagram
Purified
water
Water cock
(mechanical type)
Water tank
(Approx. 8 litres)
UV LED
Water level
sensor
Source
water
Flow Sensor
Booster
pump
Valve Valve
Drain water
Flow Restrictor
250 ml/min
Electrolysis Sterilizing Care
Water piping diagram
UV LED
Water level
sensor
Sterilized water
Normal water
Water cock
(mechanical type)
Source
water
Flow Sensor
Water tank
(Approx. 8 litres)
Electronic water
sterilization Kit
Sedi +
Carbon
Filter
Out
sediment
filter
with
anti
scalant
module
Booster
pump
Valve Valve
Sedi +
Carbon
Filter
Out
sediment
filter
with
anti
scalant
module
Mineral
Booster
Filter
WW151NP/WW140NP/WW130NP
Water for normal
use piping diagram
Purified
water
Water cock
(mechanical type)
Water tank
(Approx. 8 litres)
Water level
sensor
Source
water
Flow Sensor
Booster
pump
Valve Valve
Sedi +
Carbon
Filter
Out
sediment
filter
with
anti
scalant
module
RO
filter
Drain water
Flow Restrictor
350 ml/min
Electrolysis Sterilizing Care
Water piping diagram
Water level
sensor
Water tank
(Approx. 8 litres)
Sterilized water
Normal water
Water cock
(mechanical type)
Source
water
Flow Sensor
Booster
pump
Valve Valve
Electronic water
sterilization Kit
Sedi +
Carbon
Filter
Out
sediment
filter
with
anti
scalant
module
/
Post
Carbon
Filter
(WW140/WW151NP only)
(WW130NP only)
# UV LED is only applicable for WW151NP
17
#
#
WW151NP
PRODUCT SPECIFICATION
WW172EPWW182EP
Reverse
Osmosis
Reverse
Osmosis
Reverse
Osmosis
Ultra-filtration
Yes Yes Yes
230 V - 50 Hz
Water purifying : 40W
Approx. 8 litres
Polypropylene Module
Polyphosphate module
Polypropylene Module + Activated Carbon
Polysulfone + Polyamide
Activated Carbon
Activated Carbon + Mineral Booster
Polysulfone
* For selected models only.
365mm (W) x 283mm (D) x 506mm (H)
365mm (W) x 295mm (D) x 500mm (H) /
without water tray :
365mm (W) x 275mm (D) x 500mm (H)
10.5 kg 10 kg 9.2 kg
10-860kPa
2
(0.1-8.8 kgf/cm )
Min. 140kPa (Avg. 680kPa) (Before filtration)
Recommended input water quality
2000 ppm
425 ppm
5 NTU
Turbidity
Total Hardness
Total Dissolved Solids
(TDS)
Internal Operating
Pressure
Installation water
pressure limit
Net Weight
Dimension
Filter
Material
Volume of Tank
Power Rating
Rated Voltage
UV Sterilization
Purification
Method
Model name
Drinking Water
Fruit & Vegetable
cleaning water
Out Sediment Filter*
and
Anti scalant module
Sedi + Carbon Filter*
Post Carbon Filter*
RO Membrane Filter*
RO Recovery Plus*
Mineral Booster Filter*
UF Membrane Filter*
Customer Care : 09678-545454
WW140NP
Reverse
Osmosis
-
WW130NP
Reverse
Osmosis
-
18
  • Page 1 1
  • Page 2 2
  • Page 3 3
  • Page 4 4
  • Page 5 5
  • Page 6 6
  • Page 7 7
  • Page 8 8
  • Page 9 9
  • Page 10 10
  • Page 11 11
  • Page 12 12
  • Page 13 13
  • Page 14 14
  • Page 15 15
  • Page 16 16
  • Page 17 17
  • Page 18 18
  • Page 19 19
  • Page 20 20

LG WW140NP Owner's manual

Type
Owner's manual
This manual is also suitable for

Ask a question and I''ll find the answer in the document

Finding information in a document is now easier with AI