Silvercrest SRH 5 A1 Owner's manual
- Category
- Radios
- Type
- Owner's manual
This manual is also suitable for

IAN 313609
DAB+ RADIO SRH 5 A1
DAB+ RADIO
Operating instructions and safety instructions
RADIO DAB+
Bedienungsanleitung und Sicherheitshinweise

GB / IE / NI Operating instructions and safety instructions Page 1
DE / AT / CH Bedienungsanleitung und Sicherheitshinweise Seite 29
Before reading, unfold the page containing the illustrations and familiarise yourself with all functions of
the device.
Klappen Sie vor dem Lesen die Seite mit den Abbildungen aus und machen Sie sich anschließend mit allen
Funktionen des Gerätes vertraut.

A
B

GB
│
IE
│
NI
│
1 ■
SRH 5 A1
Contents
Introduction ................................................... 3
Information about these operating instructions ...................................3
Copyright ................................................................3
Notes on trademarks .......................................................3
Proper use ...............................................................3
Warning notices ...........................................................4
Safety. . . . . . . . . . . . . . . . . . . . . . . . . . . . . . . . . . . . . . . . . . . . . . . . . . . . . . . . 5
Risk of electrocution ........................................................5
Basic safety instructions .....................................................6
Risk of hearing damage .....................................................7
Notes on the radio interface .................................................7
Description of components ....................................... 8
Setting up ..................................................... 8
Package contents and transport inspection ......................................8
Requirements for the set-up location ...........................................9
Connecting the power supply ................................................9
Aerial ...................................................................9
Handling and operation ........................................10
Switching the device on/off .................................................10
Adjusting the volume ......................................................10
Radio operation ..........................................................10
DAB+ radio operation (DAB) ................................................11
FM radio operation (FM) ...................................................13
Playback via Bluetooth
®
.................................................14
Connecting external playback devices (AUX IN mode) ...........................16
Connecting headphones ...................................................16
Settings menu ................................................16
Alarm times .............................................................17
Date/time ..............................................................18
Sound settings ...........................................................20
Language ...............................................................21
Factory reset ............................................................21
Software version .........................................................21

■ 2
│
GB
│
IE
│
NI
SRH 5 A1
Troubleshooting ..............................................22
Cleaning .....................................................23
Cleaning the housing ......................................................23
Storage when not in use .......................................23
Disposal .....................................................24
Disposal of the device .....................................................24
Disposal of the packaging ..................................................24
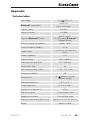
Appendix ....................................................25
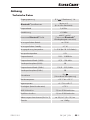
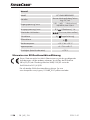
Technical data ...........................................................25
Notes on the EU Declaration of Conformity ....................................26
Kompernass Handels GmbH warranty ........................................26
Service .................................................................28
Importer ................................................................28

GB
│
IE
│
NI
│
3 ■
SRH 5 A1
Introduction
Information about these operating instructions
Congratulations on the purchase of your new device.
You have selected a high-quality product. The operating instructions
are part of this product. They contain important information on
safety, usage and disposal. Before using the product, please familiarise yourself
with all operating and safety instructions. Use the product only as described and
for the range of applications specified. Retain these operating instructions for
future reference. Please also pass on these operating instructions to any future
owner.
Copyright
This documentation is protected by copyright. Any copying or reproduction,
including in the form of extracts, or any reproduction of images (even in a modi-
fied state), is permitted only with the written authorisation of the manufacturer.
Notes on trademarks
The Bluetooth
®
logotype and Bluetooth
®
logo are registered trademarks
of Bluetooth SIG, Inc. (Special Interest Group). Any use of the trademarks by
Kompernaß Handels GmbH is made under the provisions of a licence.
The SilverCrest trademark and the retail name are the property of their respective
owner.
All other names and products may be trademarks or registered trademarks of
their respective owner.
Proper use
This device is a consumer electronics device designed for receiving DAB+ and
FM radio programmes. It can also be used to play back audio files that can
be played via Bluetooth
®
or a 3.5 mm jack cable from an external playback
device. The device is not intended for any other purpose nor for use beyond the
scope described. The device is not intended for use in commercial or industrial
environments.
The manufacturer accepts no responsibility for damage caused by failure to
observe these instructions, improper use or repairs, unauthorised modifications or
the use of unapproved replacement parts. The risk is borne solely by the user.

■ 4
│
GB
│
IE
│
NI
SRH 5 A1
Warning notices
The following warnings are used in these operating instructions:
DANGER
A warning notice at this hazard level indicates an imminently
hazardous situation.
Failure to avoid this hazardous situation could result in serious injuries or even
death.
► Follow the instructions in this warning notice to avoid the risk of serious
injuries or death.
WARNING
A warning at this hazard level indicates a potentially hazardous
situation.
Failure to avoid this hazardous situation could result in injury.
► Follow the instructions in this warning label to prevent injury.
CAUTION
A warning at this hazard level indicates a risk of property
damage.
Failure to avoid this situation could result in property damage.
► Follow the instructions in this warning label to prevent property damage.
NOTE
► A note provides additional information that makes handling the device
easier for you.

GB
│
IE
│
NI
│
5 ■
SRH 5 A1
Safety
This section contains important safety instructions for handling the device. This
device complies with statutory safety regulations. Improper use may result in
personal injury and property damage.
Risk of electrocution
DANGER
Risk of fatal injury from electrocution!
Contact with live cables or components can result in a fatal
injury!
Comply with the following safety information in order to avoid hazards due to
electrical current:
► Use only the supplied mains adapter.
► Do not use the device if the mains adapter is damaged.
► When disconnecting the device from the mains supply, always pull on the
mains adapter and never on the cable.
► Never touch the mains adapter or the device with wet hands.
► Do not kink or crush the cable of the mains adapter or place heavy objects
on it. Route the power cable so that it does not come into contact with hot
surfaces and so that no one can step on or trip over it.
► Never open the appliance or mains adapter housings. Touching live con-
nections or making modifications to the electrical or mechanical assembly
can lead to a risk of electrocution and fire.
► Do not insert any objects into the ventilation slots or other openings on the
device.
► The device consumes power in standby mode. The mains adapter also
consumes a small amount of current when the appliance is not connected to
the mains adapter. To completely disconnect the appliance and the mains
adapter from the mains power, the mains adapter must be removed from
the power socket. The device must be positioned so that you have unre-
stricted access to the mains socket at all times and can pull out the mains
adapter immediately in an emergency.

■ 6
│
GB
│
IE
│
NI
SRH 5 A1
Basic safety instructions
To ensure safe operation of the device, follow the safety guidelines set out
below:
■ Check the device for visible external damage before use. Do not operate a
device that has been damaged or dropped.
■
DANGER! Do not allow children to play with the packaging material!
Keep all packaging materials away from children.
Risk of suffocation!
■ This device may be used by children aged 8 years and above and by
persons with limited physical, sensory or mental capabilities or lack of ex-
perience and knowledge, provided that they are under supervision or have
been told how to use the device safely and are aware of the potential risks.
Do not allow children to use the device as a toy. Cleaning and user mainte-
nance tasks may not be carried out by children unless they are supervised.
■ If the cables or connections are damaged, have them replaced by an
authorised specialist or the Customer Service department.
■ Keep the power cable away from hot surfaces and sharp edges. Ensure that
the power cable is not stretched tightly or kinked. Do not allow the power
cable to dangle over edges (risk of tripping).
■ All repairs must be carried out by authorised specialist companies or
Customer Service. Improper repairs may put the user at risk. They will also
invalidate any warranty claim.
■ Defective components must always be replaced with original replacement
parts. Compliance with the safety requirements can only be guaranteed by
using these replacement parts.
■ Do not make any unauthorised modifications or alterations to the device.
■ If you move the device from a cold to a warm environment, allow the device
to acclimatise before using it. This can take up to two hours.
■ Always place the device on a stable and level surface. It can be damaged
if dropped.
■ Do not expose the device to direct sunlight or high temperatures.
Otherwise, it may become overheated and irreparably damaged.
■ Ensure sufficient air circulation to prevent heat build-up. Never cover the
device. There is a risk of fire!
■ Do not place the product near heat sources such as radiators or other
heat-generating appliances.
■ Keep the device away from open flames (e.g. candles) at all times.
■
This mains adapter for this appliance is suitable for indoor use only.

GB
│
IE
│
NI
│
7 ■
SRH 5 A1
■ The device is not designed for use in rooms with high temperature or humidity
(e.g. bathrooms) or excessive dust.
■ Protect the device from drips or splashes of water. Never submerge the
device in water; do not place the device near water and do not place any
object filled with liquid (e.g. vases) on top of the device.
■
WARNING! If you notice a burning smell or smoke, pull out the plug
from the mains socket immediately.
■ In the event of malfunctions, and in bad weather, disconnect the plug from
the mains power socket.
Risk of hearing damage
DANGER
Risks from extremely high volume levels!
Loud music can lead to hearing damage.
► Avoid listening to music at an extremely high volume, especially over long
periods of time, when using this device.
Notes on the radio interface
■ Keep the device at least 20 cm away from a pacemaker or implanted
defibrillator, as the proper functioning of the pacemaker or the implanted
defibrillator could be affected by radio waves.
■ The transmitted radio waves can cause noise interference in hearing aids.
■ Do not use the device with the radio components switched on in the presence
of flammable gases or in a potentially explosive atmosphere (e.g. in a paint
shop), as the transmitted radio waves can cause an explosion or ignite a
fire.
■ The range of the radio waves is dependent on the environment and the
ambient conditions.
■ Data transmissions via a wireless connection can be intercepted by unauthorised
third parties.
■ The device receives radio signals in the DAB+ frequency range from 174.9 -
239.2 MHz and in the FM frequency range from 87.5–108 MHz.
■ In some countries, different national regulations may apply to the assigned
radio frequency ranges. Please note that information received outside of the
assigned radio frequency ranges may not be exploited, passed on to third
parties or otherwise misused.

■ 8
│
GB
│
IE
│
NI
SRH 5 A1
Description of components
(See fold-out page for illustrations)
A. Front
1 Display
2 button (standby)
3 SOURCE/
button
4 INFO/MENU button
5 PRESET
button
6 VOLUME | ENTER / SCAN dial (with button function)
7 TUNE− button (menu navigation back/track change/
rewind in Bluetooth
®
mode)
8 TUNE+ button (menu navigation forwards/track change/
fast forward in Bluetooth
®
mode)
9 Speaker
B. Rear
0 Telescopic aerial
q Bass reflex port
w Mains adapter connection DC IN
e Headphone socket (3.5 mm Ø jack)
r AUX IN socket (3.5 mm Ø jack)
Setting up
Package contents and transport inspection
DANGER
► Do not allow children to play with packaging materials.
There is a risk of suffocation.
♦ Remove all parts of the device, the quick start guide and the operating
instructions from the packaging.
♦ Remove all packaging materials from the device.

GB
│
IE
│
NI
│
9 ■
SRH 5 A1
Check the contents of the package. The following components are included in
delivery:
▯ Radio alarm
▯ Mains adapter with mains cable
▯ AUX cable
▯ Quick start guide
▯ These operating instructions
NOTE
► Check the package for completeness and signs of visible damage.
► If any items are missing or damaged as a result of defective packaging or
transportation, please contact the Service Hotline (see section "Service").
Requirements for the set-up location
For safe and trouble-free operation of the device, the set-up location must fulfil
the following requirements:
■ Place the device on a firm, flat and level surface.
■ Position the device so that the speaker
9 and the bass reflex opening q
are not covered.
■ Do not operate the device in a hot or very wet environment or in the vicinity
of combustible materials.
■ The power socket must be easily accessible so that the plug of the mains
adapter can be easily disconnected in an emergency.
Connecting the power supply
CAUTION
► Before connecting the device, compare the connection data on the name-
plate of the power supply unit (voltage and frequency) with those of your
mains supply. This data must agree so that the device is not damaged.
♦ Connect the supplied mains adapter to the mains adapter connection
w
and to a mains socket. The device is now in standby mode.
Aerial
♦ Pull out the telescopic aerial 0 completely for DAB+ and FM reception.

■ 10
│
GB
│
IE
│
NI
SRH 5 A1
Handling and operation
Switching the device on/off
NOTE
► The DAB+ station list is automatically created or updated the first time
the device is switched on from standby mode using the
button 2. The
display 1 now shows the message Scanning... DAB. Depending on the
quality of the DAB+ radio reception, this process can take up to several
minutes.
► When switching on the device from standby mode with the
button 2,
the device is in the last selected mode (DAB+, FM, Bluetooth
®
or AUX IN).
♦ Briefly press the button 2 to switch on the device. The device starts
automatically in DAB+ mode the first time it is switched on.
♦ Briefly press the SOURCE/
button
3 to switch between DAB+, FM
radio, Bluetooth
®
or AUX IN mode.
♦ Press the button 2 again to switch off the device and put it into standby
mode.
Adjusting the volume
♦ Turn the VOLUME | ENTER / SCAN dial6 clockwise to increase
the volume.
♦ Turn the VOLUME | ENTER / SCAN dial6 anticlockwise to reduce
the volume.
NOTE
►
The display
1 shows the volume for a few seconds as a bar after turning
the VOLUME |
ENTER / SCAN dial6.
► When the maximum volume is reached, you will hear a short beep.
Radio operation
You can use the radio to receive DAB+ and FM radio stations. You can store up
to 20 preset DAB+ and 20 preset FM radio stations each.
NOTE
► The first time the device is started, it starts in DAB+ mode and the station list
of the available DAB+ radio stations is created automatically.
The display
1 now shows the message Scanning... DAB.

GB
│
IE
│
NI
│
11 ■
SRH 5 A1
DAB+ radio operation (DAB)
Automatic station scan (AMS)
The automatic station scan with station saving scans the entire frequency band
once and automatically saves the DAB+ radio stations found as a station list.
♦ This device must be switched on. If necessary, briefly press the
button 2
to switch on the device.
♦ If necessary, briefly press SOURCE/
3 several times until the DAB+
radio mode is shown on the display1.
♦ Briefly press the VOLUME |
ENTER/SCAN dial6 to start the
automatic station scan with station presetting. The display 1 now shows
the message Scanning... DAB and the number of found stations. The scan
progress is displayed as a progress bar. The DAB+ radio stations found
are automatically stored in the station list on order of increasing frequency.
When the scan is finished, the first station in the station list is automatically
played back.
NOTE
► An automatic station scan with station saving may overwrite an existing
station list.
Selecting stations
♦ Press the TUNE+8 or TUNE− button 7 to select a DAB+ radio station
from the station list. After approx. 2 seconds, the displayed station is auto-
matically played back.
Saving stations manually
♦ Press the TUNE+8 or TUNE− button7 to select a DAB+ radio station
from the station list.
♦ Press the VOLUME |
ENTER/SCAN dial6 to confirm the selection.
♦ Press the PRESET button5. The display 1 shows the preset space with the
last selected radio station (if radio stations have already been stored). If no
radio stations have yet been stored, the display 1 shows Preset 1 empty.
♦ Press the TUNE+8 or TUNE− button7 to select the desired preset.
♦ Press the VOLUME |
ENTER / SCAN dial6, to store the station in
the selected preset. The preset space of the stored station is shown in the
upper right corner of the display
1 (e.g. P1 for preset 1).
NOTE
► Any previously stored stations will be overwritten.

■ 12
│
GB
│
IE
│
NI
SRH 5 A1
Station information
In DAB+ radio mode, you can show additional station information on the
display 1:
♦ Briefly press INFO / MENU
4 repeatedly to display the following channel
information:
– Programme type (Pty)
– Group name
– Time/date
– Multiplex number/frequency
– Audio bitrate (kbps)
– Signal strength (bar)
– Signal error
– Scrolling text (radio text)
Deleting stations from the station list
You can remove outdated DAB+ radio stations from the station list if, for example,
you are using the radio at a different location where stations from the previous
station list can no longer be received:
♦ In DAB+ radio mode, press the INFO/MENU button
4 for about
2 seconds to enter the setup menu.
♦ Press the TUNE+
8 or TUNE− button 7 several times until the display 1
shows System.
♦ Press the VOLUME |
ENTER/SCAN dial6 to confirm the selection.
♦ Press the TUNE+ 8 or TUNE− button 7 several times until the display 1
shows Prune.
♦ Press the VOLUME | ENTER/SCAN dial6 to confirm the selection.
The display 1 shows the query Prune?.
♦ Press the VOLUME |
ENTER/SCAN dial6 again to confirm the
selection. Stations that are no longer current are removed from the station
list.

GB
│
IE
│
NI
│
13 ■
SRH 5 A1
FM radio operation (FM)
Automatic scan search (AMS)
♦ This device must be switched on. If necessary, briefly press the button 2 to
switch on the device.
♦ If necessary, briefly press SOURCE/ 3 several times until FM radio
mode and the frequency display in MHz is shown on the display1.
♦ Briefly press the VOLUME | ENTER / SCAN dial6 to start the auto-
matic station scan. The display 1 now shows the message Scanning.... The
station scan stops at the next station with a sufficiently strong signal.
Storing stations automatically
The automatic station scan with station saving scans the entire frequency band
once and automatically saves the FM radio stations found as an FM station list.
♦ Press the VOLUME |
ENTER/SCAN dial 6 for approx. 2 seconds
to start the automatic station scan with station presetting. The display 1
now shows the message Scanning... FM and the number of found stations.
The scan progress is displayed as a progress bar. The FM radio stations
found are automatically stored in the station list on order of increasing
frequency. When the scan is finished, the first station in the station list is
automatically played back.
NOTE
► The automatic station scan replaces the stations already stored in the preset
spaces.
Selecting stations
♦ Press PRESET 5 for about 2 seconds to call up the FM station list.
♦ Press TUNE+ 8 or TUNE− 7 to select an FM radio station from the
station list.
Manual station scan
♦ Press the TUNE+ button 8 for around 2 seconds to jump to the next availa-
ble station with a higher frequency.
♦ Press the TUNE− button
7 for around 2 seconds to jump to the next availa-
ble station with a lower frequency.
NOTE
► The frequency of the station is shown on the display
1 and the speaker9
is switched off during station search.

■ 14
│
GB
│
IE
│
NI
SRH 5 A1
Searching for stations manually
♦ Briefly press the TUNE+ 8 or TUNE− button7 to change the FM fre-
quency in 0.05 MHz increments. The current FM frequency is shown on the
display1.
Saving stations manually
♦ To store the current radio station manually, first briefly press the PRESET
button5. The display 1 shows the preset space with the last selected
radio station (if radio stations have already been stored). If no radio stations
have yet been stored, the display shows Preset 1 empty.
♦ Press the TUNE+
8 or TUNE− button7 to select the desired preset.
♦ Press the VOLUME | ENTER / SCAN dial6, to store the station in
the selected preset. The preset space of the stored station is shown in the
upper right corner of the display 1 (e.g. P1 for preset 1).
Station information
In FM radio mode, you can show additional station information on the display 1:
♦ Briefly press INFO / MENU
4 repeatedly to display the following channel
information:
– Programme type (Pty)
– Signal strength (bar)
– Time/date
– Scrolling text (radio text)
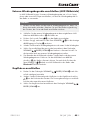
Playback via Bluetooth
®
Pairing devices
Before you start using the radio for music playback via Bluetooth
®
you must
pair it with a Bluetooth
®
-compatible external playback device.
♦ If necessary, briefly press the button 2 to switch on the device.
♦ If necessary, briefly press the SOURCE/
button 3 several times to activate
the Bluetooth
®
function. You will hear a beep and Pairing flashes on the
display 1.
♦ Set the external playback device so that it scans for Bluetooth
®
devices.
You can find a detailed description of how to do this in the operating
instructions for your external playback device.
♦ From the list of discovered Bluetooth
®
devices in the settings menu of your
external playback device, select the entry SRH 5 A1. The external playback
device will now connect to the radio automatically via Bluetooth
®
.
You will hear another beep when the connection has been successfully
established and Connected appears on the display1.
You can now use the radio to listen to music from your external playback device
wirelessly via the radio's speaker.

GB
│
IE
│
NI
│
15 ■
SRH 5 A1
NOTE
► The next time you turn on the radio, it will connect automatically to the last-
connected external playback device. If your external playback device does
not automatically reconnect to the radio, you will have to re-establish the
connection manually. You can find a detailed description of how to do this
in the operating instructions for your external playback device.
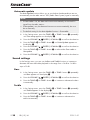
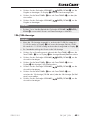
Unpairing devices
If you want to connect the radio to another external playback device, you must
first unpair the currently connected playback device:
♦ Press SOURCE/ 3 for about 2 seconds. You will hear a beep and
Pairing flashes on the display 1. Alternatively, you can unpair via the
currently connected external playback device.
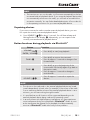
Button functions during playback via Bluetooth
®
Button Function
VOLUME |
ENTER / SCAN6
► Press briefly to start/stop playback.
TUNE+
8
► Press briefly to move to the next track.
► Press for approx. 2 seconds to change to fast
forward mode.
TUNE−
7
► Press briefly to go to the beginning of the
current track. Press briefly again to go back to
the previous track.
► Press for approx. 2 seconds to change to
rewind mode.
SOURCE /
3
► Press for approx. 2 seconds to unpair the
devices.
NOTE
► The volume on the radio and on the external playback device can be ad-
justed independently of each other. For example, if the volume of the radio
is set to maximum and the volume of the external playback device is set to
minimum, you will hear nothing through the radio.
► It is possible that not all functions will be supported depending on the
external playback device being used and its operating system.
► In an environment with high-frequency interference, you may experience
noise interference during music playback in Bluetooth
®
mode. As soon
as the interference has ceased, music playback should automatically
continue in Bluetooth
®
mode without any further problems.

■ 16
│
GB
│
IE
│
NI
SRH 5 A1
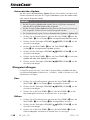
Connecting external playback devices (AUX IN mode)
In AUX IN mode, you can connect external playback devices such as a smart-
phone or an MP3 player to use them as the playback source for the radio.
NOTE
► Switch the radio and the external playback device off before connecting
them. Note also the operating instructions for the device that you want to
connect to the radio.
♦ Connect the external playback device to the AUX IN connection
r of the
radio using the supplied AUX cable.
♦ Briefly press the button2 to switch on the radio.
♦ If necessary, briefly press the SOURCE/ button 3 several times until
Auxiliary Input appears on the display
1.
♦ Turn on the external playback device and start playback.
♦ Afterwards, set the desired volume using the VOLUME | ENTER /
SCAN dial6 on the radio. Alternatively, you can increase the volume on
the external playback device.
♦ To stop AUX operation, turn off the radio and the external playback device.
Remove the AUX cable from the AUX IN connection r of the radio. Alter-
natively, you can press SOURCE/
3 to switch directly from AUX IN
mode to radio mode or Bluetooth
®
mode.
Connecting headphones
♦ Turn the VOLUME | ENTER / SCAN dial6 anticlockwise to the
lowest volume level.
♦ Insert the jack plug of the headphones into the headphone socket
e
on the rear of the device. Sound playback now takes place only via the
connected headphones.
♦ Set the desired volume using the VOLUME | ENTER / SCAN dial6.
Settings menu
NOTE
► The settings menu can be called up during operation as well as in standby
mode.
► If no setting is made in the setup menu for more than 7 seconds, the setup
menu is exited.
♦ During normal operation or standby, press INFO/MENU 4 for about
2 seconds until System appears on the display
1
.

GB
│
IE
│
NI
│
17 ■
SRH 5 A1
Alarm times
The device has two alarms, Alarm1 and Alarm2. For both, you can program
playback of the last radio station you listened to or an alarm tone at a specific
time.
Setting the alarm
♦ Press INFO/MENU 4 for about 2 seconds to call up the settings menu.
Alarms is shown as the first menu option on the display 1.
♦ Press the VOLUME | ENTER/SCAN dial6 to confirm the selection.
♦ Press the TUNE+
8 or TUNE− button 7 select either Alarm1 or Alarm2.
♦ Press the VOLUME | ENTER/SCAN dial6 to confirm the selection.
The display 1 now shows the message Alarm detail.
♦ Push the VOLUME | ENTER / SCAN dial6 to set the alarm to On.
♦ Press the TUNE+ button
8 to go next to the setting of the alarm time.
♦ Press the VOLUME | ENTER/SCAN dial6 to set the alarm time.
Set alarm time appears on the display1 and the hour display flashes.
♦ Press the TUNE+ 8 or TUNE− button7 to set the hours.
♦ Press the VOLUME |
ENTER/SCAN dial6 to confirm the entry.
The minutes flash on the display 1.
♦ Press the TUNE+ 8 or TUNE− button7 to set the minutes.
♦ Press the VOLUME | ENTER/SCAN dial6 to confirm the entry.
♦ Next select the menu item Days to select whether the alarm should be
activated daily, only once, only on weekdays or only on weekends. Press
the VOLUME |
ENTER / SCAN dial6 and then the TUNE+8 or
TUNE− button7 to make the appropriate setting.
♦ Press the VOLUME | ENTER/SCAN dial6 to confirm the selection.
♦ Next select the alarm type under the menu item Mode. You can choose
between the last DAB+ or FM radio station (DAB/FM) or an alarm tone
(Buzzer). Press the VOLUME |
ENTER / SCAN dial6 and then the
TUNE+8 or TUNE− button7 to make the appropriate setting.
♦ Press the VOLUME | ENTER/SCAN dial6 to confirm the selection.
♦ Next, select the volume of the alarm under the menu item Volume. Press
the VOLUME | ENTER / SCAN dial6 and then the TUNE+8 or
TUNE− button7 to set the alarm volume.
♦ Press the VOLUME |
ENTER/SCAN dial6 to confirm the selection.
♦ Next, save your settings under the menu option Save by pressing the
VOLUME | ENTER / SCAN dial6. The alarm is now activated.
Page is loading ...
Page is loading ...
Page is loading ...
Page is loading ...
Page is loading ...
Page is loading ...
Page is loading ...
Page is loading ...
Page is loading ...
Page is loading ...
Page is loading ...
Page is loading ...
Page is loading ...
Page is loading ...
Page is loading ...
Page is loading ...
Page is loading ...
Page is loading ...
Page is loading ...
Page is loading ...
Page is loading ...
Page is loading ...
Page is loading ...
Page is loading ...
Page is loading ...
Page is loading ...
Page is loading ...
Page is loading ...
Page is loading ...
Page is loading ...
Page is loading ...
Page is loading ...
Page is loading ...
Page is loading ...
Page is loading ...
Page is loading ...
Page is loading ...
Page is loading ...
Page is loading ...
Page is loading ...
Page is loading ...
Page is loading ...
-
 1
1
-
 2
2
-
 3
3
-
 4
4
-
 5
5
-
 6
6
-
 7
7
-
 8
8
-
 9
9
-
 10
10
-
 11
11
-
 12
12
-
 13
13
-
 14
14
-
 15
15
-
 16
16
-
 17
17
-
 18
18
-
 19
19
-
 20
20
-
 21
21
-
 22
22
-
 23
23
-
 24
24
-
 25
25
-
 26
26
-
 27
27
-
 28
28
-
 29
29
-
 30
30
-
 31
31
-
 32
32
-
 33
33
-
 34
34
-
 35
35
-
 36
36
-
 37
37
-
 38
38
-
 39
39
-
 40
40
-
 41
41
-
 42
42
-
 43
43
-
 44
44
-
 45
45
-
 46
46
-
 47
47
-
 48
48
-
 49
49
-
 50
50
-
 51
51
-
 52
52
-
 53
53
-
 54
54
-
 55
55
-
 56
56
-
 57
57
-
 58
58
-
 59
59
-
 60
60
-
 61
61
-
 62
62


Silvercrest SRH 5 A1 Owner's manual
- Category
- Radios
- Type
- Owner's manual
- This manual is also suitable for
Ask a question and I''ll find the answer in the document
Finding information in a document is now easier with AI
in other languages
Related papers
-
Silvercrest CHAMPIGNON SBPL 15 A1 Operating Instructions Manual
-
-
-
-
Silvercrest SBDB 5 A1 Operating Instructions And Safety Instructions
-
-
-
-
-
Other documents
-
PEAQ PDR110BT-B Owner's manual
-
-
Auna 10035328 User manual
-
Clatronic ar 735 Owner's manual
-
Soundmaster SCD8100 User manual
-
Schwaiger DAB 400 Operating And Safety Instructions Manual
-
AEG DAB 4130 Owner's manual
-
-
Renkforce Microwave 700 W Owner's manual
-
OK. ORD 110 User manual