
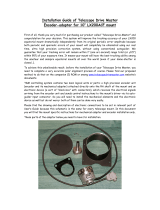
Installation Guide for TDM Encoder Coupling
The Heidenhain ERN-480 encoder of the second version of Telescope Drive Master (TDMv2) has
been equipped with a new type of coupling which provides remarkably more rigid and
temperature compensated mechanical connection against torsion but, at the same time, allows
springy movements of the encoder stator in line with itself compensating small eccentricity of
the encoder shaft. In this way, control-hysteresis of TDM system becomes tighter even in cold
weather (under 0°C) as well, when starting torque of the encoder shaft will be higher due to the
more rigid gum gaskets. Although aluminium would be lighter, the coupling system has been made
by stainless steel decreasing flexure of the parts. For providing smooth operation, internal sides
are polished.
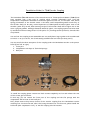
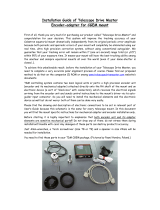
You can find this coupling as one assembled unit in a small plastic bag together with six additional
screws in it. As you can see, two screws among installed ones are black (not shiny steel).
You can see all the three main parts of this coupling under the Heidenhain encoder in the picture
below (from left to right):
1. Front part
2. Compensator with 4pcs of flat holed springs
3. Back part
To install the coupling please remove two black screws completely at first and release the rest
of the screws just a little bit.
In this way, you can remove the front part of the coupling and the flat springs with the
compensator will be loose on the back part.
Now, please remove the previous version of the encoder coupling from the Heidenhain encoder
removing four torch screws and, after that, using the same four torch screws, please install the
back side (with compensator on it) of the new coupling onto the encoder.

Please install the encoder adaptor onto the RA shaft of your telescope mount according to the
adapter installation guide.
Now, you can fix the front part of the coupling onto the previously installed adaptor stator using
four screws from six attached ones in the plastic bag.
Please push the encoder up onto the shaft gently until its impact and tighten its fixing clamp on
the back side using torch screw driver.
IMPORTANT!!!
You have to push it until impact (“click”) but do NOT press it! The compensator (middle part of
the coupling) has to be able to move quite easily between the front and back parts but without
any slackness or play.
Now, please tighten the front side clamping ring of the encoder via any holes of flat springs.
Finally, install two missing screws (but please use the rest of the attached 6 pcs of stainless
steel screws, instead of the originally used two black ones) and tighten all the six screws well in
the flat springs.
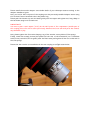
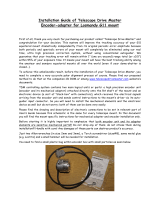
Please find the encoder unit installed with the new coupling on an EQ6 mount below.
-
 1
1
-
 2
2


Explore Scientific TDM Tracking unit Owner's manual
- Type
- Owner's manual
- This manual is also suitable for
Ask a question and I''ll find the answer in the document
Finding information in a document is now easier with AI
Related papers
-
 Explore Scientific TDM Adapter for Celestron AVX Owner's manual
-
 Explore Scientific TDM Adapter for MEADE LX200ACF Owner's manual
-
 Explore Scientific Adapter Sky Watcher AZ-EQ6 Owner's manual
-
 Explore Scientific 0721025 Owner's manual
-
 Explore Scientific 0721030 Owner's manual
-
 Explore Scientific 0721010 Owner's manual


Other documents
-
ACU-RITE DRO100 Operating instructions
-
 Magnetek Quattro® AC/PM Elevator Drive Owner's manual
-
HEIDENHAIN ITNC 530 - CONVERSATIONAL PROGRAMMING User manual
-
Mitsubishi Electric MDS-DM2 Series Owner's manual
-
Mitsubishi Melservo-J2-SUPER series User manual
-
 Mitsubishi Electronics MDS-D-SPJ3 User manual
-
-
-
-

