
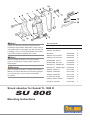
Shock absorber for Suzuki TL 1000 R
SU 806
Mounting Instructions
Note!
Please note that during storage and transportation,
especially at high ambient temperature, some of the oil
and grease used for assembling may leak and stain the
packaging. This is in no way detrimental to the product,
wipe off the excessive oil/grease with a cloth.
Note!
Before installing this product, check the contents
of the kit. If anything is missing, please contact an
Öhlins dealer.
Warning!
Before installing this product, read the Öhlins Owner’s
Manual. The shock absorber/front fork/steering damper
is an important part of your vehicle and will affect
the stability.
Kit Contents
Description Part No Pcs
Shock absorber SU806 1
Sticker set Öhlins 1
Nut M12 00430-06 2
Washer PS 12/18/1 00578-02 4
Washer PS 10/16/1 00578-03 1
Bolt MC6S 12x70 01046-28 1
Bolt MC6S 12x130 01046-29 1
Bracket TL 1000R left 03106-02 1
Bracket TL 1000R right 03106-03 1
Spacer 10/20/17 03171-01 1
Spacer 12/20/22 03171-02 3
Spacer 10/20/38 03171-03 2
C-spanner single 00710-02 1
Sticker memo notes 01180-01 1
Owner’s manual 07241-02 1

2/4
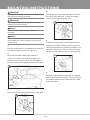
1
Put the motorcycle on a workstand so that the
rear wheel barely touches the ground.
2
Remove the bolts holding the seat and
remove it. Loosen the rear tank bracket so
that the rear end of the tank can be slightly
pivoted. Remove the plate at the left foot rest.
MOUNTING INSTRUCTIONS
Warning!
It is advisable to have an Öhlins dealer install the shock
absorber/front fork/steering damper.
Warning!
If working on a raised vehicle, ensure it is securely
supported so that it will not tip.
Note!
Before mounting this product clean the vehicle
thoroughly.
Note!
When working on this product, always see the Vehicle
Service Manual for vehicle specic procedures and
important data.
4
Loosen the link arm from the frame and from
the swing arm rear fork. Loosen the upper
mount of the original spring unit.
3
Remove the foot rest support on the right side.
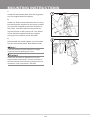
5
Loosen the three bolts of the original shock
absorber and the bracket on the inside and
remove the whole unit, including linkage, turn
carefully and pull out. Then remove the origi
-
nal spring unit together with the triangle link.
5
6
Install the right bracket plate with the spacer
and original bolts and tighten. Place the spac
-
ing washer between the plate and the inside
of the left upper.

3/4
MOUNTING INSTRUCTIONS
7
Install the left bracket plate with the long spac
-
ers and original bolts and tighten.
8
Install the Öhlins shock absorber with the long
bolt and spacers supplied to the upper bracket
and with the supplied to the lower bracket on
the swing. The uid reservoir should be fac
-
ing the left side of the motorcycle. The Öhlins
shock absorber replaces both the original
spring and the rotation shock absorber.
9
Reassemble the pedal support, foot rest plate
and the rear tank bracket. Reinstall the seat.
Note!
Lower the vehicle so that the suspension is slightly
compressed before tightening the screws.
Caution!
Ensure that all screws are tightened to the correct
torque and that nothing fouls or restricts movement of
the shock absorber/front fork/steering damper when the
suspension is fully compressed or extended.

Öhlins Racing AB
Box 722
S-194 27 Upplands Väsby, Sweden
Phone +46 8 590 025 00
fax +46 8 590 025 80
© Öhlins Racing AB. All rights
reserved. Any reprinting or
unauthorized use without the written
permission of Öhlins Racing AB
is prohibited.
Öhlins products are subject to
continuous improvement and
development, therefore, although
these instructions include the most
up-to-date information available at
the time of printing, minor updates
may occur.
To nd the latest information
contact an Öhlins distributor.
Please contact Öhlins if you have
any questions regarding the
contents in this document.
SET-UP DATA
Warning!
Before riding, always make sure that the basic settings
made by Öhlins are according to recommended Set-
up Data. Read about adjustments and setting up in
the Öhlins Owner’s Manual before you make any
adjustments. Contact an Öhlins dealer if you have any
questions about setting up.
ADJUSTMENTS
Part no. MI_SU806_1
Issued 2017-01-01
Length 253 mm
Stroke 49 mm
Rebound 13 clicks
Compression 10 clicks
Spring preload 12 mm
-
 1
1
-
 2
2
-
 3
3
-
 4
4


Ask a question and I''ll find the answer in the document
Finding information in a document is now easier with AI
Related papers
-
Ohlins YA051 Mounting Instruction
-
-
-
-
-
-
-
-
-