
N.I.F. F-20.020.517 - Bº. San Andrés, nº 18 • Apartado 49 - 20500 MONDRAGON (Guipúzcoa) ESPAÑA
MOD.: MH-21N MH-26N
MINI HORNO / MINI FORNO / MINI OVEN / MINI-FOUR / ÌÉÍÉ ÖÏÕÑÍÏÓ / MINI SÜTŐ
/ MINI TROUBA / MINI RÚRA / MINI PIEKARNIK / МИНИФУРНА /
ήϐμϣϥήϓ
ES - MANUAL DE INSTRUCCIONES
PT - MANUAL DE INSTRUÇÕES
EN - INSTRUCTIONS FOR USE
FR - MANUEL D’UTILISATION
EL - ENTY¶√ √¢∏°πøN
HU - HASZNÁLATI ÚTMUTATÓ
CS - NÁVOD K POUŽITÍ
SK - NÁVOD NA POUŽITIE
PL - INSTRUKCJA OBSŁUGI
BG - ИНСТРУКЦИЯ ЗА УПОТРЕБА
AR -
N.I.F. F-20.020.517 - Bº. San Andrés, nº 18 •
Apartado 49 - 20500 MONDRAGON (Guipúzcoa) ESPAÑA
El fabricante se reserva los derechos de modificar los modelos descritos en este Manual de Instrucciones.
O fabricante, reserva-se os direitos de modificar os modelos descritos neste Manual de Instruções.
The manufacturer reserves the right to modify the models described in this User’s Manual.
Le fabricant se réserve le droit de modifier les modèles décrit dans le présente notice.
O k·t·ÛkÂv·Ût‹ç ‰È·tËp› ·okÏÂÈÛtÈk¿ to ‰Èk·›ˆÌ· v· tpoooÈ‹Û› t· Ìovt¤Ï· ou ÂpÈyp¿ºovt·È Ûto ·pfiv Evtuo O‰ËyÈÒv
.
A gyártó fenntartja magának a jogot a használati útmutatóban közölt műszaki adatok megváltoztatására.
Výrobce si vyhrazuje právo modifikovat modely popsané v tomto uživatelském návodu.
Výrobca si vyhradzuje právo modifikovať modely opísané v tomto užívateľskom návode.
Producent zastrzega sobie prawo do modyfikowania modeli opisanych w niniejszej instrukcji obsługi.
Производителя си запазва правото променя моделите описани в този наръчник.
Enero 2011
Page is loading ...
Page is loading ...
Page is loading ...
Page is loading ...

5
latas de comida directamente no
forno, poderá causar danos no
aparelho ou nas pessoas.
• Atenção: Evite queimar-se durante ou
depois da sua utilização. As partes
metálicas e a janela de vidro podem
alcançar temperaturas muito elevadas.
Não toque nestas partes enquanto
abrir ou fechar a porta.
• Deverá utilizar uma tomada de
corrente CA em bom estado.
Introduza a tomada totalmente na
ficha. Caso contrário poderá funcionar
incorrectamente. Não ligue várias
fichas à mesma tomada.
• Se o cabo de alimentação estiver
danificado, o fabricante deverá
substituí-lo (o seu agente de
assistência ou técnico qualificado
semelhante) de forma a evitar perigos.
4. FUNCIONAMENTO
Antes de utilizar o forno pela primeira vez
aqueça o forno vazio.
Para ligar o forno deve ajustar os três
botões. Primeiro, deverá seleccionar a
temperatura que deseja com o primeiro
botão, o selector de temperatura (7). Antes
de seleccionar a temperatura, deverá
ter em conta o tipo de alimento que vai
cozinhar.
Depois deverá ajustar o botão de grill (8).
Se rodar o botão para a primeira posição,
vai seleccionar o grill de cima, ou seja,
vão funcionar as resistências de cima. Se
rodar o botão para a segunda posição, vai
activar as resistências de baixo assando os
alimentos por baixo. E por último, se rodar
o botão para a terceira posição vai aquecer
tanto as resistências de cima como as de
baixo.
Para terminar, deve seleccionar a duração
de cozedura que deseja com o botão de
temporizador (9). Tem indicados à volta do
botão os minutos 10, 20, 30… indicando
através dos pontos os minutos 2, 4, 6…
Quando tiver activado ou ajustado os três
botões do forno, a contagem do temporizador
(9) é activada. Vá reduzindo o tempo até
passar o tempo seleccionado. Nesse caso, o
forno desliga-se automaticamente e vai ouvir
um “pi” indicando que o ciclo de cozedura já
terminou.
Embora tenha seleccionado a temperatura,
o modo de grill e a duração concretas,
poderá alterá-los durante a cozedura
bastando rodar para a esquerda o botão
correspondente (7), (8) o (9). Inclusive,
pode desligar o forno rodando totalmente
para a esquerda o último botão, ou seja, o
botão de temporizador (9).
Para que o forno funcione correctamente
deve ajustar os três botões. Se activar
um ou dois, o forno não vai aquecer. Por
exemplo, se activar o temporizador, o
indicador luminoso é activado, mas o forno
não vai aquecer.
ATENÇÃO: Se o forno estiver sujo
poderá demorar mais tempo a cozinhar
o seu prato.
NOTA: Poderá produzir fumo ou cheiro
a queimado durante a sua primeira
utilização, mas não será uma causa de
mau funcionamento.
Tipo de Espessura Temperatura Tempo
comida (ºC) (min.)
Sanduíche 2-3 und 200 2-4
Torrada 2-4 und 230 2-6
Hambúrguer 2-3 und 200 3-6
Peixe 1-3 und 200 6-11
Presunto 2-3 cm. 200 6-11
Salchicha 3-4 und 200-230 7-11
Bolo 1-2 und 150 18-28
Filete 1-2 cm. 230 9-15
Frango
Frango médio
180-200 28-40
• Tabuleiro: Pode servir para comidas
tais como hambúrgueres, gratinados,
frango assado, biscoitos e alimentos
assados.
• Grelha: Batatas assadas… Comida
seca em geral.
• Tabuleiro + grelha: Para comida com
muita gordura ou óleo. Por exemplo, o
peixe.
Page is loading ...

7
EN
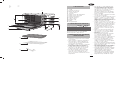
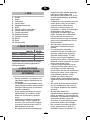
1. DESCRIPTION
1. Elements
2. Glass
3. Support slots
4. Door handle
5. Outer casing
6. Legs
7. Temperature selector dial
8. Grill mode selector dial
9. Timer dial.
10. Indicator light
11. Cable and plug
12. Tray
13. Grill rack
14. Grill rack handle
• This appliance is not designed for
use by people (including children)
with reduced physical, sensory or
mental abilities, or those with lack
of experience or knowledge, unless
they are supervised or instructed on
the use of the appliance by a person
responsible for their safety.
• Do not get the cable wet or handle the
unit with wet hands.
• Unplug the cable after using the
appliance or when you are not going
to use it. Do the same if the appliance
is going to be left unattended. Any
malfunction when the appliance is
connected to the power supply could
cause a fire.
• When you are cooking dishes with oil
that may splash, such as roast chicken,
you are advised to use two sheets of
aluminium foil in the tray in order to
reduce the splashing from the oil. Put
one in the tray. The oil will then drip into
a gap between the sheets of aluminium
foil.
• Supervise children to make sure that
they do not play with it. They should
not use the oven if there is no adult
present.
• In the event of a fault and/or a
malfunction of the appliance, switch
it off and do not try to repair it. If the
appliance needs repairing, only contact
a Technical Support Service authorised
by the manufacturer.
• If the oven is too near to a wall, it
could burn or become rusty. Make sure
that the appliance is well away from
curtains.
• Do not place anything between the
bottom of the oven and the surface on
which it is resting. This could cause a
fire.
• Do not place anything on top of the
oven when it is in use; the heat could
cause objects to become misshapen or
to break, etc.
• No bottles or tins of food can be
put directly into the oven; this could
damage the appliance or harm
individuals.
• Caution: Avoid burning yourself during
• Check that the voltage of the domestic
power supply is the same as that
indicated on the appliance.
• Always use the tray handle in order
to insert and remove the tray. Direct
contact with the tray could cause
serious burns.
• Do not apply water or dampen the
glass of the oven when it is hot. This
could cause the glass to break.
• When you unplug the appliance, pull
on the plug and not on the cable;
otherwise, the internal wiring could
become damaged.
• Do not operate the appliance near a
gas ring or other heat source or electric
fan, etc. This will ensure that the
correct temperature is maintained.
3. SAFETY WARNINGS AND
PRECAUTIONS
2. TECHNICAL CHARACTERISTICS
This product complies with the European
Directives on Electromagnetic Compatibility
and Low Voltage.
Voltage/ Frequency 220-240 V ~ 50 Hz
Power (W) 1380 1500
Dimensions (mm)
460 x 360 x 293 478 x 398 x 325
Weight (kg) 6,9 7,9
MH-21N MH-26N

8
or after its use. The metal parts and
the glass panel can reach very high
temperatures. Do not touch these parts
when you open or close the door.
• An AC plug in perfect condition must
be used. Insert the plug fully into the
socket; otherwise, it may not operate
properly. Do not connect several plugs
to the same socket.
• If the power cable is damaged, the
manufacturer must replace it (its service
agent or a similarly qualified technician)
to prevent any danger.
4. OPERATING THE APPLIANCE
Before using your oven for the first time,
heat up the oven whilst empty.
To turn the oven on, you must adjust the
three dials. Firstly, you must select the
temperature you require with the first
dial, the temperature selector (7). Before
selecting the temperature, you must take
into account the type of food you are going
to cook.
Then you must adjust the grill dial (8). If you
turn the dial to the first position, you will
select the top grill, i.e. the top elements will
come on. If you turn the dial to the second
position, this will activate the bottom
elements, cooking the food from below.
And lastly, if you turn the dial to the third
position, this will heat up both the top and
bottom elements.
Finally, you must select the cooking time
you require, using the timer dial (9). The
minutes 10, 20, 30, etc are shown around
the dial, with minutes 2, 4, 6, etc indicated
by dots.
Once you have activated or adjusted the
three dials on the oven, the timer (9) will
begin to count down. It will count down the
time until the selected time has passed.
The oven will then turn off automatically
and you will hear a beep to indicate that
the cooking cycle has finished.
Even if you have selected the specific
temperature, grill mode and cooking time,
you can change them during cooking just
by turning the corresponding dial (7), (8) or
(9) to the left. You can also turn the oven off
by turning the last dial, i.e. the timer dial (9)
fully to the left.
You must adjust the three dials in order for
the oven to operate properly. If you activate
one or two, the oven will not heat up. For
example, if you activate the timer, the
indicator light will activate, but the oven will
not heat up.
CAUTION: If the oven is dirty, your dish
may take longer to cook.
N.B.: The appliance may emit smoke and
a burning smell when it is used for the first
time, but this will not be due to any fault.
Type of Thickness Temperature Time
food (ºC) (mins.)
Sandwich 2-3 units 200 2-4
Toast 2-4 units 230 2-6
Hamburger 2-3 units 200 3-6
Fish 1-3 units 200 6-11
Ham 2-3 cm. 200 6-11
Sausage 3-4 units 200-230 7-11
Cake 1-2 units 150 18-28
Steak 1-2 cm. 230 9-15
Chicken
Half chicken
180-200 28-40
• Tray: This can be used for dishes such
as hamburgers, grilled dishes, roast
chicken, sponges and roasts.
• Grill rack: Roast potatoes… Dry food
in general.
• Tray + grill rack: For food with a lot of
fat or oil. For example, fish.
CAUTION: Be careful when taking out
puddings or other hot liquids.
TRAY GROOVES (3)
The tray can be placed in four different
positions (MH-26N) / three different positions
(MH-21N) depending on the dishes you wish
to cook. For example, to brown macaroni,
place the tray in the top groove, so that it is
closer to the top element. To roast a chicken,
use the bottom groove.

9
5. CLEANING
• Unplug the appliance and leave it to cool
down before beginning to clean it.
• Clean the inner and outer surface of
the tray, grill rack and the handle with a
cotton cloth (or sponge), using a neutral
cleaner.
• Rinse with water. Do not use a brush
with hard bristles, as this may scratch
the inner surface of the oven, the
protective surface of the tray, the grill
rack or the handle.
• Wipe the outside of the appliance with a
damp cloth.
• Do not immerse the appliance in water
or put it under the tap.
• Do not use toxic or abrasive cleaners
such as petrol, polishing powder or
solvent.
WARNING
If the power cable is damaged, the
manufacturer must replace it (its service
agent or a similarly qualified technician) to
prevent any danger.
SAFETY WARNINGS
This symbol indicates that
the appliance must not be
disposed of in domestic
waste containers.
Caution: The accessible
surface can reach very high
temperatures when the
appliance is in use.
6. INFORMATION FOR THE CORRECT
DISPOSAL OF ELECTRICAL AND
ELECTRONIC APPLIANCES
At the end of its working
life, the product must not
be disposed of as urban
waste. It must be taken to
a special local authority
differentiated waste
collection centre or to a
dealer providing this service. Disposing of
a household appliance separately avoids
possible negative consequences for the
environment and health deriving from
inappropriate disposal and enables the
constituent materials to be recovered to
obtain significant savings in energy and
resources.
To remind you that you must collaborate
with a selective collection scheme, the
symbol shown appears on the product
warning you not to dispose of it in
traditional refuse containers.
For further information, contact your local
authority or the shop where you bought the
product.
Page is loading ...
Page is loading ...
Page is loading ...
Page is loading ...
Page is loading ...
Page is loading ...
Page is loading ...

17
HU
Így szabályozhatja a megfelelő
hőmérsékletet.
• A készüléket nem használhatják
csökkent fizikai, érzékelési vagy
mentális képességekkel rendelkező
személyek (beleértve gyerekek), vagy
akik nem megfelelő vagy hiányos
ismeretekkel rendelkeznek a készülék
működésére vonatkozóan; hacsak egy
felelős személy biztonságuk érdekében
nem biztosítja a felügyeletet vagy a
vonatkozó utasításokat.
• Ne nedvesítse be a kábelt, és ne
kezelje a készüléket nedves kézzel.
• A készülék használatát követően, vagy
ha már nem kívánja használni, húzza ki
a készülék csatlakozóját az elektromos
hálózatból. Ezt akkor is végezze el, ha
a készüléket felügyelet nélkül hagyja.
Az áramellátás során bekövetkezett
meghibásodás tűzesetet okozhat.
• Ha zsíros ételeket készít, mint
például sült csirkét, ami kifröccsenhet,
javasoljuk, hogy használjon alufóliát
a tálcán, hogy csökkentse a zsír
kifröccsenését. Tegyen egy réteget a
tálcára. Így az olaj az alufólia rétegek
közé csepeg.
• Biztosítsa a gyermekek felügyeletét,
nehogy játszanak a készülékkel. Ne
használják a sütőt, ha nincs a közelben
felnőtt.
• Meghibásodás esetén a készüléket
kapcsolja ki, és ne kísérelje megjavítani.
Ha javításra van szükség, csak a
gyártó hivatalos márkakereskedéséhez
forduljon.
• Ha a sütő egy falhoz nagyon közel
helyezkedik el, azt megégetheti vagy
oxidálhatja. Győződjön meg arról, hogy
a sütő nincs függönyökhöz közel.
• Ne tegyen semmit a sütő alsó része és
az alatta lévő felület közé a tűzveszély
elkerülése érdekében.
• Működése közben ne tegyen
semmit a sütőre, mert a hő hatására
eldeformálódhatnak, összetörhetnek,
stb.
• Ne tegyen élelmiszeres palackokat vagy
konzerveket közvetlenül a sütőbe, az
károsíthatja a készüléket, vagy személyi
sérülést okozhat.
1. LEÍRÁS
1. Fűtőszálak
2. Üveg
3. Rögzítő vájatok
4. Ajtófogantyú
5. Külső burkolat
6. Tartólábak
7. Hőmérséklet kiválasztó tekerőgomb
8. Grill mód kiválasztó tekerőgomb
9. Időzítő tekerőgomb
10. Fényjelzés
11. Kábel és villásdugó
12. Tepsi
13. Rács
14. Rácstartó fogantyú
3. BIZTONSÁGI FIGYELMEZTETÉSEK
ÉS ÓVINTÉZKEDÉSEK
• Mielőtt a készüléket használná,
ellenőrizze, hogy az elektromos hálózat
feszültsége megegyezik-e a készüléken
jelzettel.
• A tálca berakásakor és kivételekor
mindig használja a tálcatartót. A tálcával
való közvetlen érintkezés súlyos égési
sérüléseket okozhat.
• Ne vizezze be vagy nedvesítse be a
sütő üvegét, amikor az még forró. Ez
összetörheti az üveget.
• Amikor a készüléket áramtalanítja,
a dugót húzza, ne a kábelt. Így
megszakíthatja a belső kábelt.
• A működő készüléket ne helyezze
gáztűzhely vagy hőforrás, vagy
elektromos ventilátor, stb. közelébe.
2. MŰSZAKI JELLEMZŐK
Ez a termék megfelel az elektromos
kompatibilitásra és a kisfeszültségű
berendezésekre vonatkozó európai
irányelveknek.
Feszültség/frekvencia 220-240 V ~ 50 Hz
Fogyasztás (W) 1380 1500
Méretek (mm)
460 x 360 x 293 478 x 398 x 325
Súly (kg) 6,9 7,9
MH-21N MH-26N
Page is loading ...
Page is loading ...
Page is loading ...
Page is loading ...
Page is loading ...
Page is loading ...

24
po použití. Kovové časti a sklenené
okienka sa môžu ohriať na veľmi
vysokú teplotu. Nedotýkajte sa týchto
častí pri otváraní a zatváraní dverí.
• Je nutné používať AC zásuvku v
dobrom stave. Zasuňte zástrčku
na doraz do zásuvky. V opačnom
prípade by mohla fungovať nesprávne.
Nezapojujte niekoľko zástrčiek do
jednej zásuvky.
• Ak je napájací kábel poškodený, musí
byť vymenený výrobcom (záručným
opravárom alebo podobným
kvalifikovaným technikom), aby sa
zabránilo rizikám.
4. FUNGOVANIE
Pred prvým použitím zohrejte vašu rúru
naprázdno.
Pre zapnutie rúry treba nastaviť všetka
tri kolieska. Najprv musíte zvoliť vami
požadovanú teplotu pomocou prvého
kolieska, voličom teploty (7). Pri voľbe
teploty musíte brať do úvahy druh potraviny,
ktorý sa chystáte spracovať.
Následne zvoľte nastavenie kolieska pre
grilovanie (8). Otočením kolieska do prvej
polohy zvolíte horný gril, čo znamená, že
budú fungovať odpory hore. Otočením do
druhej pozície aktivujete dolné odpory a
budete piecť potraviny zdola. A pri otočení
do tretej pozície sa zohrejú tak odpory hore,
ako aj dole.
Nakoniec treba zvoliť požadovanú dobu
pečenia pomocou kolieska časovača (9). Po
obvode kolieska sú napísané minuty 10, 20,
30… a pomocou bodiek vyznačené minuty
2, 4, 6…
Po aktivovaní alebo nastavení všetkých
troch koliesok rúry sa aktivuje odpočítávanie
časovača (9). Doba sa bude znižovať,
dokiaľ neubehne zvolený čas. Napokon sa
rúra automaticky vypne a ozve sa “pi”, ktoré
oznamuje, že skončil cyklus pečenia.
I po zvolení teploty možno zmeniť počas
pečenia spôsob grilovania a konkrétne časy
otočením príslušného kolieska vľavo (7),
(8) alebo (9). Dokonca môžete vypnúť
rúru
otočením posledného kolieska, tj. kolieska
časovača (9), vľavo až nadoraz.
Aby rúra správne fungovala, treba nastaviť
všetka tri kolieska. Pokiaľ aktivujete iba
jedno alebo dve, rúra sa nerozohreje.
Napr. ak aktivujete len časovač, svetelná
kontrolka sa aktivuje, ale rúra sa nebude
ohrievať.
POZOR: Ak je rúra špinavá, môže sa
predĺžiť doba prípravy pokrmov.
POZNÁMKA: Pri prvom použití môže
rúra byť cítiť spálením a môže sa tvoriť
dym, čo ale nie je známkou zlého
fungovania rúry.
Druh jedla Hrúbka Teplota Čas
(ºC) (min.)
Sendvič 2-3 j 200 2-4
Toast 2-4 j 230 2-6
Hamburger 2-3 j 200 3-6
Ryba 1-3 j 200 6-11
Šunka 2-3 cm. 200 6-11
Párky 3-4 j 200-230 7-11
Múčnik 1-2 j 150 18-28
Plátok mäsa 1-2 cm. 230 9-15
Kurča
Polovica kurčaťa
180-200 28-40
• Tácka: Môže slúžiť pre také jedlá ako
sú hamburgery, ražničie, pečené kurča,
keksy a pečené pokrmy.
• Mriežka: Pečené zemiaky…
Všeobecne suché jedlá.
• Tácka + mriežka: Pre jedlá s
množstvom tuku alebo oleja. Napr.
ryba.
POZOR: Buďte opatrní pri vyťahovaní
pudingu alebo iných horúcich tekutín.
ZASÚVACIE DRÁŽKY (3)
Môžete podnos nastaviť do štvor rôznych
polôh (MH-26N) / troch rôznych polôh
(MH-21N), podľa jedla, ktoré chcete uvariť.
Napríklad, ak chcete zapiecť makaróny,
opiecť viac hornú časť, použite hornú
drážku. K pečeniu kuraťa použite spodnú
drážku.
Page is loading ...
Page is loading ...
Page is loading ...
Page is loading ...
Page is loading ...
Page is loading ...
Page is loading ...
Page is loading ...
Page is loading ...
Page is loading ...
Page is loading ...
Page is loading ...

37
ήϳάΤΗ
ϩήϴϐϳϥΐΠϳΞΘϨϤϟϲΎΑήϬϜϟςϴΨϟΐτόΗΔϟΎΣϲϓκΧήϤϟκΨθϟ
ΔϠΛΎϤϤϟϭΔμΘΨϤϟΔϴϨϘΘϟϟΎμϤϟϑήσϦϣέΎτΧϷΐϨΠΘϟ
ΕήϳάΤΗΔϴϨϣ
ϣήϟάϫΰϦϴΒϳϥΐΠϳϻίΎϬΠϟϥΔϳϭΎΣϲϓϪϨϣκϠΨΘϳ
ΥΎγϭϷΔϴϟΰϨϤϟ
ήϳάΤΗϦϜϤϣΔϴΤτδϟΕΎΣΎδϤϟϥΔϴϟΎϋΪΟΓέήΣΔΟέΩώϠΒΗ
ϤόϳίΎϬΠϟϥϮϜϳΎϣΪϨϋϞ
ΔѧѧѧѧѧѧѧѧѧϴϜϴϧϭήΘϜϟϹϭΔѧѧѧѧѧѧѧѧѧϴΎΑήϬϜϟΕΎѧѧѧѧѧѧѧѧѧϳΎϔϨϠϟΪѧѧѧѧѧѧѧѧѧϴΠϟήϴѧѧѧѧѧѧѧѧѧδΘϟϝϮѧѧѧѧѧѧѧѧѧΣΕΎѧѧѧѧѧѧѧѧѧϣϮϠόϣ
ΔѧѧѧѧѧѧϴϟΰϨϤϟΕΎѧѧѧѧѧѧϳΎϔϨϟϊѧѧѧѧѧѧϣϪѧѧѧѧѧѧϴϣήΗϻίΎѧѧѧѧѧѧϬΠϟάѧѧѧѧѧѧϬϟΔѧѧѧѧѧѧϴϠϤόϟΓΎѧѧѧѧѧѧϴΤϟΔѧѧѧѧѧѧϳΎϬϧΪѧѧѧѧѧѧϨϋ
ϦϴϋίϮѧѧѧѧѧѧϤϟϭΔѧѧѧѧѧѧμΘΨϤϟΔѧѧѧѧѧѧϴϠΤϤϟΰϛήѧѧѧѧѧѧϤϟϰѧѧѧѧѧѧϟ·ϒϴϟΎѧѧѧѧѧѧϜΗϱϥϭΪѧѧѧѧѧѧΑϪѧѧѧѧѧѧΎτϋ·ϦѧѧѧѧѧѧϜϤϳ
ϰѧѧѧѧѧѧϠϋΔϴΒϠѧѧѧѧѧѧγΐѧѧѧѧѧѧϗϮϋΐѧѧѧѧѧѧϨΠΗϲϨѧѧѧѧѧѧόϳΪѧѧѧѧѧѧΣϰѧѧѧѧѧѧϠϋΕΎѧѧѧѧѧѧϳΎϔϨϟϲѧѧѧѧѧѧϣέΔѧѧѧѧѧѧϴϠϤόϟϩάѧѧѧѧѧѧϫϥϭήѧѧѧѧѧѧϓϮϳϦϳάѧѧѧѧѧѧϟ
ΔѧѧѧѧѧѧѧѧϗΎτϠϟϲѧѧѧѧѧѧѧѧϧϼϘόϟήϴѧѧѧѧѧѧѧѧδΘϟϭΓΰѧѧѧѧѧѧѧѧϬΟϻΕΎѧѧѧѧѧѧѧѧΒϛήϤϟΪѧѧѧѧѧѧѧѧϴΠϟήϴѧѧѧѧѧѧѧѧδΘϟΎΑϤѧѧѧѧѧѧѧѧδϳϭΔΤѧѧѧѧѧѧѧѧμϟϭςѧѧѧѧѧѧѧѧϴΤϤϟ
ΎϫέΩΎμϣϭ
ίΎѧѧѧѧѧѧѧϬΠϟ˯ΎѧѧѧѧѧѧѧϨΘϗ·ϞѧѧѧѧѧѧѧΤϣϭΔѧѧѧѧѧѧѧϴϠΤϤϟΕΎτϠѧѧѧѧѧѧѧδϟΎΑϞѧѧѧѧѧѧѧμΗ·ΔϴϓΎѧѧѧѧѧѧѧο·ΕΎѧѧѧѧѧѧѧϣϮϠόϤϟ
.7
6
-
 1
1
-
 2
2
-
 3
3
-
 4
4
-
 5
5
-
 6
6
-
 7
7
-
 8
8
-
 9
9
-
 10
10
-
 11
11
-
 12
12
-
 13
13
-
 14
14
-
 15
15
-
 16
16
-
 17
17
-
 18
18
-
 19
19
-
 20
20
-
 21
21
-
 22
22
-
 23
23
-
 24
24
-
 25
25
-
 26
26
-
 27
27
-
 28
28
-
 29
29
-
 30
30
-
 31
31
-
 32
32
-
 33
33
-
 34
34
-
 35
35
-
 36
36
-
 37
37
-
 38
38


Fagor MH-26N Owner's manual
- Type
- Owner's manual
Ask a question and I''ll find the answer in the document
Finding information in a document is now easier with AI
in other languages
- français: Fagor MH-26N Le manuel du propriétaire
- español: Fagor MH-26N El manual del propietario
- português: Fagor MH-26N Manual do proprietário
- slovenčina: Fagor MH-26N Návod na obsluhu
- polski: Fagor MH-26N Instrukcja obsługi
- čeština: Fagor MH-26N Návod k obsluze
Related papers
Other documents
-
Whirlpool AKP 463/IX User guide
-
Whirlpool AKZM 828/IX Owner's manual
-
-
-
-
Whirlpool AKZ 684/IX User guide
-
-
Whirlpool AKZ 481/IX User guide
-
-