Page is loading ...

Countertop Wine Cellar
Compoir Cave á Vin Systéme
Encimera Enfriado de Vinos
User Manual
Model # HVUEB06B
Guide de l’Utilisateur
Modéle # HVUEB06B
Manual del Usuario
Para Modelo de # HVUEB06B
Quality • Innovation • Style

1
English
IIMMPPOORRTTAANNTT SSAAFFEEGGUUAARRDDSS
W
W
h
h
e
e
n
n
u
u
s
s
i
i
n
n
g
g
t
t
h
h
i
i
s
s
a
a
p
p
p
p
l
l
i
i
a
a
n
n
c
c
e
e
,
,
a
a
l
l
w
w
a
a
y
y
s
s
e
e
x
x
e
e
r
r
c
c
i
i
s
s
e
e
b
b
a
a
s
s
i
i
c
c
s
s
a
a
f
f
e
e
t
t
y
y
p
p
r
r
e
e
-
-
c
c
a
a
u
u
t
t
i
i
o
o
n
n
s
s
,
,
i
i
n
n
c
c
l
l
u
u
d
d
i
i
n
n
g
g
t
t
h
h
e
e
f
f
o
o
l
l
l
l
o
o
w
w
i
i
n
n
g
g
:
:
1) Read all of the instructions before using this appliance.
2) This wine cellar must be properly installed in accordance with the
installation instructions before it is used. See grounding instructions in
the installation section.
3) Never unplug your wine cellar by pulling on the power cord. Always
grasp the plug firmly and pull straight out from the outlet.
4) Repair or replace immediately, all electric service cords that have
become frayed or otherwise damaged. Do not use a cord that shows
cracks or abrasion damage along its length, the plug or the connector
end.
5) Unplug your wine cellar before cleaning or before making any repairs.
Note: If for any reason this product requires service, we strongly
recommend that a certified technician performs the service.
6) If your wine cellar is not being used, we recommend that you remove
the door and leave the shelves in place. This will reduce the possibility
of danger to children.
7) This wine cellar should not be recessed or built-in an enclosed cabinet.
It is designed for freestanding installation only.
8) Do not operate your wine cellar in the presence of explosive fumes.
9) Do not store foods in wine cellar as interior temperature may not be
cool enough to prevent spoilage.
S
S
A
A
V
V
E
E
T
T
H
H
E
E
S
S
E
E
I
I
N
N
S
S
T
T
R
R
U
U
C
C
T
T
I
I
O
O
N
N
S
S
D
D
A
A
N
N
G
G
E
E
R
R
R
R
i
i
s
s
k
k
o
o
f
f
c
c
h
h
i
i
l
l
d
d
e
e
n
n
t
t
r
r
a
a
p
p
m
m
e
e
n
n
t
t
.
.
B
B
e
e
f
f
o
o
r
r
e
e
y
y
o
o
u
u
t
t
h
h
r
r
o
o
w
w
a
a
w
w
a
a
y
y
y
y
o
o
u
u
r
r
o
o
l
l
d
d
a
a
p
p
p
p
l
l
i
i
a
a
n
n
c
c
e
e
,
,
t
t
a
a
k
k
e
e
o
o
f
f
f
f
t
t
h
h
e
e
d
d
o
o
o
o
r
r
s
s
.
.
L
L
e
e
a
a
v
v
e
e
t
t
h
h
e
e
s
s
h
h
e
e
l
l
v
v
e
e
s
s
i
i
n
n
p
p
l
l
a
a
c
c
e
e
s
s
o
o
t
t
h
h
a
a
t
t
c
c
h
h
i
i
l
l
d
d
r
r
e
e
n
n
m
m
a
a
y
y
n
n
o
o
t
t
e
e
a
a
s
s
i
i
l
l
y
y
c
c
l
l
i
i
m
m
b
b
i
i
n
n
s
s
i
i
d
d
e
e
.
.

2
English
Thank you for using our Haier product.
This easy-to-use manual will guide you
in getting the best use of your
wine cellar.
Remember to record the model and
serial number. They are on a label in
back of the wine cellar
.
Model number
Serial number
Date of purchase
Staple your receipt to your manual.
Y
Y
o
o
u
u
w
w
i
i
l
l
l
l
n
n
e
e
e
e
d
d
i
i
t
t
t
t
o
o
o
o
b
b
t
t
a
a
i
i
n
n
w
w
a
a
r
r
r
r
a
a
n
n
t
t
y
y
s
s
e
e
r
r
v
v
i
i
c
c
e
e
.
.
TTaabbllee OOff CCoonntteennttss
P
AGE
I
I
M
M
P
P
O
O
R
R
T
T
A
A
N
N
T
T
S
S
A
A
F
F
E
E
G
G
U
U
A
A
R
R
D
D
S
S
1
P
P
A
A
R
R
T
T
S
S
A
A
N
N
D
D
F
F
E
E
A
A
T
T
U
U
R
R
E
E
S
S
3
I
I
N
N
S
S
T
T
A
A
L
L
L
L
I
I
N
N
G
G
Y
Y
O
O
U
U
R
R
W
W
I
I
N
N
E
E
C
C
E
E
L
L
L
L
A
A
R
R
4-5
Unpacking your wine cellar 4
Leveling your wine cellar 4
Proper Air Circulation 4
Electrical requirements 5
Use of extension cords 5
Install Limitations 5
W
W
I
I
N
N
E
E
C
C
E
E
L
L
L
L
A
A
R
R
F
F
E
E
A
A
T
T
U
U
R
R
E
E
S
S
A
A
N
N
D
D
U
U
S
S
E
E
6
Temperature Adjustment 6
P
P
R
R
O
O
P
P
E
E
R
R
W
W
I
I
N
N
E
E
C
C
E
E
L
L
L
L
A
A
R
R
C
C
A
A
R
R
E
E
A
A
N
N
D
D
C
C
L
L
E
E
A
A
N
N
I
I
N
N
G
G
7
Cleaning and Maintenance 7
Power interruptions 7
Vacation & moving care 7
T
T
R
R
O
O
U
U
B
B
L
L
E
E
S
S
H
H
O
O
O
O
T
T
I
I
N
N
G
G
8
W
W
A
A
R
R
R
R
A
A
N
N
T
T
Y
Y
9

1. Removable Chrome Shelves
2. Leveling Legs (4) (not shown)
3. Glass See-though Door
4. Temperature Control Panel
English
3
3
1
4
Knowing Your Wine Cellar
Parts and Features
2

English
4
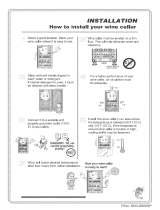
Installing Your Wine Cellar
Unpacking your Wine Cellar
1. Remove all packaging material. This includes the base and all adhesive tape
holding the wine cellar accessories inside and outside.
2. Inspect and remove any remains of packing, tape or printed materials before
powering on the wine cellar.
Leveling your Wine Cellar
• Your wine cellar has 4 leveling legs. After properly placing your wine cellar in
its final position, you can level your wine cellar.
• Leveling legs can be adjusted by turning them counterclockwise to raise your
wine cellar or by turning them clockwise to lower your wine cellar.
• Install the legs by screwing in the legs into the preset screw holes. (Please note
that the leg which stands on the hinge is the shorter leg.)
Proper Air Circulation
• To assure your wine cellar works at the maximum efficiency it was designed for,
you should install it in a location where there is proper air circulation and
electrical connections.
• The following are recommended clearances around the wine cellar:
Sides……………2 "(50mm)
Top....................4" (100mm)
Back..................2" (50mm)
• Do not over fill your wine cellar for proper internal air circulation.
N
N
O
O
T
T
E
E
:
:
A
A
l
l
l
l
o
o
w
w
e
e
n
n
o
o
u
u
g
g
h
h
s
s
p
p
a
a
c
c
e
e
i
i
n
n
t
t
h
h
e
e
f
f
r
r
o
o
n
n
t
t
o
o
f
f
t
t
h
h
e
e
u
u
n
n
i
i
t
t
t
t
o
o
o
o
p
p
e
e
n
n
t
t
h
h
e
e
d
d
o
o
o
o
r
r
t
t
o
o
1
1
2
2
0
0
˚
˚
.
.

5
English
Electrical Requirement
• Make sure there is a suitable power Outlet (110 volts, 15 amps outlet) with
proper grounding to power the wine cellar.
• Avoid the use of three plug adapters or cutting off the third grounding in order
to accommodate a two plug outlet. This is a dangerous practice since it pro-
vides no effective grounding for the wine cellar and may result in shock haz-
ard.
Use of Extension Cords
• Avoid the use of an extension cord because of potential safety hazards under
certain conditions. If it is necessary to use an extension cord, use only a 3-wire
extension cord that has a 3-blade grounding plug and a 3-slot outlet that will
accept the plug. The marked rating of the extension cord must be equal to or
greater than the electrical rating of the appliance.
Install Limitations
• Do not install your wine cellar in any location not properly insulated or heated
e.g. garage etc.
• Select a suitable location for the wine cellar on a hard even surface away from
direct sunlight or heat source e.g. radiators, baseboard heaters, cooking
appliances etc. Any surface unevenness should be corrected with the leveling
legs located on the front and rear bottom corners of the wine cellar. Avoid
placing unit where there may be electrical interference.
• Your wine cellar is designed for free-standing installation only. It is not
designed for built-in application.
N
N
O
O
T
T
E
E
:
:
T
T
o
o
m
m
i
i
n
n
i
i
m
m
i
i
z
z
e
e
t
t
h
h
e
e
r
r
i
i
s
s
k
k
o
o
f
f
r
r
u
u
s
s
t
t
i
i
n
n
g
g
,
,
l
l
e
e
a
a
k
k
a
a
g
g
e
e
a
a
n
n
d
d
i
i
n
n
s
s
u
u
l
l
a
a
t
t
i
i
o
o
n
n
d
d
a
a
m
m
a
a
g
g
e
e
,
,
a
a
v
v
o
o
i
i
d
d
p
p
l
l
a
a
c
c
i
i
n
n
g
g
t
t
h
h
e
e
u
u
n
n
i
i
t
t
i
i
n
n
a
a
p
p
l
l
a
a
c
c
e
e
w
w
h
h
e
e
r
r
e
e
h
h
e
e
a
a
v
v
y
y
m
m
o
o
i
i
s
s
t
t
u
u
r
r
e
e
i
i
s
s
p
p
r
r
e
e
s
s
e
e
n
n
t
t
.
.
U
U
n
n
d
d
e
e
r
r
n
n
o
o
c
c
i
i
r
r
c
c
u
u
m
m
s
s
t
t
a
a
n
n
c
c
e
e
s
s
s
s
p
p
i
i
l
l
l
l
o
o
r
r
d
d
i
i
r
r
e
e
c
c
t
t
l
l
y
y
a
a
p
p
p
p
l
l
y
y
w
w
a
a
t
t
e
e
r
r
o
o
n
n
t
t
o
o
o
o
r
r
i
i
n
n
t
t
o
o
t
t
h
h
e
e
u
u
n
n
i
i
t
t
.
.

English
6
Wine Cellar Features & Use
General Features
Temperature Adjustments:
• Your wine cellar has electronic temperature control on the front of the unit.
You can set the temperature of your wine cellar at any setting you desire. The
temperature will range from 46˚F to 64˚F. When initially turned on, the LED
will show the ambient. The LCD will then display the internal temperature.
N
N
O
O
T
T
E
E
:
:
W
W
h
h
i
i
t
t
e
e
w
w
i
i
n
n
e
e
t
t
e
e
m
m
p
p
e
e
r
r
a
a
t
t
u
u
r
r
e
e
i
i
s
s
c
c
o
o
o
o
l
l
e
e
r
r
t
t
h
h
a
a
n
n
r
r
e
e
d
d
w
w
i
i
n
n
e
e
t
t
e
e
m
m
p
p
e
e
r
r
a
a
t
t
u
u
r
r
e
e
.
.
By pressing the ( ) temperature button on the display you can increase the
temperature and pressing the ( ) temperature button will lower the temperature.
After you set your required temperature, the set temperature will flash for 5
seconds and then the display will revert to the ambient temperature.
Your wine cellar also has a light for you viewing pleasure. A light switch on the
control panel will activate the light manually. Under normal operation it is best
for the light to remain off.
Please note that the actual cabinet temperature in a thermal electric unit is
dependent on the ambient temperature. You may set the cabinet temperature
within range but the unit may not reach the preset temperature.
By pressing the (C/F) button you can have the temperature readout either in cel-
sius or fahrenheit.
When the ambient temperature is below the pre-set temperature, the cellar will
not operate until the ambient temperature increases to higher than the pre-set
temperature.

7
English
Warning: To avoid electric shock always unplug your
wine cellar before cleaning. Ignoring this
warning may result in death or injury.
Caution: Before using cleaning products, always read and
follow manufacturer’s instructions and warnings to avoid
personal injury or product damage.
General:
• Prepare a cleaning solution of 3-4 tablespoons of
baking soda mixed with warm water. Use sponge or soft
cloth, dampened with the cleaning solution, to wipe down
your wine cellar.
• Rinse with clean warm water and dry with a soft cloth.
• Do not use harsh chemicals, abrasives, ammonia, chlorine
bleach,concentrated detergents, solvents or metal scouring
pads. SOME of these chemicals may
dissolve, damage and/or discolor your wine cellar.
Proper Wine Cellar Care and Cleaning
Cleaning and Maintenance
Power Interruptions
• Occasionally there may be power interruptions due to thunderstorms or other
causes. Remove the power cord from AC outlet when a power outage occurs.
When power has been restored, replug power cord to AC outlet.
Vacation and Moving Care
• For long vacations or absences, unplug the unit, empty contents from wine
cellar, and clean the wine cellar and door gaskets according to "General clean-
ing" section. P
rop doors open, so air can circulate inside.When moving always
move the wine cellar vertically
. Do not move the unit lying on its side.

8
Troubleshooting
Wine Cellar does not operate
• Check if wine cellar is plugged in.
• Check if there is power at the ac outlet, by checking the circuit breaker.
Wine appears too warm
• Frequent door openings.
• Allow time for recently added wine to reach desired temperature.
• Check gaskets for proper seal.
• Adjust temperature control to colder setting.
Wine temperature is too cold
• If temperature control setting is too cold, adjust to a warmer setting.
Wine cooler runs too frequently
• This may be normal to maintain constant temperature during
high temperature and humid days.
• Doors may have been opened frequently or for an extended
period of time.
• Check gasket for proper seal.
• Check to see if doors are completely closed.
Moisture build up on interior or exterior
of the wine cellar:
• This is normal during high humidity periods.
• Prolonged or frequent door openings.
• Check door gaskets for proper seal.
Wine Cellar door does not shut properly:
• Level the wine cooler.
• Check for blockages e.g. wine bottles, shelves.
English

English
9
What is covered and for how
long?
This warranty covers all defects in
workmanship or materials for a period
of:
12 months labor (carry-in)
12 months parts
The warranty commences on the date
the item was purchased and the origi-
nal purchase receipt must be presented
to the authorized service center before
warranty repairs are rendered.
EXCEPTIONS: Commercial or
Rental Use warranty
90 days labor (carry-in only)
90 days parts
No other warranty applies
What is covered.
1. The mechanical and electrical parts,
which serve as a functional, purpose
of this appliance for a period of 12
months. This includes all parts
except finish, and trim.
What will be done?
1. We will repair or replace, at our dis-
cretion any mechanical or electrical
part which proves to be defective in
normal usage during the warranty
period so specified.
2. There will be no charge to the
purchaser for parts and labor on
any covered items during the initial
12
month period. Beyond this period
only parts are covered in the remain-
ing warranty
. Labor is not provided
and must be paid by the customer.
3. Contact your nearest authorized
service center. For the name of the
nearest service center please call
1-877-337-3639
THIS WARRANTY COVERS
APPLIANCES WITHIN THE
CONTINENTAL UNITED STATES,
PUERTO RICO AND CANADA.
IT DOES NOT COVER
THE FOLLOWING:
Damages from improper installation.
Damages in shipping.
Defects other than manufacturing.
Damage from misuse, abuse, accident,
alteration, lack of proper care and
maintenance or incorrect current or
voltage.
Damage from other than household
use.
Damage from service by other than an
authorized dealer or service center.
Decorative trims or replaceable
light bulbs.
Transportation and shipping.
Labor (after the initial 12 months).
THIS LIMITED WARRANTY IS GIVEN IN
LIEU OF ALL OTHER WARRANTIES,
EXPRESSED OR, INCLUDING THE
WARRANTIES OF MERCHANTABILITY
AND FITNESS FOR A PARTICULAR
PURPOSE
The remedy provided in this warranty is
exclusive and is granted in lieu of all
other remedies.
This warranty does not cover incidental
or consequential damages, so the
above limitations may not apply to
you. Some States do not allow limita-
tions on how long an implied warranty
lasts, so the above limitations may not
apply to you.
This warranty gives you specific legal
rights, and you may have other rights,
which vary, from state to state.
Haier America
New Y
ork, NY 10018
Limited Warranty

IMPORTANT
Do Not Return This Product To The Store
If you have a problem with this product, please contact
the "Haier Customer Satisfaction Center" at 877.337.3639.
D
ATED PROOF OF PURCHASE REQUIRED FOR WARRANTY SERVICE
IMPORTANT
Ne pas Réexpédier ce Produit au Magasin
Pour tout problème concernant ce produit, veuillez contacter le service des
consommateurs "Haier Customer Satisfaction Center" au 1-877-337-3639.
UNE PREUVE D’ACHAT DATEE EST REQUISE POUR BENEFICIER DE LA GARANTIE.
IMPORTANTE
No regrese este producto a la tienda
Si tiene algún problema con este producto, por favor contacte
el "Centro de Servicio al Consumidor de Haier" al 1-877-337-3639 (Válido solo en E.U.A).
NECESITA UNA PRUEBA DE COMPRA FECHADA PARA EL SERVICIO DE LA GARANTIA
Made in China
Fabriqué en Chine
Hecho en China
Haier America
New York, NY 10018
Printed in China
Issued: August 2006
P
art # RF-9999-185
/