Electro-Voice SL 6.2 User manual
- Category
- Soundbar speakers
- Type
- User manual
This manual is also suitable for

Model SL6.2M
Extended Range
High Output Speaker
Technical Specifications:General Description:
The SL6.2M provides high efficiency, high power
handling, and extended frequency response in a very
compact, plastic enclosure. It’s proven performance
and reliability position it as the correct choice for
small to medium theater surround applications.
The SL6.2M features a high-energy 6" low frequency
transducer, a pure titanium 1" high frequency
neodymium transducer mounted on a 100° x 100°
waveguide, and a crossover network with full
bandwidth protection. These components provide
wide dynamic range, smooth coverage, and
exceptional reliability.
One person installation is simple using the included
EV Strong-Arm-Mount
TM
. It provides ease of location
and aiming not possible with other brackets.
The SL6.2M’s performance, reliability, and shape
make it ideal for digital age theaters.
Key Features:
• 46 Hz – 20 kHz Response
• 250W Power Handling
• 90 dB High Sensitivity
• Full-Bandwidth overload protection
• Strong-Arm-Mount
TM
for easy, flexible
aiming
• Lightweight, unobtrusive plastic enclo-
sure
• Easy access input terminals
esnopseRycneuqerF
1
)Bd01-(zHk02-zH84
gnildnaHrewoP
2
sttaw052
ytivitisneS
3
m1/W1,Bd09
ecnadepmIsmho8
LPSdetaluclaCxaMBd611
egarevoClatnoziroH
4
°001
egarevoClacitreV
4
°001
ycneuqerFrevossorCzHk8.1
recudsnarTFL)mm001(”6
recudsnarTFH)mm52(”1
noitcetorPmetsySlluF
noisnepsuSsixA-itluM
noitatoRxgniwS°09x°001
slanimreTAG21stpecca,gnirpS
lairetaMerusolcnE)elbatniap(SBA
)DxWxH(miD
xmm914(”57.11x"9x”5.61
)mm892xmm822
)hcae(thgieWteN)gk5.4(sbl9.9
thgieWgnippihS)gk4.01(sbl32
seirosseccAdedulcnIMAS
™
yekxeh,
1
)gnitnuomllaw(ecapSflaH
2
esionknipsuounitnocnahtretaergBd3:gnitaRmargorPmreTgnoL
gnitar
3
)gnitnuomllaw(ecapSflaH:gvA
4
nalplacitrevnisixagnolhtiwdetnuomnehW

Packing List
Listed and illustrated below are the parts in-
cluded in each boxed pair of EVID™ speakers.
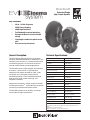
Product Feature Identification
Illustrated below are the major components
of the EVID™ Series full-range speakers.
EVID SL6.2M
A 2 Speaker system
B 2 SAM™ assembly
C 2 Large logo cap
C 2 Small logo cap
D 1 Data sheet/Instructions
E 1 Warranty card
F 1 SAM™ mounting tool
Figure Quantity Part
A
B
C
EDF
Figure 1: EVID™ components
Input wire
connectors
Connection eyebolt
for seismic
security cable
Figure 3: EVID™ features (back)
A. Shielded woofer
B. Coherent Coverage Waveguide horn
C. Low-frequency port
D. Treated woofer cone
E. Durable zinc-plated steel grille (not shown)
F. Cast aluminum Strong-Arm-Mount™ (SAM™)
G. Over 100 degrees of swing; 90 degrees
of rotation
H. Simple keyed socket head adjustments
I. Titanium dome tweeter with neodymium
magnet structure
A
I
H
G
F
(E)
D
C
B
Figure 2: EVID™ features (front)
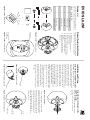
Installation and Wiring
Step 1: Mount the SAM™ Bracket
The SAM™ bracket can be mounted on
either side of the speaker, enabling optimal
configuration for any installation. First,
determine whether the bracket should be
mounted on the left or right side of the
speaker (do not bolt the speaker to the
bracket). It is best to mount the bracket on
the side away from the direction in which
the speaker will be aimed. This ensures
that the full sweep angle is available for
aiming on that side and provides easier
access to the sweep tightening bolt on the
wall bracket (see step 2). For safety,
make sure the mounting surface can
support more than the speaker's
weight! Use only industry-accepted fasten-
ers and mounting methods when mounting
the bracket. Consult an expert if you are
not sure.
For standard vertical installation mount
the SAM™ bracket as shown in Figure 4.
For horizontal mounting configurations,
mounting the bracket on the bottom side
(as in Figure 5) is easiest and safest, and
allows the speaker to be mounted closer to
the ceiling.
Step 2: Mount the Speaker to the
SAM™ Bracket
Attach the speaker to the SAM™ bracket
with the socket head bolt, as shown in
Figure 6.
Secure the speaker with the provided
security tool by tightening the two socket
head bolts as shown. After selecting the
proper horizontal angle, secure the swing
axis as shown by tightening bolt A. Next,
select the proper vertical angle with the
aid of the angle markers as shown in
Figure 7. Then secure the rotation axis by
tightening bolt B.
SAM™
Ceiling
Figure 5: SAM™ mounted on bottom
SAM™
Figure 4: SAM™ mounted on side
Figure 6: Attach SAM™
Bolt A
(swing)
Bolt B
(rotation)
15˚ angle markers
Figure 7: Tighten socket-head bolts

Attach both logo caps as shown in Figure 8
after tightening and securing the speaker.
Step 3: Wire the Speaker
Connect the wires to the speaker at the
back terminal plate observing the polarity
of the connections. The push-terminals
accept banana connector plugs.
Step 4: Secure the Seismic Tab
Connection Point
The rear of the enclosure includes an eye-
bolt for connection to a seismic restraint.
Connect it to a properly rated hardware fit-
ting that is securely installed independent-
ly of the SAM™ bracket. Even if your local
construction code does not require the
installation of secondary support, its use is
highly recommended for further security.
Step 5: Test System Operation
After all connections are made, test the
complete system operation. The Trouble-
shooting Table on the next page will assist
in locating many speaker-related problems.
EV logo cap
(large)
EV logo cap
(small)
Figure 8: Attach logo caps
Connect seismic
security cable
Figure 9: Secure seismic security cable
Problem Possible Cause(s) Action
1. No sound Amplifier Connect a known working test speaker to the amplifier
outputs. If there is no sound, check that all the elec-
tronics are on, the signal routing is correct, the source
is active, the volume is turned up, and so on. Correct/
repair/replace as necessary. If there is sound, the
problem is in the wiring.
Wiring Verify that you have connected the correct wire pairs to
the amplifier. Play something at low level through the
amplifier (for example, from a CD player or tuner).
Connect the test speaker in parallel with the malfunc-
tioning line. If the sound has gone or is very weak, the
line has a short in it (possibly a severe scrape, pinch,
or staple puncture). If the sound level is normal, the
wire is open (possibly a cut wire or a missed connec-
tion). Using the test speaker, move down the line and
test each connection/junction until you find the problem
and correct it. Observe proper polarity.
2. Poor low- Speakers wired When two speakers are connected out of polarity
frequency out-of-polarity (out of phase), the low frequencies will cancel each
response other acoustically. Carefully observe the wire markings
or tracers on your speaker wires. Verify that the ampli-
fier (+) terminal is connected to the red speaker termi-
nals and the amplifier (–) terminal is connected to all
the black speaker terminals.
Improperly wired Using a test speaker as described above, verify that
subwoofer panel all amplifier and speaker wires are connected to their
proper terminals with the correct polarity. Reversing
just one set of amplifier wires can cut out all bass
output from the subwoofer.
3. Intermittent output Faulty connection Check all connections at amplifier and speakers to
such as crackling ensure they are clean and tight. If the problem persists,
or distortion it may be in the amplifier or wiring. See no. 1 above.
4. Constant noise Defective amplifier If the noise is present but no program material is
such as buzzing, or other electronic playing, the likely cause is the signal chain in the elec-
hissing, humming device tronics. Evaluate each component as necessary to iso-
late the problem.
Poor system Check and correct the system grounding, as required.
grounding or
ground loop
If these suggestions do not solve your problem, contact your nearest Electro-Voice dealer or
Electro-Voice distributor.
Troubleshooting Table

Architecture & Engineering Specs:
The loudspeaker shall be a two-way system consisting of one 6”
(152mm) low-frequency transducer, a 1” (25mm) high-frequency
transducer with a Coherent Coverage Waveguide, and a frequency-
dividing network installed in a vented, line-array enclosure. The
network shall include a passive limiter for both the low-frequency
and high-frequency transducers. The loudspeaker system shall meet
the following performance criteria: Power handling, 250-Watts long
term program using IEC268-5 shaped pink noise; Frequency
response, 46 Hz - 20 kHz (-10 dB from rated sensitivity); Pressure
sensitivity, 90 dB at one watt, 200 Hz -10 kHz at one meter; Impedance,
8 ohms nominal, 6 ohms minimum. The high-frequency transducer
shall drive a waveguide to cover evenly 100° horizontally by 100°
vertically. The enclosure shall be molded of acrylic butyl styrene. The
enclosure shall be 16.5” (419mm) high, 9” (228mm) wide, 11.75”
(298mm) deep. The finish shall be a paintable black. The grille shall
be zinc plated, powder coated for corrosion resistance, and
restrained with a safety leash. The loudspeaker shall be adjustable
over a range of 100° horizontally and 90° vertically. The support
bracket shall be low profile and integral with the enclosure.
U.S.A. and Canada only. For customer orders, contact Customer Service at:
800/392-3497 Fax: 800/955-6831
Europe, Africa, and Middle East only. For customer orders, contact Customer Service at:
+ 49 9421-706 0 Fax: + 49 9421-706 265
Other International locations. For customer orders, contact Customer Service at:
+ 1 952 884-4051 Fax: + 1 952 736-4212
For warranty repair or service information, contact the Service Repair department at:
800/685-2606
For technical assistance, contact Technical Support at: 866/78AUDIO
Specifications subject to change without notice.
12000 Portland Avenue South, Burnsville, MN 55337
Phone: 952/884-4051, Fax: 952/884-0043
www.electrovoice.com
© Telex Communications, Inc. 6/2002
Part Number 38110-153 Rev A
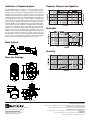
Beamwidth:
Frequency Response and Impedance:
Directivity:
Block Diagram:
Side
Wall Plate
Front
Top
Dimension Drawings:
-
 1
1
-
 2
2
-
 3
3
-
 4
4


Electro-Voice SL 6.2 User manual
- Category
- Soundbar speakers
- Type
- User manual
- This manual is also suitable for
Ask a question and I''ll find the answer in the document
Finding information in a document is now easier with AI
Related papers
-
Electro-Voice HS Series Installation guide
-
-
-
Electro-Voice EVID SOS 3.2 Series Assembly Instruction
-
-
-
-
-
-