Charbroil 463840904 Owner's manual
- Category
- Barbecues & grills
- Type
- Owner's manual

Qty: 2
463840904
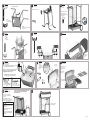
Items to Assemble:
2 Wheel Assemblies
2 Hitch Pins
2 Leg Extenders
Items to Assemble:
2 Leg Assemblies
1 Bottom Shelf
6 Carriage Bolts
6 Wing Nuts
Qty: 6
Qty: 6
Place Bottom Shelf and Legs as shown.
After assembling tighten all Wing Nuts.
Right Side:
Attach 2 Carriage Bolts and Wing Nuts in
front and back.
Left Side:
Place 1 Carriage Bolt
and Wing Nut in upper hole only
Items to Assemble:
1 Grill Bottom
1 Heat Shield
4 Carriage Bolts
4 Wing Nuts
2 Control Knobs
1 Rotary Knob
1 Condiment Basket
Item to Assemble:
1 Wire Shelf
1 Panel
2 Push Pins
Qty: 2
Place Wire Shelf in 3rd hole from top.
Assemble front panel first by
placing tabs into slots on Bottom Shelf.
Attach with push pins.
A
B
.
A
B
Qty. 4
Qty.4
Attach Wheel Assembly with Hitch Pins
Correct position of LP Tank and
Tank Wire Support Bracket
Back of Grill
B
A
Leg wires on Warming Rack
must run underneath surface.
Push V-Bar down
onto rest in Grill
Bottom
Items to Assemble:
1 V-Bar
Items to Assemble:
2 Shelves
8 Wing Screws
Qty: 8
1
11
4
5
6
7
1
2
3
See Use & Care Manual for “Match Lighting Instructions” and to
perform the Burner Flame Check” and important safety
instructions before using.
Hang grease clip from center of grill bottom.
Use an empty soup can (not included) to hang
from grease clip.
Items to Assemble:
1 Grease Clip
1 Tank Wire Support Bracket
1 LP Tank
LP tank is shipped empty. Use only with an
(over-fill protection device) OPD equipped LP tank.
Fill and leak check before attaching to grill and regulator.
CAUTION
!
• Failure to install can in clip will cause hot grease
to drip from bottom of grill with risk of fire or
property damage.
• Tank collar opening must face to front of cart
once tank is attached.
• Failure to install tank correctly may allow gas
hose to be damaged in operation, resulting in
the risk of fire.
8
9
“R”
Right
“L”
Left
Note: On the underside of the lamp assemblies are “L” for left side
and “R” for right side. Match to letters on the handle.
Attach right and left lamp assemblies to lid with either thumbscrews
or Phillips head screws provided. Do not overtighten screws.
Overtightening will cause handle to crack.
or
or
Or
Items to Assemble:
1 Handle Assembly
1 Right Lamp Assembly
1 Left Lamp Assembly
CAUTION: To prevent a shorting condition make sure
the lamp assemblies are fully inserted into casting.
Screw
Left Lamp
Assembly
Casting
NO GAP
INCORRECT ASSEMBLY
CORRECT ASSEMBLY
L
Casting
Screw
Left Lamp
Assembly
L
9
10
Note: Grill lid
style may vary.
Hinge Pin
and Hitch Pin
Qty: 2
Qty: 2
Items to Assemble:
1 Grill Lid
2 Hinge Pins
2 Hitch Pins
1 Logo Plate Assy
1 Temp Gauge Bezel
1 Temperature Gauge
w/Wing Nut
Items to Assemble:
1 Warming Rack
1 Cooking Grate (set)
A
B
Insert pivot wire of Warming
Rack into Lid. Flex leg
wires to insert into Grill
bottom.
Place cooking grates
into grill bottom.
-
 1
1

Charbroil 463840904 Owner's manual
- Category
- Barbecues & grills
- Type
- Owner's manual
Ask a question and I''ll find the answer in the document
Finding information in a document is now easier with AI
Related papers
-
Charbroil 462836203 Owner's manual
-
Thermos 461833803 Owner's manual
-
-
-
-
-
-
-
-
Charbroil Quickset Traditional 463731704 Owner's manual