Page is loading ...

REV. 10/22/2015 INST-3305
METRA. The World’s best kits.™metraonline.com © COPYRIGHT 2004-2015 METRA ELECTRONICS CORPORATION
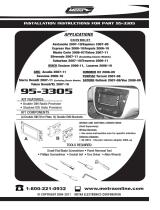
Installation instructions for part 95-3305 or 99-3305
CAUTION!
Metra recommends disconnecting the negative bat
-
tery terminal before beginning any installation, unless the vehicle
manufacturer recommends against so. Please check with your local
Dealership for more information. All accessories, switches, climate
controls panels, and especially air bag indicator lights must be con
-
nected before reconnecting the battery or cycling the ignition. Also,
do not remove the factory radio with the key in the on position, or the
vehicle running. It would be best to remove the key from the ignition
and then wait a few seconds before removing the factory radio.
95-3305:
• ISO DDIN radio provision
99-3305:
• DIN radio provision with pocket
• ISO DIN radio provision with pocket
95-3305: • A1) ISO DDIN radio housing • B1) ISO DDIN radio brackets
99-3305: • A2) Radio housing • B2) ISO DIN radio brackets • C2) ISO DIN trim plate
KIT FEATURES
KIT COMPONENTS
WIRING & ANTENNA CONNECTIONS (sold separately)
Wiring Harness:
• Please visit metraonline.com for harness options
Antenna Adapter:
• Please visit metraonline.com for antenna
adapter options
• Panel removal tool • Phillips screwdriver
• 7mm & 10mm Socket Wrench • Torx driver
• Allen wrench
TOOLS REQUIRED
GM multi-kit 2006-up
95-3305 or 99-3305
B2
C2
A2B1A1
APPLICATIONS
See application list inside cover

95-3305 or 99-3305
2
Buick
Enclave ............................. 2008-2012
Lucerne ............................ 2006-2011
Chevrolet
Avalanche ......................... 2007-2013
Equinox ............................ 2007-2009
Express ..................................2008-up
Impala .............................. 2006-2013
Impala Limited (Fleet) ..................2014
Monte Carlo ...................... 2006-2007
Silverado** ........................ 2007-2013
Silverado 2500/3500 ...................2014
Suburban .......................... 2007-2014
Tahoe ............................... 2007-2014
Traverse ........................... 2009-2012
Captiva Sport ..........................2012-up
Applications Table of Contents
GMC
Acadia .............................. 2007-2012
Savana ...................................2008-up
Sierra** ............................. 2007-2013
Sierra 2500/3500 ........................2014
Yukon ................................ 2007-2014
Hummer
H2 .................................... 2008-2009
Pontiac
Torrent .............................. 2007-2009
Saturn
Outlook ............................. 2007-2010
Vue ................................... 2008-2010
Suzuki
XL-7 ................................. 2007-2009
**Excluding classic models
Dash Disassembly
- Buick Enclave 2008-2012 ................................................................................................... 7
- Buick Lucerne 2006-2011 ................................................................................................... 3
- Chevrolet Avalanche 2007-2013 ......................................................................................... 3
- Chevrolet Captiva Sport 2012-up ......................................................................................... 8
- Chevrolet Equinox 2007-2009 ............................................................................................. 6
- Chevrolet Express 2008-up ................................................................................................. 4
- Chevrolet Impala 2006-2013 ............................................................................................... 3
- Chevrolet Limited (Fleet) 2014 ............................................................................................. 3
- Chevrolet Monte Carlo 2006-2007....................................................................................... 3
- Chevrolet Silverado Pickup (excluding classic models) 2007-2013 ...................................... 3
- Chevrolet Silverado 2500/3500 2014 .................................................................................. 3
- Chevrolet Suburban 2007-2014 .......................................................................................... 3
- Chevrolet Tahoe 2007-2014 ................................................................................................ 3
- Chevrolet Traverse 2009-2012 ............................................................................................ 7
- GMC Acadia 2007-2012 ...................................................................................................... 7
- GMC Savana 2008-up ......................................................................................................... 4
- GMC Sierra (excluding classic models) 2007-2013 .............................................................. 3
- GMC Sierra 2500/3500 2014 .............................................................................................. 3
- GMC Yukon 2007-2014 ....................................................................................................... 3
- Hummer H2 2008-2009 ...................................................................................................... 8
- Pontiac Torrent 2007-2009 .................................................................................................. 6
- Saturn Outlook 2007-2010 .................................................................................................. 7
- Saturn Vue 2008-2010 ........................................................................................................ 8
- Suzuki XL-7 2007-2009 ...................................................................................................... 5
Kit Assembly
- ISO DDIN radio provision ..................................................................................................... 9
- DIN radio provision with pocket ......................................................................................... 10
- ISO DIN radio provision with pocket ................................................................................... 11

95-3305 or 99-3305
3
Dash Disassembly
(Figure B)
(Figure A)
1. Unclip and remove the trim panel around radio and
A/C control. (Figure A)
2. Remove (6) 7mm screws to extract radio and A/C
control from sub dash. (Figure B)
Continue to kit assembly
1. Unclip and remove radio trim panel. (Figure A)
2. Remove (2) 7mm screws securing switch panel
below climate controls. Unplug and remove switch
panel. (Figure B)
3. Remove (2) 7mm screws securing climate controls.
Unplug and remove climate controls. (Figure B)
4. Remove (4) 7mm screws securing radio. Unplug
and remove the radio. (Figure C)
Continue to kit assembly
Buick Lucerne 2006-2011/
Chevrolet Impala 2006-2013
,
Impala Limited (Fleet) 2014
,
Monte Carlo 2006-2007
Chevrolet Avalanche 2007-2013,
Silverado (excluding classic models) 2007-2013, Tahoe/Suburban 2007-2014,
Silverado 2500/3500 2014 / GMC Yukon 2007-2014,
Sierra
(excluding classic models)
2007-2013, Sierra 2500/3500 2014
(Figure B)
(Figure A) (Figure C)

95-3305 or 99-3305
4
1. Remove (2) 10mm bolts from below knee
bolster under steering column and remove
panel. (Figure A)
2. Remove (2) 10mm bolts from panel below
passenger dash airbag and remove panel.
(Figure B)
3. Unsnap and remove radio and instrument
cluster panel. (Figure C)
Note: To access radio it may not be
necessary to completely remove radio and
instrument cluster panel.
4. Remove (4) 7mm bolts to remove radio.
(Figure D)
Continue to kit assembly
Chevy Express/GMC Savana 2008-up
(Figure B) (Figure D)
(Figure C)
(Figure A)
Dash Disassembly

95-3305 or 99-3305
5
1. Press in on sides of the shifter boot to release it
from the shifter trim panel. (Figure A)
2. Lift the boot up to access the Allen screw securing
the shifter knob to the shifter lever. Loosen the
Allen screw and remove the shifter knob. (Figure B)
3. Remove (1) Torx screw from the shifter trim panel.
(Figure C), then using the panel removal tool
unsnap the shifter trim panel. Unplug and remove the panel. (Figure D)
4. Using a panel removal tool unsnap the radio trim panel. Unplug and
remove the panel. (Figure E)
5. Remove (4) 7mm screws securing the radio. Unplug and remove the
radio.
Continue to kit assembly
Suzuki XL-7 2007-2009
(Figure A) (Figure B)
12:02
103:5
(Figure C) (Figure E)
Dash Disassembly
AUX
BAND
FWD
REV
SEEK SEEK
PASSENGER AIR BAG
AUX
(Figure D)

95-3305 or 99-3305
6
Chevy Equinox/Pontiac, Torrent 2007-2009
(Figure C)
(Figure B)
Dash Disassembly
1. Unsnap panel below power window switch and remove. (Figure A)
Note: This allows you to unplug the window switch easier.
2. Unsnap and remove entire panel surrounding radio and shifter.
(Figure B, next page)
3. Remove (4) 7mm screws securing radio. Unplug and remove the radio.
(Figure C, next page)
Continue to kit assembly
(Figure A)

95-3305 or 99-3305
1. Unclip the radio trim panel
including the climate controls.
2. Unplug the climate controls and
remove the panel.
3. Remove (4) 7mm screws securing
the radio. Unplug and remove the
radio.
Continue to kit assembly
Buick Enclave 2008-2012/Chevy Traverse 2009-2012/
GMC Acadia 2007-2012/Saturn Outlook 2007-2010
Buick Enclave/Chevy Traverse Saturn OutlookGMC Acadia
7
Dash Disassembly

95-3305 or 99-3305
8
1. Unclip and remove the trim panel on top of the
radio trim panel. (Figure A)
2. Remove (2) Phillips screws exposed under panel
previously removed. (Figure B)
3. Unclip and remove the radio trim panel including
the A/C vents. (Figure B)
4. Unclip and remove the trim panel surrounding the
shifter including the climate controls. (Figure C)
5. Remove (4) 7mm screws securing the radio.
Unplug and remove the radio.
Continue to kit assembly
Hummer H2 2008-2009 Chevrolet Captiva 2012-up/Saturn Vue 2008-2010
1. Unclip the radio trim panel including the A/C vents.
2. Unplug any harnesses connected to the panel, and
then remove the panel. (Figure A)
3. Remove (4) 7mm screws securing the
climate controls.
4. Unplug and remove the climate controls.
5. Remove (4) 7mm screws securing the radio.
Unplug and remove the radio.
Continue to kit assembly
(Figure A) (Figure A) (Figure C)
(Figure B)
Dash Disassembly

95-3305
9
Kit Assembly
(Figure B)
ISO DDIN radio provision
1. Slide the ISO DDIN radio brackets
into the radio housing, aligning the
holes in the radio housing to the clips
on the brackets. (Figure A)
2. Slide the radio unit into the
completed assembly, and then
secure using the screws supplied
with the radio. (Figure B)
3. Locate the factory wiring harness
and antenna connector in the
dash and complete all necessary
connections to the radio. Metra
recommends using the proper
mating adapter from Metra or
AXXESS. Re-connect the negative
battery terminal and test the radio
for proper operation.
4. Reassemble the dash in reverse
order of disassembly.
Suzuki XL-7 only: Trim the top corners
of the radio housing. (Figure C) (Figure A)
(Figure C)

99-3305
10
(Figure C)
Kit Assembly
DIN radio provision with pocket
1. Remove the metal DIN sleeve from the aftermarket
radio.
2. Slide the sleeve into the radio housing and secure
by bending the metal locking tabs down. (Figure A)
3. Slide the radio into the sleeve until it clicks in.
(Figure B)
4. Locate the factory wiring harness and antenna
connector in the dash and complete all necessary
connections to the radio. Metra recommends using
the proper mating adapter from Metra or AXXESS.
Re-connect the negative battery terminal and test
the radio for proper operation.
5. Reassemble the dash in reverse order of
disassembly.
Suzuki XL-7 only: Trim the top corners of the
radio housing. (Figure C)
(Figure B)(Figure A)

99-3305
11
Kit Assembly
ISO DIN radio provision with pocket
1. Remove the metal DIN sleeve and trim ring from
the aftermarket radio.
2. Secure the ISO DIN radio brackets to the radio with
the screws supplied with the radio. (Figure A)
3. Slide the radio into the radio housing until the side
clips engage. (Figure B)
4. Snap the ISO DIN trim plate into the radio housing.
(Figure B)
5. Locate the factory wiring harness and antenna
connector in the dash and complete all necessary
connections to the radio. Metra recommends using
the proper mating adapter from Metra or AXXESS.
Re-connect the negative battery terminal and test
the radio for proper operation.
6. Reassemble the dash in reverse order of
disassembly.
Suzuki XL-7 only: Trim the top corners of the
radio housing. (Figure C)
(Figure B)(Figure A)
Right side clip
(Figure C)

REV. 10/22/2015 INST-3305
METRA. The World’s best kits.™metraonline.com © COPYRIGHT 2004-2015 METRA ELECTRONICS CORPORATION
KNOWLEDGE IS POWER
Enhance your installation and fabrication skills by
enrolling in the most recognized and respected
mobile electronics school in our industry.
Log onto www.installerinstitute.com or call
800-354-6782 for more information and take steps
toward a better tomorrow.
Metra recommends MECP
certified technicians
Installation instructions for part 95-3305 or 99-3305
IMPORTANT
If you are having difficulties with the
installation of this product, please call our
Tech Support line at 1-800-253-TECH.
Before doing so, look over the instructions a
second time, and make sure the installation
was performed exactly as the instructions
are stated. Please have the vehicle apart
and ready to perform troubleshooting steps
before calling.

REV. 10/22/2015 INST-3305
METRA. The World’s best kits.™metraonline.com © COPYRIGHT 2004-2015 METRA ELECTRONICS CORPORATION
KNOWLEDGE IS POWER
Enhance your installation and fabrication skills by
enrolling in the most recognized and respected
mobile electronics school in our industry.
Log onto www.installerinstitute.com or call
800-354-6782 for more information and take steps
toward a better tomorrow.
Metra recomienda técnicos
con certificación del Programa
de Certificación en Electrónica
Móvil (Mobile Electronics
Certification Program, MECP).
EL CONOCIMIENTO ES PODER
Mejore sus habilidades de instalación y
fabricación inscribiéndose en la escuela de
dispositivos electrónicos móviles más reconocida
y respetada de nuestra industria. Regístrese en
www.installerinstitute.com o llame al
800-354-6782 para obtener más información y
avance hacia un futuro mejor.
Instrucciones de instalación para la pieza 95-3305 or 99-3305
IMPORTANTE
Si tiene dificultades con la instalación
de este producto, llame a nuestra línea
de soporte técnico al 1-800-253-TECH.
Antes de hacerlo, revise las instrucciones
por segunda vez y asegúrese de que la
instalación se haya realizado exactamente
como se indica en las instrucciones. Por
favor tenga el vehículo desarmado y listo
para ejecutar los pasos de resolución de
problemas antes de llamar.
/