Page is loading ...


notes
Date of Purchase:
Model Number:
Serial Number:
Notes:
owner’s manual
Spartan

thank you
Congratulations on the purchase of your new
Spartan Sound System. You can be assured that
the Spartan complies with all specifications and
was manufactured to very high quality control
standards. TeachLogic incorporates state of the art
technology, employs the most advanced manu-
facturing methodology and uses only premium
quality components to assure many years of reli-
able performance. We appreciate your confidence
by your selection of our product. It is TeachLogic’s
intent to uphold that confidence by providing fac-
tory assistance and dealer support.
We hope you will take the time to view this manual
to familiarize yourself with the product features
and its operation. This manual will help you learn
to use and gain the maximum benefit of the Spar-
tan system. The manual provides a basic explana-
tion on the principles of RF transmission and its
advantages. Followed by the system description,
operation and installation instruction. The manual
will conclude with maintenance and troubleshoot-
ing procedures.
Brian Van Waay
President
contact
If you should encounter
some unresolved issue,
please contact TeachLogic
customer service depart-
ment for further assistance.
1•800•588•0018
sales@teachlogic.com
1•760•631•1283
www.teachlogic.com

4
owner’s manual
safety instructions
Read Instructions
All safety and operation instructions should be
read before operating this TeachLogic product.
Retain Instructions
Safety and operating instructions should be kept
for future reference.
Water & Moisture
This product should not be operated near water or
excessively moist area.
Heat Environment
Do not subject this product to excessive heat
conditions.
Power Source
This product must be connected to an AC power
source per the voltage input specified and marked
on the power supply.
Power Cord Caution
Power cable should be routed clear of foot traffic
and supported clear of kinking or abrasion.
Object Protection
Locate the operating unit so it will not be
subjected to falling objects or water entry.
Proper Installation
Adhere to safe positioning to avoid falling,
dismounting, head clearance, or cord cable
obstruction
Internal Service
User should not attempt to service this product.
A qualified technician must accomplish all internal
service.
Electric Shock
Do not adapt or modify the AC power plug thus
lifting the earth ground connection.
certifications
Listed
US CA
TeachLogic systems are
manufactured using lead-
free processes and are free
of materials harmful to the
environment. They conform
to the most stringent new
European guidelines for
consumer products (RoHS).
Recycle—Do not dispose
of rechargeable batteries in
trash. Actually it is unlawful
to do so in CA, NY & ME.
Contact: Earth911.com
1-800-CLEANUP
Save our resources and
don’t contaminate.
Go Green
caution
Spartan

table of contents
About the Spartan........................................................
Spartan Features and Functions..............................
Operating Procedure............................................
Lead Acid Battery...................................................
Handheld Transmitter..........................................
Body-Pack Transmitter.........................................
Optional Microphones.....................................
Battery Chargers.................................................
Tips for Best Results..........................................
Troubleshooting....................................................
Accessories...........................................................
Specifications...............................................................
Three Year Limited Warranty...................................
1
2
3–4
5–6
7–8
9–10
11–12
13-14
15
15–17
18–19
20
21

transmitterowner’s manual
about the Spartan
The Spartan is a portable battery /AC operable
sound system with a 20 watt (RMS) amplifier. Its
resilient 4" coaxial speaker produces exceptional
projection with outstanding clarity. The USB port
reads MP3 files for playback of recorded program
material, and in addition, the Spartan has a cabled
microphone input, auxiliary line input, tone control
and external speaker output.
Whether permanently mounted or toted about, the
Spartan can always give full performance either
plugged into AC power or by its internal recharge-
able battery. The Spartan is ideally suited for voice
reinforcement in a classroom, conference center or
covering an assembled crowd outdoor.
A featured option, is the Spartan with a 96 channel
wireless receiver to accommodate a 96 channel
wireless microphone; either as a body-pack or
handheld configuration.
Unique Application for the Spartan
The wireless receiver in the Spartan is compatible
with the AirLink (ALS-960) transmitter. With AirLink
plugged into an installed system, the Spartan can
be an ideal wireless sound extension to any remote
location. Such as providing sound in another room
or keeping the crowd informed at the concession
stand.
In addition, the Spartan is compatible with the Ti-
tan’s AirLink (TX-750) transmitter to provide sound
to a remote location or as a monitor at an isolated
area.
1
Spartan models
SP-300
Spartan Portable Sound
System without the wire-
less receiver
SP-300W
Spartan Portable Sound
System with a UHF 96
Channel Receiver
SP-300BP
Wireless Spartan SP-300W
with a Body-Pack Trans-
mitter and Microphone
SP-350
Wireless Spartan SP-300W
with a Handheld Micro-
phone/Transmitter
SP-301
Spartan unpowerred
Companion Speaker
Spartan

2
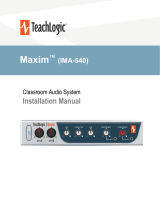
SP-300W back panel
Cabled Mic Input (¼" phone jack)
Aux Line Level Input (3.5mm jack)
Tone Control ±6dB
Wireless Receiver Frequency
Selector:
4 Decade Select (10–100)
5 Digit Select (0–9)
External Speaker Output (¼"
phone jack)
Power Input: AC Operation,
Recharge Battery
Battery Charge Indicator (LED)
Power Switch & Mic Volume
Aux Input & MP3 Volume Control
Wireless Receiver Power/Volume
Control
MP3/USB Controls:
Play/Pause
Mode
Reverse
Forward
MP3 Player/USB Port
1
2
3
6
7
8
9
10
11
12
13
14
15
16
Spartan features and functions
2
3
4
5
6
7
8
10
11
12
13
14
15
16
9
1

owner’s manual
3
initial procedure
•Locate power supply and plug it into an AC
outlet
•Plug power supply into unit and observe LED
•Flashing “Red” LED indicates battery is being
charged
•(Although fully charged at time of shipment, it
is a good practice to fully charge battery)
•“Green” LED indicates battery is fully charged
and unit is ready for use
•After 2-3 hours of use, LED will glow “Red”
indicating battery needs recharging
•Power supply may be plugged in for continued
use
•Power supply will simultaneously recharge bat-
tery (4–6 hours)
Spartan

4
operate using the cabled microphone
operate using wireless microphone
operate the USB digital player
•Use a dynamic microphone (no phantom power
available)
•Plug the microphone into the MIC IN jack
•Adjust volume with power/mic control while
talking into microphone
•Turn Wireless Receiver Power/Volume control
(WR) clockwise until click
•Adjacent LED lights ”Red”
•Select the frequency to match the transmitter
frequency
• Select Decade: 10–90 (Upper selector switch)
• Select Digit: 0–9 (Lower selector switch)
•Adjust volume with WR control while talking
into the wireless microphone
•Turn Aux/MP3 Power Volume control clockwise
until click
•Adjacent LED lights ”Red”
•Insert USB 2.0 into Port (MP3 will commence
playing automatically)
•Adjust volume to desired level (Aux/MP3 con-
trol)
•Press “PLAY/PAUSE” button (MP3 will stop)
•Press “PLAY/PAUSE” button again and playing
will resume
•MODE Button: Selects program folders 1,2,3,4
• Initial play will commence in folder 1
• Press MODE button to advance to next folder
•Press l<< to select file (song) in folder
•Hold down for fast reverse
•Press l>> to select file (song) in folder
•Hold down for fast forward
operating procedure
Turn unit "on": Turn Power/Mic control clockwise until click: Adjacent LED will light “Red”.
Only remove USB 2.0 with
player turned “off” or in
PAUSE mode
DO NOT REMOVE USB
2.0 WHILE PLAYER IS IN
PLAY MODE
USB format must be either
“FAT” or “FAT 32” (Will
not work with iPod)
caution
note

owner’s manual
charging the battery
The Spartan contains one 12V/2.7 AH maintenance-free lead acid rechargeable battery.
•Observe Battery Indicator when Spartan is
turned “on”
•“Green” LED: Battery is fully charged
•“Red” LED: Battery is weak and needs to be
charged
Charging battery:
•Plug in AC power supply, charging will start
automatically
•While charging: LED Indicator will flash “Red”
•Completion of charge: LED Indicator will change
to “Green”
•Do not form a memory barrier
•Can be charged at any state of charge condition
•Can be recharged hundreds of times
•Can be left plugged in continuously
•Recharge immediately after use for best perfor-
mance and prolonged lifespan
•Recharge monthly minimum
•Evidence of battery life expiring: decrease in ser-
vice per charge, distorted sound, will not accept
recharge
Lead acid batteries can be
recycled over 200 times
Service per charge: 2–3
hours at moderate level.
Life expectancy is one to
two years (Replacement
cost: $55.00 as of 1/1/10).
charging battery
lead acid batteries
Spartan
Battery needs to be re-
charged soon after use to
prevent damage to battery
caution
5

5
1. Battery should operate at temperatures
between 59°F–122°F. When temperature falls
to 5°F, battery will undergo some changes in
its chemical contents and therefore cannot be
recharged. Operating the battery at higher tem-
perature will result in higher capacity but short-
er lifespan, whereas lower temperature opera-
tion has a longer lifespan but less capacity.
2. If the battery is not recharged within 72
hours after it has reached complete exhaus-
tion, it will be permanently damaged.
3. The battery’s cycle lifespan (number of charge
and discharge cycle) is determined by the
degree at which power is dissipated; espe-
cially the degree of discharge each time it
is used and the recovery charging method.
For normal use, the battery can be used
for longer hours when less power is dis-
sipated each time and vice versa. At 77°F,
maintenance-free batteries could be charged
150–200 times for 100% discharge each time.
4. Decrease in capacity, internal short cir-
cuit, deformation in appearance, erosion of
charged ends and decrease in open circuit
voltage are symptoms indicating battery
is approaching the end of its life cycle.
lead acid battery guidelines
6

owner’s manual
7
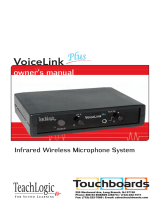
handheld microphone/transmitter
The handheld microphone/transmitter is equipped with a dynamic microphone element
for enhanced clarity and extended dynamic range. Its low handling noise and built-in
windscreen makes it well suited for close-up handheld use. It can be powered by either Al-
kaline or rechargeable NiMH batteries. The rechargeable batteries can be recharged either
in the drop-in charger or with the plug-in charger.
handheld transmitter operation
1. Be sure the microphone is switched off before
inserting batteries.
2. Remove lower identity cap.
3. Remove lower battery compartment door.
4. Insert two (2) AA batteries (use only alkaline or
fully charged NiMH batteries).
Caution: Be sure to observe correct polarity
5. Replace lower battery compartment door.
6. Locate power switch at base of microphone
(small gray button)
Spartan
Power “on/off” switch
LED power "on" indicator
Up/down frequency select
LCD readout
Frequency set button
Charging port connection
Soft comfort, non-slip body
Protective screen head
Color identity end cap
Battery compartment
Microphone sensitivity:
HI/LOW/MUTE select
1
2
3
4
5
6
7
8
9
10
11
UT-96HH
HI
LOW
MUTE
5
6 7 8
9 10 11
4321
DO NOT ATTEMPT TO
CHARGE ALKALINE BAT-
TERIES
danger

8
handheld transmitter operation (cont.)
7. Press upward and hold the power switch for 2-3
seconds.
8. Power LED will illuminate “Red” and “On” will
be displayed in the LCD screen.
9. LCD window will also display: Battery condition
and CH #
10. A microphone sensitivity selection switch
provides three modes of microphone sensitivity
(HIGH, LOW, MUTE)
• MUTE: Mutes microphone “off” while retaining
transmission and RF connection
• LOW: Use when microphone is held close to mouth
or strong vocal input
• HIGH: Use when additional sensitivity is required for
softer voice
11. LCD screen displays the channel number
selected for the microphone.
To display channel frequency: Press and hold the
UP or DOWN select button.
12. To change channel selection
• Press and hold frequency SET button for 2
seconds. LCD panel will commence flashing
(indicating programming mode)
• Press UP or DOWN arrow to select channel
desired
• Press SET button to lock in channel selected
13. The battery status is displayed on the left of
the LCD screen.
• When battery nears depletion: Icon will flash
3 times
• Microphone will automatically turn “off” to
prevent damage
14. To turn microphone “off”, press and hold
the power switch until the LCD screen displays
“OFF“.
FCC regulation
RF transmission equip-
ment must comply with
FCC regulations. All
TeachLogic transmis-
sion devices comply with
Part 15 of the FCC rules
and operate in the UHF
band in the 640–664 MHz
frequency range. Power
output is limited to less
than 50 milliwatts to pre-
vent any interference with
any other RF operated
equipment.

owner’s manual
9
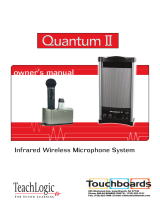
body-pack transmitter
The Body-Pack Transmitter is the component that transmits the voice to the Spartan
receiver. The audio is transmitted via an RF signal on a selected RF frequency. An external
microphone is plugged into the Body-Pack Transmitter which picks up the speaker’s voice.
The microphone can be either a Lapel, Collar style or a Headset with a boom microphone.
The transmitter is usually worn on the waist utilizing the wire belt clip, however; it can
be placed in your pocket if it is more convenient. The Body-Pack is battery powered and
requires two “AA” size batteries.
body-pack transmitter operation
1. Ensure microphone is switched off before insert-
ing batteries.
2. Remove battery compartment cover.
3. Insert two “AA” batteries, observing polarity
(alkaline or rechargeable NiMH).
4. Plug in microphone: Lapel, Headset w/boom,
Collar or UltraLite mic.
Spartan
LCD display
Frequency SET button
Built-in microphone for handheld use
UP/DOWN channel select buttons
Transmitting Antenna
Power “On“ LED indicator
Microphone mute button
Power “ON/OFF” switch
MIC input jack (3.5mm)
Microphone input sensitivity
selection switch (L,M,H)
AUX input jack (3.5mm)
Charging jack
1
2
3
4
5
6
7
8
9
10
11
12
UT-96BP
5
6
7
4
1
10
2
11
12
3
8 9
SET
UP
DOWN
HI/MID/LOW
SENSITITVITY
AUX IN
MUTE MIC
ON/OFF
DO NOT ATTEMPT TO
CHARGE ALKALINE BAT-
TERIES
danger

10
body-pack transmitter operation (cont.)
5. Push power switch to “ON”. Top power LED will
illuminate “Red”
6. “On” will be displayed in the LCD screen.
7. LCD window will display: Battery condition and
CH #
8. A selection switch on the side of the body-pack
provides three levels of microphone sensitivity
(HI/MID/LOW)
• High: Most sensitive position for weak voice or
distant microphone to mouth.
• Mid: When the microphone used is further away
from mouth, such as: a collar or lapel microphone is
clipped on clothing away from mouth
• Low: When microphone is used close to mouth, such
as; a headset with a boom microphone or with a very
strong vocal performer.
9. MUTE Button: Mutes microphone “off” while
retaining transmission and RF Connection
10. Internal Microphone:
• Locate two small hole on front of transmitter
• Hold transmitter in front of mouth and speak into it.
11. LCD screen displays the transmission channel
number and battery condition
12. To display channel frequency: Press and hold
UP or DOWN button.
13. To change channel selection
• Press and hold frequency SET button for 2 seconds
• LCD panel will commence flashing (indicating pro-
gramming mode)
• Press UP or DOWN arrow to select channel desired
• Press SET button to lock in channel selected
14. The battery status is displayed on the left
edge of the LCD screen.
• When battery nears depletion: Icon will flash 3 times
• Transmitter will automatically turn “off” to prevent
damage
15. To turn microphone “Off”; push power switch
to "OFF".
FCC regulation
RF transmission equip-
ment must comply with
FCC regulations. All
TeachLogic transmis-
sion devices comply with
Part 15 of the FCC rules
and operate in the UHF
band in the 640–664 MHz
frequency range. Power
output is limited to less
than 50 milliwatts to pre-
vent any interference with
any other RF operated
equipment.

owner’s manual
11
Spartan
optional microphones for body-pack transmitter
LM-835 lapel microphone
HBM-935 headband microphone
CM-835 collar microphone
The Lapel Microphone (LM-835) is a small capsule
microphone with a spring clip for securing it on to
a clothing edge. The lapel microphone renders ex-
cellent vocal reproduction. The lapel microphone
is less obtrusive to the user and least visible.
However, due to the greater distance from mouth
to microphone it will require additional gain. As a
result it is more prone to feedback. So adjustment
of volume is more critical, especially near or under
a speaker.
The Headband Microphone (HBM-935) is worn
around the head with a unidirectional microphone
located on the end of a flexible boom. This is the
best performing microphone due to its unidirec-
tional mic element and its always close proximity
to the mouth. The microphone also renders maxi-
mum gain and is least prone to feedback.
The Collar Microphone (CM-835) is a flexible rod
that can be formed to fit around the neck. The end
with the microphone is then contoured up toward
the mouth. The cord exits the flexible rod from
the back, out of the way. The collar microphone
utilizes a unidirectional element for excellent voice
reproduction and minimizes feedback.
Any of the microphones below may be used with the Body-Pack Transmitter.

12
ULM-835 ultra-lite microphone
LM-300 plug-in microphone w/ lanyard
The Ultra-Lite Microphone (ULM-835) is a minia-
ture boom style microphone supported by a wire
around the left ear. The unidirectional microphone
element renders excellent vocal quality and
maximum clarity. Its lightweight and miniature size
make it comfortable and inconspicuous. It is avail-
able in either beige or black.
The Plug-in Microphone (LM-300) is a small cap-
sule size microphone that plugs directly into the
top of the Body-Pack. With the adjustable lanyard,
the Body-Pack can be worn around the neck as a
pendant style microphone. The Body-Pack is easily
removed from the lanyard to facilitate use as a
handheld microphone.
The boom can be formed to fit but it is not considered to
be flexible.
So it cannot be bent back and forth; IT WILL BREAK!
caution

owner’s manual
13
Spartan
BRC-10 operating instructions
• Use “AA” rechargeable NiMH batteries only
• Plug adapter into 110v AC outlet.
• Remove color identification cap.
• Plug cable into jack at the base (bottom end) of
transmitter
• Turn Handheld Transmitter “On” to observe bat-
tery icon
• During charging, the battery icon will cycle
through the charge “block”
• When fully charged, battery icon will display all
“blocks” filled
• Charging time; typically 10-12 hours
• Turn Handheld Transmitter “Off” and reinstall
color identification cap.
battery chargers

14
BRC-70 operating instructions
• Use “AA” rechargeable NiMH batteries only in
microphones
• Plug power adapter in 110v AC outlet.
• Plug cable into base of charger
• Charging Handheld Microphone/Transmitter
• Remove color identification cap from Handheld
microphone, store on cap holder
• Insert Handheld microphone into small square
receptacle
• Push down firmly in place
• Charging Handheld Indicators (Handheld symbol)
• “on” indicator LED lights “Amber” when charging
• “ok” indicator LED lights “Green” when fully
charged
• Charging Body-Pack Transmitter
• Insert Body-Pack into Front/Large receptacle
• Push down firmly in place
• Observe front with LCD facing forward (toward you)
Charging Body-Pack Indicators (Body-Pack symbol)
• “on” indicator LED lights “Amber” when charging
• “ok” indicator LED lights “Green” when fully
charged
• Charging time; typically 10-12 hours.
• During normal charging the battery icon will
cycle through the charge “block” icons
• Remove transmitters when charging is complete
• Reinstall color identification cap on handheld
• Turn transmitter “On”, verify battery icon in LCD
window shows all blocks filled
caution
• Do not subject to
moisture or high
temperature.
• Keep charging pins clean
and dust-free.
• Do not attempt to charge
non-rechargeable
batteries.
• Do not mix up old and
new batteries to charge.
• Use only the power
adapter that came with
the unit.

owner’s manual
15
tips for best results
1. Make sure batteries are inserted per correct
polarity
• Positive Terminal (+) downward toward base in
Handheld)
• Positive Terminal (+) away from spring in Body-Pack
2. Use only new high-quality alkaline or recharge-
able NiMH batteries in the transmitter.
3. When batteries are weak, replace all the batter-
ies at the same time. Do not mix and use new
and old batteries together.
4. Observe the area between Microphone/Trans-
mitter and Receiver. Minimize obstructing metal
objects, i.e. metal fence, cars, steel structure,
etc. (Line of sight is best)
5. A receiver can only receive one transmission
signal. Cannot turn “On” two wireless micro-
phones on same frequency (channel) simultane-
ously.
6. Turn the transmitter off when it is not in use.
7. Remove the batteries when not used for a length
of time.
Spartan
BRC-70 charger troubleshooting
Amber indicator does
not light
Amber indicator
twinkles
• Please check if batteries
are inserted correctly.
Also check if the probes
were covered by dust, or
any deformation caused
to it.
• Please check if the batter-
ies are rechargeable, or
misallocated.
Problem Solution
/