Page is loading ...

User Manual
P.N. ART0000866080 REV B / NWL0001314187
BVMC-EM SERIES
MRCOFFEE.COM
–PROGRAMMABLE –
B
R
E
W
N
O
W
O
R
L
A
T
E
R
!
AUTOMATIC CLEANING CYCLE
–PROGRAMMABLE –
12 tazas
12 tazas
CICLO DE LIMPIEZA AUTOMÁTICA
¡
P
R
E
P
A
R
E
C
A
F
É
A
H
O
R
A
O
D
E
S
P
U
É
S
!
2021 Sunbeam Products, Inc. All rights reserved. Distributed by Sunbeam
Products, Inc. Boca Raton, Florida 33431. Made in China.
P.N. ART0000866080 REV B / NWL0001314187

E3 E4
Introduction
Welcome and congratulations on the purchase
of your new Mr. Coffee coffeemaker. Your new
Mr. Coffee will wake you up in the morning, give
you a boost in the afternoon and provide you the
exibility to brew however you choose!
Our number one goal is to give you the best-tasting cup of
coffee every time, so if you have any questions about your
new coffeemaker, please contact us at 1-800-672-6333 or
visit us at www.mrcoffee.com.
IMPORTANT SAFEGUARDS
When using electrical appliances, basic safety
precautions should always be followed to reduce the
risk of re, electric shock, and/or injury to persons
including the following:
1. Read all instructions.
2. Do not touch hot surfaces. Use handles or knobs.
3. To protect against electric shock, do not place
or immerse cord, plugs, or appliance in water or
other liquid.
4. This appliance is not intended for use by children
or by persons with reduced physical, sensory,
or mental capabilities, or lack of experience and
knowledge. Close supervision is necessary when
any appliance is used near children. Children
should be supervised to ensure that they do not
play with the appliance. Keep the appliance and
its cord out of reach of children.
5. Unplug from outlet when either the appliance or
display clock (if provided) is not in use, and before
cleaning. Allow to cool before putting on or taking
off parts, and before cleaning the appliance.
6. Do not operate any appliance with a damaged
cord or plug or after the appliance malfunctions,
or has been damaged in any manner. Return
appliance to an Authorized Service Center for
examination, repair or adjustment. Do not attempt
to replace or splice a damaged cord.
7. The use of an accessory not recommended by the
appliance manufacturer for use with this appliance
may result in re, electric shock or injury to
persons.

E5 E6
8. Do not use outdoors.
9. Do not let cord hang over edge of table or
counter, or touch hot surfaces.
10. Do not place on or near a hot gas or electric
burner, or in a heated oven.
11. Always attach plug to appliance rst, then plug
cord into the wall outlet (for appliances with
detachable cords). To disconnect, turn any control
to the off position, then remove plug from wall
outlet.
12. Do not use appliance for other than intended use.
13. All lids should be closed during use.
14. Scalding may occur if the lid is removed or brew
basket door is opened during or immediately after
the brewing cycles. Contents may be hot. Allow
to cool before opening the lid.
For appliances with sealed capsules
15. WARNING: To avoid the risk of injury, never open
or disengage the brew chamber during the brew
cycle.
16. Only use capsules intended for this appliance. If
the capsule does not t, do not force the capsule
into the appliance.
For appliances with glass containers:
17. The container is designed for use with this
appliance. It must never be used on a range top.
18. Do not set a hot container on a wet or cold
surface.
19. Avoid sudden temperature changes, such as
rinsing, washing, lling, or immersing a hot
container with cold liquids.
20. Do not use a cracked or chipped container or a
container having a loose or weakened handle.
21. Do not clean container with cleansers, steel wool
pads, or other abrasive material.
For appliances with service panels:
22. WARNING: TO REDUCE THE RISK OF FIRE OR
ELECTRIC SHOCK, DO NOT REMOVE THIS
COVER. NO USER–SERVICEABLE PARTS INSIDE.
REPAIR SHOULD BE DONE BY AUTHORIZED
SERVICE PERSONNEL ONLY.
SAVE THESE INSTRUCTIONS
HOUSEHOLD USE ONLY

E7 E8
POWER CORD INSTRUCTIONS:
A short power-supply cord (or detachable power-supply cord) may
be provided to reduce risks resulting from becoming entangled in or
tripping over a longer cord. Longer detachable power-supply cords
or extension cords are available and may be used if care is exercised
in their use. If a long detachable power-supply cord or extension cord
is used:
a. The marked electrical rating of the detachable power-supply cord or
extension cord should be at least as great as the electrical rating of
the appliance;
b. If the appliance is of the grounded type, the extension cord
should be a grounding type 3-wire cord; and
c. The longer cord should be arranged so that it will not drape over
the counter top or table top where it can be pulled on by children
or tripped over unintentionally.
Do not pull, twist or otherwise abuse the power cord.
North American models with polarized plugs:
Polarized plug
This appliance has a polarized plug, (one blade
is wider than the other). As a safety feature to
reduce the risk of electrical shock, this plug is
intended to t in a polarized outlet only one way. If the plug does
not t fully in the outlet, reverse the plug. If it still does not t,
contact a qualied electrician. Do not attempt to defeat this safety
feature or modify the plug in any way. If the plug ts loosely into
the AC outlet or if the AC outlet feels warm do not use that outlet.
PRODUCT NOTICES
1. Place the appliance on a hard, at, level surface to avoid
interruption of airow underneath the coffeemaker.
2. Glass decanters only: Discard the decanter immediately if it is
ever boiled dry.
3. Glass decanters only: Protect the decanter from sharp blows,
scratches or rough handling.
4. Do not operate the appliance with an empty water tank.
5. Keep the area above the appliance clear during use, as hot
steam will escape the appliance.

E9 E10
(not included with all models)
Coffeemaker Extras
• Water Filtration Disk
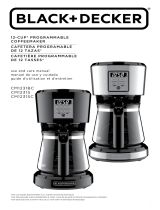
A. Strong Brew Button
B. Strong Indicator
C. Clean Button
D. Clean Indicator
E. Brew Later Button
F. Brew Later Indicator
G. Hour Button
H. Minute Button
I. Brew Now /Off Button
J. Brew Now Indicator
K. Clock Display
L. AM/PM Indicator
M. Freshness Timer
Understand Your Control Panel
B
A
D
C G
F
I
J
K LM
H E
7
1
3
5
2
6
4
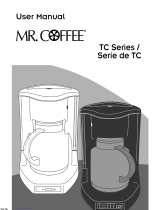
Get To Know Your Coffeemaker Brewer
1. Brew Basket
2. Carafe
3. Control Panel
4. Brewer Base
5. Grab-a-cup Auto Pause
6. Warming Plate
7. Water Reservoir Lid

E11 E12
Getting Started
Unpack your Coffeemaker
Unpack your coffeemaker and remove all plastic bags,
cartons and any tape on the brewer.
WARNING: KEEP PLASTIC BAGS AWAY FROM CHILDREN.
Setting the Clock
Plug in brewer into an outlet. Press the HR and MIN buttons
to set the clock. Pressing any button other than HR or
MIN or 5 seconds of inactivity will set the clock at the time
selected.
Water Filtration System
Using the carbon-based water lter in your coffeemaker
during the brewing process helps remove up to 97% of the
chlorine from the water and improves the taste of your coffee.
To use the water ltration system, please follow these steps:
1. Align the red indicator on the frame to the letter that
corresponds with the month that you are using the disk
for the rst time. This serves to remind you to change the
disk every month (approx. 30 brewing cycles). To change
the disk, remove the used disk, insert new disk into the
frame.
2. Rinse the water lter in fresh
water before rst use.
3. Follow the instructions from the
“Brewing Coffee” section.
4. When you are done brewing,
rinse the water lter with fresh
water. Do not put your water
lter in the dishwasher.
To replace the water lter disks: slide the used disk from your
water ltration system. To insert the new disk, slide disk into
the frame.
Clean Before First Use
1. Wash the Parts - Wash the carafe and brew basket in a
mixture of mild detergent and water. Rinse each thoroughly.
2. Fill Water Reservoir – Fill the Water Reservoir with fresh
water to the MAX ll line.
3. Place Carafe – Set the Carafe on the warming plate.
4. Run without Coffee – Leave the Brew Basket empty. Press
the BREW NOW button once so that the Brew Now
Indicator is illuminated to begin the Cleansing Brew cycle.
There will be an audible signal when the brewing cycle is
complete. Once the unit stops dripping, pour the hot water
in the carafe into the sink.

E13 E14
Note: Brew Basket and Carafe are top rack dishwasher safe.
Suggested Coffee Measurement Chart
1 level tablespoon (tbsp) = 5 gr. / 0.17 oz.
1 cup = 5 . oz. of brewed coffee
Use more or less coffee to suit your taste. Please note that
extra ne coffee grounds and decaf coffee may leave some
grounds in the carafe after brewing.
1. Fill Water Reservoir – Fill the Water Reservoir with fresh
water to the desired amount. Use the Water Window to
check how much water is in the reservoir.
2. Line the Brew Basket - Place an 8-12 Cup Paper Filter or
for best results use a Reusable Coffee
lter (not included with all models)
inside the Brew Basket.
3. Add Coffee – Scoop the desired
amount of coffee into the Brew
Basket. (Figure 1) Refer to the Coffee
Measuring Chart for guidance based
on the number of cups being brewed.
4. Place Carafe - Place the Carafe on the
warming plate.
5. The BREW NOW Indicator will
remain illuminated for the duration
of the keep warm time. To turn the
coffeemaker off before it goes off
automatically after 4 hours, press the
Brew Now button.
Note: For a fresh cup, remember to
clean the Brew Basket between each
brew.
Water to Brew Ground Coffee
12 Cups 9 tbs.
10 Cups 7.5 tbs.
8 Cups 6 tbs.
6 Cups 4.5 tbs.
4 Cups 3 tbs.
Brewing Coffee
Figure 2
Figure 1

E15 E16
The Strong Brew Function slows down the brewing process
to allow the hot water to fully saturate the grounds and
extract bolder avors. There will be brief pauses in the
brewing process in order to pull the strong taste from your
coffee grounds.
1. To enjoy a richer and bolder cup
of coffee, follow steps 1-4 in the
“Brewing Coffee” section or steps
1-3 in the “How to Use the Brew Later
Function” section.
2. Press the STRONG Button once at
the beginning of brewing so that the
Strong Brew Indicator is illuminated. (Figure 3)
3. If you change your mind mid-brew, press the STRONG
Button again so that the Strong Brew Indicator is no
longer illuminated.
Using the Strong Brew Function
IMPORTANT: You must set the clock before using this feature.
1. To set the Brew Later function, follow steps 1-4 in the
“Brewing Coffee” section.
2. Press BREW LATER. The Brew Later Indicator will illuminate.
The clock will ash the currently set Brew
Later time (if no time has been set, the
clock will show 12:00 AM). To set desired
brew time, press the HR and MIN
buttons. 5 seconds of inactivity will set
Brew Later at the time selected. The Brew
Later Indicator will remain illuminated
to indicate that the coffeemaker is set
to brew at a later time. The clock will go
back to showing the set time of day. (Figure 4)
3. If you change your mind and wish to turn off the Brew Later
feature, simply press BREW LATER again and the Brew
Later indicator will turn off. Once the Brew Later time is set,
the coffeemaker will automatically remember the time until
you change it or unplug the machine.
NOTE: As a reminder, if you want to continue to use the
Brew Later feature, you will have to repeat these steps each
time. Your coffeemaker will not automatically start again the
next day.
Using the Brew Later Function
Figure 3 Figure 4

E17 E18
While it may not seem like an important ingredient, coffee is
98 percent water. The type of water that you brew with greatly
affects the nal taste. Always use clean, fresh water that is
ltered and free of impurities. It is best to avoid soft water
or well water. Please refer to the “Advanced Water Filtration
System” section to learn more about how your coffeemaker
reduces impurities in water.
A clean coffeemaker is essential to brewing great tasting
coffee each and every time.
CAUTION: Make sure your coffeemaker is unplugged and has
cooled completely before cleaning.
Remove the Brew Basket and Carafe and wash them in a
solution of hot water and mild liquid soap, and dry thoroughly.
You can also place the Brew Basket and Carafe in the
dishwasher; top-rack only. Do not wash the Advanced Water
Filtration cartridge with soap.
Minerals (calcium/limestone) found in water will leave deposits
in your coffeemaker and affect its performance. The Clean
Indicator will illuminate when it is recommended to clean and
decalcify your coffeemaker using vinegar. To decalcify your
coffeemaker, follow the steps below.
Water
Routine Cleaning
Daily Cleaning
Using the Clean Function to Decalcify
your Coffeemaker
1. IMPORTANT: Remove the Advanced Water Filtration
System from the coffeemaker.
2. Prepare 4 cups or 20 . oz. of undiluted, white
household vinegar. Pour the vinegar into the water
reservoir on the carafe side.
3. Place an empty 8-12 cup basket-style paper lter or a
Understanding the Freshness Timer
The Freshness Timer displays how long it has been since the
coffee was brewed. It automatically starts at the beginning
of the brew cycle. The progress bar will illuminate in 1 hour
segments. At the end of 4 hours, all bars will be lit and the
coffeemaker will automatically turn off.

E19 E20
Mr. Coffee Reusable Coffee Filter into the brew basket.
4. Place the empty carafe on the unit, centered on the
warming plate.
5. Press CLEAN so that the Clean indicator lit solid. The
prepared cleaning solution will
begin being brewed through the
coffeemaker. (Figure 5)
6. The entire cycle will take
approximately 45 minutes to
complete. The Clean Indicator will
turn off when the cycle is complete.
7. Discard the cleaning solution and
rinse the carafe thoroughly with clean
water.
8. Fill the water reservoir with 12 cups of clean, fresh water.
9. Place the empty carafe back on the coffeemaker,
centered on the warming plate.
10. Remove and discard the paper lter used during the
cleaning cycle. If a Mr. Coffee Reusable Coffee Filter was
used during cleaning, remove it and rinse it thoroughly
before replacing it in the brew basket.
11. Press BREW NOW so that the Brew Now Indicator is
illuminated and allow the full brew cycle to complete,
rinsing the coffeemaker with hot water.
12. Discard the water from the carafe and rinse the carafe
thoroughly with clean water.
13. Repeat steps 8 through 12 one more time, to ensure the
coffeemaker is fully rinsed.
The Clean Indicator will blink when your coffeemaker has
counted 90 brew cycles. Follow steps 1-13 to complete the
Clean function. The Clean Indicator will turn off once the
clean function is run in its entirety (this will take 45 minutes).
If you wish to stop the Clean function once it has already
begun, press the CLEAN button, the Clean function will stop
and the Clean Indicator will turn off. Press the BREW NOW
button again to ensure the cleaning solution is completely
brewed through the machine and follow steps 7-12.
If you wish to turn off the Clean Indicator without running a
decalcication cycle, simply press the CLEAN button so that
the Clean Indicator is lid solid and then quickly press the
CLEAN button again and the Clean Indicator will turn off.
Please note that we strongly recommend that you run the
Clean function in its entirety when prompted by the Clean
Indicator to ensure that your coffeemaker’s performance is
not affected over time.
If the Clean Indicator is not illuminated, but you wish to use
the Clean function, you can still follow steps 1-13.
Cleaning Frequency
TYPE OF WATER CLEANING FREQUENCY
Soft Water Every 80 Brew Cycles
Hard Water Every 40 Brew Cycles
Figure 5

E21 E22
Troubleshooting your Coffeemaker
Problem Possible Cause Solution
The BREW NOW
light does not
light up.
The appliance is
unplugged.
Plug unit in.
There’s a power
outage.
Wait for power to be
restored.
The coffee is not
brewing.
The appliance is
unplugged.
Plug unit in.
There’s a power
outage.
Wait for power to be
restored.
No water in the
water reservoir.
Fill water reservoir
above minimum level
marking.
The brew basket
is not properly
inserted.
Insert brew basket
correctly.
The coffeemaker
only brews water.
There are no coffee
grounds in the brew
basket.
Add the paper lter
or reusable coffee
lter with the desired
amount of coffee to the
brew basket.
The coffeemaker
brews slowly.
The coffeemaker
needs cleaning.
Clean coffeemaker
as described in the
“Routine Cleaning”
section.
The Strong Brew
function might be
engaged.
The Strong Brew
function causes the
brewing process to
slow down for more
avor extraction. If
this function is on, the
unit will intermittently
pause briey during
brewing.
The Clean function
might be engaged.
The Clean function
causes the brewing
process to slow
down to allow for the
cleaning solution to
clean your coffeemaker
thoroughly. If this
function is on, the unit
will resume brewing
after pausing. The
process can take up to
45 minutes.

E23 E24
The lter basket
overows.
The lter basket
is not properly
inserted.
Insert the lter basket
correctly.
The carafe is not
placed all the way
on the warming
plate.
Place the carafe
correctly on the
warming plate.
Too many coffee
grounds were
placed in the lter.
Remove lter and
discard grounds. If
paper lter, replace. If
permanent lter, rinse.
Begin brewing process
again.
The carafe was
removed from the
warming plate
for more than 30
seconds.
Turn off and unplug
the unit. Allow to cool.
Wipe up the spill.
The coffee is not
hot.
There’s a power
outage.
Wait for power to be
restored.
The coffee tastes
bad.
Coffee grounds
other than for an
automatic drip
coffeemaker were
used.
Use fresh
coffee grounds
recommended
for automatic drip
coffeemakers.
The ground coffee-
to-water ratio was
unbalanced.
Use the correct coffee-
to-water ratio.
The coffeemaker
needs cleaning.
Clean coffeemaker as
described in “Routine
Cleaning” section.
The unit sud-
denly stopped
brewing.
There is no water in
the water reservoir.
Fill the water reservoir
with fresh, cold water
to the desired water
level, up to the MAX
line.

E25 E26
Warranty Information
Sunbeam Products, Inc, (“Sunbeam”) warrants that for a period of one year
from the date of purchase, this product will be free from defects in material and
workmanship. Sunbeam, at its option, will repair or replace this product or any
component of the product found to be defective during the warranty period.
Replacement will be made with a new or remanufactured product or
component. If the product is no longer available, replacement may be made
with a similar product of equal or greater value. This is your exclusive warranty
from Sunbeam.
This warranty is valid for the original retail purchaser from the date of initial
retail purchase and is not transferable. Keep the original sales receipt. Proof
of purchase is required to obtain warranty performance. Sunbeam dealers,
service centers, or retail stores selling Sunbeam products do not have the right
to alter, modify or any way change the terms and conditions of this warranty.
This warranty does not cover normal wear of parts or damage resulting from
any of the following: negligent use or misuse of the product, use on improper
voltage or current, use contrary to the operating instructions, disassembly,
repair or alteration by anyone other than Sunbeam or an authorized Sunbeam
service center. Further, the warranty does not cover: Acts of God, such as re
ood, hurricanes and tornadoes.
- 1 - Year Limited Warranty
User Maintenance
Service Maintenance & Warranty
This appliance has no user serviceable parts. Any servicing beyond
that described in the Cleaning Section should be performed by
an Authorized Service Representative only. See warranty available
online.
Service Maintenance and Warranty can be found online at
www.mrcoffee.com or call us toll-free at the Consumer Service
Department, 1-800-MR COFFEE (1-800-672-6333).
What are the Limits on Sunbeam’s Liability?
Sunbeam shall not be liable for any incidental or consequential damages caused
by the breach of any express, implied or statutory warranty or condition.
Except to the extent prohibited by applicable law, any implied warranty or
condition of merchantability or tness for a particular purpose is limited in
duration to the duration of the above warranty. Sunbeam disclaims all other
warranties, or conditions or representations, express, implied, statutory or
otherwise.
Sunbeam shall not be liable for any damages of any kind resulting from the
purchase, use or misuse of, or inability to use the product including incidental,
special, consequential or similar damages or loss of prots, or for damages arising
from any tort, including negligence or gross negligence, or fault committed by
Sunbeam, its agents or employees or for any breach of contract, fundamental or
otherwise, or for any claim brought against purchaser by any other party.
Some states or jurisdictions do not allow the exclusion or limitation of incidental
or consequential damages or limitations on how long an implied warranty lasts,
so the above limitations or exclusions may not apply to you. This warranty gives
you specic legal rights, and you may also have other rights that vary from state to
state or jurisdiction to jurisdiction.
How to Obtain Warranty Service
In the U.S.A.
If you have any question regarding this warranty or would like to obtain warranty
service, please call 1-800-672-6333 and a convenient service center period
address will be provided to you.

NOTE NOTE

Manual del usuario
P.N. ART0000866080 REV B / NWL0001314187
SERIE BVMC-EM
MRCOFFEE.COM
–PROGRAMMABLE –
B
R
E
W
N
O
W
O
R
L
A
T
E
R
!
AUTOMATIC CLEANING CYCLE
–PROGRAMMABLE –
12 tazas
12 tazas
CICLO DE LIMPIEZA AUTOMÁTICA
¡
P
R
E
P
A
R
E
C
A
F
É
A
H
O
R
A
O
D
E
S
P
U
É
S
!
©2021 Sunbeam Products, Inc. Todos los derechos reservados. Distribui-
do por Sunbeam Products, Inc. Boca Raton, Florida 33431. Hecho en
China.
P.N. ART0000866080 REV B / NWL0001314187

S1 S2
Introducción
Bienvenido y felicitaciones por la compra de
su nueva Cafetera de Mr. Coffee. Su nueva
cafetera de Mr. Coffee le despertará en la
mañana, le ofrecerá un estímulo en la tarde y le
proporcionará ¡la exibilidad para preparar café
de la manera que usted elija!
Nuestro objetivo principal es brindarle la mejor taza de
café cada vez, por lo tanto, si tuviera alguna pregunta
sobre su cafetera, llámenos al 1-800-672-6333 o visítenos
en www.mrcoffee.com.
MEDIDAS DE SEGURIDAD IMPORTANTES
Cuando se utilizan aparatos eléctricos, siempre se
deben seguir medidas básicas de seguridad para
reducir el riesgo de incendio, descarga eléctrica o
lesiones personales, incluyendo las siguientes:
1. Lea todas las instrucciones.
2. No toque las supercies calientes. Utilice asas o
perillas.
3. A n de protegerse contra una descarga eléctrica,
no coloque ni sumerja el cable, los enchufes o el
aparato en agua ni ningún otro líquido.
4. Este aparato no está diseñado para ser
utilizado por los niños ni por personas con su
capacidad física, sensorial o mental reducida,
o falta de experiencia o conocimiento. Todo
aparato utilizado cerca de los niños, requiere la
supervisión cercana de un adulto. Los niños deben
estar bajo supervisión para asegurar que no
jueguen con el aparato. Mantenga el aparato y su
cable fuera del alcance de los niños.
5. Desenchufe el aparato del tomacorriente cuando
éste o el reloj de la pantalla (si es proporcionado)
no esté en uso y antes de limpiarlo. Permita que el
aparato se enfríe antes instalarle o retirarle piezas
y antes de limpiarlo.
6. No opere ningún aparato con un cable o enchufe
dañado o después de presentar un fallo en su
funcionamiento, o si se ha dañado de manera
alguna. Devuelva el aparato a un centro de
servicio autorizado para su revisión, reparación
o ajuste. No intente reemplazar o cortar un cable
dañado.

S3 S4
7. El uso de accesorios no recomendados por
el fabricante del producto podría ocasionar
incendio, descarga eléctrica o lesión personal.
8. No utilice el aparato al aire libre.
9. No permita que el cable cuelgue del borde de la
mesa o del mostrador ni que entre en contacto
con supercies calientes.
10. No coloque el aparato sobre o cerca de una
hornilla caliente de gas o eléctrica ni dentro de un
horno caliente.
11. Siempre conecte el enchufe al aparato primero
y luego enchufe el cable al tomacorriente
(para aparatos con cables separables). Para
desconectar, gire todo control a la posición
de apagado y luego retire el enchufe del
tomacorriente.
12. No utilice el aparato para otro n que no sea para
el que ha sido diseñado.
13. Todas las tapas deben estar cerradas durante el
uso.
14. Si la tapa se retira o la puerta de la cesta de
preparación se abre durante o inmediatamente
después de terminar el ciclo de preparación,
esto podría ocasionar quemaduras. El contenido
puede estar caliente. Permita que el aparato se
enfríe antes de abrir la tapa.
Para aparatos con cápsulas selladas:
15. ADVERTENCIA: A n de evitar el riesgo de una
lesión, nunca abra ni desconecte la cámara de
preparación durante el ciclo de preparación.
16. Solo utilice cápsulas diseñadas para este aparato.
Si la cápsula no encaja, no la fuerce dentro del
aparato.
Para aparatos con recipientes de vidrio:
17. El recipiente está diseñado para utilizarse con
este aparato. Nunca debe ser utilizado sobre una
estufa.
18. No coloque un recipiente caliente sobre una
supercie mojada o fría.
19. Evite los cambios bruscos de temperatura,
tales como enjuagar, lavar, llenar o sumergir un
recipiente caliente con líquidos fríos.
20. No utilice un recipiente rajado o astillado, o que
tenga el asa oja o debilitada.
21. No limpie el recipiente con limpiadores,
estropajos de lana de acero ni ningún otro
material abrasivo.
Para aparatos con paneles de servicio:
22. ADVERTENCIA: PARA REDUCIR EL RIESGO
DE INCENDIO O DESCARGA ELÉCTRICA, NO
RETIRE ESTA CUBIERTA. NO TIENE PIEZAS EN EL
INTERIOR QUE DEBAN SER REPARADAS POR EL
USUARIO. CUALQUIER REPARACIÓN SOLO SE
DEBE REALIZAR POR PERSONAL DE SERVICIO
AUTORIZADO.
CONSERVE ESTAS INSTRUCCIONES
SOLO PARA USO DOMÉSTICO

S5 S6
INSTRUCCIONES PARA EL CABLE DE ALIMENTACIÓN:
Un cable de alimentación corto (o cable de alimentación separable)
puede ser provisto para reducir los riesgos de enredarse o tropezar
con un cable más largo. Existen cables de alimentación separables
más largos o cables de extensión disponibles y estos pueden ser
utilizados si se toma el cuidado debido en su uso. Si se utiliza un
cable de alimentación separable o cable de extensión:
a. La clasicación eléctrica marcada del cable de alimentación separable
o cable de extensión debe ser, como mínimo, igual a la clasicación
eléctrica del aparato;
b. Si el aparato es del tipo de conexión a tierra, el cable de extensión debe
ser un cable de tres alambres de conexión a tierra; y
c. El cable más largo debe ser acomodado de manera que no cuelgue
del mostrador o de la mesa para evitar que un niño tire del mismo o que
alguien se tropiece sin darse cuenta.
No tire, tuerza ni maltrate el cable de alimentación.
Modelos norteamericanos con enchufes polarizados:
Enchufe polarizado
Este aparato tiene un enchufe polarizado (un
contacto es más ancho que el otro). Como
una característica de seguridad para reducir
el riesgo de descarga eléctrica, este enchufe
está diseñado para entrar en un tomacorriente polarizado solo
de una manera. Si el enchufe no entra completamente en el
tomacorriente, invierta el enchufe. Si aún no entra, consulte a un
electricista calicado. No intente ignorar esta característica de
seguridad ni modicar el enchufe de manera alguna. Si el enchufe
entra holgadamente en el tomacorriente de corriente alterna o si
el tomacorriente de corriente alterna se siente caliente, no utilice
ese tomacorriente.
AVISOS DEL PRODUCTO
1. Coloque el aparato sobre una supercie dura, plana y nivelada
para evitar interrupciones en el ujo de aire por debajo de la
cafetera.
2. Solo para jarras de vidrio: Descarte la jarra de inmediato si en
alguna ocasión hierve hasta evaporarse su contenido.
3. Solo para jarras de vidrio: Proteja la jarra de golpes secos,
rasguños o maltrato.
4. No opere el aparato con un tanque de agua vacío.
5. Mantenga el área encima del aparato despejada durante el
uso, ya que vapor caliente se escapará del aparato.
Conozca Su Cafetera
1. Cesta de preparación
2. Jarra
3. Panel de control
4. Base de la jarra
5. Función de pausa
automática para servirse
una taza
6. Placa de calentamiento
7. Tapa del depósito de agua

S7 S8
7
1
3
5
2
6
4
(no incluidos en todos los modelos)
Extras de Su Cafetera
• Disco de ltración de agua
A. Botón de preparación fuerte
B. Indicador de preparación
fuerte
C. Botón de limpieza
D. Indicador de limpieza
E. Botón de preparar más tarde
F. Luz indicador de preparar
más tarde
G. Botón de hora
H. Botón de minutos
I. Botón de preparar ahora /
Apagar
J. Indicador de preparar ahora
K. Pantalla del reloj
L. Indicador de AM/PM
M. Reloj contador del tiempo de
frescura
Comprenda Su Panel de Control
B
A
D
C G
F
I
J
K LM
H E

S9 S10
Preparación para Utilizar
Desempaque Su Cafetera
Desempaque su cafetera y retire todas las bolsas de plástico,
cartones y cinta adhesiva de la cafetera.
ADVERTENCIA: MANTENGA LAS BOLSAS DE PLÁSTICO
ALEJADAS DE LOS NIÑOS.
Programe el Reloj
Enchufe la cafetera a un tomacorriente. Presione los botones
HR y MIN (hora y minutos) para jar el reloj. Presionar otro
botón que no sea HR o MIN o después de 5 segundos de
inactividad, jará el reloj a la hora seleccionada.
Sistema de Filtración de Agua Avanzado
Utilizar el ltro de carbono de agua en su cafetera durante el
proceso de preparación de café, ayuda a eliminar hasta 97%
del cloro del agua y mejora el sabor de su café. Para utilizar el
sistema de ltración de agua, siga los siguientes pasos:
1. Alinee el indicador rojo en el marco con la letra que
corresponde al mes en que utiliza el disco por primera
vez. Esto sirve para recordarle de cambiar el disco cada
mes (aproximadamente 30 ciclos de preparación). Para
cambiar el disco, retire el disco utilizado, inserte el disco
nuevo en el marco.
2. Enjuague el ltro de agua con
agua fresca antes del primer uso.
3. Siga las instrucciones de la
sección de “Cómo Preparar
Café”.
4. Cuando termine de preparar su
café, enjuague el ltro de agua
con agua fresca. No coloque su
ltro de agua en el lavaplatos.
Para reemplazar los discos del ltro de agua: Deslice el disco
utilizado de su sistema de ltración de agua. Para insertar un
disco nuevo, deslice el disco dentro del marco.
Limpiar Antes de Utilizar por Primera Vez
1. Lave las piezas - Lave la jarra, la cesta de preparación en
una mezcla de líquido de fregar suave y agua. Enjuague
bien cada uno.
2. Llene el depósito de agua – Llene el depósito de agua con
agua fresca hasta la línea de llenado MAX.
3. Coloque la jarra en posición – Coloque la jarra sobre la
placa de calentamiento.
4. Haga funcionar sin café – Deje vacía la cesta de
preparación. Presione el botón BREW NOW (preparar
ahora) una vez para que el indicador de preparar ahora
se ilumine para comenzar el ciclo de limpieza. El aparato
/