
Dake Corporation Phone: 800.937.3253 www.dakecorp.com
1809 Industrial Park Dr
Grand Haven, MI 49417
DAKE SEMI-AUTO MITERING BANDSAW
SE-6.5M
INSTRUCTIONAL MANUAL
WARNING!
Read and understand all instructions and responsibilities before operating. Failure to follow
safety instructions and labels could result in serious injury.

Dake Corporation
1809 Industrial Park Dr
Grand Haven, MI 49417
www.dakecorp.com
983110-2 1 REV092023
TABLE OF CONTENTS
DAKE STANDARD LIMITED WARRANTY ............................................................ 2
RETURN & REFUND POLICY .............................................................................. 4
DAKE STANDARD TERMS & CONDITIONS OF SALE ........................................ 5
SPECIFICATIONS ................................................................................................ 6
SAFETY WARNINGS ............................................................................................ 7
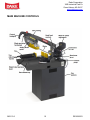
MAIN MACHINE CONTROLS ............................................................................. 10
SET UP ............................................................................................................... 11
TRANSPORTATION OF MACHINE ........................................................... 11
ADJUSTMENTS .................................................................................................. 12
TOOTH SELECTION ................................................................................. 12
BLADE SPEED .......................................................................................... 13
OPERATIONS ..................................................................................................... 14
STARTING SAW ........................................................................................ 14
USAGE OF RAPID OPENING VISE .......................................................... 14
DOWN FEED CONTROLS ........................................................................ 14
QUICK HEAD ADJUSTMENT FOR ANGLE CUTS .................................... 15
CUTTING SPEED ADJUSTMENT ............................................................. 16
MAINTENANCE .................................................................................................. 17
CHANGING BLADE ................................................................................... 17
TROUBLESHOOTING ........................................................................................ 18
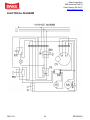
ELECTRICAL DIAGRAM .................................................................................... 20
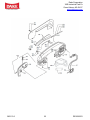
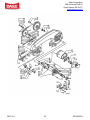
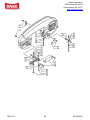
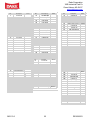
EXPLODED VIEWS & PART LIST ...................................................................... 21
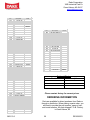
ORDERING INFORMATION ............................................................................... 26

Dake Corporation
1809 Industrial Park Dr
Grand Haven, MI 49417
www.dakecorp.com
983110-2 2 REV092023
DAKE STANDARD LIMITED WARRANTY
Finished Machines
Dake warrants to the original purchaser the finished machine manufactured or distributed by it to be free
from defects in material and workmanship under normal use and service within 1 year (12 months) from
the delivery date to the end user.
Parts
Dake warrants to the original purchaser the component part manufactured or distributed by it to be free
from defects in material and workmanship under normal use and service within 30 days from the delivery
date to the end user.
The standard limited warranty includes the replacement of the defective component part at no cost to the
end user.
Sale of Service (Repairs)
Dake warrants to the original purchaser the component part repaired by Dake Corporation at the
manufacturing facility to be free from defects in material and workmanship under normal use and service
within 90 days from the return date to the end user, as it pertains to the repair work completed. The
standard limited warranty includes repair of the defective component part, at no cost to the end user.
Warranty Process
Subject to the conditions hereinafter set forth, the manufacturer will repair or replace any portion of the
product that proves defective in materials or workmanship. The manufacturer retains the sole right and
option, after inspection, to determine whether to repair or replace defective equipment, parts or
components. The manufacturer will assume ownership of any defective parts replaced under this
warranty.
All requested warranty claims must be communicated to the distributor or representative responsible for
the sale. Once communication has been initiated, Dake Customer Service must be contacted for
approval:
Phone: (800) 937-3253
Email: [email protected]
When contacting Dake, please have the following information readily available:
- Model #
- Serial #
- Sales Order #
Purchasers who notify Dake within the warranty period will be issued a Case number and/or a Return
Material Authorization (RMA) number. If the item is to be returned per Dake’s request, the RMA number
must be clearly written on the exterior packaging. Any item shipped to Dake without an RMA will not be
processed.

Dake Corporation
1809 Industrial Park Dr
Grand Haven, MI 49417
www.dakecorp.com
983110-2 3 REV092023
Warranty Exceptions:
The following conditions are not applicable to the standard limited warranty:
(a) Part installation or machine service was not completed by a certified professional, and is not
in accordance with applicable local codes, ordinances and good trade practices.
(b) Defects or malfunctions resulting from improper installation or failure to operate or maintain
the unit in accordance with the printed instructions provided.
(c) Defects or malfunctions resulting from abuse, accident, neglect or damage outside of prepaid
freight terms.
(d) Normal maintenance service or preventative maintenance, and the parts used in connection
with such service.
(e) Units and parts which have been altered or repaired, other than by the manufacturer or as
specifically authorized by the manufacturer.
(f) Alterations made to the machine that were not previously approved by the manufacturer, or
that are used for purposes other than the original design of the machine.

Dake Corporation
1809 Industrial Park Dr
Grand Haven, MI 49417
www.dakecorp.com
983110-2 4 REV092023
RETURN & REFUND POLICY
Thank you for purchasing from Dake! If you are not entirely satisfied with your purchase, we are
here to help.
Returns
All Dake manufactured / distributed machines, parts and couplings include a 30-day return
option. These policies are valid from the date of final shipment to the end user.
To be eligible for a return, the item must be unused and in the same condition as received.
All requested warranty claims must be communicated to the distributor or representative
responsible for the sale. Once communication has been initiated, Dake Customer Service must
be contacted for approval:
Phone: (800) 937-3253
Email: customerse[email protected]
Once the return request has been approved by Customer Service, a representative will supply a
Return Material Authorization (RMA) number. The returned item must have the provided RMA
number clearly marked on the outside packaging. Any item received without an RMA number
clearly visible on the packaging will not be processed.
An RMA number can only be provided by the Dake Customer Service team and must be
obtained prior to the return shipment.
Refunds
Once the item has been received and inspected for damages, a representative will notify the
requestor referencing the provided RMA number.
If the return is approved, a refund will be issued to the original method of payment, less a 20%
restocking fee. The restocking fee may be waived if an order is placed at the time of return with
like-value merchandise.
Transportation costs are the responsibility of the end user and will not be credited upon return
approval.
Any item that is returned after the initial 30 days or has excessive/obvious use will not be
considered for a full refund.

Dake Corporation
1809 Industrial Park Dr
Grand Haven, MI 49417
www.dakecorp.com
983110-2 5 REV092023
DAKE STANDARD TERMS & CONDITIONS OF SALE
All proposals and quotations for the original sale of our products are subject to the following terms and conditions:
ACCEPTANCE OF ORDER: All orders are subject to acceptance by Dake at its main office in Grand Haven,
Michigan.
APPLICABLE LAWS: This quotation or acceptance shall be governed in all respects by the laws of the State of
Michigan.
CANCELLATION: We reserve the right to cancel and/or refuse to complete your order if, in our opinion, you have
not established credit to promptly meet the payment terms of your order. Any cancellation from the Purchaser may
be subject to a 10% cancellation fee for any of our non-standard machinery upon the discretion of Dake. All custom
or special quotes will not be eligible for cancellation, nor returns.
DELIVERY: The proposed shipment date is an estimate and is contingent upon causes beyond Dake’s control.
Under no circumstances shall Dake have any liability for loss of use or for any direct or consequential damages
resulting from delay. All shipments from the Dake facilities are F.O.B.
FREIGHT CLAIM: Damage freight claims must be submitted to Dake within thirty (30) days of shipment from
Dake’s facility. If shipment for order was set up by the Purchaser, Dake is not liable to handle the freight claims.
PERMITS AND COMPLIANCE: Dake shall not be responsible for obtaining any permits, inspections, certifications,
or licenses required for the installation or use of the equipment. Dake makes no promise or representation that the
equipment or any services to be furnished by Dake will conform to any federal, state, or local laws, ordinances,
regulations, codes or standards.
PRICES: Unless otherwise agreed to in writing, all prices are F.O.B. our plant in Grand Haven, Michigan and
Grand Prairie, Texas. In any event, the quoted prices for component parts become invalid ten (10) days after date
of quotation, and machinery may become invalid sixty (60) days after date of quotation. Unless otherwise specified
in Dake’s quotation, installation services and final on-site adjustments are not included in the quotation.
TAXES: Prices do not include taxes. If any sales, use or similar tax is payable to Dake in connection with any
transaction or part thereof between the Purchaser and Dake with respect to goods delivered, the Purchaser will,
upon demand, pay to Dake the amount of any such tax. If you are tax exempt, please include your exemption
document when submitting your order.
TERMS OF PAYMENT: Terms of payment are as stated in Dake’s quotation subject to credit approval by our home
office. Dake will invoice Purchaser when the equipment is completed and ready for shipment. Payment terms run
from invoice date. Purchaser may be required to issue a down payment before production of order and shipment, at
the discretion of Dake Accounting. For credit card purchases, a 3.5% processing fee may be applicable to the
order. The following states are exempt from the 3.5% processing fee: CA, CO, KS, OK, TX, FL, NY, CT, MA, and
ME. Dake’s preferred method of payment is as follows: ACH Wire and credit card. Checks will be accepted but may
cause delay in order processing. Below is our billing address:
1809 Industrial Park Drive, Grand Haven, MI 49417
WARRANTY If, within a period of one (1) year from date of shipment, any part of any equipment sold by Dake is defective in
material or workmanship and is so found after inspection by Dake, it will be replaced or repaired at the option of Dake, providing
the equipment has been given normal and proper usage and is still the property of the original Purchaser. Purchased
components such as Micro Drop mist system or the like, installed as a part of Dake equipment are warranted only to the extent
of the original Manufacturer’s warranty. Dake is not responsible for any service work performed unless authorized in advance.
THE FOREGOING WARRANTY IS EXCLUSIVE AND IN LIEU OF ALL OTHER WARRANTIES WHETHER
WRITTEN, ORAL OR IMPLIED (INCLUDING ANY WARRANTY OF MERCHANTABILITY OR FITNESS FOR
PARTICULAR PURPOSE). UNDER NO CIRCUMSTANCES SHALL DAKE BE LIABLE FOR ANY INCIDENTAL
OR CONSEQUENTIAL DAMAGES.

Dake Corporation
1809 Industrial Park Dr
Grand Haven, MI 49417
www.dakecorp.com
983110-2 6 REV092023
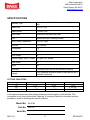
SPECIFICATIONS
Machine Type
Hydraulic controlled feed horizontal mitering band
saw
Blade Size 84-1/4” x 3/4"
Blade Speed 114-263 FPM
Head Feed Hydraulic controlled down feed
Vise Manual with quick opening release
Miter Cutting Capabilities Up to 60° right
Controls CE Certified
Horsepower 2.5
Weight 308 lbs
Work Height 37”
Overall Height, Open / Closed 65” open / 52” closed
Base Width 25”
Depth 48”
Lubricant Flood type unit build into the machine (Electric)
Voltage
120V (Machine should be wired to main service by a
qualified electrician)
CUTTING CAPACITIES
Degree
Round
Square
Flat
90°
6-1/2”
6-3/4”
7-3/4”
60°
3”
3”
4 x 2-3/4”
45°
4-1/4”
4-1/2”
6 x 4-1/4”
In the space provided record the serial number and model number of the machine. This
information is only found on the black Dake tag. If contacting Dake this information must be
provided to assist in identifying the specific machine.
Model No:
SE-6.5M
Part No:
983110
Serial No:

Dake Corporation
1809 Industrial Park Dr
Grand Haven, MI 49417
www.dakecorp.com
983110-2 7 REV092023
Date of Purchase:
SAFETY WARNINGS
WARNING: FAILURE TO FAOLLOW THESE RULES
MAY RESULT IN SERIOUS PERSONAL INJURY
As will all machinery there are certain hazards involved with operation and use of the machine.
Using the machine with respect and caution will considerably lessen the possibility or personal
injury. However, if normal safety precautions are overlooked or ignored, personal injury to the
operator may result.
This machine was designed for certain applications only. We strongly recommend that this
machine NOT be modified and/or used for any application other than for which it was designed.
If you have any questions relative to its application DO NOT use the machine until you contact
with us and we have advised, you.
Your machine might not come with a power socket or plug. Before using this machine,
please ask your local electrician to install the socket or plug on the power cable end.
SAFETY RULES FOR ALL TOOLS
USER:
• Wear proper apparel: No loose clothing, gloves, rings, bracelets, or other jewelry to get
caught in moving parts. Non-slip foot wear is recommended. Wear protective hair
covering to contain long hair.
• Always wear eye protection. Refer to ANSLZ87.1 standard for appropriate
recommendations. Also use face or dust mask if cutting operation is dusty.
• Do not overreach. Keep proper footing and balance at all times.
• Never stand on the machine. Serious injury could occur if the machine is tipped or if the
cutting blade is accidentally contacted.
• Never leave the saw running unattended. Turn off power. Don't leave saw until it comes
to a complete stop.
• Do not operate the tool while under the influence of drugs, alcohol, or any medication.
• Make sure the saw is disconnected from power supply while motor is being mounted,
connected, or reconnected.
• Always keep hands and fingers away from table.
• Stop the machine before removing any chips or debris.

Dake Corporation
1809 Industrial Park Dr
Grand Haven, MI 49417
www.dakecorp.com
983110-2 8 REV092023
• Shut off power and clean the band saw and work area before leaving machine.
USE OF MACHINE:
• Remove adjusting keys and wrenches. Form a habit of checking to see that keys and
adjusting wrenches are removed from the saw before turning it on.
• Do not force the saw. It will do a more efficient and safer job at the rate for which it was
designed.
• Use correct blade. Do not force blade or attachments to do a job for which it was not
designed.
• Secure work. Use clamps or a vise to hold work when practical. It is safer than using your
hands.
• Maintain blade is in top condition. Keep blades sharp and clean for best and safest
performance. Follow instructions for lubricating and changing accessories.
• Use recommended accessories. Consult the owner’s manual for recommended
accessories. The use of improper accessories may cause hazards.
• Avoid accidental starting. Make sure the switch is in the “OFF” position before plugging in
the cord.
• Direction of feed. Feed work into the blade against the direction of rotation of the blade.
• Adjust and position the blade guide arm before starting the cut.
• Keep blade guide arm tight. A loose blade guide arm will affect sawing accuracy.
• Make sure blade speed is set correctly for material being cut.
• Check for proper blade size and type.
• Stop the machine before putting material in the vise.
• Always have stock firmly clamped in vise before starting the cut.
• Ground all tools. If tool is equipped with three-prong plug, it should be plugged into a
three-hole electrical receptacle, the adapter plug must be attached to a known ground.
Never remove the third prong.
ADJUSTMENTS:
• Make all adjustments with the power off. In order to maintain the machine, precision and
correct ways of adjustment while assembling, the user should read the detailed
instruction in this manual.
WORKING ENVIRONMENT:
• Keep work area clean. Cluttered areas and benches invite accidents.
• Do not use in dangerous environment. Do not use power tools in damp or wet locations
or expose them to rain. Keep work area well-lighted.

Dake Corporation
1809 Industrial Park Dr
Grand Haven, MI 49417
www.dakecorp.com
983110-2 9 REV092023
• Keep children and visitors away. All children and visitors should be kept a safe distance
from work area.
• Do not install or use this machine in an explosive, dangerous environment.
MAINTENACNE:
• Disconnect machine from power source when making repairs.
• Check damaged parts. Before further use of the saw, a guard or other part that is
damaged should be carefully checked to ensure that it will operate properly and perform
its intended function check for alignment of moving parts, binding of moving parts,
breakage of parts, mounting, and any other condition that may affect its operation. A
guard or other part that is damaged should be properly repaired or replaced.
• Disconnect tools before servicing and when changing accessories such as blades, bits,
cutters, etc.
• Make sure that the blade tension is properly adjusted. Green LED will light when properly
tensioned. Saw will not operate until green light is lit.
• Re-check blade tension after initial cut with new blade.
• To prolong blade life always releases blade tension at the end of each work day.
• Check coolant daily. Low coolant level can cause foaming and high blade temperatures.
Dirty or weak coolant can clog pump. This can cause low cutting rate and permanent
blade failure. Dirty coolant can cause the growth of bacteria with ensuring skin irritation.
• When cutting magnesium never use soluble oils or emulsions (oil-water mix) as water will
greatly intensify any accidental magnesium chip fire. See your industrial coolant supplier
for specific coolant recommendations when cutting magnesium.
• To prevent corrosion of machined surfaces when a soluble on is used as coolant, pay
particular attention to wiping dry the surfaces where fluid accumulates and does not
evaporate quickly, such as between the machine bed and vise.
SPECIFIC USAGE:
This machine is used for general metals cutting within the range of cutting capacity.
SAFETY DEVICE:
By the time the saw arm cover is opened, the interlock switch will function to stop the all
involvement. Do not remove this switch from machine for any reason and check its function
frequency.


Dake Corporation
1809 Industrial Park Dr
Grand Haven, MI 49417
www.dakecorp.com
983110-2 11 REV092023
SET UP
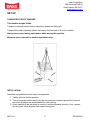
TRANSPORTATION OF MACHINE
This machine weighs 300lbs.
Transport to desired location before unpacking, please use lifting jack.
Transportation after unpacking, please use heavy duty fiber belt to lift up the machine.
Always keep proper footing and balance while moving this machine.
Minimum space required for machine operation below:
INSTALLATION:
Assemble saw pedestal and bolt saw on the pedestal.
1. Tighten all locks before operation.
2. Turn off the power before wiring, and be sure machine is properly grounded. Overload
and circuit breakers are recommended for safety wiring.
3. Check carefully if the saw blade is running in counterclockwise direction, if not, reverse
the wiring per circuit diagram then repeat running test.

Dake Corporation
1809 Industrial Park Dr
Grand Haven, MI 49417
www.dakecorp.com
983110-2 12 REV092023
ADJUSTMENTS
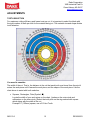
TOOTH SELECTION
For maximum cutting efficiency and lowest cost per cut, it is important to select the blade with
the right number of teeth per inch for the material being cut. The material size and shape dictate
tooth selection.
You need to consider:
The width of the cut. That is, the distance in the cut that each tooth must travel from the point it
enters the work piece until it leaves the work piece, and the shape of the work piece. Use the
chart above to assist with tooth selection.
• Squares, Rectangles, Flats (Symbol: ■)
Locate the width of your work piece on the chart. (Inches on the outer circle and
millimeters on the inner circle.) Select the tooth pitch on the ring marked with square
which aligns with the width of the cut.
Example: 6” (150mm) square, use a 2/3 Vari-Tooth.

Dake Corporation
1809 Industrial Park Dr
Grand Haven, MI 49417
www.dakecorp.com
983110-2 13 REV092023
• Round Solids (Symbol: ●)
Locate the diameter of your work piece on the chart. Select the tooth pitch on the ring
marked with the circle which aligns with the size of stock you are cutting.
Example: 4” (100mm) round, use a 3/4 Vari-Tooth.
• Tubing, Pipe, Structural (Symbols: O, H, ˄)
Determine the average width of cut by dividing the area of the work piece by the distance
the saw blade must travel to finish the cut. Select the tooth pitch on the ring marked with
the tubing and structural shape which aligns with the average width you are cutting.
Example: 4” (100mm) outside diameter, 3” (75mm) inside diameter tubing.
4"(100mm) OD =12.5 in2 (79 cm2)
3"(75 mm ) ID = 7.0 in2 (44 cm2)
Area = 5.5 in2 (35 cm2)
5.5 in2 (35 cm2) / 4" (100mm) distance = 1.38” (35 mm) average width 1.38" (35 mm),
use a 4/6 Vari-Tooth.
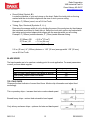
BLADE SPEED
The band speeds are to be used as a starting point for most application. For exact parameters
consult your saw blade supplier.
Material
Speed (FPM)
Tool, Stainless, Alloy Steels, Bearing Bronze
114
Med. to High Carbon Steels, Hard Brass or Bronze
130
Low to Med. Carbon Steel, Soft Brass
180
Aluminum, Plastic
262
TELLTALE CHIPS
Chips are the best indicator of correct feed force. Monitor chip information and adjust feed
accordingly.
Thin or powdery chips – increase feed rate or reduce band speed.
Burned heavy chips – reduce feed rate and/or band speed.
Curly silvery and warm chips – optimum fed rate and band speed.

Dake Corporation
1809 Industrial Park Dr
Grand Haven, MI 49417
www.dakecorp.com
983110-2 14 REV092023
OPERATIONS
STARTING SAW
Trigger switch and lock button located on handle of the saw used for starting the saw in manual
or semi-automatic mode.
USAGE OF RAPID OPENING VISE
The workpiece is places between the vise jaws with the amount to be cut off extending out past
the blade. Your machine is equipped with a “rapid vise jaw” which allows you to instantly
position the movable vise jaw. This is for quick change over a different material. Simply release
the lever located under the vise and move the vise jaw open or closed to the desired position.
Then tighten the lever. Adjust vise normally.
DOWN FEED CONTROLS
This control regulates the speed at which the
head descends and pressure. When the head
lock control is all the way to the left it locks the
head at any height chosen. Rotating the lever
down or in any position in between allows the
head to descend allowing for regulated cutting
pressure.
The upper rotary control “head down feed
control” varies the speed at which the head
descends during the cut. The dial with numbers
corresponds to the speeds and feed
recommendations listed on the motor label. Turn
the dial to a higher number to increase the down
feed speed.
Note: If cutting in manual mode, both of these
controls are to be set at their maximum settings.
Be careful not to let go of the cutting head which
can drop and cause injury.

Dake Corporation
1809 Industrial Park Dr
Grand Haven, MI 49417
www.dakecorp.com
983110-2 15 REV092023
QUICK HEAD ADJUSTMENT FOR ANGLE CUTS
1. Loosen the head swivel lock handle.
2. Rotate head to the required angle by aligning indicator to the scale. Three presets can be
used, or any angle in between.
3. Lock head back down.
For mitering beyond 45° slide the cam located on the left side attached to the swivel. Loosen the
handle and slide the cam to allow for greater angles. This can also be used to adjust angles if
needed.

Dake Corporation
1809 Industrial Park Dr
Grand Haven, MI 49417
www.dakecorp.com
983110-2 16 REV092023
CUTTING SPEED ADJUSTMENT
The motor speed selection chart can help you figure out the best speeds for the material, blade
recommendation, head feed range and corresponding reference number for the speed adjusting
wheel. These are good stating points.
Always allow the blade to achieve speed before starting your cut. This saw incorporates
“constant speed control” to prevent bod downs when cutting.

Dake Corporation
1809 Industrial Park Dr
Grand Haven, MI 49417
www.dakecorp.com
983110-2 17 REV092023
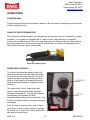
MAINTENANCE
CAUTION - WARNING
Make certain that the unit is disconnected from the power source before attempting to
service or remove any component.
It is easier to keep the machine in good condition or best performance by means of maintaining
it at any time than remedy it after it is out of order.
Regular Maintenance Schedule:
Daily
Check and fill cutting fluid if needed, before starting the machine every day.
Water soluble cutting fluid is recommended. Avoid cutting oils.
If there is a strange or unusual noise or malfunction, stop the machine
immediately to check it for the problem source. Repairs must be made by
qualified personnel before continuing use.
Clean work area.
Weekly
Clean and coat any machines surfaces with oil to prevent rust.
Check to see if sliding surfaces and turning parts lack of lubricant. If
lubrication is insufficient, fill it.
Monthly
Check electrical cord, plugs, switched at least once a month to avoid
loosening or wearing.
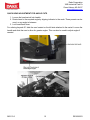
CHANGING BLADE
Check the compatibility of the NEW blade for the saw. Only use a blade with a thickness
between .025” and .035”.
Raise saw head to upper most position and open the blade guards. Loosen tension screw knob
sufficiently to allow the saw blade to slip off the wheels. Install the new blade with the teeth
slanted toward the motor as follow:
1. Place the blade in between each of the guide bearings.
2. Slip the blade around the motor wheel (rear) with the left hand and hold on position.
3. Hold the blade taut against the motor wheel by pulling the blade towards the front wheel
with the right hand and adjust the position of the front wheel by slipping the blade around
the wheel using thumb, index, and little finger as guides.
4. Adjust the blade tension knob clockwise until the green LED is lit on the no/go tensioning
gauge. Do not tighten excessively.
5. Replace the blade guards. Rear blade cover has interlocks and will not allow the saw to
run without these interlocks engaged.

Dake Corporation
1809 Industrial Park Dr
Grand Haven, MI 49417
www.dakecorp.com
983110-2 18 REV092023
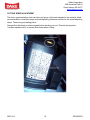
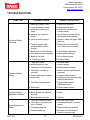
TROUBLESHOOTING
SYMPTOM POSSIBLE CAUSE CORRECTIVE ACTION
Excessive Blade
Breakage
1. Materials loosen in vise.
1. Clamp work securely.
2. Incorrect speed or feed.
2. Adjust speed or feed.
3. Blade teeth spacing too
large.
3. Replace with a finer tooth
spacing blade.
4. Material too coarse for
blade.
4. Use a blade at slower speed
with proper teeth spacing.
5. Incorrect blade tension.
5. Adjust to where the green LED
lights up.
6. Teeth in contact with
material before saw is
started.
6. Place blade in contact with
work after motor is started.
7. Blade runs on wheel flange.
7. Adjust wheel alignment.
8. Miss-aligned guide bearings.
8. Adjust guide bearings.
9. Blade is too thick.
9. Use a thinner grade.
10. Cracking at weld.
10. Reweld blade.
Premature Blade
Dulling
1. Teeth too coarse.
1. Use finer teeth.
2. Blade speeds too fast.
2. Reduce speed.
3. Inadequate feed pressure.
3. Adjust pressure setting.
4. Hard spots or scale on
material.
4. Reduce speed, increase feed
pressure.
5. Work hardening of material.
5. Increase feed pressure.
6. Blade twist.
6. Replace with a new blade and
adjust blade tension.
7. Insufficient blade tension.
7. Tighten blade tension
adjustment knob.
8. Blade slips.
8. Tighten blade tension.
Unusual Wear on
Side/Back of Blade.
1. Blade guides worn.
1. Replace.
2. Blade guides not adjusted
properly.
2. Adjust.
3. Blade guides are loose.
3. Tighten.
Teeth Ripping from
Blade
1. Tooth too coarse for work.
1. Use finer tooth blade.
2. Too heavy of pressure; too
slow of speed.
2. Decrease pressure, increase
speed.
3. Vibrating workpiece.
3. Clamp workpiece securely.
4. Gullets loading up.
4. Use coarser tooth blade or
brush to remove chips.

Dake Corporation
1809 Industrial Park Dr
Grand Haven, MI 49417
www.dakecorp.com
983110-2 19 REV092023
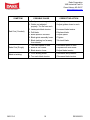
SYMPTOM POSSIBLE CAUSE CORRECTIVE ACTION
Bad Cuts (Crooked)
1. Feed pressure too great.
1. Reduce pressure.
2. Guides not adjusted
properly. Too far from work.
2. Adjust guides closer to work.
3. Inadequate blade tension.
3. Increase blade tension.
4. Dull blade.
4. Replace blade.
5. Blade speed is incorrect.
5. Adjust speed.
6. Blade guide assembly loose.
6. Tighten.
7. Blade tracking too far away
from wheels.
7. Re-track blade.
Bade Cuts (Rough)
1. Too much speed or feed.
1. Decrease speed or feed.
2. Blade is too coarse.
2. Replace with finer blade.
3. Blade tension loose.
3. Adjust blade tension.
Blade is twisting.
1. Cut is binding blade.
1. Decrease feed pressure
2. Too much blade tension
2. Decrease blade tension.
Page is loading ...
Page is loading ...
Page is loading ...
Page is loading ...
Page is loading ...
Page is loading ...
Page is loading ...
-
 1
1
-
 2
2
-
 3
3
-
 4
4
-
 5
5
-
 6
6
-
 7
7
-
 8
8
-
 9
9
-
 10
10
-
 11
11
-
 12
12
-
 13
13
-
 14
14
-
 15
15
-
 16
16
-
 17
17
-
 18
18
-
 19
19
-
 20
20
-
 21
21
-
 22
22
-
 23
23
-
 24
24
-
 25
25
-
 26
26
-
 27
27


Ask a question and I''ll find the answer in the document
Finding information in a document is now easier with AI
Related papers
Other documents
-
 Lissmac UNICUT 500 Owner's manual
-
Laguna Tools PX|22 Owner's manual
-
-
-
-
-
-
-
-
