Page is loading ...

1
Hearth & Home Technologies • LOGS-48 Installation Instructions • 2300-948 Rev. D • 5/16
CAUTION: Logs are fragile, handle with care.
LOGS-48
MODELS: MEZZO48, MEZZO48ST, CRAVE6048, CRAVE6048ST
MEZZO48-B, MEZZO48ST-B, CRAVE6048-B, CRAVE6048ST-B
Installation Instructions
CAUTION! Risk of Cuts or Abrasions. Wear protective
gloves and safety glasses during installation.
Leave this manual with party responsible for use and
operation.
Kit Components:
• Burner Port Fixture
• Ceramic Logs (7)
• Shoulder Screws (12)
• Self-tapping Screws (6)
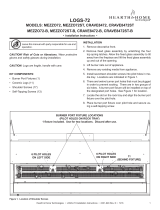
Figure 1. Location of Shoulder Screws
LOCATING SCREWS
6
6
3
3
4
4
1
1
2
2
5
5
10
10
8
8
7
7
9
9
11
11
12
12
Figure 2. Location of Burner Port Fixture
BURNER PORT FIXTURE
INSTALLATION
1. Remove decorative front. Remove fi xed glass assem-
bly by unlatching the four top spring latches. Allow the
fi xed glass assembly to tilt away from the fi replace and
lift the fi xed glass assembly up and out of the opening.
2. Remove any existing media from appliance.
3. Lift burner rails out of appliance.
For Natural Gas appliances, the air shutter should be ad-
justed for optimal fl ame appearance. If LOGS-48 is being
installed on a Propane appliance, proceed to step 8.
NG Appliances Only:
4. Remove the media tray. It is attached to the interior
fi rebox bottom with ten screws.
5. Remove the two screws that attach the pilot to the
burner.
6. Remove the four screws securing the burner to the fi re-
box sides and disengage burner from orifi ce. Remove
burner.
7. Adjust shutter setting on NG burner to 1/4 in. Reinstall
burner, pilot and media tray. For more information, see
the appliance installation manual.
NG and Propane Appliances:
8. Install twelve shoulder screws into pilot holes in media
tray. Locations are indicated in Figure 1.
9. There are 6 burner port holes that must be plugged in
order to prevent sooting. Place burner port fi xture over
shoulder screw #7 as shown in Figure 2. Ensure the
“UP” marking is in the correct orientation. The corner cut
out will fi t around a media tray screw as shown in the
detail of Figure 2.

2Hearth & Home Technologies • LOGS-48 Installation Instructions • 2300-948 Rev. D • 5/16
13. LOG #2 (SRV2300-704): Install Log # 2. Place log so
that the larger end of the log is in contact with the locat-
ing screw and the small end of the log is resting on the
end of Log #1. See Figure 6.
14. LOG #3 (SRV2300-705): Install Log # 3. Install log
onto shoulder screws #3 and #6 by lining up shoulder
screws with holes in bottom of log.
Figure 6. Log #2 (SRV2300-704)
1
1
2
2
3
3
1
1
2
2
Figure 7. Log #3 (SRV2300-705)
Figure 5. Log #1 (SRV2300-703) Left and Right Side Placement
1
1
1
1
12. LOG #1 (SRV2300-703), QTY 2: Install Log # 1. Place
log so that the shoulder screws fi t into the holes on the
bottom of the log and the logs contact the fi rebox sides.
Repeat for both ends of the media tray. See Figure 5.
HOLES FOR SHOULDER SCREWS
HOLES FOR SHOULDER SCREWS
Note: Log #1, Log #2 and Log #3 have holes located on
the bottom that are used for placement on corresponding
shoulder screws. See Figure 4.
Figure 4. Log Placement Holes
10. Insert six self-tapping screws into the 6 burner ports
that lie within the burner port fi xture rectangle holes.
See Figure 3.
Figure 3. Insert Screws into Six Burner Ports
11. Remove burner port fi xture. Discard. Reinstall burner
rails.

3
Hearth & Home Technologies • LOGS-48 Installation Instructions • 2300-948 Rev. D • 5/16
16. LOG #5 (SRV2300-707): Install Log # 5. Place log so
that the back end sits against shoulder screw #5. See
Figure 9. The other end of the log will contact shoul-
der screw #8. The center of the log will rest on Log
#4, crossing the burner over the screws which were
installed in Step 9.
17. LOG #6 (SRV2300-708): Install Log # 6. Place log so
that the forked end is facing the fi rebox opening and
the left limb is in contact with the locating screw. The
other end of the log will rest on Log # 5 and should be
as far forward as possible without interfering with glass
installation.
Figure 8. Log #4 (SRV2300-706)
15. LOG #4 (SRV2300-706): Install Log # 4. Install log
onto shoulder screws #7 and #9 by lining up shoulder
screws with holes in bottom of log.
3
3
4
4
1
1
2
2
Figure 9. Log #5 (SRV2300-707)
3
3
4
4
1
1
2
2
5
5
6
6
3
3
4
4
1
1
2
2
5
5
1
1
Figure 10. Log #6 (SRV2300-708)
Please contact your Hearth & Home Technologies dealer with
any questions or concerns.
For the location of your nearest Hearth & Home Technologies
dealer,
please visit www.hearthnhome.com.
Hearth & Home Technologies
7571 215th Street West, Lakeville, MN 55044
www.hearthnhome.com
WARNING
Delayed Ignition Risk
• Place media according to instructions.
• Do NOT place media in area in front of pilot.
• Do NOT place media in a position that they
may fall into area in front of pilot.
• Do NOT use any media other than the media supplied
with the appliance.
• Do NOT use more than the amount shipped with the
appliance.
Fireplace will not function properly.
Delayed ignition may occur.
18. Place media on media tray according to instructions in-
cluded with media kit. Once the logs are installed, there
will not be room for all of the media originally installed.
The amount used should decrease by approximately
fi ve pounds (1 bag).
19. Replace fi xed glass assembly and decorative front on
appliance.
NOTICE: Do not reinstall all glass media. Decrease amount
used by fi ve pounds (1 bag).
/