Electronic Programme Guide 05:27 20/10/2004
GENRE
20/10
2. BBC TWO
04:00-
History: Britain 1750-1900
21/10
7. BBC THREE
06:00-
Big Cook Little Cook
22/10
30. CBBC Channel
06:20-
Tots TV
23/10
40. BBC NEWS 24
06:30-
Bobinogs
24/10
51. BBCi
06:45-
Wide Eye
25/10
89. BBC R Scotland
07:00-
Snailsbury Tales
26/10
90. BBC R n Gaidheal
07:15-
Arthur
27/10
04:00-6:00
History: Britain 1750-1900
Secondary Schools, How industrialisation changed the day-to-day
lives of the British people.
800. 16:9monoscope
07:30-
I Love Mummy
All
Genre
News
Sports
Movies
Drama
Entertainment
Lifestyle
Kids
Education
All
Electronic Programme Guide 05:43 20/10/2004
GENRE
20/10
1. BBC ONE
00:15-
Last Embrace
21/10
2. BBC TWO
22/10
7. BBC THREE
23/10
40. CBBC Chennel
24/10
40. BBC NEWS 24
25/10
51. BBCi
26/10
89. BBC R Scotland
27/10
03:25-6:00
BBC News 24
BBC ONE joins the BBC's rolling news channel for a night of news,
with bulletins on the hour and the headlines every 15 minutes.
90. BBC R n Gaidheal
Movies
Electronic Programme Guide 06:06 20/10/2004
GENRE
21/10
22/10
30. CBBC Channel
06:30-
Bobinogs
23/10
40. BBC NEWS 24
06:45-
Wide Eye
24/10
51. BBCi
07:00-
Snailsbury Tales
25/10
89. BBC R Scotland
07:15-
Arthur
26/10
90. BBC R n Gaidheal
07:30-
I Love Mummy
27/10
04:00-6:00
History: Britain 1750-1900
Secondary Schools, How industrialisation changed the day-to-day
lives of the British people.
800. 16:9monoscope
07:55-
Newsround
All
20/10
2. BBC TWO
06:00-
Big Cook Little Cook
7. BBC THREE
06:20-
Tots TV
REC TIMER 06:02 20/10/2004
No. Name Start End Date Mode
1 BBC ONE 00:00 00:00 01/01/2004 Inactive
2 BBC ONE 00:00 00:00 01/01/2004 Inactive
3 BBC ONE 00:00 00:00 01/01/2004 Inactive
4 BBC ONE 00:00 00:00 01/01/2004 Inactive
5 BBC ONE 00:00 00:00 01/01/2004 Inactive
6 BBC ONE 00:00 00:00 01/01/2004 Inactive
7 BBC ONE 00:00 00:00 01/01/2004 Inactive
8 BBC ONE 00:00 00:00 01/01/2004 Inactive
9 BBC ONE 00:00 00:00 01/01/2004 Inactive
10 BBC ONE 00:00 00:00 01/01/2004 Inactive
Start
End
Date
Mode
Name BBC TWO
06:30
06:45
20/10/2004
Once
Electronic Programme Guide 06:06 20/10/2004
GENRE
21/10
7. BBC THREE
06:20-
Tots TV
22/10
30. CBBC Channel
06:30-
Bobinogs
23/10
40. BBC NEWS 24
06:45-
Wide Eye
24/10
51. BBCi
07:00-
Snailsbury Tales
25/10
89. BBC R Scotland
07:15-
Arthur
26/10
90. BBC R n Gaidheal
07:30-
I Love Mummy
27/10
04:00-6:00
History: Britain 1750-1900
Secondary Schools, How industrialisation changed the day-to-day
lives of the British people.
800. 16:9monoscope
07:55-
Newsround
All
20/10
2. BBC TWO
06:00-
Big Cook Little Cook
REC TIMER 06:02 20/10/2004
No. Name Start End Date Mode
1 BBC ONE 06:30 06:45 20/10/2004 Inactive
2 BBC ONE 00:00 00:00 01/01/2004 Inactive
3 BBC ONE 00:00 00:00 01/01/2004 Inactive
4 BBC ONE 00:00 00:00 01/01/2004 Inactive
5 BBC ONE 00:00 00:00 01/01/2004 Inactive
6 BBC ONE 00:00 00:00 01/01/2004 Inactive
7 BBC ONE 00:00 00:00 01/01/2004 Inactive
8 BBC ONE 00:00 00:00 01/01/2004 Inactive
9 BBC ONE 00:00 00:00 01/01/2004 Inactive
10 BBC ONE 00:00 00:00 01/01/2004 Inactive
REC TIMER 06:02 20/10/2004
No.
2
3
4
5
Name
BBC ONE
BBC ONE
BBC ONE
BBC ONE
Start
00:00
00:00
00:00
00:00
End
00:00
00:00
00:00
00:00
Date
01/01/2000
01/01/2000
01/01/2000
01/01/2000
Mode
Inactive
Inactive
Inactive
Inactive
1 BBC TWO 06:30 06:45 20/10/2004 Active
6 BBC ONE 00:00 00:00 01/01/2004 Inactive
7 BBC ONE 00:00 00:00 01/01/2004 Inactive
8 BBC ONE 00:00 00:00 01/01/2004 Inactive
9 BBC ONE 00:00 00:00 01/01/2004 Inactive
10 BBC ONE 00:00 00:00 01/01/2004 Inactive
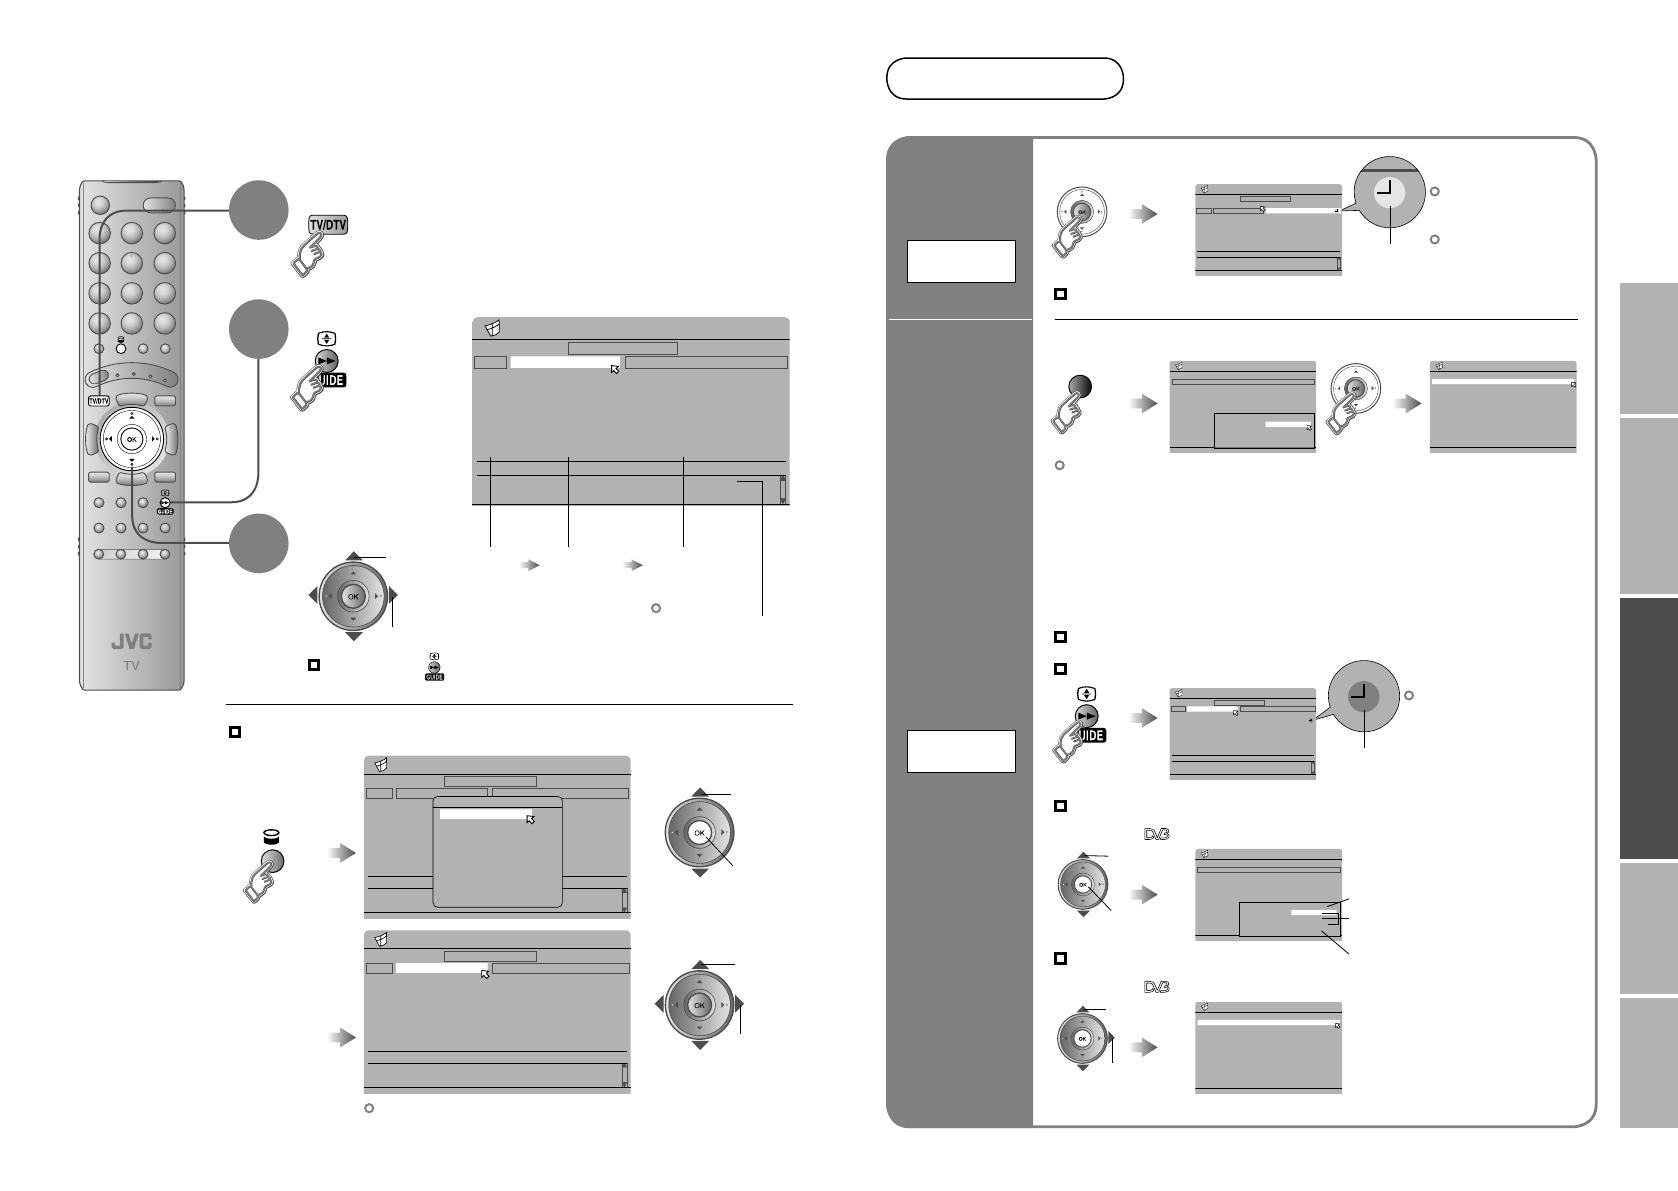
IMPORTANT! PREPARE USE
SETTINGS
TROUBLE?
EPG
1
Select DTV
Display EPG
Find a programme
1 select
2 next
3
2
Select
a date
Select
a channel
Select
a programme
2 set
1 select
(yellow)
2 next
1 select
Search from a genre
2 Select a genre
Close EPG
Only programmes in the selected genre are displayed.
3 Find a programme
Reserve a
programme
to watch
Programme-
view setting
At the start time,
the channel will
automatically change.
If the TV’s power is off
at the start time,
nothing happens.
Cancel the reservation
Select the reserved programme and press “OK”
Reserve a
programme
to record
Programme-
record setting
You can find a programme from an eight-day programme guide,
check its information, and make a reservation.
You can check
programme content.
After !
1 While EPG is
displayed...
Display the
Genre List
1 select a
reservation
2 next
(red)
(red)
1 select a
reservation
2 set the
mode to
“Inactive”
“MENU” “ ” “Rec Timer”
“MENU” “ ” “Rec Timer”
Change a reservation
At the start time,
the channel will
automatically change
and the device
connected to EXT-2
will begin recording
the programme.
Change with 2 3
Cancel a reservation
Enter using the
numerical keypad
Change with 2 3
(Once / Daily / Weekly)
· Set the recording device to external input mode before the start time.
· For T-V LINK incompatible devices, manually set the timer on the device.
For details, refer to the manual of the recorder.
· Make sure that recording times on the recording device do not overlap with
recording times on the TV.
· When Rec Timer has been set, the power lamp on the TV will :
Start blinking 3 minutes before the start time (green or red)
Light during recording (green or orange)
· Some T-V LINK compatible DVD recorders may not work correctly.
Prepare for recording
After !
Confirm the reservation
Exit
Press “MENU”
Using EPG
(Electronic Programme Guide)
Reservations
22-23 3/6/2006 1:35:19 PM


