
AV-14JT5EU / AV-21JT5EU
AV-14JT5EU
AV-21JT5EU
VICTOR COMPANY OF JAPAN, LIMITED
PMJV1V2022
0500-T-CR-DW
2000 VICTOR COMPANY OF JAPAN, LIMITED
COLOUR TELEVISION
VIDEO AUDIO
P TV/AV
INSTRUCTIONS

ADDITIONAL INFORMATIONS FOR THE SET SOLD IN GREAT BRITAIN
The appliance is supplied with a moulded three pin main plug fitted with 5Amp fuse.
Should the fuse require replacement, it must be replaced with a fuse rated at 5 amp
and approved by ASTA or BSI to BS1362.
The plug contains a removable fuse cover that must be refitted when the fuse is
replaced.In the event of the fuse cover being lost or damaged, the plug must not be
used until a replacement cover has been obtained.Replacement fuse covers can be
purchased from your nearest electrical dealer and must be the same colour as the
original.
If the moulded means plug is unsuitable for the socket outlet in your home or is
removed for any other reasons, then the fuse should be removed and the cut off plug
dispose of safely to prevent the hazard of electric shock.
There is a danger of electric shock if the cut off plug is inserted into any socket outlet.
If a replacement plug is to be fitted, please observe the wiring code shown below.The
wires in the mains lead are are coloured in the accordance with the following code:
Blue-neutral Brown-live
As the colours of the wires in the main lead of this appliance may not correspond with
the coloured markings identifying the terminals in your plug, proceed as follows:
The wire which is coloured blue must be connected to the terminal which is marked
with theletter N or coloured black.The wire which is coloured brown must be connected
to the terminal which is marked with the letter E or coloured red.
Do not make any connections to the terminal in the plug which is marked by the letter
E by the safety earth symbol or coloured green or green and yellow.
AV-14JT5/21JT5 (TOC) EN 5/3/00, 1:33 PM2

IMPORTANT SAFEGUARDS................................ 2
BEFORE LAUNCHING ......................................... 3
CONNECTING THE EXTERNAL EQUIPMENT.... 4
IDENTITY OF FEATURES ON LOCAL AND
REMOTE CONTROL ............................................ 6
INSTALLATION...................................................... 8
DAILY USE............................................................ 16
TELETEXT ............................................................ 24
TROUBLESHOOTING .......................................... 26
SPECIFICATIONS................................................. 27
CONTENTS
1
AV-14JT5/21JT5 (TOC) EN 5/3/00, 1:33 PM3

2
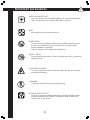
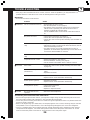
IMPORTANT SAFEGUARDS
WATER AND MOISTURE
Never install the set in the following places; In a wet basement, bath-
room. Do not place any container with liquid on the set.
HEAT
Never place the set near heat sources.
VENTILATION
Do not cover the ventilation opening in the cabinet and never place
the set in a confined space such as bookcase or built-in unless
proper ventilation is provided.
Leave a minimum 10cm gap all around the unit.
OBJECT ENTRY
Do not insert foreign objects, such as needles and coins, in the venti-
lation openings.
LIGHTNING STRIKING
You should disconnect the set from the mains and the aerial system
during thunderstorms.
CLEANING
Unplug the set from the mains during cleaning.
AFTER MOVING THE SET
If the set is moved in a different direction, the MAIN POWER button
must be switched off for at least 15 minutes in order to take out a
colour strain on the screen.

3
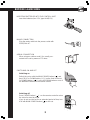
INSERTING BATTERIES INTO THE CONTROL UNIT
Insert the batteries (two 1.5V, type AAA(R03))
MAINS CONNECTION
Plug the mains cable into the power socket with
230V/50Hz AC.
AERIAL CONNECTION
When using an outdoor aerial, it is usually con-
nected to the set by means of 75 ohms.
SWITCHING ON AND OFF
Switching on
Switch the set on with the MAIN POWER button ( ), and
then PR UP or DOWN button (8P9) on the front of the set.
Or POWER button ( / I ) or the UP/DOWN button or one of
the NUMBER buttons on the remote control.
Switching off
Press POWER button ( / I ) on the remote control to return
the set to its stand by mode.
If you do not use the set for an extended period of time, turn
it off with MAIN POWER button ( ) on the set.
P TV/AV
BEFORE LAUNCHING
31 2
64 5
97 8
0
P
AV
P.MODE
/
OK
MENU

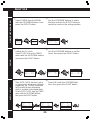
4
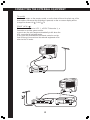
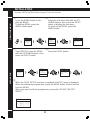
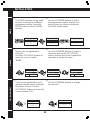
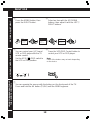
TV and AV
Use the AV button on the remote control, or on the front of the set to select one of the
three options. Whenever the AV button is pressed, on the on-screen display will be
changed as shown: AV S-VHS TV
SCART JACK ( ):
This is used to connect a VCR 1, a PERI-TV decoder 2, a
Camcoder or a video game console.
In most case, the set changes automatically to AV when the
VCR connected is in display mode.
If not, press the AV button on the remote control or on the
front of the set. You must turn the external equipment off to
return to the TV mode.
CONNECTING THE EXTERNAL EQUIPMENT
1
2
1

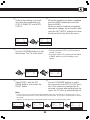
5
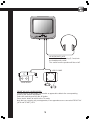
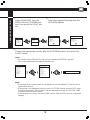
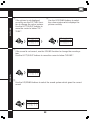
FRONT AV JACK (AUDIO/VIDEO)
Connect the AV (Audio/Video) socket with an appreciate cable to the corresponding
socket of the external equipment.
Select AV mode by pressing the AV button.
Press the AV button to return to the TV mode.
Note that you can play only one apparatus, if two apparatuses are connected FRONT AV
JACK and SCART JACK.
VIDEO AUDIO
P TV/AV
HEADPHONES JACK
Insert the headphones plug (3,5 mm) into
the headphones socket.
The sound from the speaker will be cut off.
CAMCODER
VIDEO GAME
OR

6
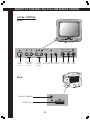
IDENTITY OF FEATURES ON LOCAL AND REMOTE CONTROL
LOCAL CONTROL
Front
VIDEO AUDIO
P TV/AV
VIDEO AUDIO
P TV/AV
MAIN
POWER
BUTTON
PROGRAMME
DOWN/UP
BUTTONS
VOLUME
DOWN/UP
BUTTONS
AV
BUTTON
STAND-BY
INDICATOR
REMOTE
SENSOR
VIDEO
INPUT
AUDIO
INPUT
HEAD
PHONE
AERIAL TERMINAL
Back
ANT
SCART JACK

7
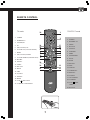
1 POWER
2 NUMBER 0-9
3 P. MODE/OK
4AV
5 (PR/CURSOR) UP
6 VOLUME UP (CURSOR RIGHT)
7 MENU
8 (PR/CURSOR) DOWN
9 VOLUME DOWN (CURSOR LEFT)
10 MUTING
11 RECALL
12 SLEEP
13 Not used
14 MOVE
15 SKIP
16 TV/TEXT
17 DELETE
18 MODE
19 VCR/
/DVD switch
20 VCR/DVD Control buttons
REMOTE CONTROL
31 2
64 5
97 8
0
P
P
AV
P.MODE
/
OK
MENU
RM-C71
TV
?
VCR DVD
1
10
15
14
3
6
18
17
7
5
13
4
8
20
16
12
2
9
11
19
TV mode
TELETEXT mode
1 POWER
2 NUMBER 0-9
3 INDEX
4 Not used
5 PAGE UP
6 SUBPAGE
7 MENU
8 PAGE DOWN
9 HOLD
10 MUTE
11 REVEAL
12 SIZE
13 CANCEL
14 GREEN KEY
15 RED KEY
16 TV/TEXT
17 YELLOW KEY
18 CYAN KEY
19 VCR/
/DVD
switch
20 Not used

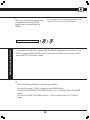
8
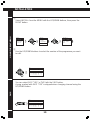
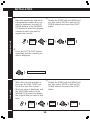
USING THE MENU
AUTO SETUP
INSTALLATION
Read this “INSTALLATION” before using the TV for the first time.
1
Press the MENU button to dis-
play the MENU.
To exit the MENU, press the
MENU button again.
2
Select the sub-menu title with the UP/
DOWN buttons, then press the RIGHT
button to display the sub-menu.
To return to the MENU, press the
MENU button.
MENU
Menu
Picture
Timer
Language
Install
Menu
Picture
Timer
Language
Install
P
P
P
P
Install
Auto setup
Manual tune
Fine tune
Edit
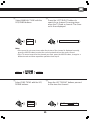
1
Select INSTALL from the MENU
with the UP/DOWN buttons, then
press the RIGHT button.
Menu
Picture
Timer
Language
Install
P
P
2
Press the RIGHT button.
Menu
Picture
Timer
Language
Install
P
P
Install
Auto setup
Manual tune
Fine tune
Edit
P
P
Edit
Pr Name Ch Picture Sound Skip
01 ----- C01 Euro BG No
02 ----- C07 Euro BG No
03 ----- C25 Euro BG No
04 ----- C35 Euro I No
05 ----- C50 Euro I No
06 ----- C63 Euro BG No
07 ----- C72 France LL' No
08 ----- C77 E/Euro DK No
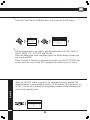
4
When the AUTO SETUP has been completed, the EDIT menu is displayed.
When not editing the programmes, press the MENU button 3 times and exit
from the MENU.
When you want to edit the programmes, proceed to “USING THE EDIT
MENU”.

9
LANGUAGE SELECTION
1
Select LANGUAGE from the
MENU with the UP/DOWN but-
tons, then press the RIGHT but-
ton.
P
P
Menu
Picture
Timer
Language
Install
P
P
Deutsch
Italiano
Espanol
Nederlands
Svenska
English
Francais
2
Select the required language with the
UP/DOWN buttons.
P
P
France
Great Britain
Italia
Sverige
Schweiz
Nederland
Ireland
Espana
East Europe
Others
Deutschland
3
Choose the appropriate country with the UP/DOWN buttons, then press the
RIGHT button.
Note:
• You should choose FRANCE to view a French broadcast (SECAM-L system).
• The country determines the teletext character set.
P
P
P
P
Auto setup
C10 Pr05
France
Great Britain
Italia
Sverige
Schweiz
Nederland
Ireland
Espana
East Europe
Others
Deutschland
Menu
Picture
Timer
Language
Install
Deutsch
Italiano
Espanol
Nederlands
Svenska
English
Francais
Note:
• If the channel you want to watch is not registered, use the MANUAL TUNE function to
register that channel.
• If the picture is not displayed correctly, use the PICTURE function from the EDIT menu
to change the settings. If the picture is still not displayed correctly, use the FINE TUNE
function to finely tune the channel.
• If the sound is not correct, use the SOUND function from the EDIT menu to change the
settings.

10
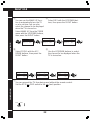
USING THE EDIT MENUSKIP
INSTALLATION
1
Select INSTALL from the MENU with the UP/DOWN buttons, then press the
RIGHT button.
Menu
Picture
Timer
Language
Install
P
P
Menu
Picture
Timer
Language
Install
P
P
Install
Auto setup
Manual tune
Fine tune
Edit
3
Use the UP/DOWN buttons to select the number of the programme you want
to edit.
P
P
Edit
Pr Name Ch Picture Sound Skip
01 ----- C01 Euro BG No
02 ----- C07 Euro BG No
03 ----- C25 Euro BG No
04 ----- C35 Euro I No
05 ----- C50 Euro I No
06 ----- C63 Euro BG No
07 ----- C72 France LL' No
08 ----- C77 E/Euro DK No
You can select SKIP “YES” or “NO” with the SKIP button.
A prog. marked with SKIP “YES” is skipped when changing channel using the
UP/DOWN button.
P.MODE
/
OK
Edit
Pr Name Ch Picture Sound Skip
01 ----- C01 Euro BG No
02 ----- C07 Euro BG Yes
03 ----- C25 Euro BG No
04 ----- C35 Euro I No
05 ----- C50 Euro I No
06 ----- C63 Euro BG No
07 ----- C72 France LL' No
08 ----- C77 E/Euro DK No

11
2
Select EDIT with the UP/DOWN buttons, then press the RIGHT button.
P
P
Install
Auto setup
Manual tuneu
Fine tune
Edit
P
P
Edit
Pr Name Ch Picture Sound Skip
01 ----- C01 Euro BG No
02 ----- C07 Euro BG No
03 ----- C25 Euro BG No
04 ----- C35 Euro I No
05 ----- C50 Euro I No
06 ----- C63 Euro BG No
07 ----- C72 France LL' No
08 ----- C77 E/Euro DK No
4
Edit the programme in accordance with the explanations of SKIP, DELETE,
MOVE, NAME, CH., PICTURE and SOUND.
When the editing has been completed, press the MENU button 3 times and
exit from the MENU.
When you want to continue to edit another program, use the LEFT/RIGHT but-
tons to move the cursor below “PR.” (programme) and then return to step 3.
DELETE
When the DELETE button is pressed, the selected channel is deleted. The
deleted channel is automatically moved to PR. 99 and the SKIP function is set
to YES. If a channel is deleted, the programme numbers of the following chan-
nels are all lowered by one.
P.MODE
/
OK
Edit
Pr Name Ch Picture Sound Skip
01 ----- C01 Euro BG No
02 ----- C25 Euro BG No
03 ----- C35 Euro I No
04 ----- C50 Euro I No
05 ----- C63 Euro BG No
06 ----- C72 France LL' No
07 ----- C77 E/Euro DK No
08 ----- C80 Euro BG No

12
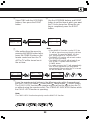
MOVECH. (CHANNEL)
INSTALLATION
1
The MOVE function can be used
to move a channel to a different
programme number. Press the
MOVE button to start the MOVE
function.
2
Use the UP/DOWN buttons to select
the programme number to which you
want to move the channel and press
the MOVE button again.
P.MODE
/
OK
P
P
Edit
Pr Name Ch Picture Sound Skip
01 ----- C01 Euro BG No
02 ----- C07 Euro BG No
03 ----- C25 Euro BG No
04 ----- C35 Euro I No
05 ----- C50 Euro I No
06 ----- C63 Euro BG No
07 ----- C72 France LL' No
08 ----- C77 E/Euro DK No
Edit
Pr Name Ch Picture Sound Skip
01 ----- C01 Euro BG No
02 ----- C07 Euro BG No
03 ----- C25 Euro BG No
04 ----- C35 Euro I No
05 ----- C50 Euro I No
06 ----- C63 Euro BG No
07 ----- C72 France LL' No
08 ----- C77 E/Euro DK No
P.MODE
/
OK
Edit
Pr Name Ch Picture Sound Skip
01 ----- C01 Euro BG No
02 ----- C25 Euro BG No
03 ----- C35 Euro I No
04 ----- C07 Euro BG No
05 ----- C50 Euro I No
06 ----- C63 Euro BG No
07 ----- C72 France LL' No
08 ----- C77 E/Euro DK No
1
Names can be registered to
channels.
Use the LEFT/RIGHT buttons to
move the cursor to below
“NAME”.
2
Use the UP/DOWN buttons to select a
character and use the LEFT/RIGHT
buttons to move the cursor. Repeat this
operation to create the name.
P
P
P
P
Edit
Pr Name Ch Picture Sound Skip
01 ----- C01 Euro BG No
02 ----- C07 Euro BG No
03 ----- C25 Euro BG No
ABCDEFGHIJKLMNOPQRST
UVWXYZ+- . 0123456789
Edit
Pr Name Ch Picture Sound Skip
01 ----- C01 Euro BG No
02 M---- C07 Euro BG No
03 ----- C25 Euro BG No
ABCDEFGHIJKLM NOPQRST
UVWXYZ+-. 0123456789
P
P
Edit
Pr Name Ch Picture Sound Skip
01 ----- C01 Euro BG No
02 M---- C07 Euro BG No
03 ----- C25 Euro BG No
ABCDEFGHIJKLMNOPQRST
UVWXYZ+- . 0123456789
NAME
1
The channel registered to a pro-
gramme number can be changed
to another channel. Use the
LEFT/RIGHT buttons to move the
cursor to below “CH.”.
2
Use the UP/DOWN buttons to change
the channel.
P
P
P
P
Edit
Pr Name Ch Picture Sound Skip
01 ----- C01 Euro BG No
02 ----- C07 Euro BG No
03 ----- C25 Euro BG No
04 ----- C35 Euro I No
05 ----- C50 Euro I No
06 ----- C63 Euro BG No
07 ----- C72 France LL' No
08 ----- C77 E/Euro DK No
Edit
Pr Name Ch Picture Sound Skip
01 ----- C01 Euro BG No
02 ----- C55 Euro BG No
03 ----- C25 Euro BG No
04 ----- C35 Euro I No
05 ----- C50 Euro I No
06 ----- C63 Euro BG No
07 ----- C72 France LL' No
08 ----- C77 E/Euro DK No

13
1
If the picture is not displayed
correctly, use the PICTURE func-
tion to change the colour system.
Use the LEFT/RIGHT buttons to
move the cursor to below “PIC-
TURE”.
2
Use the UP/DOWN buttons to select
the colour system which displays the
picture correctly.
P
P
Edit
Pr Name Ch Picture Sound Skip
01 ----- C01 Euro BG No
02 ----- C07 Euro BG No
03 ----- C25 Euro BG No
04 ----- C35 Euro I No
05 ----- C50 Euro I No
06 ----- C63 Euro BG No
07 ----- C72 France LL' No
08 ----- C77 E/Euro DK No
SOUND PICTURE
P
P
Edit
Pr Name Ch Picture Sound Skip
01 ----- C01 Euro BG No
02 ----- C07 E/Euro BG No
03 ----- C25 Euro BG No
04 ----- C35 Euro I No
05 ----- C50 Euro I No
06 ----- C63 Euro BG No
07 ----- C72 France LL' No
08 ----- C77 E/Euro DK No
1
If the sound is not correct, use the SOUND function to change the sound sys-
tem.
Use the LEFT/RIGHT buttons to move the cursor to below “SOUND”.
P
P
Edit
Pr Name Ch Picture Sound Skip
01 ----- C01 Euro BG No
02 ----- C07 Euro BG No
03 ----- C25 Euro BG No
04 ----- C35 Euro I No
05 ----- C50 Euro I No
06 ----- C63 Euro BG No
07 ----- C72 France LL' No
08 ----- C77 E/Euro DK No
2
Use the UP/DOWN buttons to select the sound system which gives the correct
sound.
P
P
Edit
Pr Name Ch Picture Sound Skip
01 ----- C01 Euro BG No
02 ----- C07 Euro I No
03 ----- C25 Euro BG No
04 ----- C35 Euro I No
05 ----- C50 Euro I No
06 ----- C63 Euro BG No
07 ----- C72 France LL' No
08 ----- C77 E/Euro DK No

14
INSTALLATION
MANUAL TUNEFINE TUNE
Manually register the channel to
a programme number. When no
menu is displayed, use the UP/
DOWN buttons or the NUMBER
0-9 buttons to select the program
number to which you want to
register the channel.
2
Display the MENU with the MENU but-
ton, then select INSTALL with the UP/
DOWN buttons and press the RIGHT
button.
MENU
Menu
Picture
Timer
Language
Install
Menu
Picture
Timer
Language
Install
P
P
Install
Auto setup
Manual tune
Fine tune
Edit
5
Press the LEFT/RIGHT buttons
repeatedly until the channel you
want is displayed.
P
P
1
When the channel reception is
poor, use the FINE TUNE func-
tion to fine-tune the channel.
When no menu is displayed, use
the UP/DOWN buttons or the
NUMBER 0-9 buttons to display
the channel that you want to fine-
tune.
2
Display the MENU with the MENU but-
ton, then select INSTALL with the UP/
DOWN buttons and press the RIGHT
button.
MENU
Menu
Picture
Timer
Language
Install
P
P
Menu
Picture
Timer
Language
Install
P
P
Install
Auto setup
Manual tune
Fine tune
Edit
P
P
1
Manual tune
C50 Pr01

15
3
Select MANUAL TUNE with the
UP/DOWN buttons.
4
Press the LEFT/RIGHT buttons to
search for a channel. Scanning stops
when the TV finds a channel. The chan-
nel is then displayed.
P
P
Install
Auto set
Manual tune
Fine tune
Edit
P
P
Manual tune
C32 Pr01
Note:
• If the sound is not correct even when the picture of the channel is displayed correctly,
press the MODE button to select the sound system that has the correct sound.
• If the TV cannot search for the channel you want, press the MODE button, change to a
different mode and then repeat the operation from step 4.
3
Select FINE TUNE with the UP/
DOWN buttons.
4
Keep the LEFT/RIGHT buttons pressed
to fine-tune the channel.
P
P
Install
Auto set
Manual tune
Fine tune
Edit
P
P
Fine tune
568,45 Mhz
Euro
P.MODE
/
OK
E/Euro

16
DAILY USE
SELECTING A PROGRAMME
NUMBER
The set has a total of 100 programme numbers, 0...99. The NUMBER button
0...9 are used for direct programme selection. In order two digit programme,
press the second numbered button within two seconds. Switch through the
programme number step by step with the UP/DOWN buttons (P 8/9).
Adjust the volume with the VOLUME DOWN/UP buttons (– r +) on the front
of the set, or with the LEFT/RIGHT buttons on the remote control.
VOLUME CONTROL
P
P
Pressing the MUTING button (
) once turns the sound off. The sound returns
if the button is pressed once more. The volume is adjusted with the VOLUME
DOWN/UP (– r +) or with the LEFT/RIGHT button.
MUTE

17
RECALL
The RECALL button is used to display the current status: programme number,
station name, clock. This display appears for 5 seconds unless any button is
pressed.
?
SLEEP
By pressing the SLEEP button repeatedly, you can select one of the following
settings:
0:00 0:20 0:40 1:00 1:20 1:40 2:00
The set will turn off after time you select.
Automatic Switch-Off in No Broadcast Signal:
If broadcast signal is not present for about 30 minutes, the set will be auto-
matically turned off.
In AV mode, however, this function does not operate.
PICTURE MODE
By pressing the P.MODE/OK button, you can select one of three picture set-
tings (PICTURE MODEs); NORMAL I, NORMAL II or FAVOURITE.
P.MODE
/
OK

18
DAILY USE
PICTURE ADJUSTMENT
1
Press the MENU button, then
press the RIGHT button.
2
Select an item with the UP/DOWN
buttons, then adjust it with the LEFT/
RIGHT buttons.
MENU
Menu
Picture
Timer
Language
Install
P
P
Picture
Brightness
Contrast
Colour
Sharpness
P
P
P
P
VCR/DVD CONTROL BUTTONS
1
You can control your JVC brand
VCR or DVD player with the TV
remote control.
Set the VCR/
/DVD switch to
the VCR or DVD position.
2
Press the VCR/DVD Control button to
control your VCR or DVD player.
VCR DVD VCR DVD
Note:
Some of the buttons may not work depending
on the device.
1
You can operate the menus with the buttons on the front panel of the TV.
Press and hold the AV button (TV/AV) until the MENU appears.
USING THE MENUS WITHOUT
THE REMOTE CONTROL
Picture
Brightness
Contrast
Colour
Sharpness
Page is loading ...
Page is loading ...
Page is loading ...
Page is loading ...
Page is loading ...
Page is loading ...
Page is loading ...
Page is loading ...
Page is loading ...
-
 1
1
-
 2
2
-
 3
3
-
 4
4
-
 5
5
-
 6
6
-
 7
7
-
 8
8
-
 9
9
-
 10
10
-
 11
11
-
 12
12
-
 13
13
-
 14
14
-
 15
15
-
 16
16
-
 17
17
-
 18
18
-
 19
19
-
 20
20
-
 21
21
-
 22
22
-
 23
23
-
 24
24
-
 25
25
-
 26
26
-
 27
27
-
 28
28
-
 29
29


Ask a question and I''ll find the answer in the document
Finding information in a document is now easier with AI
Other documents
-
Technicolor - Thomson 14MG10U User manual
-
-
-
-
-
-
DAEWOO ELECTRONICS DWP-28W2K User manual
-
Daewoo 20 t 1 st Owner's manual
-
Hitachi C29-F880 User manual
-
BenQ DC-C25 User manual