Page is loading ...

.............. .........
SERVICE MANUAL
.............. .........
MODEL
DEST. MODEL DEST.
VPL-HS1 WORLD
VPL-HS1FP WORLD
RM-PJHS1 WORLD
SU-HS1 WORLD
IFU-HS1 WORLD
LCD VIDEO PROJECTOR

! WARNING
This manual is intended for qualified service personnel only.
To reduce the risk of electric shock, fire or injury, do not perform any servicing other than that
contained in the operating instructions unless you are qualified to do so. Refer all servicing to
qualified service personnel.
! WARNUNG
Die Anleitung ist nur für qualifiziertes Fachpersonal bestimmt.
Alle Wartungsarbeiten dürfen nur von qualifiziertem Fachpersonal ausgeführt werden. Um die
Gefahr eines elektrischen Schlages, Feuergefahr und Verletzungen zu vermeiden, sind bei
Wartungsarbeiten strikt die Angaben in der Anleitung zu befolgen. Andere als die angegeben
Wartungsarbeiten dürfen nur von Personen ausgeführt werden, die eine spezielle Befähigung
dazu besitzen.
! AVERTISSEMENT
Ce manual est destiné uniquement aux personnes compétentes en charge de l’entretien. Afin
de réduire les risques de décharge électrique, d’incendie ou de blessure n’effectuer que les
réparations indiquées dans le mode d’emploi à moins d’être qualifié pour en effectuer d’autres.
Pour toute réparation faire appel à une personne compétente uniquement.
WARNING!!
AN INSULATED TRANSFORMER SHOULD BE USED DURING
ANY SERVICE TO AVOID POSSIBLE SHOCK HAZARD, BE-
CAUSE OF LIVE CHASSIS.
THE CHASSIS OF THIS RECEIVER IS DIRECTLY CONNECTED
TO THE AC POWER LINE.
SAFETY-RELATED COMPONENT WARNING !!
COMPONENTS IDENTIFIED BY A
!!
!!
! MARK ON THE SCHEMATIC
DIAGRAMS, EXPLODED VIEWS AND IN THE PARTS LIST ARE
CRITICAL TO SAFE OPERATION. REPLACE THESE COMPO-
NENTS WITH SONY PARTS WHOSE PART NUMBERS APPEAR
AS SHOWN IN THIS MANUAL OR IN SUPPLEMENTS PUB-
LISHED BY SONY.
ATTENTION!!
AFIN D’ÉVITER TOUT RISQUE D’ÉLECTROCUTION
PROVENANT D’UN CHÂSSIS SOUS TENSION, UN
TRANSFORMATEUR D’ISOLEMENT DOIT ETRE UTILISÉ LORS
DE TOUT DÉPANNAGE.
LE CHÂSSIS DE CE RÉCEPTEUR EST DIRECTEMENT
RACCORDÉ Á L’ALIMENTATION SECTEUR.
ATTENTION AUX COMPOSANTS RELATIFS Á LA
SÉCURITÉ!!
LES COMPOSANTS IDENTIFIÉS PAR UNE MAPQUE
!!
!!
! SUR
LES SCHÉMAS DE PRINCIPE, LES VUES EXPLOSÉES ET LES
LISTES DE PIECES SONT D’UNE IMPORTANCE CRITIQUE
POUR LA SÉCURITÉ DU FONCTIONNEMENT. NE LES
REMPLACER QUE PAR DES COMPOSANTS SONY DONT LE
NUMÉRO DE PIÈCE EST INDIQUÉ DANS LE PRÉSENT MANUEL
OU DANS DES SUPPLÉMENTS PUBLIÉS PAR SONY.

NL
For the customers in the Netherlands
Voor de klanten in Nederland
•Gooi de batterij niet weg, maar lever hem
in als KCA.


1
VPL-HS1
Table of Contents
1. Operating Instructions
1-1. VPL-HS1.....................................................................................................1-1
1-2. SU-HS1 .....................................................................................................1-25
1-3. IFU-HS1 ....................................................................................................1-27
2. Service Informations
2-1. Board Layout...............................................................................................2-1
2-2. Disassembly and Extension Boards ............................................................2-2
2-2-1. Hood Block Assy Removal ........................................................2-2
2-2-2. H Board Removal.......................................................................2-2
2-2-3. C Board Removal .......................................................................2-3
2-2-4. MS Board Removal....................................................................2-3
2-2-5. BB and NF Boards Removal ......................................................2-4
2-2-6. BC Board Removal ....................................................................2-4
2-2-7. Optics block assy Removal ........................................................2-5
2-2-8. Q Board Removal.......................................................................2-5
2-2-9. BA Board Removal ....................................................................2-6
2-2-10. NR Board Removal ....................................................................2-6
2-2-11. F Board Removal .......................................................................2-7
2-2-12. Hi-voltage block and G Board Removal ....................................2-7
2-2-13. Projection Lens Removal ...........................................................2-8
2-2-14. Prism Block Assy and In-polarizer Removal.............................2-8
2-2-15. Extension Boards and Extension Cables....................................2-9
2-2-16. Extension Boards and Extension Cables Connection ..............2-10
(1)BC Board .............................................................................2-10
(2)BB and MS Boards ..............................................................2-10
(3)C Board................................................................................2-11
(4)BA Board.............................................................................2-11
(5)Q Board ...............................................................................2-12
2-3. Power cord ................................................................................................2-12
3. Electrical Adjustments
3-1. Preparations.................................................................................................3-1
3-1-1. Equipment Required...................................................................3-1
3-1-2. Optical Unit Adjustment ............................................................3-1
3-1-3. Factory Mode Setting .................................................................3-1
3-2. V-COM Adjustment....................................................................................3-1
3-3. Adjustment Item Initialize Data ..................................................................3-2
3-4. Service Knowhow .......................................................................................3-6

2
VPL-HS1
4. Semiconductors
IC.................................................................................................................4-1
Transistor.....................................................................................................4-3
Diode ...........................................................................................................4-4
5. Spare Parts
5-1. Notes on Repair Parts..................................................................................5-1
5-2. Exploded Views ..........................................................................................5-2
5-2-1. Cover ..........................................................................................5-2
5-2-2. Chassis 1.....................................................................................5-3
5-2-3. Chassis 2.....................................................................................5-4
5-2-4. Stand...........................................................................................5-5
5-2-5. Optics 1 ......................................................................................5-6
5-2-6. Optics 2 ......................................................................................5-7
5-2-7. Stand(SU-HS1) ..........................................................................5-8
5-3. Electrical Parts List .....................................................................................5-9
5-4. Packing Materials......................................................................................5-31
5-5. IFU-HS1 ....................................................................................................5-31
5-6. SU-HS1 .....................................................................................................5-31
6. Block Diagrams
Q Block .......................................................................................................6-1
BA Block.....................................................................................................6-2
BB Block .....................................................................................................6-3
BC and H Blocks.........................................................................................6-4
G Block .......................................................................................................6-5
MS Block ....................................................................................................6-6
C Block........................................................................................................6-7
3-4-1. After Replacing the Prism Block ...............................................3-6
3-4-2. After Replacing the Board .........................................................3-6
3-5. White Balance Adjustment on Servicing ....................................................3-7
3-5-1. Signal Level Adjustment ............................................................3-7
3-5-2. White Balance Adjustment ........................................................3-7
3-6. Memory .......................................................................................................3-9

3
VPL-HS1
7. Diagrams
7-1. Frame Schematic Diagram ..........................................................................7-1
7-2. Schematic Diagrams and Printed Wiring Boards........................................7-3
Schematic Diagrams
BA .........................................................................................................7-5
BB .........................................................................................................7-9
BC .......................................................................................................7-14
C .......................................................................................................7-17
F .......................................................................................................7-24
G .......................................................................................................7-26
H .......................................................................................................7-28
Q .......................................................................................................7-31
NF .......................................................................................................7-35
NR .......................................................................................................7-35
MS .......................................................................................................7-37
Printed Wiring Boards
BA .........................................................................................................7-4
BB .........................................................................................................7-8
BC .......................................................................................................7-13
C .......................................................................................................7-15
F .......................................................................................................7-24
G .......................................................................................................7-25
H .......................................................................................................7-28
Q .......................................................................................................7-29
NF .......................................................................................................7-35
NR .......................................................................................................7-35
MS .......................................................................................................7-36


1-1
VPL-HS1
Section 1
Operating Instructions
Reprinted from the
operating instructions
1-1. VPL-HS1
Operating Instructions
___________________________________
GB
Mode d’emploi _________________________________________
FR
Manual de instrucciones __________________________________
ES
4-085-330-
11
(1)
LCD Video Projector
© 2001 Sony Corporation
VPL-HS1

1-2
VPL-HS1
GB
2
To prevent fire or shock hazard, do not expose
the unit to rain or moisture.
To avoid electrical shock, do not open the
cabinet. Refer servicing to qualified personnel
only.
For the customers in the USA
If you have any questions about this product, you may
contact:
Sony Electronics Inc.
Attn: Business Information Center (BIC)
12451 Gateway Boulevard
Ft. Myers, Florida 33913
Telephone No.: 800-686-7669
The number below is for FCC related matters only.
Declaration of Conformity
Trade Name: SONY
Model No.: VPL-HS1
Responsible Party: Sony Electronics Inc.
Address: 680 Kinderkamack Road, Oradell
NJ 07649 U.S.A.
Telephone No.: 201-930-6972
This device complies with Part 15 of the FCC Rules.
Operation is subject to the following two conditions: (1)
This device may not cause harmful interference, and (2)
this device must accept any interference received,
including interference that may cause undesired
operation.
This equipment has been tested and found to comply
with the limits for a Class B digital device, pursuant to
Part 15 of the FCC Rules. These limits are designed to
provide reasonable protection against harmful
interference in a residential installation. This equipment
generates, uses, and can radiate radio frequency energy
and, if not installed and used in accordance with the
instructions, may cause harmful interference to radio
communications. However, there is no guarantee that
interference will not occur in a particular installation. If
this equipment does cause harmful interference to radio
or television reception, which can be determined by
turning the equipment off and on, the user is encouraged
to try to correct the interference by one or more of the
following measures:
- Reorient or relocate the receiving antenna.
- Increase the separation between the equipment and
receiver.
- Connect the equipment into an outlet on a circuit
different from that to which the receiver is connected.
- Consult the dealer or an experienced radio/TV
technician for help.
You are cautioned that any changes or modifications not
expressly approved in this manual could void your
authority to operate this equipment.
For the customers in Canada
This Class B digital apparatus complies with Canadian
ICES-003.
Voor de klanten in Nederland
WARNING
This symbol is intended to alert the user to
the presence of uninsulated "dangerous
voltage" within the product's enclosure
that may be of sufficient magnitude to
constitute a risk of electric shock to
persons.
This symbol is intended to alert the user to
the presence of important operating and
maintenance (servicing) instructions in
the literature accompanying the
appliance.
Bij dit product zijn batterijen geleverd.
Wanneer deze leeg zijn, moet u ze niet
weggooien maar inleveren als KCA.
The socket-outlet should be installed near the
equipment and be easily accessible.
3
GB
Table of Contents
Precautions ...............................................4
Connections and Preparations
Unpacking .................................................5
Step 1: Installing the Projector ..................5
Before Setting Up the Projector ..................... 6
Installing the Projector and a Screen .............. 7
Step 2: Connecting the Projector ..............8
Connecting with video equipment .................8
Connecting Using the Optional Signal Interface
Cables ........................................................ 8
Connecting Using the Optional Interface Unit 9
Step 3: Adjusting the Picture Size and
Position .....................................................9
Step 4: Selecting the Menu Language ....12
Projecting
Projecting the Picture on the Screen ......14
Selecting the Picture Viewing Mode .......16
Using the Menus
Operation through the Menus .................17
Menu Configurations ...............................18
Menu Items ................................................... 19
About the Preset Memory No. ..................... 21
Adjusting Picture Quality of a Signal from the
Computer ................................................. 21
Using a “Memory Stick”
About a “Memory Stick” ..........................22
Preparing for Viewing the Still Picture Stored
in a “Memory Stick” .................................23
Inserting a “Memory Stick” ..........................23
Using the MS (“Memory Stick”) Home .......24
Viewing Still Images in Sequence
— Slide Show ..........................................24
Displaying Index Pictures on the
Full Screen ..............................................26
Displaying the Index Menu ...........................27
Displaying a Full-Screen Picture .............27
Rotating a Still Picture .............................28
Protecting an Important Still Picture ........29
Projecting a Selected Picture When the
Power Is Turned On — Startup ...............30
Registering a Still Picture as the Startup
Picture ......................................................30
Setting the Startup Picture ............................31
Deleting a Still Picture .............................32
Initializing a “Memory Stick” ....................33
Others
Troubleshooting .......................................34
Replacing the Lamp ................................38
Replacing the Air Filter ............................39
Specifications ..........................................40
Location of Controls ................................44
Front ..............................................................44
Rear ...............................................................45
Remote control ..............................................46
Index .......................................................47

1-3
VPL-HS1
GB
4
Precautions
Precautions
On safety
• Check that the operating voltage of your unit is
identical with the voltage of your local power
supply.
• Should any liquid or solid object fall into the
cabinet, unplug the unit and have it checked by
qualified personnel before operating it further.
• Unplug the unit from the wall outlet if it is not to be
used for several days.
• To disconnect the cord, pull it out by the plug. Never
pull the cord itself.
• The wall outlet should be near the unit and easily
accessible.
• The unit is not disconnected to the AC power source
(mains) as long as it is connected to the wall outlet,
even if the unit itself has been turned off.
• Do not look into the lens while the lamp is on.
• Do not place your hand or objects near the
ventilation holes. The air coming out is hot.
On preventing internal heat build-up
After you turn off the power with the I / 1 (on/
standby) switch, do not disconnect the unit from the
wall outlet while the cooling fan is still running.
Caution
The projector is equipped with ventilation holes
(intake) and ventilation holes (exhaust). Do not block
or place anything near these holes, or internal heat
build-up may occur, causing picture degradation or
damage to the projector.
On repacking
Save the original shipping carton and packing
material; they will come in handy if you ever have to
ship your unit. For maximum protection, repack your
unit as it was originally packed at the factory.
5
GB
Unpacking / Step 1: Installing the Projector
Connections and
Preparations
Connections and Preparations
This section describes how to install the projector and
screen, how to connect the equipment from which
you want to project the picture, etc.
Unpacking
Check the carton to make sure it contains the
following items:
Remote control (1),
Size AA (R6)
batteries (2)
Signal interface
cable (1)
Air filter (for
replacement) (1)
Lens cap (1)
AC power cord (1)
Operating Instructions (1)
Inserting the batteries into the remote
control
Step 1: Installing
the Projector
You can obtain good picture quality even when you
project the picture from the side of the screen (“SIDE
SHOT”) (1 page 7). You can enjoy home
entertainment with this projector in various situations.
Enjoying home theater
Enjoying video games on a large screen
Insert the batteries E side first
as shown in the illustration.

1-4
VPL-HS1
GB
6
Step 1: Installing the Projector
Connections and
Preparations
Watching sports, etc. with your company
Viewing images, recorded by a digital
camera and stored in the “Memory Stick,” on
a large screen.
Before Setting Up the
Projector
Do not place the projector in the following situations,
which may cause malfunction or damage to the
projector.
Poorly ventilated
Highly heated and humid
Very dusty and extremely smoky
Do not use the projector under the following
conditions.
Tilting the unit out of the range of the
adjuster setting
Blocking the ventilation holes
Placing the projector without the adjuster
Ventilation
holes
(exhaust)
Ventilation
holes
(intake)
7
GB
Step 1: Installing the Projector
Connections and
Preparations
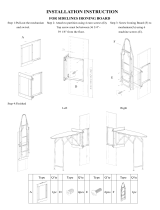
Installing the Projector and a
Screen
The installation distance between the projector and
screen varies depending on the size of the screen.
1
Determine the installation
position of the projector and
screen.
When projecting from the side (SIDE
SHOT)
Position the projector with the lens end come
within the area in the illustration, by using
the values a, b, c and d in the table below as a
guide. Align the bottom of the adjuster of the
projector with the bottom end of the screen.
When projecting from the center
You can change the projection angle using the
adjuster.
Position the projector with the lens end come
within the area in the illustration, by using
the values c and d in the table below as a guide.
a: Maximum horizontal distance between the
right/left end of the screen and the center of
the projector’s lens when the projector is
placed on the side (for “SIDE SHOT”)
b: Horizontal distance between the right/left
end of the screen and the center of the lens
when the projector is placed on the side (for
“SIDE SHOT”)
c: Maximum projection distance between the
screen and the center of the projector’s lens
when you use the horizontal distance a, or
when you place the projector with the center
of the screen and the center of the lens
aligned.
d: Minimum projection distance between the
screen and the center of the lens when you
use the horizontal distance b, or when you
place the projector with the center of the
screen and the center of the lens aligned.
Unit: m (feet)
When you project a 720p format signal,
computer’s signal, etc.
The table shows the distances when projecting the
conventional video signals. Distances used for
projecting a 720p format signal, computer’s signal
and data stored in the “Memory Stick” are shown on
page 41.
2
Project an image on the screen
and adjust the picture so that it
fits the screen.
To project an image, connect video equipment to
the projector. (1 page 8)
Screen
Projector
a
b
c
d
10°
10°
Screen
size
(inches)
40 60 80 100 120 150
a0.6
(2.0)
0.9
(3.0)
1.2
(3.9)
1.5
(4.9)
1.8
(5.9)
2.3
(7.5)
b0.4
(1.3)
0.6
(2.0)
0.8
(2.6)
1.0
(3.3)
1.2
(3.9)
1.6
(5.2)
c1.7
(5.6)
2.7
(8.9)
3.6
(11.8)
4.5
(14.8)
5.4
(17.7)
6.8
(22.3)
d1.6
(5.2)
2.5
(8.2)
3.3
(10.8)
4.2
(13.8)
5.0
(16.4)
6.3
(20.7)

1-5
VPL-HS1
GB
8
Step 2: Connecting the Projector
Connections and
Preparations
Step 2:
Connecting the
Projector
When making connections, be sure to do the
following:
• Turn off all equipment before making any
connections.
• Use the proper cables for each connection.
• Insert the cable plugs properly; plugs that are not
fully inserted often generate noise. When pulling
out a cable, be sure to pull it out from the plug, not
the cable itself.
• When you connect your projector to PJ MULTI
INPUT, select the input signal with the INPUT-A
setting in the SET SETTING menu. (1 page
20)
Connecting with video
equipment
Connecting Using the Optional
Signal Interface Cables
To connect with a DVD player with
component video connectors/digital
BS tuner
To connect with an AV amplifier
Rear of the projector
S video or video/
audio cable
(not supplied)
to S
video or
video/
audio
output
Signal
interface
cable
(supplied)
to video/
audio
output
Video equipment Video equipment
with
SONY
logo
upside
Signal interface cable SIC-HS20
(not supplied)
DVD player with component video
connectors, digital BS tuner, etc.
to audio
output
Rear of the projector
to RGB/component
output
Y
C
B
(P
B
)
C
R
(P
R
)
S
Video
Audio
R
Audio L
Signal interface cable SIC-HS40
(not supplied)
Rear of the projector
to component
video output
AV amplifier
Y
C
B
(P
B
)
C
R
(P
R
)
Video
S
Video
to video output
9
GB
Step 3: Adjusting the Picture Size and Position
Connections and
Preparations
To connect with a computer
Connecting Using the Optional
Interface Unit
Using the optional interface unit allows you to
connect various video equipment, and to select the
output to the projector or TV from the connected
equipment simply by switching the select switch on
the interface unit.
Step 3: Adjusting
the Picture Size
and Position
Signal interface cable
SIC-HS30 (not supplied)
to monitor output
to audio output
Computer
Rear of the projector
to PJ multi
output
Rear of the projector
PJ multi cable
(supplied with
the IFU-HS1)
Interface unit
IFU-HS1
VCR, etc.
DVD player, etc.
TV
VOLUME
MS SLIDE
DYNAMIC STANDARD LIVING
USER 1
MENU
ENTER
RESET
USER 2 USER 3
OFF
APA
INPUT
VIDEO MEMORY
+
–
SIDE
SHOT
+
–
Rear remote
control detector
Front remote control
detector
2
4
6
5,8
6
7
Adjuster stopper

1-6
VPL-HS1
GB
10
Step 3: Adjusting the Picture Size and Position
Connections and
Preparations
1
Plug the AC power cord into a
wall outlet.
The ON/STANDBY indicator lights in red and
the projector goes into standby mode.
2
Press the @/1 (on/standby)
switch to turn on the projector.
The ON/STANDBY indicator lights in green.
3
Turn on the equipment
connected to the projector.
Refer to the operating instructions of the
connected equipment.
4
Press INPUT to project the
picture on the screen.
Each time you press the button, the input
indication changes. (1 page 15)
5
Adjust the focus roughly using
the focus lever.
6
Adjust the size and position of
the picture to fit the screen
using the zoom lever and
adjuster.
Move the zoom lever to adjust the picture size.
Use the adjuster to adjust the picture position.
Hold down and slide the adjuster stopper to the
right, move the projector, then replace the
stopper.
You can move the projector vertically and
horizontally within the following ranges:
ON/
STANDBY
Lights in red.
ON/
STANDBY
Lights in green.
INPUT
VIDEO 1
Focus lever
Zoom lever
Adjuster stopper
Up to 20° each for horizontal angle
Up to 10° each for
vertical angle
Up to 2° each for
tilting angle
11
GB
Step 3: Adjusting the Picture Size and Position
Connections and
Preparations
7
Adjust to correct the
trapezoidal distortion.
When projecting from the side
Corrects the horizontal distortion.
Press SIDE SHOT + or – so that the top edge of
the picture becomes parallel to the bottom edge.
If the left side is longer than the right side, press
SIDE SHOT –.
Use SIDE SHOT + if the right side is longer.
To fine-adjust the distortion, press M or m.
When projecting from the center
Corrects the vertical distortion.
Use the menu. Select V (vertical) with the
KEYSTONE DIR setting in the INSTALL
SETTING menu. Next, adjust with the
DIGIT KEYSTONE setting so that the left side
of the picture becomes parallel to the right side.
(1 page 20)
If the top edge of the picture is longer than the
bottom edge, set to a plus value.
If the bottom edge is longer than the top edge,
set to a minus value.
8
Adjust the focus again using
the focus lever.
Picture
When projecting from
the center
When projecting from
the side
Screen
If you position the projector
below the bottom of the
screen, adjust so that the
bottom edge of the picture
fits the bottom edge of the
screen. For the projector
positioned above the
bottom of the screen,
adjust so that the top edge
of the picture fits the top
edge of the screen.
If you position the
projector on the left side
of the screen, adjust so
that the left side of the
picture fits the left side
of the screen. For the
projector positioned on
the right side, adjust so
that the right side of the
picture fits the right side
of the screen.
Picture
Screen

1-7
VPL-HS1
GB
12
Step 4: Selecting the Menu Language
Connections and
Preparations
Step 4:
Selecting the
Menu Language
You can select one of nine languages for displaying
the menu and other on-screen displays. The factory
default setting is English.
1
Plug the AC power cord into a
wall outlet.
The ON/STANDBY indicator lights in red and
the projector goes into standby mode.
2
Press the @/1 (on/standby)
switch to turn on the projector.
The ON/STANDBY indicator lights in green.
3
Press MENU.
The menu appears.
The menu presently selected is shown as a
yellow button.
4
Press M or m to select the SET
SETTING menu, and press
, or ENTER.
The selected menu appears.
SIDE
SHOT
VOLUME
MS SLIDE
DYNAMIC STANDARD LIVING
USER 1
MENU
ENTER
RESET
USER 2 USER 3
OFF
APA
INPUT
VIDEO MEMORY
+
–
+
–
3
2
4,5,6
PICTURE CTRL
CONTRAST:
BRIGHT:
COLOR:
HUE:
SHARP:
D.PICTURE:
COLOR TEMP:
COLOR SYS:
VOLUME:
VIDEO 1
80
50
50
50
50
OFF
HIGH
AUTO
30
MENU
ENTER
SET SETTING
S TATU S :
INPUT-A:
LANGUAGE
:
POWER SAVING
:
VIDEO 1
ON
COMPONENT
ENGLISH
OFF
or
13
GB
Step 4: Selecting the Menu Language
Connections and
Preparations
5
Press M or m to select
LANGUAGE, and press , or
ENTER.
6
Press M or m to select a
language, and press < or
ENTER.
The menu changes to the selected language.
To clear the menu
Press MENU.
ENTER
SET SETTING
S TATU S :
INPUT-A:
LANGUAGE
:
POWER SAVING
:
VIDEO 1
ON
COMPONENT
ENGLISH
OFF
or
ENTER
or

1-8
VPL-HS1
GB
14
Projecting the Picture on the Screen
Projecting
Projecting
This section describes how to operate the projector to
view the picture from the equipment connected to the
projector. It also describes how to adjust the quality of
the picture to suit your taste.
Projecting the
Picture on the
Screen
1
Plug the AC power cord into a
wall outlet.
The ON/STANDBY indicator lights in red and
the projector goes into standby mode.
2
Press the @/1 (on/standby)
switch to turn on the projector.
The ON/STANDBY indicator lights in green.
3
Turn on the equipment
connected to the projector.
Refer to the operating instructions of the
connected equipment.
4
Press INPUT repeatedly to
select the input you want to
project on the screen.
Display the indication of the input you want.
Example:To view the picture from the video
equipment connected to the VIDEO
INPUT jack.
VOLUME
MS SLIDE
DYNAMIC STANDARD LIVING
USER 1
MENU
ENTER
RESET
USER 2 USER 3
OFF
APA
INPUT
VIDEO MEMORY
+
–
SIDE
SHOT
+
–
4
2
7
ON/
STANDBY
Lights in red.
ON/
STANDBY
Lights in green.
INPUT
VIDEO 1
15
GB
Projecting the Picture on the Screen
Projecting
*
Set the INPUT-A setting in the SET SETTING menu
according to the input signal. (1 page 20)
5
Move the zoom lever to adjust
the size of the picture.
6
Move the focus lever to adjust
the focus.
Adjust to obtain sharp focus.
7
Press VOLUME + or – to adjust
the volume.
To turn off the power
1 Press the
@
/
1
(on/standby) switch.
A message “Power OFF?” appears on the screen.
2 Press the
@
/
1
switch again.
The ON/STANDBY indicator flashes in green and
the fan continues to run to reduce the internal heat.
Also, the ON/STANDBY indicator flashes quickly
during which you will not be able to light up the
ON/STANDBY indicator with the @/1 switch.
3 Unplug the AC power cord from the wall
outlet after the fan stops running and the
ON/STANDBY indicator lights in red.
You can turn off the projector by holding the @/1 (on/
standby) switch for about one second, instead of
performing the above steps.
To view the picture
from
Press
INPUT to
display
Sound is
heard from the
equipment
connected to
Video equipment
connected to VIDEO
INPUT on the projector
VIDEO 1 AUDIO INPUT
Video equipment
connected to S VIDEO
INPUT on the projector
S-VIDEO 1 AUDIO INPUT
RGB/component
equipment connected to
PJ MULTI INPUT via
the optional signal
interface cable or the
interface unit
INPUT A
*
PJ MULTI
INPUT
Video equipment
connected to PJ MULTI
INPUT via the optional
signal interface cable or
the interface unit
VIDEO 2 PJ MULTI
INPUT
Video equipment
equipped with S VIDEO
connected to PJ MULTI
INPUT via the optional
signal interface cable or
the interface unit
S-VIDEO 2 PJ MULTI
INPUT
“Memory Stick”
inserted into the
“Memory Stick” slot
MS AUDIO INPUT
Zoom lever
Focus lever
VOLUME
+
–

1-9
VPL-HS1
GB
16
Selecting the Picture Viewing Mode
Projecting
Selecting the
Picture Viewing
Mode
You can select the picture viewing mode that best
suits the type of program or room condition.
Press one of the VIDEO MEMORY
buttons (DYNAMIC, STANDARD,
LIVING and USER 1, 2 and 3).
DYNAMIC
Select for enhanced picture contrast and sharpness.
STANDARD
Recommended for normal viewing condition in your
home.
Also select to reduce roughness when viewing the
picture with DYNAMIC.
LIVING
Select for soft, film-like picture.
USER 1, 2 and 3
You can adjust the quality of the picture to suit your
taste and store the settings into the selected memory
of the projector. Press one of the USER 1, 2 and 3
buttons, then adjust the picture by using the menus.
The settings are stored, and you can view the picture
with the adjusted picture quality by pressing the
button. (1 page 20)
OFF
Select for the setting stored in each input that can be
selected with the INPUT button, or each input signal.
Tip
You can select the picture viewing mode using the VIDEO
MEMORY button on the projector. Each press of the button
selects the above item.
SIDE
SHOT
VOLUME
MS SLIDE
DYNAMIC STANDARD LIVING
USER 1
MENU
ENTER
RESET
USER 2 USER 3
OFF
APA
INPUT
VIDEO MEMORY
+
–
+
–
VIDEO MEMORY buttons
DYNAMIC
STANDARD
LIVING
USER 1, 2 and 3
OFF
17
GB
Operation through the Menus
Using the Menus
Using the Menus
This section describes how to make various
adjustments and settings using the menus.
Operation through
the Menus
1
Press MENU.
The menu appears.
The menu presently selected is shown as a
yellow button.
2
Press M or m to select a menu,
and press , or ENTER.
The selected menu appears.
3
Select an item you want to
adjust.
Use M or m to select an item, and press , or
ENTER.
VOLUME
MS SLIDE
DYNAMIC STANDARD LIVING
USER 1
MENU
ENTER
RESET
USER 2 USER 3
OFF
APA
INPUT
VIDEO MEMORY
+
–
SIDE
SHOT
+
–
1
RESET button
2,3,4
PICTURE CTRL
CONTRAST:
BRIGHT:
COLOR:
HUE:
SHARP:
D.PICTURE:
COLOR TEMP:
COLOR SYS:
VOLUME:
VIDEO 1
80
50
50
50
50
OFF
HIGH
AUTO
30
MENU
SET SETTING
STATUS:
INPUT-A:
LANGUAGE
:
POWER SAVING
:
VIDEO 1
ON
COMPONENT
ENGLISH
OFF
ENTER
Settings
Items
Menus
or
ENTER
SET SETTING
STATUS:
INPUT-A:
LANGUAGE
:
POWER SAVING
:
VIDEO 1
ON
COMPONENT
ENGLISH
OFF
or

1-10
VPL-HS1
19
GB
Menu Configurations
Using the Menus
Menu Items
Adjustable items are limited according to the input signals. Items that cannot be adjusted are not displayed in the
menu. (1 page 42)
Menu Item Description
PICTURE
CTRL
CONTRAST The higher the setting, the greater the contrast. The lower the setting, the lower
the cotrast.
BRIGHT (brightness) The higher the setting, the brighter the picture. The lower the setting, the darker
the picture.
COLOR The higher the setting, the greater the intensity. The lower the setting, the lower
the intensity.
HUE The higher the setting, the more greenish the picture becomes. The lower the
setting, the more purplish the picture becomes.
SHARP (sharpness) The higher the setting, the sharper the picture. The lower the setting, the softer
the picture.
RGB ENHANCER Adjusts the picture sharpness when computer signals are input.
D. (Dynamic)
PICTURE
ON: Emphasizes the black color.
OFF: Reproduces the dark portions of the picture accurately, in accordance
with the source signal.
GAMMA MODE GRAPHICS: Reproduces the photos in natural tones.
TEXT: Contrasts black and white. Suitable for images that contain lots of text.
COLOR TEMP HIGH: Gives the white colors a blue tint.
MIDDLE: Gives the white colors a neutral tint.
LOW: Gives the white colors a red tint.
COLOR SYS (System) Select the color system of the input signal.
AUTO: NTSC
3.58
, PAL, SECAM and NTSC
4..43
(switched automatically).
Normally, set to this position.
PAL-M/N: PAL-M/PAL-N and NTSC
3.58
(switched automatically).
When the PAL-M, PAL-N or NTSC
3.58
signal is input with COLOR SYS
set to AUTO, set to this position if the picture is distorted or colorless.
VOLUME Adjusts the volume. It can be adjusted for each of the inputs selected with the
INPUT button.
INPUT
SETTING
DOT PHASE When a signal from a computer is input, adjusts the picture for clearer picture
after the picture is adjusted by pressing the APA button.
SIZE H When a signal from a computer is input, adjusts the horizontal size of the
picture. The higher the setting, the wider the picture. The lower the setting, the
narrower the picture.
SHIFT As the setting for H (horizontal) increases, the picture moves to the right, and as
the setting decreases, the picture moves to the left. Use < or , to adjust the
horizontal position.
As the setting for V (vertical) increases, the picture moves up, and as the setting
decreases, the picture moves down. Use M or m to adjust the vertical position.
SCAN CONV (Scan
converter)
ON: Displays a computer signal according to the screen size. The picture will
be slightly softer.
OFF: Displays a computer signal as it is input. The picture will be clear but the
picture size will be smaller.
Note
When SVGA or XGA signal is input, this item will not be displayed.
ASPECT 4:3: Select when the 4:3 aspect ratio picture is input.
16:9: Select when the 16:9 aspect ratio picture (sqeezed) is input from
equipment such as a DVD player.
GB
18
Menu Configurations
Using the Menus
4
Make the setting or adjustment
on an item.
When changing the adjustment level
To increase the value, press M or ,.
To decrease the value, press m or <.
Press ENTER to restore the original screen.
When changing the setting
Press M or m to change the setting.
Press < or ENTER to restore the original
screen.
To clear the menu
Press MENU.
To reset items that have been
adjusted
Select the item you want to reset, then press RESET.
“Complete!” appears on the screen and the setting is
reset to its factory preset value.
Items that can be reset are:
• CONTRAST, BRIGHT, COLOR, HUE, SHARP
and RGB ENHANCER in the PICTURE CTRL
menu
• DOT PHASE, SIZE H and SHIFT in the INPUT
SETTING menu
• DIGIT KEYSTONE in the INSTALL SETTING
menu
Menu
Configurations
The projector is equipped with four menu pages. The
items that can be adjusted in each menu are described
on pages 19 and 20.
PICTURE CTRL menu
The PICTURE CTRL menu is used for adjusting the
picture. You can also adjust the volume with this
menu.
INPUT SETTING menu
The INPUT SETTING menu is used to adjust the
input signal. You can adjust the size and position, etc.
of the picture.
SET SETTING menu
The SET SETTING menu is used for changing the
settings of the projector.
INSTALL SETTING menu
The INSTALL SETTING menu is used for correcting
distortion. You can change the display position,
intensity of the background picture, etc., of the menu
screen.
ENTER
SET SETTING
S TATU S :
INPUT-A:
LANGUAGE
:
POWER SAVING
:
VIDEO 1
ON
COMPONENT
ENGLISH
ON
or

1-11
VPL-HS1
GB
20
Menu Configurations
Using the Menus
INPUT
SETTING
(continued)
VIDEO MEMORY You can select picture viewing mode that best suits the type of picture or the
environment.
OFF: Select for the setting stored in each input channel or input signal.
DYNAMIC: Select for enhanced picture contrast and sharpness.
STANDARD: Recommended for normal viewing condition. Also select to
reduce roughness when viewing the picture with DYNAMIC.
LIVING: Select for soft, film-like picture.
USER 1, 2 and 3: You can adjust the quality of the picture to suit your taste and
store the settings. Once the settings are stored, you can view the picture with
the adjusted picture quality by pressing the button.
To store the settings
1 Select USER 1, USER 2 or USER 3.
2 Adjust the items you want in the menus.
Items that can be stored are:
CONTRAST, BRIGHT, COLOR, HUE, SHARP, RGB ENHANCER,
D.PICTURE, COLOR TEMP, COLOR SYS, SCAN CONV, ASPECT.
Tip
You can also adjust the picture quality in DYNAMIC, STANDARD or
LIVING mode. To reset to the factory setting, press RESET.
SET
SETTING
STATUS Set to OFF to turn off the on-screen displays except for the menus, message
when turning off the power, and warning messages.
To display all of the on-screen display again, set to ON.
INPUT-A Selects the signal input from the PJ MULTI connector.
COMPUTER: Inputs the signal from a computer.
COMPONENT: Inputs the component or progressive component signal from a
DVD player, digital BS tuner, etc.
VIDEO GBR: Inputs the signal from a TV game, DVD player or HDTV
broadcast.
LANGUAGE Selects the language used in the menu and on-screen displays. Available
languages are: English, French, German, Italian, Spanish, Japanese, Chinese,
Portuguese and Korean.
POWER SAVING When set to ON, the POWER SAVING indicator lights. The projector goes into
power saving mode if no signal is input for 10 minutes, and the lamp goes out
and the cooling fan keeps running. In power saving mode, no button functions
for the first 60 seconds. It is cancelled when a signal is input or any button is
pressed. If you do not set the projector to power saving mode, select OFF.
INSTALL
SETTING
KEYSTONE MEM
(memory)
ON: DIGIT KEYSTONE setting is stored.
The data is retrieved when the projector power is turned on. The setting will
remain the same every time.
OFF: DIGIT KEYSTONE is reset to “0” when the power is turned on next
time.
DIGIT KEYSTONE Corrects the trapezoidal distortion caused by the projection angle. Use this item
after selecting the type of distortion, H (horizontal) or V (vertical), with
KEYSTONE DIR.
KEYSTONE DIR When the picture is a vertical trapezoid ( ), select V. Next, correct the
distortion with DIGIT KEYSTONE. When the picture is a holizontal trapezoid
( ), select H, then correct the distortion with DIGIT KEYSTONE.
MENU POSITION Selects the display position from TOP LEFT, BOTTOM LEFT, CENTER, TOP
RIGHT and BOTTOM RIGHT.
MENU COLOR Selects the tone of the menu display from STANDARD, WARM, COOL,
GREEN or GRAY.
MENU
BACKGROUND
Selects the intensity of the background picture of the menu display from DARK,
STANDARD or LIGHT.
LAMP TIMER Indicates how long the lamp has been turned on.
Menu Item Description
21
GB
Menu Configurations
Using the Menus
About the Preset Memory No.
This projector has 32 types of preset data for input
signals (the preset memory). When the preset signal is
input, the projector automatically detects the signal
type and recalls the data for the signal from the preset
memory to adjust it to an optimum picture. The
memory number and signal type of that signal are
displayed in the INPUT SETTING menu.
You can also adjust the preset data through the INPUT
SETTING menu.
This projector also has 20 types of user memories for
INPUT-A into which you can save the setting of the
adjusted data for an unpreset input signal.
When an unpreset signal is input for the first time, a
memory number is displayed as 0. When you adjust
the data of the signal in the INPUT SETTING menu,
it will be registered to the projector. If more than 20
user memories are registered, the newest memory
always overwrites the oldest one.
See the chart on page 43 to find if the signal is
registered to the preset memory.
Since the data is recalled from the preset memory
about the following signals, you can use these preset
data by adjusting SIZE H. Make fine adjustment by
adjusting SHIFT.
Note
When the aspect ratio of input signal is other than 4:3, a part of the
screen is displayed in black.
Adjusting Picture Quality of a
Signal from the Computer
You can automatically adjust to obtain the clearest
picture when projecting a signal from the computer.
1 Project a still picture from the computer.
2 Press the APA button.
When the picture is adjusted properly, “complete”
appears on the screen.
Notes
• Press the APA button when the full image is displayed on the
screen. If there are black edges around the image, the APA
function will not function properly and the image may extend
beyond the screen.
• If you switch the input signal or re-connect a computer, press
the APA button again to get the suitable picture.
• To restore the original screen, press the APA button again
during the adjustment.
• The picture may not be adjusted properly depending on the
kinds of input signals.
• Adjust the items in the INPUT SETTING menu when you
adjust the picture manually. (1 page 19)
Signal Memory
No.
SIZE
Super Mac-2 23 1312
SGI-1 23 1320
Macintosh 19” 25 1328
INPUT SETTING
DOT PHASE:
SIZE H:
SHIFT:
SCAN CONV:
INPUT-A
15
800
H: 200 V: 30
ON
No. 13
640 480
Memory No.
Signal type

1-12
VPL-HS1
GB
22
About a “Memory Stick”
Using a “Memory
Stick”
Using a “Memory Stick”
This section describes how to view the still images
that are recorded by a digital camera and stored in a
“Memory Stick.” You can make a slide show using
the images, display an index screen of the images, etc.
About a “Memory
Stick”
On “Memory Stick”s
“Memory Stick” is a new compact, portable and
versatile IC recording medium with a data capacity
that exceeds a floppy disk. “Memory Stick” is
specially designed for exchanging and sharing digital
data among “Memory Stick” compatible products.
Because it is removable, “Memory Stick” can also be
used for external data storage.
Types of “Memory Stick”s
There are two types of “Memory Stick”s: MagicGate
“Memory Stick”s that are equipped with the
MagicGate copyright protection technology and
general “Memory Stick”s. You can use both types of
“Memory Stick” with your projector. However,
because your projector does not support the
MagicGate standards, data recorded in the “Memory
Stick” is not subject to MagicGate copyright
protection.
On MagicGate
MagicGate is copyright protection technology that
uses encryption technology.
Format that can be displayed with this
projector
Image data recorded with a digital camera and
recorded on a Memory Stick in the following format:
Images (DCF-compatible) compressed in the JPEG
(Joint Photographic Experts Group) format
(extension: .jpg)
Before using a “Memory Stick”
• You cannot rotate or erase still images when the
write-protect tab on the “Memory Stick” is set to
LOCK.
• We recommend backing up important data.
• Image data may be damaged in the following cases:
–
If you remove the “Memory Stick,” turn the power
off, or detach the battery for replacement when the
access lamp is flashing.
–
If you use a “Memory Stick” near static electricity
or magnetic fields.
Notes
• Prevent metallic objects or your finger from coming into
contact with the metal parts of the connecting section.
• Do not attach any other material than the supplied label onto the
label space.
• Attach the label to the prescribed labeling position. Make sure
the label is attached to the labeling position properly.
• Do not bend, drop or apply strong shock to a “Memory Stick.”
• Do not disassemble or modify a “Memory Stick.”
• Do not let the “Memory Stick” get wet.
• Do not use or keep a “Memory Stick” in locations that are:
– Extremely hot such as in a car parked in the sun or under the
scorching sun.
– Under direct sunlight.
– Very humid or subject to corrosive gases.
• When you carry or store a “Memory Stick,” put it in its case.
About formatting “Memory Stick”s
When “Memory Stick”s are shipped from the factory,
they are already formatted to a special standard
format. When you format “Memory Stick”s, we
recommend formatting them on this unit.
Caution when formatting “Memory Stick”s
on a personal computer
Pay attention to the following points when formatting
“Memory Stick”s on the personal computer, for
example, that you are using.
Operation of “Memory Stick”s formatted on the
personal computer is not guaranteed on this unit. To
use a “Memory Stick” that has been formatted on the
personal computer, the “Memory Stick” must be
reformatted on this unit. Note that in this case all data
stored on the “Memory Stick” will be lost.
Terminal
Write-protect
tab
Labeling
position
23
GB
Preparing for Viewing the Still Picture Stored in a “Memory Stick”
Using a “Memory
Stick”
Access Lamp
If the access lamp is turned on or is flashing, data is
being read from or written to the “Memory Stick.” Do
not shake the projector or subject it to shock. Do not
turn off the power of the projector or remove the
“Memory Stick.” This may damage the data.
Notes
• To prevent data loss, make backup of data
frequently. In no event will Sony be liable for any
loss of data.
• Unauthorized recording may be contrary to the
provisions of copyright law.
• The “Memory Stick” application software may be
modified or changed by Sony without prior notice.
.....................................................................................
•“Memory Stick” and are trademarks of Sony
Corporation.
•“MagicGate Memory Stick” and are trademarks of Sony
Corporation.
Preparing for Viewing
the Still Picture Stored
in a “Memory Stick”
Inserting a “Memory Stick”
Insert the “Memory Stick” into the “Memory Stick”
slot on the front of the projector.
To remove the “Memory Stick”
When the access lamp is turned off, press the
“Memory Stick” and remove your hand. As the lock
is released, remove the “Memory Stick.”
“Memory Stick”
Insert the “Memory Stick” in the
direction of the arrow until it clicks.
Access lamp
/