3
From the home screen, select > Sensors > Add Sensor >
Power.
4
Rotate the crank arm a few times.
When the sensor is paired with your Edge device, the sensor
status is Connected. You can customize a data field to display
Vector data.
Your First Ride
Before you ride with Vector for the first time, you must enter the
crank length, set the installation angle of the sensors inside the
pedals, and calibrate the static zero reference. You must also
calibrate the system if you move Vector to another bike.
These procedures contain instructions for the Edge 1000. If you
have another compatible device, see Edge 810 and 510 Device
Instructions, or go to www.garmin.com/vectorowner.
Entering the Crank Length
The crank length is often printed on the crank arm.
1
Rotate the pedals a few times in order to activate Vector.
2
From the home screen, select > Sensors > > Sensor
Details > Crank Length.
3
Enter the crank length, and select .
Setting the Installation Angle
Before you set the installation angles, you must set the Edge
data fields to display power and cadence.
1
Go for a short ride on a trainer or on the road.
2
Ride until the cadence is nearly 70 rpm.
3
Accelerate smoothly to approximately 90 rpm.
When the installation angles are successfully set, a message
appears and data fields display power data on the Edge
device (1000, 810, and 510 only).
Performing a Static Zero Calibration
NOTE: During this task, the bike must be in an upright position,
and nothing can be touching the pedals.
1
From the home screen, select the status bar or swipe down
from the top of the screen.
The connections page appears.
2
Select > Calibrate.
When the zero reference is determined, a message appears
on the Edge device.
Calibrating Vector Before Each Ride
For best results, Garmin recommends calibrating Vector at the
start of every ride.
1
Perform a static zero calibration.
2
Go for a ride.
Customizing the Data Fields
This procedure contains instructions for the Edge 1000, 810,
800, and 510 devices. If you have another compatible device,
see Edge 500 Device Instructions.
1
Hold a data field to change it.
2
Select a category.
3
Select a data field.
Training
Pedal-Based Power
Vector measures pedal-based power.
Vector measures the force you apply a few hundred times every
second. Vector also measures your cadence or rotational
pedaling speed. By measuring the force, the direction of force,
the rotation of the crank arm, and time, Vector can determine
power (watts). Because Vector independently measures left and
right leg power, it reports your left-right power balance.
NOTE: The Vector S system does not provide left-right power
balance.
Maintenance Tips
NOTICE
Some bike tools may scratch the finish of Vector components.
• Use wax paper or a towel between the tool and the
hardware.
• After any bike adjustments, rotate the crank arm to check for
clearance.
• Calibrate Vector at the start of every ride (Calibrating Vector
Before Each Ride).
• Keep Vector components clean.
• When moving Vector to another bike, clean the threads and
surfaces thoroughly.
• Go to www.garmin.com/vectorowner for the latest updates
and information.
Vector Data
Your ride data or history is recorded to your Edge.
NOTE: History is not recorded while the timer is stopped or
paused.
When the device memory is full, a message appears. The
device does not automatically delete or overwrite your history.
Upload your history to Garmin Connect™ periodically to keep
track of all your ride data.
Sending Your Ride to Garmin Connect
NOTICE
To prevent corrosion, thoroughly dry the USB port, the weather
cap, and the surrounding area before charging or connecting to
a computer.
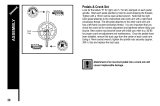
1
Pull up the weather cap
À
from the USB port
Á
.
2
Plug the small end of the USB cable into the USB port on the
device.
3
Plug the large end of the USB cable into a computer USB
port.
4
Go to www.garminconnect.com/start.
5
Follow the on-screen instructions.
Garmin Connect
You can connect with your friends on Garmin Connect. Garmin
Connect gives you the tools to track, analyze, share, and
encourage each other. Record the events of your active lifestyle
including runs, walks, rides, swims, hikes, triathlons, and more.
To sign up for a free account, go to www.garminconnect.com
/start.
Store your activities: After you complete and save an activity
with your device, you can upload that activity to Garmin
Connect and keep it as long as you want.
Training 3