Page is loading ...

'


IMPORTANT SAFETY INSTRUCTIONS
B
Read these instructions – All the safety and operating instructions should be read
before this product is operated.
C
Keep these instructions – The safety and operating instructions should be retained for
future reference.
D
Heed all warnings – All warnings on the appliance and in the operating instructions
should be adhered to.
E
Follow all instructions.
F
Do not use this apparatus near water – The appliance should not be used near water or
moisture – for example, in a wet basement or near a swimming pool, and the like.
G
Clean only with dry cloth.
H
Do not block any ventilation openings. Install in accordance with the manufacturer’s
instructions.
I
Do not install near any heat sources such as radiators, heat registers, stoves, or other
apparatus (including amplifiers) that produce heat.
J
Do not defeat the safety purpose of the polarized or grounding plug. A polarized plug has
two blades with one wider than the other. A grounding plug has two blades and a third
grounding prong. The wide blade or the third prong is provided for your safety. If the
provided plug does not fit into your outlet, consult an electrician for replacement of the
obsolete outlet.
K
Protect the power cord from being walked on or pinched particularly at the plugs,
convenience receptacles, and at the point where they exit from the apparatus.
L
Only use attachments/accessories specified by the manufacturer.
M
Use only with the cart, stand, tripod, bracket, or table specified by the
manufacturer, or sold with the apparatus. When a cart is used, use caution
when moving the cart/apparatus combination to avoid injury from tip-over.
N
Unplug this apparatus during lightning storms or when unused for long periods of time.
O
Refer all servicing to qualified personnel. Servicing is required when the apparatus has been
damaged in any way such as the power cord or plug is damaged. Other damage may occur
if liquid or objects have been dropped or spilled into the apparatus. Dropping the apparatus,
exposure to rain, and excessive moisture may cause additional damage.
P
Please keep the unit in a good ventilation environment.
Q
CAUTION: These servicing instructions are for use by qualified service personnel only. To
reduce the risk of electric shock, do not perform any servicing other than that contained in
the operating instructions unless you are qualified to do so.
R
WARNING: To reduce the risk of fire or electric shock, do not expose this apparatus to rain
or moisture. The apparatus shall not be exposed to dripping or splashing and objects filled
with liquids, such as vases, shall not be placed on apparatus.
S
WARNING: The mains plug/appliance coupler is used as disconnect device, the disconnect
device shall remain readily operable.

T
The lightning flash with arrowhead symbol within an equilateral triangle is intended to
alert the user to the presence of non-insulated “dangerous voltage” within the product’s
enclosure that may be of sufficient magnitude to constitute a risk of electric shock.
WARNING: To reduce the risk of electric shock, do not remove cover (or back), as
there are no user-serviceable parts inside. Refer servicing to qualified personnel.
The exclamation point within an equilateral triangle is intended to alert the user to the
presence of important operating and maintenance instructions in the literature
accompanying the appliance.
U
No naked flame sources, such as lighted candles, should be placed on the
apparatus.
V
Batteries are included for the remote control. Do not expose these batteries to direct
sunlight or excessive heat such as a fire. Care should be taken in the act of battery
disposal as they include toxic materials that may harm the environment. Please refer to
your local recycling and hazardous waste center for advise with battery disposal.
W
WARNING: The terminals marked with symbol of “+/-” may be of sufficient
magnitude to constitute a risk of electric shock. The external wiring
connected to the terminals requires installation by an instructed person or
the use of ready-made insulated leads or cords.
X
Correct disposal of this product. This marking indicates that this product should not be
disposed with other household wastes throughout the EU. To prevent possible harm
to the environment or human health from uncontrolled waste disposal, recycle it
responsibly to promote the sustainable reuse of material resources. To return your
used device, please use the return and collection systems or contact the retailer where
the product was purchased. They can take this product for environmentally safe
recycling.
Unpacking and Warranty
B
Please keep all packing materials for any potential shipping needs.
C
Please keep a copy of the sales receipt and note the serial number on it for warranty
and insurance purposes.
D
Please register your product online at www.peachtreeaudio.com.
CAUTION: TO REDUCE THE RISK OF ELECTRIC SHOCK, DO NOT
REMOVE COVER (OR BACK). NO USER-SERVICEABLE
PARTS INSIDE. REFER SERVICING TO QUALIFIED
SERVICE PERSONNEL.
CAUTION
RISK OF ELECTRIC SHOCK
DO NOT OPEN

Introduction
Back Panel
Front Panel
Connections
Remote Control
Useful Tips and More…
Troubleshooting
Product Warranty and Service
Technical Specifications
(Rev. 10/2015)
Introduction
Back Panel
Front Panel
Connections
Remote Control
Useful Tips and More…
Troubleshooting
Product Warranty and Service
Technical Specifications
(Rev. 10/2015)

Thank you for choosing the sonaDAC and welcome to the extended family if this is your
first Peachtree Audio product! Our mission is simple: to make exceptional audio products
at affordable prices. Products that utilize a unique blend of cosmetic design, high-quality
materials, and intuitive user interface and most importantly; sublime sound quality.
Products for people like us… people that love to listen!
The sonaDAC is designed to be the hub of an all-digital system and can be thought of as
three products in one: a state-of-the art Digital-to-Analog Converter (DAC), a class-A line-
level preamplifier and a high-performance headphone amplifier all contained in a small,
beautiful and easy-to-use chassis.
The heart of the DAC is the reference ESS 9018K2M that is compatible with input signals
up to 32-Bit/384kHz. This includes all the standard and “high-res” PCM formats up to 24-
Bit/352kHz and DSD signals up to 5.6MHz, also known as DSD128 or double-rate DSD.
But perhaps more importantly, the DAC is driven by a comprehensive power supply with
large reserves and multiple points of regulation to ensure that all digital signals are
converted to analog as accurately as possible with maximum dynamic range and minimum
noise so the gear won’t interfere with your enjoyment of the music.
The preamplifier in the sonaDAC is a fully balanced, dual differential design utilizing
discrete components and isolated signal paths driving the RCA and XLR outputs. The
circuit is derived from our critically acclaimed Grand Pre X-1 and it does not utilize any op-
amps or DC servos. This provides extremely pure and powerful audio outputs that can
drive the power amplifier to its full potential while maintaining the signal integrity and detail
afforded by the DAC circuitry.
The sonaDAC also includes a useful feature that bypasses the volume control for use with
input devices that include their own volume control. Want to use the volume control on
your mobile phone or tablet instead of the one built into the sonaDAC? No problem! Turn
the volume control bypass feature on for that input and control your system volume level
wirelessly from your mobile device app. This makes using streaming devices like the
SONOS connect much easier since the sonaDAC volume control is disengaged.
For the times you would rather listen privately, the sonaDAC includes an impressive
headphone amplifier. It is designed to sound sublime and to easily drive high-
performance, high-impedance or low sensitivity headphones. The signal path is very short
and direct with only a small buffer between the DAC and the headphone amplifier. This
allows for stunning clarity even when listening through modestly priced headphones. You
will likely hear the smaller details in your music through your headphones that you never
knew was there before!
Please take a few minutes to review this manual and visit www.peachtreeaudio.com to
register your sonaDAC with us. Your information will not be shared and we will only
contact you with news that is directly relevant to you! If you have additional questions or
feedback please contact your dealer, distributor or Peachtree Audio directly.
We sincerely hope that you love your sonaDAC and that it brings you many years of
enjoyment. Thank you again for supporting Peachtree Audio and happy listening!
- Your friends at Peachtree Audio
4
INTRODUCTION

B
BALANCED XLR OUTPUT: Provides balanced stereo analog output to a power
amplifier or powered subwoofer. Note: this output can be used in conjunction with the
RCA output to connect to a power amplifier and one or more subwoofers
simultaneously.
C
RCA OUTPUT: Provides stereo analog output to a power amplifier or powered
subwoofer. Note: this output can be used in conjunction with the XLR output to connect
to a power amplifier and one or more subwoofers simultaneously.
D
FILTER Button: FLAT provides extremely accurate internal digital-to-analog
conversion. SMOOTH typically provides a more sonically pleasing internal digital-to-
analog conversion. Please audition both settings and select the one that sounds best
to you. Note: When measuring the sonaDAC using test equipment, the FLAT setting is
recommended.
E
OPT1 & OPT2 Inputs: Accept digital audio input from a Toslink optical digital audio
output up to 96kHz. Toslink digital audio outputs are common on most digital audio
sources including; disc players, cable boxes, older Apple TVs and so forth.
F
COAX1 & COAX2 Inputs: Accept digital audio input from a Coaxial (RCA style) digital
audio output up to 192kHz. A coaxial digital audio output is available on many digital
audio sources including disc players, cable boxes, the SONOS Connect and so forth.
G
DC 5V Output: Provides a 5-volt DC output for mobile device charging and future
expansion. Note: this is NOT a USB audio input. Useful for the powering the Peachtree
Audio Bt1 Bluetooth adapter or the Google Chromecast Audio Wi-Fi adapter.
H
USB Input: Accepts up to 384kHz (including DSD 2.8 & 5.6MHz) digital audio input
from a PC/Mac when the USB button is set to 2.0 (recommended for all Mac users and
Windows PC users with music files above 96kHz). Accepts up to 96kHz digital audio
input from a PC/Mac when the USB button is set to 1.0 (recommended for all Windows
PC users with music files that do NOT exceed 96kHz). PC Users Note: For playback of
files above 96kHz, Windows requires that you install the included driver on your PC.
I
USB 1.0/2.0 Button: Mac users set this to 2.0. Windows PC users, set this to 1.0 if
using music files that do NOT exceed 96kHz. Windows PC users, set this to 2.0 if
using music files that exceed 96kHz. PC Users Note: For playback of files above
96kHz, Windows requires that you install the included driver on your PC.
J
TRIGGER 12V: Enables power on/off control of another product with a 12V trigger
input similar to the sonaAMP. Insert one end of a 3.5mm cable into this port and
connect the other end to a 12V trigger input of the product to be controlled.
K
AC INPUT & Fuse Holder: For connection to a compatible AC power source using the
included power cord. The fuse can be replaced after turning the POWER switch OFF
and disconnecting the AC INPUT. Contact an authorized Peachtree Audio dealer,
distributor or service center for any questions regarding proper fuse values.
**CAUTION** Using an improper fuse value may cause damage to the unit.
L
115/230 AC VOLTAGE SELECTOR: Changes the AC input voltage compatibility
between 115V and 230V. The voltage may be selected after turning the POWER
switch OFF, disconnecting the AC INPUT, and inserting the correct fuse value into the
fuse holder. **CAUTION** the improper setting may cause damage to the unit.
M
POWER ON/OFF Switch: Connects and disconnects AC input power to the unit.
REAR PANEL
BALANC ED X LR OUT PU T
R L
R
L
RC A O UT PU T
115V 230V
AC~50/60Hz
VOLTAGE SELECTOR
AC INPUT
POWER
ON
OFF
OP T1 OP T2
CO AX1 CO AX2
DC 5 V US B
US B
2.0
1.0
TR IG GER
12 V
FILTE R
SMO OTH
FLAT
1
5
6
12
2
3
4
7
8
9
10
11

B
Button: With the AC cord attached and the rear panel POWER switch set to ON,
this button toggles the unit between On mode which lights the button blue and Standby
mode which lights the button red. Note: When the unit is in Standby mode, pressing
any input button will put the unit into On mode and select that input.
C
USB Button: This selects the USB input and lights the button blue or green. *Note: the
USB input is capable of accepting audio up to 384kHz when the USB 1.0/2.0 button on
the rear panel is set to 2.0. PC Users Note: For playback of files above 96kHz,
Windows requires that you install the included driver on your PC.
D
IR Receiver Window: Allows infrared commands from the wireless remote to control
the unit. For best results please ensure an unobstructed line-of-sight between the top
side of the remote control (where the IR transmitter is located) and this window.
E
OPT1 & OPT2 Buttons: These select the OPT1 or OPT2 digital audio inputs and light
the corresponding input button blue or green. *Note: these inputs are capable of
accepting digital audio up to 192kHz.
F
Volume Knob: Rotate clockwise to increase and counter-clockwise to decrease output
level. Note: the volume knob is motorized and rotates when the volume up or down
buttons are pressed on the remote control. The knob also has a dimple to more easily
indicate the current setting from a distance.
G
COAX1 & COAX2 Buttons: These select the COAX1 or COAX2 digital audio inputs
and light the corresponding button blue or green. *Note: these inputs are capable of
accepting digital audio up to 192kHz.
H
PHASE Button: Inverts the phase of the XLR, RCA and OUTPUTS. When the
button is lit blue, the phase of the output is inverted.
I
Output: 1/4” headphone output connection. Inserting a headphone connection
automatically mutes the XLR & RCA OUTPUTS. Removing a headphone connection
automatically un-mutes the XLR & RCA OUTPUTS. **CAUTION** Lower the output
level when inserting or removing a headphone connection.
*See Volume Control Bypass on page 7 for more details.
6
COAX1 COAX2OPT1 OPT2
PHASE
USB
1
5
2
3
4
7
8
6
FRONT PANEL

*The sonaDAC includes a volume control bypass feature that removes the built-in volume
control from the signal path. When an input is selected it will light blue if volume control
bypass is Off (the built-in volume control is in the signal path) or green if volume control
bypass is On (the volume control in the source device must be used). To set this up:
B Put the unit into Standby mode (the Button will be lit red).
C Press and hold the PHASE button, then press and hold the Button for ~2 seconds
to enter the volume control bypass mode (all of the input buttons should now be lit).
D Press the desired input button to toggle between volume control bypass On (the input
button LED lit green) and the volume control bypass Off (the input button LED lit blue).
Off is the factory default setting for all inputs but any input or combination of inputs can
be set to bypass the built-in volume control.
E Press the Button to save the current settings and exit the volume control bypass
selection mode.
Caution: When the sonaDAC is in volume control bypass mode, the source device is in
complete control of the output level sent to the power amplifier and speakers. If extra care
is not taken, significant damage to your speakers or power amplifier can occur. Peachtree
Audio does not accept any responsibility for any damage caused by improper use of this
feature.
7
COAX1 COAX2OPT1 OPT2
PHASE
USB
VOLUME CONTROL BYPASS FEATURE

B STANDBY Button: With the AC cord
attached and the rear panel POWER
switch set to ON, this button toggles
the unit between On mode which
lights the button blue and Standby
mode which lights the button red.
C
MUTE Button: This mutes and un-
mutes all of the audio outputs. When
muted, the
currently selected input
LED will blink slowly.
D
VOLUME UP & DOWN Buttons:
These increase and decrease the
output level. Note: the volume knob
is motorized and rotates when these
buttons are pressed. The knob also
has a dimple to more easily indicate
the current setting from a distance.
E
USB Button: This selects the USB
input and lights the button blue or
green. The USB input is capable of
accepting audio up to 384kHz when
the USB 1.0/2.0 button on the rear
panel is set to 2.0. PC Users Note:
For playback of files above 96kHz,
Windows requires that you install the
included driver on your PC.
F
PHASE Button: Inverts the phase of
the XLR, RCA and OUTPUTS.
When the button is lit blue, the phase
of the output is inverted.
G
OPT1 & OPT2 Buttons: These select
the OPT1 or OPT2 digital audio
inputs and light the corresponding
input button blue or green. *Note:
these inputs are capable of
accepting digital audio up to 192kHz.
H
COAX1 & COAX2 Buttons: These
select the COAX1 or COAX2 digital
audio inputs and light the
corresponding button blue or green.
*Note: these inputs are capable of
accepting digital audio up to 192kHz.
Note: When the unit is in Standby mode, pressing any input button will put the unit into On
mode and select that input.
*See Volume Control Bypass on page 7 for more details.
8
REMOTE CONTROL
1
2
3
4
5
6
7

At Peachtree Audio we think products should be easy to use, but you need to know a few
things before setup. The sonaDAC’s USB digital input accepts music files from your
computer and plays them back with superb fidelity. See instructions below. Some minor
changes may occur with Windows or Apple OS updates, but the basics are the usually the
same.
USB Connections
Windows PC
B Connect the USB terminal on the sonaDAC to a USB connection on your computer.
C Your computer will “see” the USB audio DAC inside the sonaDAC. You might get a
pop-up box noting a new USB connection.
D Right click the speaker icon on your screen.
E Select “Audio” tab.
F Using the drop-down box, choose the Peachtree option.
G Click OK.
H You will need to install the included CD software download for playback of music files
above 96kHz when using a Windows PC.
Launch your music program and play.
Mac
B Open System Preferences.
C Click on Sound.
D In the output tab you should see Peachtree as one of the choices.
E Select it.
Launch iTunes and enjoy your music.
Once you set up your computer following the above instructions it should recognize the
sonaDAC’s USB audio DAC. If you unplug the USB connection you may have to repeat
some steps; this is not unusual.
Other useful tips...
For the best sound when listening to music from your computer, set your computer and
music program volume controls to maximum and use the sonaDAC volume knob or
remote control as the master volume control.
For critical listening to music from your computer, avoid keeping multiple programs open.
It can compromise the sound quality and even cause signal dropouts.
Provide adequate ventilation for the sonaDAC so it does not get too hot.
Please periodically check www.peachtreeaudio.com for additional tips and articles.
Interested in the Green Movement?
• The sonaDAC meets the European RoHS standards for non-hazardous metals.
• The sonaDAC utilizes a standby transformer that draws less than half a watt of power.
• We will continue to investigate more ways of making our products environmentally
friendly.
9
USEFUL TIPS AND MORE…

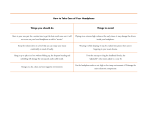
ISSUE
SOLUTIONS
The sonaDAC will not turn on.
Check to be sure that both the power switch on
the back panel and the standby switch on the
front panel are on. The front panel light should be
blue. It is green when in standby.
The sonaDAC turns on but there is no sound.
Be sure your system is not muted and that the
sonaDAC has been selected. Be sure your digital
source is on and playing. Be sure the sonaDAC’s
standby button is glowing blue and that your
desired input is glowing blue. If the input button is
blinking the sonaDAC is in “mute” mode. Press
the mute button on the remote to un-mute the
sonaDAC. Check to be sure your digital cable is
properly connected.
The remote control does not work.
Please check the batteries by removing the cover
on the back of the remote. It is an infrared
remote so it needs a clear line of sight to the
sensor on the front panel of the sonaDAC. Check
that no light sources, like lamps, are interfering
with the infrared remote signal.
You intermittently lose your signal on the USB
input.
First, try re-launching your music server program
(iTunes, WMP, etc.). If your computer still doesn’t
recognize the USB DAC unplug the USB cable
from the computer and the sonaDAC, wait a few
seconds, then reconnect. These are computer
hookups, and sometimes you’ll lose a signal just
as with your printer or other USB device. You
should not have this problem often. We designed
the sonaDAC to remain locked on the USB signal
at all times, but signal dropouts are still possible.
You pick up hum and noise on your sonaDAC
from the computer.
This can require some trial and error diagnostics.
If you have music files available on a laptop
computer connect it (while on battery power) to
the sonaDAC. If it works properly, with no noise,
then the computer is introducing a ground loop
into the system. This is not uncommon. However,
the sonaDAC’s digital inputs are galvanically
isolated to minimize this problem. If a problem
persists, please feel free to contact Peachtree
Audio.
When you switch from one source to another you
get a loud “click” or “pop”.
Sometimes this is from static buildup but it
should not occur consistently over a long period
of time. Contact your dealer or Peachtree Audio
if this persists.
10
TROUBLE SHOOTING

International Guarantee
The sonaDAC has a two year Parts and Labor guarantee from the time of purchase.
The tubes (valves) have a 6-month guarantee. Units that are covered under this
guarantee include sonaDAC’s purchased from an authorized sonaDAC distributor or
dealer.
Peachtree Audio can take no responsibility for defects arising from accident, misuse,
abuse, wear and tear, neglect or through unauthorized adjustment and/or repair. The
warranty does not cover shipping costs. Visit www.peachtreeaudio.com for a copy of
the complete warranty.
Claims Under Warranty
The unit should be packed in its original packing and returned to the dealer from
whom it was purchased, or if unavailable, directly to the sonaDAC distributor.
You should use a suitable carrier. Do not send by Postal Service. Peachtree Audio
cannot accept responsibility for the sonaDAC while in transit to the dealer, distributor,
or service facility. Please insure your unit against loss or damage while in transit.
In the unlikely event that you experience a failure with your sonaDAC, please call for
a return authorization number before returning products for service. Any sonaDAC
received without an RA # will be refused. You may also wish to route your repair
through your dealer, which we encourage.
Call 704-391-9337 for a return authorization number and additional information on
where and how to return your unit for service.
Main office (not service):
Peachtree Audio
2045 120th Avenue NE
Bellevue, WA 98005
www.peachtreeaudio.com
11
PRODUCT WARRANTY AND SERVICE

sonaDAC
Line Output (0dBFS, 1kHz)
XLR Output
RCA Output
Output Voltage 7.6V 3.8V
Output Impedance 260Ω 130Ω
Channel Separation (10kHz) 96dB 92dB
Frequency Response (20Hz-20kHz) +/- 0.3dB
THD+N (2V out, A-weighted) 0.007%
SNR (0 dBFS, 1kHz, A-weighted) 106dB 96dB
THD+N (20kHz, 2V out, A-weighted) 0.04%
Headphone Output
1/4 inch
Output Power, 16Ω, 0.1% THD 1303mW
Output Power, 300Ω, 0.1% THD 127mW
Output Impedance 4.7Ω
Frequency Response (1V in, 0dBFS, 300Ω, 20Hz-
20kHz)
+/- 0.7dB
THD+N (0dBFS, 1kHz, 2V out, 300Ω, A-weighted) 0.007%
SNR (1V in, 0 dBFS, 1kHz, 300Ω, A-weighted) 110dB
Power Consumption
Maximum Power 9W
On Mode (Idle) 8.75W
Standby Mode <0.5W
Physical
inches mm
Overall dimensions (Height x Width x Depth) 3.27 x 9.89 x 10.48 83 x 251 x 266
Weight 8.35 pounds 3.79 kg
12
TECHNICAL SPECIFICATIONS
sonaDAC
Line Output (0dBFS, 1kHz)
XLR Output
RCA Output
Output Voltage
7.6V
3.8V
Output Impedance
260Ω
130Ω
Channel Separation (10kHz)
96dB
92dB
Frequency Response (20Hz-20kHz)
+/- 0.3dB
THD+N (2V out, A-weighted)
0.007%
SNR (0 dBFS, 1kHz, A-weighted)
106dB
96dB
THD+N (20kHz, 2V out, A-weighted)
0.04%
Headphone Output
1/4 inch
Output Power, 16Ω, 0.1% THD
1303mW
Output Power, 300Ω, 0.1% THD
127mW
Output Impedance
4.7Ω
Frequency Response (1V in, 0dBFS, 300Ω, 20Hz-
20kHz)
+/- 0.7dB
THD+N (0dBFS, 1kHz, 2V out, 300Ω, A-weighted)
0.007%
SNR (1V in, 0 dBFS, 1kHz, 300Ω, A-weighted)
110dB
Power Consumption
Maximum Power
9W
On Mode (Idle)
8.75W
Standby Mode
<0.5W
Physical
inches
mm
Overall dimensions (Height x Width x Depth)
3.27 x 9.89 x 10.48
83 x 251 x 266
Weight
8.35 pounds
3.79 kg
12
TECHNICAL SPECIFICATIONS

Marking by the “CE” symbol (shown left) indicates compliance of this device with
the EMC (Electromagnetic Compatibility) and LVD (Low Voltage Directive)
standards of the European Community.
Note: This equipment has been tested and found to comply with the limits for a
class B digital device, pursuant to part 15 of the FCC Rules. These limits are
designed to provide reasonable protection against harmful interference in a
residential installation. The equipment generates, uses and can radiate radio
frequency energy and, if not installed and used in accordance with the
instructions, may cause harmful interference to radio communications. However,
there is no guarantee that interference will not occur in a particular installation. If
this equipment does cause harmful interference to radio or television reception,
which can be determined by turning the equipment off and on, the user is
encouraged to try to correct the interference by one or more of the following
measures:
• Reorient or relocate the receiving antenna
• Increase the separation between the equipment and the receiver
• Connect the equipment into an outlet on a circuit different from that to
which the receiver is connected
• Consult the dealer or an experienced radio/TV technician for help

/