GE GSD2200, GSD2201, GSD2600, GSD3200J Series User manual
- Category
- Dishwashers
- Type
- User manual
This manual is also suitable for

ge.com
GSD2200
GSD2201
GSD2600
GSD3200J Series
Owner’s Manual
Dishwashers
165D4700P313 49-5989 06-05 JR
Safety Instructions . . . . . . . . 2, 3
Operating Instructions
Care and Cleaning . . . . . . . . . . .9
Control Panels . . . . . . . . . . . . . . .4
Control Settings . . . . . . . . . . . . . 5
Dial Cycles . . . . . . . . . . . . . . . . . .6
Loading the
Dishwasher Racks . . . . . . . . . . . .8
Optional Accessories . . . . . . . . .10
Using the Dishwasher . . . . . . . . .7
Troubleshooting Tips . . . . 11, 12
Consumer Support
Consumer Support . . . Back Cover
Product Registration . . . . . . 13, 14
Warranty . . . . . . . . . . . . . . . . . . 15
Write the model and serial
numbers here:
Model # ____________________
Serial # ____________________
You can find them on a label on the
tub wall just inside the door.

2
Operating Instructions Safety InstructionsConsumer Support Troubleshooting Tips
■
Do not tamper with controls.
■
Do not abuse, sit on, or stand on the door or
dish rack of the dishwasher.
■
Do not discard a dishwasher without first
removing the door of the washing compartment.
■
Do not store or use combustible materials,
gasoline or other flammable vapors and liquids
in the vicinity of this or any other appliance.
■
Do not allow children to play around dishwasher
when opening or closing door due to the
possibility of small fingers being pinched in door.
■
Do not allow children to play with, on or around
this appliance or any discarded appliance.
DO NOT…
WARNING!
IMPORTANT SAFETY INFORMATION.
READ ALL INSTRUCTIONS BEFORE USING.
WARNING!
For your safety, the information in this manual must be followed to minimize the risk of fire
or explosion, electric shock, or to prevent property damage, personal injury, or death.
Under certain conditions hydrogen gas may be produced in a water heater that has not been
used for two weeks or more. HYDROGEN GAS IS EXPLOSIVE.
If the hot water has not been used for two weeks or more, prevent the possibility of damage or
injury by turning on all hot water faucets and allow them to run for several minutes. Do this
before using any electrical appliance which is connected to the hot water system. This simple
procedure will allow any built-up hydrogen gas to escape. Since the gas is flammable, do not
smoke or use an open flame or appliance during this process.
WATER HEATER SAFETY
Use this appliance only for its intended purpose as described in this Owner’s Manual.
PROPER INSTALLATION AND MAINTENANCE
This dishwasher must be properly installed and located in accordance with the Installation
Instructions before it is used. If you did not receive an Installation Instructions sheet with
your dishwasher, you can receive one by visiting our website at ge.com.
■
Connect to a grounded metal, permanent
wiring system; or run an equipment-grounding
conductor with the circuit conductors and
connect to the equipment-grounding terminal
or lead of the appliance.
■ I
mproper connection of the equipment-
grounding conductor can result in a risk of
electric shock. Check with a qualified electrician
or service representative if you are in doubt
whether the appliance is properly grounded.
■ Use supply conductors rated at least 75°C
(167°F).
■
Dispose of discarded appliances and shipping
or packing material properly.
■
Do not attempt to repair or replace any part
of your dishwasher unless it is specifically
recommended in this manual. All other
servicing should be referred to a qualified
technician.
■
To minimize the possibility of electric shock,
disconnect this appliance from the power
supply before attempting any maintenance.
NOTE: Turning the dishwasher off does not
disconnect the appliance from the power
supply. We recommend having a qualified
technician service your appliance.

SAVE THESE INSTRUCTIONS
Consumer Support
Troubleshooting TipsOperating Instructions
Safety Instructions
3
PROPER DISPOSAL OF THE DISHWASHER
Junked or abandoned dishwashers are
dangerous…even if they will sit for “just a few
days.” If you are getting rid of your old
dishwasher, please follow the instructions below
to help prevent accidents.
Before You Throw Away Your Old Dishwasher:
■ Take off the door of the washing
compartment or remove the door latch
keeper (as shown).
WARNING! RISK OF CHILD ENTRAPMENT
READ AND FOLLOW THIS SAFETY INFORMATION CAREFULLY.
Door latch keeper
ge.com
WHEN USING YOUR DISHWASHER
■ Use only powder, tabs, liquid detergents
or rinse agents recommended for use in
a dishwasher and keep them out of the
reach of children. Cascade
®
and Electrasol
®
Automatic Dishwashing Detergents, and
Jet-Dry
®
and Cascade Crystal Clear
®
rinse
agents have been approved for use in
all GE dishwashers.
■ Using a detergent
that is not specifically
designed for dishwashers
will cause the dishwasher
to fill with suds.
■ If your dishwasher is connected to a
wall switch, insure that the switch is
on prior to use.
■ Locate sharp items so that they are
not likely to damage the door seal.
■ Load sharp knives with the handles up to
reduce the risk of cut-type injuries.
■ Do not wash plastic items unless marked
dishwasher safe or the equivalent. For
plastic items not so marked, check the
manufacturer’s recommendations.
■ Non-Dishware Items: Do not wash items
such as electronic air cleaner filters, furnace
filters and paint brushes in your dishwasher.
Damage to dishwasher and discoloration or
staining of dishwasher may result.
■ Do not touch the heating element during or
immediately after use.
■ Do not operate your dishwasher unless all
enclosure panels are properly in place.
■ Close supervision is necessary if this
appliance is used by or near children.
■ Load light, plastic items so they will not
become dislodged and drop to the bottom
of the dishwasher—they might come into
contact with the heating element and be
damaged.

Operating Instructions Safety InstructionsConsumer Support Troubleshooting Tips
4
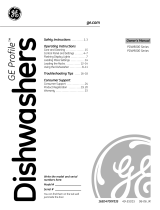
About the dishwasher control panel.
POTS &
PANS
NORMAL
WASH
HEATED DRY
ON OFF
CYCLES
ENERGY OPTIONS
OFF
SHORT WASH
START
HOT START
OPTION
PLATE WARMER
(HEATED DRY ON)
RINSE ONLY
(HEATED DRY OFF)
NORMAL
WASH
HEATED DRY
ON OFF
HI TEMP WASH
ON OFF
CYCLES
ENERGY OPTIONS
OFF
LIGHT WASH
START
HOT START
OPTION
PLATE WARMER
(HEATED DRY ON)
RINSE ONLY
(HEATED DRY OFF)
HEAVY
WASH
Model GSD2600
Models GSD2200, GSD2201
You can locate your model number on the tub wall just inside the door. Throughout this manual, features
and appearance may vary from your model.
POTS
& PANS
NORMAL
WASH
HEATED DRY
ON OFF
HI TEMP WASH
ON OFF
CYCLES
ENERGY OPTIONS
OFF
SHORT WASH
START
HOT START
OPTION
PLATE WARMER
(HEATED DRY ON)
RINSE ONLY
(HEATED DRY OFF)
Model GSD3200J Series

Cycle Chart
Model Cycle Water Usage (gal.) Cycle Time (min.)
GSD2200, Hot Start Option
1
3.4 26
GSD2201 Pots & Pans 9.2 71
Normal Wash* 6.3 71
Short Wash* 3.8 58
Rinse Only* 2.5 13
Drying/Plate Warmer 0.0 27
GSD2600 Hot Start Option
1
3.4 26
Heavy Wash 9.2 71
Normal Wash* 6.3 71
Light Wash* 5.0 62
Rinse Only* 2.5 13
Drying/Plate Warmer 0.0 27
GSD3200J Series Hot Start Option
1
3.4 26
Heavy Wash 10.9 61
Normal Wash* 6.8 61
Short Wash* 6.2 48
Rinse Only* 4.5 13
Drying/Plate Warmer 0.0 30
* Normal Wash should be selected to run this cycle.
1
Hot Start Option adds water amount and cycle time shown when selected.
Consumer Support
Troubleshooting TipsOperating Instructions
Safety Instructions
Energy Options
HI TEMP Provides extra heat for best performance. It is used best with heavily-soiled dishes.
WASH ON
HI TEMP Turns HI TEMP WASH off.
WASH OFF
HEATED DRY ON Turns the heating element on for fast drying. This option will extend the time of your wash cycle.
Available on all wash cycles except RINSE ONLY. Adds approx. 32 minutes to the cycle.
HEATED DRY OFF Turns HEATED DRY off. Dishes air dry naturally and energy is saved.
Cycles
POTS & PANS/ For heavily soiled dishes or cookware with dried-on or baked-on soils.
Everyday dishes may be included.
HEAVY WASH This cycle will not remove burned-on foods.
NORMAL WASH
For loads of everyday dishes, glasses and cookware with medium soils. NOTE: Many dishes have lighter soil than normal.
Choosing
a cycle other than NORMAL WASH will save energy and water.
SHORT WASH For quickly washing loads of everyday dishes with medium soils
that have not dried on, such as loads consisting
(on some models)
mostly of glasses.
LIGHT WASH For dishes with light soils.
(on some models)
RINSE ONLY For rinsing partial loads that will be washed later. Do not use detergent.
PLATE WARMER For warming clean dishes and serving plates. This cycle will take approximately 30 minutes.
HOT START Preheats wash water to the correct temperature.
Start
Slowly turn t
he Dial to the START or ON position, or the selected cycle. Don’t turn it past the START, ON
or cycle position, or you could accidentally miss a rinse.
There is a time delay between start-up and water fill so you will not hear any wash action right away.
■ Latch the door to begin the cycle.
Control Settings
ge.com
5

About the dial cycles.
Rinse Only
For rinsing partial loads that will be washed later. Do not use detergent.
Make sure HEATED DRY OFF is selected.
Be sure the door is unlatched.
Slowly turn the Dial to RINSE ONLY.
Latch the door to start the cycle.
4
3
2
1
OFF
SHORT WASH
START
HOT START
OPTION
PLATE WARMER
(HEATED DRY ON)
RINSE ONLY
(HEATED DRY OFF)
Hot Start
Preheats wash water to the correct temperature.
Select the HOT START cycle and any other option.
Be sure the door is unlatched.
Slowly turn the Dial to HOT START.
Latch the door to start the cycle.
4
3
2
1
OFF
SHORT WASH
START
HOT START
OPTION
PLATE WARMER
(HEATED DRY ON)
RINSE ONLY
(HEATED DRY OFF)
Short Wash/Light Wash
For quickly washing loads of everyday dishes with light to medium soils that have not dried on.
Be sure the door is unlatched.
Slowly turn the Dial to SHORT WASH/LIGHT WASH.
Latch the door to start the cycle.
3
2
1
OFF
SHORT WASH
START
HOT START
OPTION
PLATE WARMER
(HEATED DRY ON)
RINSE ONLY
(HEATED DRY OFF)
Plate Warmer
For warming clean dishes and serving plates. This cycle will take approximately 32 minutes.
Load clean dishware to be warmed.
Select HEATED DRY ON.
Be sure the door is unlatched.
Slowly turn the Dial to PLATE WARMER.
Latch the door to start the cycle.
5
4
3
2
1
OFF
SHORT WASH
START
HOT START
OPTION
PLATE WARMER
(HEATED DRY ON)
RINSE ONLY
(HEATED DRY OFF)
Operating Instructions Safety InstructionsConsumer Support Troubleshooting Tips
6

Filling the Dispenser
Fill the rinse agent dispenser until it reaches the bottom
of lip inside the opening. Replace cap.
To check if rinse agent is needed, remove the cap and
look into the dispenser.
A full dispenser should last about one month.
If rinse agent spills, wipe up the excess.
Check the Water Temperature
The entering water must be at least 120°F. and not
more than 150°F., for effective cleaning and to
prevent dish damage. Check the water temperature
with a candy or meat thermometer. Turn on the
hot water faucet nearest the dishwasher, place
the thermometer in a glass and let the water run
continuously into the glass until the temperature
stops rising.
Use Jet-Dry
®
Rinse Agent
Proper Use of Detergent
Jet-Dry
®
or Cascade Crystal Clear
®
rinse agents remove spots and prevent new film build-up on your
dishes, glasses, flatware, cookware and plastic.
Use only detergent specifically made for use in
dishwashers. Cascade
®
and Electrasol
®
Automatic
Dishwashing Detergents have been approved for
use in all GE dishwashers. Keep your detergent
fresh and dry. Don’t put powder detergent into
the dispenser until you’re ready to wash dishes.
The amount of detergent to use depends on
whether your water is hard or soft. With hard water,
you need extra detergent. With soft water, you
need less detergent.
Protect your dishes and dishwasher by contacting
your water department and asking how hard your
water is. Twelve or more grains is extremely hard
water. A water softener is recommended. Without
it, lime can build up in the water valve, which
could stick while open and cause flooding.
Too much detergent with soft water can cause a
permanent cloudiness of glassware, called etching.
Use the information in the table below as a
guideline to determine the amount of automatic
dishwasher detergent to place in the dispenser.
You’ll find two detergent dispensers on the inside
door of your dishwasher. All wash cycles require
detergent in the main cup.
When
using automatic
dishwashing detergent tabs, simply place one tab
in the main cup and close.
Be sure the Dial is OFF before adding detergent.
Otherwise, the
detergent cup will not close and
latch properly.
Add detergent then close the
main cup.
NOTE: To open detergent cup after it has been
closed, simply turn the detergent cup handle
counterclockwise until it releases. A snapping
sound may be heard.
DO NOT USE HAND DISH DETERGENT
NOTE: Using a detergent that is not specifically
designed for dishwashers will cause the dishwasher to
fill with suds. During operation, these suds will spill out
of the dishwasher vents, covering the kitchen floor and
making the floor wet.
Because so many detergent containers look alike,
store the dishwasher detergent in a separate space
from all other cleaners. Show anyone who may use
the dishwasher the correct detergent and where it
is stored.
While there will be no lasting damage to the
dishwasher, your dishes will not get clean using a
dishwashing detergent that is not formulated to
work with dishwashers
Open cup
Main cup
7
Consumer Support
Troubleshooting TipsOperating Instructions
Safety Instructions
Using the dishwasher.
ge.com
Detergent Cups to Fill
Fill to 1/3 of main cup
Fill to 2/3 of main cup
Fill main cup
Fill
main cup and open cup
Number
of Grains
Less than 4
4 to 8
8 to 12
Greater than 12

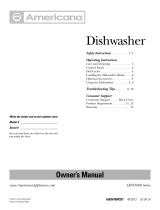
Loading the dishwasher racks.
Operating Instructions Safety InstructionsConsumer Support Troubleshooting Tips
8
Upper Rack
The upper rack is for glasses, cups and
saucers. Cups and glasses fit best along
the sides. This is also a secure place for
dishwasher-safe plastics. The upper rack is
good for all kinds of odd-shaped utensils.
Saucepans, mixing bowls and other items
should be placed face down.
Secure larger dishwasher-safe plastics over two
fingers when possible.
Make sure small plastic items are secure so they
can’t fall onto the heating element.
Don’t block it or load tall things
next to it.
Also, be careful not to let a
portion of an item such as a
pot or dish handle extend
through the bottom rack. This
could block the wash arm and
cause poor washing results.
Wash Tower
Keep the center area clear in the lower rack.
The wash tower rises through the center
of the lower rack during the wash and
rinse portions of the cycle.
Lower Rack
When loading the lower rack, do not load large
platters or trays in the front right corner. They may
prevent detergent from circulating during the wash
cycle.
The lower rack is best used for plates,
saucers, and cookware. Large items such
as broiler pans and racks should go along
the sides. Load platters, pots and bowls
along the sides, in corners, or in the back.
The soiled side of items should face the
center of the rack.
Be sure items don’t fall through rack and
block rotation of the spray arm.
Silverware Basket
Put flatware in the removable basket with
fork and knife handles up to protect your
hands. Place spoons in the basket with
handles down. Mix knives, forks and spoons
so they don’t nest together. Distribute evenly.
Small plastic items, such as measuring
spoons and lids from small containers,
should go in the bottom of the silverware
basket with silverware on top.
For best dishwashing results, follow these loading guidelines. Features and appearance of racks and silverware baskets
may vary from your model.
Don’t let any
item extend
through bottom.
Forget to Add a Dish?
A forgotten dish can be added any time before the main wash.
Push the door latch to the left.
Once the water calms, open the door. Steam may rise out of the dishwasher.
Add forgotten dishes.
Close the door and push the latch to the far right.
4
3
2
1

Caring for the dishwasher. ge.com
9
Consumer Support
Troubleshooting TipsOperating Instructions
Safety Instructions
To clean the control panel use a lightly dampened cloth then dry thoroughly. To clean the exterior
use a good appliance polish.
Never use sharp object, scouring pads or harsh cleaners on any part of the dishwasher.
If your dishwasher is left in an unheated place
during the winter, ask a service technician to:
Cut off electrical power to the dishwasher.
Remove fuses or trip circuit breaker.
Turn off the water supply and disconnect
the water inlet line from the water valve.
Drain water from the inlet line and water
valve. (Use a pan to catch the water.)
Reconnect the water inlet line to the
water valve.
Remove the plastic sump cover in the tub
bottom and use a sponge to soak up water
in the rubber boot.
5
4
3
2
1
Sump cover screws
An air gap protects your dishwasher against
water backing up into it if a drain clogs.
The air gap is not a part of the dishwasher.
It is not covered by your warranty. Not all
plumbing codes require air gaps, so you may
not have one.
The air gap is easy to clean.
Turn off the dishwasher and lift off the
chrome cover.
Unscrew the plastic cap and clean with
a toothpick.
2
1
Check the air gap any time your
dishwasher isn’t draining well.
Air gap
Does Your Dishwasher Have an Air Gap?
Protect Against Freezing

About optional accessories.
Operating Instructions Safety InstructionsConsumer Support Troubleshooting Tips
10
You can change the door and lower access
panel appearance of your dishwasher by
ordering one of these optional accessories:
■ Color Panels
■ 1/4” Wood Panel Trim Kit
■ 3/4” Trimless Wood Panel Kit
These accessories are available at extra cost
(VISA, MasterCard or Discover
cards accepted)
by calling 800.626.2002.
Specify accessory number when ordering.
Descriptions of Optional Accessories
Wood panel trim kit–This accessory contains
trim and instructions for you to supply and install
a 1⁄4″ thick decorative wood door and lower
access panel:
■ GPF325B (Black) ■ GPF325W (White)
■ GPF325C (Bisque)
NOTE: The GPF100 dishwasher door spring kit
must also be ordered and installed when the
door panel weighs four lbs. or more.
Trimless wood panel kit–This accessory contains
parts and instructions for you to supply and install
a 3 ⁄ 4″ thick decorative wood door and lower
access panel:
■ GPF375
NOTE: The GPF100 dishwasher door spring kit
will be included with the trimless wood panel kit
and must be installed with it.
■ Prevents movement of baby bottles during the
dishwasher cycle
■ Snaps easily onto any dishwasher upper rack
■ Eliminates hand washing
■ Fits all baby bottles
You can order a package of 5 Baby Bottle Holders,
at extra cost, by calling 800.626.2002, or through the
Internet at ge.com (Visa, MasterCard or Discover
cards accepted).
For best results, the
Baby Bottle Holder
should be installed
on the upper rack
of the dishwasher.
About rack accessories.
Baby Bottle Holder
Part Number: WX69X200

Consumer Support
Troubleshooting TipsOperating Instructions
Safety Instructions
Problem Possible Causes What To Do
Dishwasher won’t run Fuse is blown, or the • Replace fuse or reset circuit breaker. Remove any other appliances
circuit breaker tripped from the circuit.
Power is turned off • In some installations, the power to the dishwasher is provided through
a wall switch, often located next to the disposer switch. Make sure it
is on.
Noise Some of the sounds • Soft food disposal shredding action.
you’ll hear are normal
• Drain valve opening to pump water out.
• Timer control as cycle progresses.
• Detergent cup opening.
• The motor stopping during the drying period.
Utensils are not secure • Make sure everything is secured in dishwasher.
in the rack or something
small has dropped into
the rack
Rattling dishes when • Make sure dishes are properly loaded. See the Loading the
the spray arm rotates dishwasher racks section.
Motor hums • Dishwasher has not been used on a regular basis. If you do not use
your dishwasher often, set it to fill and pump out once every week.
This will help keep the seal moist.
Water standing in This is normal • A small amount of clean water around the outlet on the tub bottom
the bottom of the tub at the back of the tub keeps the water seal lubricated.
Water won’t pump Drain is clogged • If you have an air gap, clean it.
out of the tub • Check to see if your kitchen sink is draining well. If not, you may need
a plumber.
• If the dishwasher drains into a disposer, run disposer clear.
Suds in the tub Correct detergent • Use only automatic dishwasher detergents to avoid sudsing.
wasn’t used Cascade
®
, Cascade
®
Complete and Electrasol
®
Automatic Dishwashing
Detergents have been approved for use in all GE dishwashers.
• To remove suds from the tub, open the dishwasher and let suds
dissipate. Add 1 gallon of cold water to the tub. Close and latch the
dishwasher. Pump out water by slowly turning the Dial until a drain
period is reached. Repeat if necessary.
Rinse agent • Always wipe up rinse agent spills immediately.
was spilled
Stained tub interior Some tomato-based • Use of the RINSE ONLY cycle after adding the dish to the load
foods can cause reddish can decrease the level of staining. GE recommends Cascade
®
stains Plastic Booster to help remove these types of stains.
Tea or coffee stains • Remove the stain by hand, using a solution of 1/2 cup bleach
and 3 cups warm water.
WARNING
Before cleaning interior, wait at least 20 minutes after a cycle for the
heating elements to cool down. Failure to do so can result in burns.
An overall yellow or • A special filter in the water supply line is the only way to correct
brown film can be this problem. Contact a water softener company.
caused by iron deposits
in water
White film on inside • GE recommends Jet-Dry
®
or Cascade Crystal Clear
®
to help
surface – hard water prevent hard water mineral deposits from forming.
minerals
• Run dishwasher with citric acid to remove mineral deposits. Citric
acid (Part number: WD35X151) can be ordered through GE Parts.
See back cover for ordering information.
11
Before you call for service… ge.com
Troubleshooting Tips
Save time and money! Review the charts on the
following pages, or visit ge.com. You may not
need to call for service.

Problem Possible Causes What To Do
Dishes don’t dry Low inlet water • Make sure inlet water temperature is at least 120°F.
temperature
• Select HEATED DRY.
• Use HOT START and ADDED HEAT options.
• Select a higher cycle, such as POTS & PANS or HEAVY WASH.
Rinse agent dispenser • Check the rinse agent dispenser and fill as required.
is empty
Dishes and flatware Inlet water temperature • Raise the water heater temperature to 120°F.
not clean is below 120°F.
• Use HOT START, POTS & PANS or HEAVY WASH and HI TEMP WASH.
Too little detergent • See Using the dishwasher section, refer to Proper Use of Detergent for
detergent recommendations.
Old or damp powdered • See Using the dishwasher section, refer to Proper Use of Detergent for
detergent detergent recommendations.
Water pressure is • Turn on a faucet. Is water coming out more slowly than usual? If so,
temporarily low wait until pressure is normal before using your dishwasher.
Air gap is clogged • Clean the air gap.
Improper rack loading • Make sure large dishware does not block the detergent dispenser or
the wash arm.
No air gap or high • Verify that you have an air gap or a high drain loop. Refer to
drain loop the Installation Instructions.
Spots and filming • Use Jet-Dry
®
or Cascade Crystal Clear
®
rinse agents to remove spots and
on glasses and prevent new film build-up.
flatware • To remove stubborn spots and pre-existing film from glassware:
1 Remove all metal utensils from the dishwasher.
2 Do not add detergent.
3 Select the longest cycle.
4 Start the dishwasher and allow to run for 18 to 22 minutes.
Dishwasher will now be in the main wash.
5 Open the door and pour 2 cups (500 ml) of white vinegar into the
bottom of the dishwasher.
6 Close the door and allow to complete the cycle. If vinegar rinse
doesn’t work: Repeat as above, except use 1/4 cup (60 ml) of citric
acid crystals instead of vinegar.
Cloudiness on Combination of soft • This is called etching and is permanent. To prevent this from
glassware water and too much happening, use less detergent if you have soft water. Wash glassware in
detergent the shortest cycle that will get them clean.
Water temperature • Lower the water heater temperature.
entering the dishwasher
exceeds 150°F.
Detergent cup lid Dial is not in the OFF • Turn the Timer Dial to OFF.
won’t latch position
Detergent left in Dishes are blocking the • Reposition the dishes.
dispenser cups detergent cups
Steam This is normal • Steam comes through the vent by the door latch during drying and
when water is being pumped out.
Black or gray Aluminum utensils have • Remove marks with a mild, abrasive cleaner.
marks on dishes rubbed against dishes
12
Operating Instructions Safety InstructionsConsumer Support Troubleshooting Tips
Before you call for service…
Extremely hard water
Low inlet water
temperature
Overloading the
dishwasher
Improper loading
Old or damp powder
detergent
Rinse agent dispenser
empty
Too little detergent

13
General Electric Company
Warranty Registration Department
P.O. Box 32150
Louisville, KY 40232-2150
GE Service Protection Plus
™
GE, a name recognized worldwide for quality and dependability, offers you
Service Protection Plus
™
–comprehensive protection on all your appliances–
No Matter What Brand!
Benefits Include:
• Backed by GE
• All brands covered
• Unlimited service calls
• All parts and labor costs included
• No out-of-pocket expenses
• No hidden deductibles
• One 800 number to call
You will be completely satisfied with our service protection or you may request your money back
on the remaining value of your contract. No questions asked. It’s that simple.
Protect your refrigerator, dishwasher, washer and dryer, range, TV, VCR and much more–any brand!
Plus there’s no extra charge for emergency service and low monthly financing is available. Even icemaker
coverage and food spoilage protection is offered. You can rest easy, knowing that all your valuable
household products are protected against expensive repairs.
Place your confidence in GE and call us in the U.S. toll-free at
800.626.2224
for more information.
*All brands covered, up to 20 years old, in the continental U.S.
We’ll Cover Any Appliance.
Anywhere. Anytime.*
Please place in envelope and mail to:
✁
Cut here

Consumer Product Ownership Registration
Im
p
o
rta
n
t
M
a
il
T
o
d
a
y!
GE Appliance
s
GE Consumer & Industrial
Appliances
General Electric Company
Louisville, KY 40225
ge.com
First
Name
Mr. ■■ Ms. ■■ Mrs. ■■ Miss ■■
Street
Address
City
State
Date Placed
In Use
Month
Day
Year
Zip
Code
Apt. #
Last
Name
Phone
Number
_
_
Consumer Product Ownership Registration
Dear Customer:
Thank you for purchasing our product and thank you for placing your confidence in us.
We are proud to have you as a customer!
Follow these three steps to protect your new appliance investment:
Important: If you did not get a registration card with your
product, detach and return the form below to
ensure that your product is registered, or register
online at ge.com.
1
23
Model Number Serial Number
✁
Cut here
Complete and mail
your Consumer
Product Ownership
Registration today.
Have the peace of
mind of knowing we
can contact you in
the unlikely event of
a safety modification.
After mailing the
registration below,
store this document
in a safe place. It
contains information
you will need should
you require service.
Our service number
is 800.GE.CARES
(800.432.2737).
Read your Owner’s
Manual carefully.
It will help you
operate your new
appliance properly.
Model Number Serial Number
E-mail Address*
14
* Please provide your e-mail address to receive, via e-mail, discounts, special offers and other important
communications from GE Appliances (GEA).
■■ Check here if you do not want to receive communications from GEA’s carefully selected partners.
FAILURE TO COMPLETE AND RETURN THIS CARD DOES NOT DIMINISH YOUR WARRANTY
RIGHTS.
For information about GEA’s privacy and data usage policy, go to ge.com and click on “Privacy Policy”
or call 800.626.2224.

15
Consumer Support
Troubleshooting TipsOperating Instructions
Safety Instructions
What Is Not Covered:
For The Period Of: GE Will Replace:
One Year Any part of the dishwasher which fails due to a defect in materials or workmanship. During
From the date of the this full one-year warranty, GE will also provide, free of charge, all labor and in-home service
original purchase to replace the defective part.
Second Year Any part of the Water Distribution System which fails due to a defect in materials or
From the date of the workmanship. Associated inlet and drain plumbing parts are not covered by this warranty.
original purchase During this second-year limited warranty, you will be responsible for any labor or in-home
service costs.
Ten Years The PermaTuf
®
tub or door liner, if it fails to contain water due to a defect in materials or
From the date of the workmanship. During this full warranty, GE will also provide, free of charge, all labor and
original purchase in-home service to replace the defective part.
GE Dishwasher Warranty.
■ Service trips to your home to teach you how to use
the product.
■ Improper installation, delivery or maintenance.
■ Failure of the product if it is abused, misused, or used for
other than the intended purpose or used commercially.
■ Replacement of house fuses or resetting of circuit
breakers.
■ Damage to the product caused by accident, fire, floods
or acts of God.
■ Incidental or consequential damage caused by possible
defects with this appliance.
■ Cleaning or servicing of the air gap device in the
drain line.
■ Damage caused afer delivery.
This warranty is extended to the original purchaser and any succeeding owner for products purchased for home
use within the USA. In Alaska, the warranty excludes the cost of shipping or service calls to your home.
Some states do not allow the exclusion or limitation of incidental or consequential damages. This warranty gives
you specific legal rights, and you may also have other rights which vary from state to state. To know what your
legal rights are, consult your local or state consumer affairs office or your state’s Attorney General.
Warrantor: General Electric Company. Louisville, KY 40225
All warranty service provided by our Factory Service Centers,
or an authorized Customer Care
®
technician. To schedule service,
on-line, 24 hours a day, visit us at ge.com, or call 800.GE.CARES
(800.432.2737).
Staple your receipt here.
Proof of the original purchase
date is needed to obtain service
under the warranty.

Consumer Support.
GE Appliances Website
ge.com
Have a question or need assistance with your appliance? Try the GE Appliances Website 24 hours a day,
any day of the year! For greater convenience and faster service, you can now download Owner’s Manuals,
order parts, catalogs, or even schedule service on-line. You can also “Ask Our Team of Experts
™
”
your questions, and so much more...
Schedule Service ge.com
Expert GE repair service is only one step away from your door. Get on-line and schedule your service at
your convenience 24 hours any day of the year! Or call 800.GE.CARES (800.432.2737) during normal
business hours.
Real Life Design Studio ge.com
GE supports the Universal Design concept–products, services and environments that can be used by
people of all ages, sizes and capabilities. We recognize the need to design for a wide range of physical and
mental abilities and impairments. For details of GE’s Universal Design applications, including kitchen
design ideas for people with disabilities, check out our Website today. For the hearing impaired, please call
800.TDD.GEAC (800.833.4322).
Extended Warranties ge.com
Purchase a GE extended warranty and learn about special discounts that are available while your warranty
is still in effect. You can purchase it on-line anytime, or call 800.626.2224 during normal business hours.
GE Consumer Home Services will still be there after your warranty expires.
Parts and Accessories ge.com
Individuals qualified to service their own appliances can have parts or accessories sent directly to their
homes (VISA, MasterCard and Discover cards are accepted). Order on-line today, 24 hours every day or by
phone at 800.626.2002 during normal business hours.
Instructions contained in this manual cover procedures to be performed by any user. Other servicing generally
should be referred to qualified service personnel. Caution must be exercised, since improper servicing may cause
unsafe operation.
Contact Us ge.com
If you are not satisfied with the service you receive from GE, contact us on our Website with all the details
including your phone number, or write to: General Manager, Customer Relations
GE Appliances, Appliance Park
Louisville, KY 40225
Register Your Appliance ge.com
Register your new appliance on-line–at your convenience! Timely product registration will allow for
enhanced communication and prompt service under the terms of your warranty, should the need arise.
You may also mail in the pre-printed registration card included in the packing material.
Printed in the United States
Printed on Recycled Paper
-
 1
1
-
 2
2
-
 3
3
-
 4
4
-
 5
5
-
 6
6
-
 7
7
-
 8
8
-
 9
9
-
 10
10
-
 11
11
-
 12
12
-
 13
13
-
 14
14
-
 15
15
-
 16
16


GE GSD2200, GSD2201, GSD2600, GSD3200J Series User manual
- Category
- Dishwashers
- Type
- User manual
- This manual is also suitable for
Ask a question and I''ll find the answer in the document
Finding information in a document is now easier with AI
Related papers
Other documents
-
Hotpoint HDA430 User manual
-
-
-
-
Signature 1480 Operating instructions
-
-
-
 GE Monogram ZBD1850NII User guide
-
 GE Monogram Dishwasher PDW8000 User manual
-
 Americana Appliances ADW1000 series User manual


