Page is loading ...

This mini bike has a minimum age requirement of 16 and a maximum weight capacity of 150 lbs. (60 kg). Always wear all
necessary and properly tting protective equipment when operating this mini bike.
WARNING: To reduce the risk of injury, the user must read and understand the operator’s manual before using
this product.
Obtain, review, and follow provincial/municipal government acts and regulations pertaining to owning and operating an off-
road vehicle before using this product.
OPERATOR’S MANUAL
MANUAL DEL OPERADOR
DOODLE BUG / VIPER
DIRT BUG / BLITZ / RACER
DB30-G
SAVE THIS MANUAL FOR FUTURE REFERENCE
El requisito para usar este mini motocicleta es que el usuario tenga, como mínimo, 16 años. La capacidad de peso máxima
de este motocicleta mini es de 60 kg (150 lb). Use siempre todo el equipo de protección que sea necesario y que calce
correctamente al operar este motocicleta mini.
ADVERTENCIA: Para reducir el riesgo de lesiones, el usuario debe leer y comprender el manual del operador
antes de usar este producto.
Obtenga, revise y obedezca todas las leyes y reglamentaciones gubernamentales provinciales y municipales relacionadas
con la tenencia y la operación de un vehículo todoterreno antes de usar este producto.
GUARDE ESTE MANUAL PARA FUTURAS CONSULTAS
NOTICE AVISO
Do not use E15, E20, or E85 fuel (or
fuel containing greater than 10% etha-
nol) in this product. It is a violation of
federal law and will damage the unit
and void your warranty.
No utilice combustibles E15, E20 o E85
(ni combustibles que contengan más
de 10 % de etanol) con este producto.
Esto constituye una violación a la ley
federal, dañará la unidad y anulará la
garantía.

2 — English
© 2014 Baja, Inc. All Rights Reserved.
Limited Warranty ............................................................................................................................................................... 2
Rules for Safe Operation .................................................................................................................................................. 3
Symbols ............................................................................................................................................................................ 4
Safety Labels ................................................................................................................................................................. 5-6
Features ........................................................................................................................................................................7-8
Operation ..................................................................................................................................................................... 9-11
Maintenance ..............................................................................................................................................................12-19
Troubleshooting .............................................................................................................................................................. 20
Emissions Warranty ........................................................................................................................................................ 21
ProductSpecications .................................................................................................................................................... 22
TABLE OF CONTENTS
KEEP YOUR RECEIPT. Proof of purchase is required to substantiate any warranty claim. WHAT IS COVERED: Baja, Inc.,
(“Baja”) warrants to the original retail purchaser in the United States of America or Canada that this product is free of defects in
materials and workmanship and agrees to repair, provide replacement parts, or replace (without charge for parts and/or labor)
any product or component part that contains a material defect, which Baja shall determine in its sole discretion, for a period of
6 months from the date of purchase, except as limited below. Warranty service and replacement parts are warranted only for
the duration of the warranty on the original product. This product is also covered by an Emissions Control System Warranty
which is separate from and in addition to this warranty. All defective parts or products that are replaced under warranty shall
become the property of Baja.
WHAT IS NOT COVERED: This warranty does not cover any conditions caused by misuse, abuse, negligence, accident, normal
wearandtear,alteration,modication,improperorinadequatemaintenance,useofunauthorizedreplacementparts,operationin
anywaycontrarytotheinstructionsprovidedintheoperator’smanual,orserviceprovidedbyanyoneotherthananAuthorized
Baja Motorsports
®
Service Center. This warranty does not cover transportation costs for warranty service or pick-up, and those
costs will be the sole responsibility of the owner.
This warranty is VOID with respect to any product that has been used for rental purposes, commercial purposes, or that has
sustained the following damage:
Bent or broken frame due to abuse; or
Bent or broken wheel or wheels due to abuse; or
Bent or broken fender due to abuse; or
Any sign of impact, accident, jumping, spin-out or roll over not caused by the condition for which the warranty coverage is
sought.
TO OBTAIN SERVICE: Contact Baja toll free at 888-863-2252, Monday through Friday between the hours of 8 AM and 5 PM,
EasternStandardTime(EST).AnyapprovedwarrantyservicewillbereferredtoanAuthorizedBajaMotorsports
®
Service Center.
YOUR VEHICLE IS COVERED BY A SEPARATE ENGINE EMISSIONS WARRANTY, SHOWN LATER IN THIS MANUAL. BAJA’s
OBLIGATION UNDER THIS WARRANTY IS STRICTLY AND EXCLUSIVELY LIMITED TO THE REPAIR OR REPLACEMENT
OF DEFECTIVE PRODUCT OR PARTS AND BAJA DOES NOT AUTHORIZE ANY OTHER PARTY TO ASSUME ITS OBLIGA-
TIONS OTHER THAN OUTLINED IN THIS WARRANTY. NO DEALER OR THIRD PARTY IS AUTHORIZED TO MODIFY THIS
WARRANTY. TO THE EXTENT PERMITTED BY APPLICBLE LAW, ANY IMPLIED WARRANTIES GRANTED UNDER STATE
LAW, INCLUDING ALL WARRANTIES OF MERCHANTABILITY OR FITNESS FOR A PARTICULAR PURPOSE, THAT CAN-
NOT BE DISCLAIMED ARE LIMITED TO THE STATED 6 MONTH WARRANTY FROM THE DATE OF PURCHASE. BAJA AS-
SUMES NO RESPONSIBILITY FOR INCIDENTAL, CONSEQUENTIAL, INDIRECT, OR OTHER DAMAGES TO THE MAXIMUM
EXTENT ALLOWED BY LAW. IF ANY PROVISION OF THIS WARRANTY IS HELD TO BE INVALID OR UNENFORCEABLE
BY A COURT OF COMPETENT JURISDICTION, SUCH PROVISION SHALL BE SEVERABLE AND ITS INVALIDITY SHALL
NOT AFFECT ANY OTHER PROVISION OF THIS WARRANTY.
WARNING:
This manual should be considered as a permanent part of the vehicle and should remain with the vehicle when resold or
otherwise transferred to a new user or operator. The manual contains important safety information and instructions which
should be read carefully before operating the vehicle. All operators should obtain, review, and follow provincial and munici-
pal government acts and regulations pertaining to owning and operating an off-road vehicle. Children under the age of 16
should never operate this vehicle.
LIMITED WARRANTY

3 — English
© 2014 Baja, Inc. All Rights Reserved.
WARNING:
This operator’s manual contains important safety and
maintenance information. Read it carefully and make sure
you understand all included information before riding.
Failing to follow the warnings contained in this manual
could result in SERIOUS INJURY or DEATH.
NOTICE TO PARENTS
This mini bike is built for use by persons age 16 and older.
Never allow anyone under the age of 16 to operate the mini
bike.
It is very important that every person who rides the mini bike
complete a training course.
READ ALL INSTRUCTIONS
It is important that this manual remain with the vehicle when
you transfer or loan it to another user or owner.
All information, illustrations, photographs and specications
contained in this manual are based on the latest product
information available at the time of publication. Due to im-
provements or other changes, there may be some discrep-
ancies in this manual. We reserve the right to make product
changes at any time, without notice and without incurring
any obligation to make the same or similar changes to the
vehicle previously built or sold.
Carefully read and understand this manual and all labels
and follow the operating procedures described.
Never operate a mini bike without proper instruction. Take
a training course. Beginners should receive training from a
certied instructor. Contact an authorized mini bike dealer
or call Motorcycle Safety Foundation at 1-800-446-9227
to nd out about the training courses nearest you.
Never carry a passenger on a mini bike.
Do not start or operate the engine in a conned space,
building, near open windows, or in other unventilated space
where dangerous carbon monoxide fumes can collect.
Carbon monoxide, a colorless, odorless, and extremely
dangerous gas, can cause unconsciousness or death.
Never consume drugs or alcohol before or while operating
this mini bike.
Never operate a mini bike on any paved surfaces, includ-
ing sidewalks, driveways, parking lots, and streets.
Never operate a mini bike on any public street, road, or
highway, even a dirt or gravel one.
Never operate the mini bike at night. Night is dened as
the period of time 30 minutes before sunset to 30 minutes
after sunrise.
Never operate a mini bike without wearing a DOT or Snell-
approved motorcycle helmet that ts properly. You should
also wear eye protection (goggles) marked to comply with
ANSI Z87.1, gloves, over the ankle boots, long-sleeved
shirt or jacket, and long pants.
Never operate this mini bike at excessive speeds. Always
ride at a speed that is proper for the terrain, visibility,
operating conditions, and your experience.
Always keep both hands on the handlebars and both feet
on the footrests of the mini bike during operation.
Always be careful when skidding or sliding. Learn to safely
control skidding or sliding by practicing at low speeds and
on level, smooth terrain. On extremely slippery surfaces
such as ice, go slowly and be very cautious in order to
reduce the chance of skidding or sliding out of control.
Never operate the mini bike on hills too steep for the mini
bike or for your abilities. Practice on smaller hills before
attempting larger hills.
Check the terrain carefully before you start up any hill.
Never climb hills with excessively slippery or loose sur-
faces. Shift your weight forward. Never open the throttle
suddenly. Never go over the top of any hill at high speed.
Never attempt wheelies, jumps, or other stunts.
Never operate a mini bike in water.
Always inspect your mini bike each time you use it to make
sure it is in safe operating condition. Always follow the
inspection and maintenance procedures and schedules
described in this manual.
Never modify a mini bike through improper installation or
use of accessories.
Always use the size and type tires specied in this manual.
Always maintain proper tire pressure as described in this
manual.
Check the terrain carefully before you start down any hill.
Shift your weight backward. Never go down a hill at high
speed.
Never exceed the stated load capacity of 150 lbs. (68 kg).
Never ride alone. This mini bike can go 15 miles (24.1 km)
in an hour, which may be farther than you can walk back
in the event of a problem with the mini bike.
We believe in conservation and protection of the earth’s
natural resources. We encourage every vehicle owner
and operator to do the same by obeying posted signs and
riding only in areas designated and approved for off-road
recreational use.
RULES FOR SAFE OPERATION
FOR MORE INFORMATION ABOUT MINI BIKE SAFETY,
CALL BAJA MOTORSPORTS AT 1-866-260-8630.

4 — English
© 2014 Baja, Inc. All Rights Reserved.
Some of the following symbols may be used on this product. Please study them and learn their meaning for safe opera-
tion of this product.
SYMBOL NAME EXPLANATION
Safety Alert Indicates a potential personal injury hazard.
Read Operator’s Manual
To reduce the risk of injury, user must read and understand
operator’s manual before using this product.
Wear Eye Protection
Always wear eye protection with side shields (goggles)
marked to comply with ANSI Z87.1.
Wear Protective Gear Always use an approved helmet and protective gear.
Public Roads Never use this mini bike on public roads.
Passengers Never carry passengers on this mini bike.
B
E
E
R
B
E
E
R
Drugs and Alcohol Never use with drugs or alcohol.
Never attempt wheelies, jumps, or
other stunts
Never attempt wheelies, jumps, or other stunts, which
can result in death or serious personal injury.
UNDER
16
Age Limit
Never permit children under the age of 16 to operate this
mini bike.
Toxic Fumes
Gas products emit carbon monoxide, an odorless, color-
less, poison gas. Breathing carbon monoxide can cause
nausea, fainting, or death.
The following signal words and meanings are intended to explain the levels of risk associated with this product.
SYMBOL SIGNAL MEANING
DANGER:
Indicates an imminently hazardous situation, which, if not avoided, will result in
death or serious injury.
WARNING:
Indicates a potentially hazardous situation, which, if not avoided, could result in
death or serious injury.
CAUTION:
Indicates a potentially hazardous situation, which, if not avoided, may result in
minor or moderate injury.
NOTICE:
(Without Safety Alert Symbol) Indicates important information not related to an
injury hazard, such as a situation that may result in property damage.
SYMBOLS

5 — English
© 2014 Baja, Inc. All Rights Reserved.
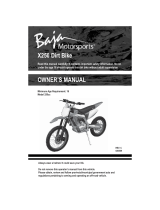
SAFETY LABELSSAFETY LABELS
The following labels are found on the product. For your safety, please review and understand all of the labels before starting
the product. If any of the labels come off the unit or become hard to read, contact an authorized service center for replace-
ment.
1
2
1
4
7 6
3
5
2

6 — English
© 2014 Baja, Inc. All Rights Reserved.
SAFETY LABELSSAFETY LABELS
VEHICLE INDENTIFICATION NUMBER (VIN)
AND ENGINE SERIAL NUMBER LOCATION
You need to know the VIN and engine serial numbers to
get title documents for the mini bike. You also need these
numbers to order parts from your authorized service center
or Baja Motorsports.
From a seated position on the mini bike, the VIN is stamped
on the right side of the frame neck where the steering
attaches. The engine serial number is located on the left side
of the engine housing.
Write down the serial numbers here for your future reference:
VIN:
Engine No:
5
6
7
4
3

7 — English
© 2014 Baja, Inc. All Rights Reserved.
FEATURES
Brake lever — The brake can be applied by squeezing the
brake lever.
Engine switch — The engine switch must be placed in the
ON position to start the engine. To stop the engine, place the
switch in the OFF position.
Fuel valve — This vehicle has one manually operated fuel
valve featuring 2 positions.
In the ON position, fuel is allowed to flow into the carburetor
when the engine is running or being started.
In the OFF position, fuel is shut off from the carburetor. The
fuel valve needs to be placed in this position when the mini
bike is not in use.
Fuel tank cap — To open the fuel tank cap, turn the cap
counterclockwise. To close, turn the cap clockwise and
tighten it securely.
Manual choke lever — When engine is cold, place the choke
lever in the ON position. When engine has warmed up, move
lever back to the OFF position.
Pull cord — Pull the pull cord to start the engine.
Throttle grip — Controls engine and mini bike speed. Ro-
tate the throttle grip backward (toward operator) to increase
engine and mini bike speed. Rotate the throttle grip forward
(away from operator) to decrease engine and mini bike speed.
BRAKE LEVER
SIDE STAND
SEAT
FRONT TIRE

8 — English
© 2014 Baja, Inc. All Rights Reserved.
FEATURES
PULL
CORD
FUEL TANK CAP
CHOKE
LEVER
REAR
TIRE
FUEL
VALVE
ENGINE
SWITCH
THROTTLE
GRIP
BRAKE
LEVER

9 — English
© 2014 Baja, Inc. All Rights Reserved.
OPERATION
WARNING:
Always wear appropriate protective clothing and acces-
sories: a properly tting helmet, eye protection (goggles)
marked to comply with ANSI Z87.1, gloves, over the ankle
boots, long-sleeved shirt or jacket, chest protector, and
long pants.
WARNING:
Always wear eye protection with side shields (goggles)
marked to comply with ANSI Z87.1. Failure to do so could
result in objects being thrown into your eyes, resulting in
possible serious injury.
WARNING:
Do not allow familiarity with product to make you care-
less. Remember that a careless fraction of a second is
sufcient to inict serious injury.
SAFETY GEAR
A DOT or Snell-approved motorcycle helmet is the most
important part of your safety gear because it can help prevent
a serious head injury. Choose a helmet that ts snugly.
Retailers can help in selecting a good quality helmet which
ts properly.
Always wear eye protection when you ride. If a rock or branch
hit your eyes, you could be severely injured. Wear shatterproof
goggles that are marked to comply with ANSI Z87.1.
BREAK-IN
NOTICE:
Carefully and correctly follow the break-in procedures.
Failure to follow the break-in procedures can signicantly
shorten the life of your mini bike by causing excessive
wear and damaging the engine.
The rst month is the most important in the life of your vehicle.
Proper operating during this break-in period will be helpful for
assuring maximum life and performance of your new mini bike.
The following guidelines explain proper break-in procedures.
Vary the engine rotating speed. Vary the engine rotating
speed during the break-in period. This allows the parts to
“load” and then “unload” (allowing the parts to cool). Although
it is essential to place some stress on the engine components
during break-in, you must be careful not to load the engine
too much.
Avoid constant low or high rotating speed. Operating the
engine at constant low rotating speed (light load) can cause
parts to glaze and not seal properly. Operating the engine at
a constant high rotating speed can cause excessive heat,
which can damage internal components. Allow the engine to
accelerate freely without exceeding the maximum throttle limit.
Allow the engine lubricant to circulate before riding. Allow
enough idling time after warm or cold engine starting. This
allows the lubricant to reach all critical engine components.
Observe and document your initial and most critical
service. The initial service (break-in maintenance) is the most
important service that your vehicle will receive. Observing
a proper break-in operating, will help engine components
seal properly. Maintenance required as part of the initial
service includes proper adjustments, tightening of all bolts
and nuts, and replacement of dirty oil. Timely performance
of this service will help you get the best service life and
performance of the engine.
WARNING:
Always inspect your mini bike according to the pre-ride
inspection checklist each time before riding and make
sure it is in a safe operating condition. Failure to inspect
the mini bike before operating could increase the chance
of an accident, resulting in serious personal injury or
equipment damage.
WARNING:
Always use the size and type of tires specied in this
Operator’s Manual. Always maintain proper tire pressure
as described in the Maintenance section of this manual
and on the unit. Operating this mini bike with improper
tires, or improper tire air pressure, could be hazardous.
If you use improper tires or improper air pressure, you
may lose control of the mini bike and cause an accident,
which could result in serious personal injury.
EYE
PROTECTION
(GOGGLES)
HELMET
LONG-SLEEVED
SHIRT
LONG PANTS
GLOVES
CHEST
PROTECTOR
BOOTS

10 — English
© 2014 Baja, Inc. All Rights Reserved.
OXYGENATED FUELS
NOTICE:
Do not use E15, E20, or E85 fuel (or fuel containing
greater than 10% ethanol) in this product. It is a viola-
tion of federal law and will damage the unit and void
your warranty.
Fuel system damage or performance problems resulting
from the use of an oxygenated fuel containing more than
the percentage of oxygenates stated below are not covered
under warranty.
Ethanol. Gasoline containing up to 10% ethanol by volume
(commonly referred to as E10) is acceptable. E15, E20, and
E85 are not.
FUELING/REFUELING THE MINI BIKE
WARNING:
Gasoline and its vapors are highly ammable and ex-
plosive. To prevent serious personal injury and property
damage, handle it with care. Keep away from ignition
sources and open ames, handle outdoors only, do not
smoke, and wipe up spills immediately.
WARNING:
Improper fueling of the mini bike could be hazardous.
Failing to follow safety precautions when refueling could
result in a re or explosion or let you breathe toxic fumes,
causing serious personal injury.
WARNING:
Always shut off engine before fueling. Never add fuel to
a mini bike with a running or hot engine. Do not smoke
or allow ame or spark in the vicinity while the unit is be-
ing refueled. Always work in a well-ventilated area. Move
at least 30 ft. (9,1 m) from refueling site before starting
engine. Improper handling of fuel could result in serious
personal injury.
Allow unit to cool down prior to refueling and restarting.
Clean surface around fuel cap to prevent contamination.
Slowly turn the fuel tank cap counterclockwise and remove.
OPERATION
WHAT YOU SHOULD KNOW BEFORE RIDING
Before riding, you should read carefully and understand all
the following information, in addition to being thoroughly
familiar with the Rules for Safe Operation in the front of this
manual. If you are properly prepared, you will have a more
enjoyable ride.
Before riding, you should nd a at, open area with enough
space to practice the skills.
WARNING:
The risk of an accident is greatly increased if the opera-
tor does not know how to operate the mini bike properly
in different situations and on different types of terrain.
Beginning and inexperienced operators should complete
the certied training courses offered by the Motorcycle
Safety Foundation (www.msf-usa.org). They should then
regularly practice the skills learned in the course and the
operating techniques described in the Operator’s Manual.
Failure to follow safe and proper operating techniques
could result in serious personal injury.
For more information about the training course, contact an
authorized mini bike dealer or call the Motorcycle Safety
Foundation at 1-800-446-9227. For more information on
mini bike safety, contact the Baja Mini Bike Safety Hotline
at: 1-866-260-8630.
Do not operate the mini bike indoors where there is little or
no ventilation. Breathing in exhaust gasses from the mini bike
could cause severe injury or death. Always run your mini bike
outdoors where there is fresh air.
Make sure it is legal to ride in the area you selected; comply
with all laws and make sure you are not trespassing. Call the
police if you don’t know where you can ride.
Protect your riding areas. When you are riding, remember
to keep the terrain in good condition. Don’t destroy plants,
trees, or other vegetation. Don’t litter and don’t bother wildlife.
With your help, your riding area can remain open for use in
the future.
After you have found a good place to practice, review the
control system on your mini bike before riding. Learn to nd
these controls without looking for them, because you will not
have time to look for them when you are riding.
NOTE: Obtain, review, and follow all laws, acts, and regulations
pertaining to owning and operating an off-road vehicle.
WARNING:
Never ride your mini bike on a frozen lake or river. Serious
injury or death could occur if the ice breaks.

11 — English
© 2014 Baja, Inc. All Rights Reserved.
OPERATION
WARNING:
If a whistling sound is heard when loosening the fuel tank
cap, have the vehicle inspected and repaired before con-
tinued operation. Failure to do so could cause the fuel to
overheat, resulting in a re or explosion causing serious
personal injury.
Carefully pour fuel into the tank until the level reaches
approximately 2 in. below the top of the fuel tank opening.
Avoid spillage.
Replace fuel tank cap and turn clockwise to secure.
WARNING:
Check for fuel leaks. A leaking fuel cap is a re hazard and
must be replaced with an original manufacturer’s replace-
ment cap immediately. If you nd any leaks, correct the
problem before using the product. Failure to do so could
result in a re that could cause serous personal injury.
WARNING:
Overlling the fuel tank could be hazardous. If you overll
the fuel tank, fuel may overow when it expands due to
heat from engine or sun. Spilled fuel could catch re or
explode, resulting in serious personal injury.
WARNING:
Failure to complete the pre-ride inspection and verify
proper performance of the mini bike before riding can
result in serious personal injury.
PRE-RIDE INSPECTION
ITEM TO
CHECK
ITEM MUST PERFORM AS
FOLLOWS:
Steering Smoothness; no restriction of move-
ment; no play or looseness.
Brakes Proper brake lever free play; enough
brake force.
Tires Proper air pressure; enough tread depth;
no cracks, rips, or other damages.
Fuel Enough fuel for the intended trip.
Fuel cap No damage to fuel tank or cap; fuel tank
cap closed securely.
Engine stop
switch
Proper operation of switch. Start engine,
then press stop switch. Engine should
stop.
Engine
lubricant
Proper level; check lubricant by inspect-
ing engine oil dip stick. The engine lu-
bricant should be between the minimum
and maximum lines.
Throttle Proper free play of throttle grip; smooth
response; quick return to idle position.
General
condition
Bolts and nuts are tight; no rattle from
any parts of the engine when running;
no visible evidence of damage including
frame cracks.
STARTING THE ENGINE
Place the engine switch in the ON position.
Turn the fuel valve to the ON position.
Place the choke lever in the ON position.
Pull the pull cord sharply until the engine runs. Return the
cord gently to the unit. Do not allow it to snap back.
Allow engine to warm, then move the choke lever to the
OFF position.
NOTE: You may need to use the choke function until the
engine has completely warmed up. As the engine warms,
the choke lever can be progressively reduced. Once the
engine is completely warm, turn the choke lever to the
OFF position.
WARNING:
Always open the throttle gradually when you want to ac-
celerate. Opening the throttle suddenly could cause the
front wheel to leave the ground and cause loss of control
of the mini bike causing serious personal injury.
WARNING:
Always keep both hands on the handlebars and both
feet on the foot rests of your mini bike during operation.
Removing even one hand or foot can reduce your ability
to control the mini bike or could cause you to lose your
balance and fall off the mini bike. If you remove a foot from
the footrest, you may come in contact with the mini bike,
ground, obstacles, etc., which could cause an accident
and result in serious personal injury.
STOPPING THE ENGINE
Rotate the throttle grip forward (away from you) to slow
down the engine.
Place the engine switch in the OFF position.
Place the choke lever in the OFF position.
Turn the fuel valve to the OFF position.

12 — English
© 2014 Baja, Inc. All Rights Reserved.
MAINTENANCE
INSPECTION AND MAINTENANCE SCHEDULE
It is very important to inspect and maintain your mini bike regularly. Follow the guidelines in the chart below. The intervals
between periodic services in months are shown. At the end of each interval, be sure to perform and document the mainte-
nance listed.
A repair shop or person of the owner’s choosing may maintain, replace, or repair emission-control devices and
systems.
WARNING:
Failing to perform recommended maintenance or performing maintenance improperly can lead to an accident and cause
serious personal injury, cause noncompliance to emissions regulations, and may void your warranty. If you are not sure
how to perform the maintenance items below, contact your Baja authorized service center or Baja Motorsports.
Item
Each
Use
First month
or 20 hours
Every 3 months
or 50 hours
Every 6 months
or 100 hours
Every year
or 300 hours
Engine Oil – Check X
Engine Oil – Change* X X
Air Filter – Check X
Air Filter – Clean* X X
Air Filter – Change* X
Carburetor Sediment Cup –
Clean*
X
Spark Plug – Check, Adjust X
Spark Plug – Replace X
Idle Speed – Check, Adjust X
Fuel Tank and Filter – Clean X
Fuel Tube – Check X
Centrifugal Clutch – Clean
and Lube
X Every
5 hours
Nuts and Bolts – Check
for Tightness
X
Chain Tension – Check X
Brakes – Check* X
Throttle – Check* X
Throttle Cable – Check* X
* – This item of maintenance should be carried out at a service center. It may also be done by the user with reference to
this manual provided special tools and authorized spare parts are used. The user must also be capable of completing
the procedure.
NOTICE:
If you operate your mini bike under severe conditions, it will need maintenance more often than shown in the chart above.
Severe conditions include operating under frequent full throttle or in dusty, wet, sandy, or muddy areas. If you have ques-
tions regarding appropriate maintenance intervals for your mini bike, contact your Baja authorized service center or Baja
Motorsports.

13 — English
© 2014 Baja, Inc. All Rights Reserved.
MAINTENANCE
WARNING:
Before inspecting, cleaning, or servicing the mini bike,
shut off engine, wait for all moving parts to stop, ensure
engine switch is in OFF position and disconnect the spark
plug wire. Failure to follow these instructions can result in
serious personal injury or property damage.
SPARK PLUG
Your mini bike is equipped with an NGK BP5H or Torch E5T
spark plug. To determine if the standard spark plug is in good
condition, check the color of the plug’s center electrode in-
sulator after vehicle operation. A brown color indicates that
the plug is correct. A white or dark insulator indicates that the
engine may need adjustment or another plug type may be
needed. Consult your authorized dealer or Baja Motorsports
if your plug insulator is not a light brown color.
NOTE: This mini bike uses a resistor-type spark plug to avoid
jamming electronic parts. Improper spark plug selection may
cause electronic interference with your mini bike’s ignition
system, resulting in the vehicle performance problems. It
could also have an incorrect t or heat range for your en-
gine, which could cause severe engine damage and void the
warranty. Use only recommended spark plugs: NGK BP5H,
Torch E5T, or suitable equivalent.
To install a spark plug, turn it in as far as possible with your
ngers, then tighten it with a wrench about 1/2 turn past
nger tight (if the spark plug is new) or 1/4 turn past nger
tight (if you are reinstalling the old spark plug). Be careful
not to cross-thread the spark plug, which could damage the
aluminum threads of the cylinder head.
To maintain a proper functioning spark plug, keep the plug
free of carbon. Remove carbon from the plug with a wire or
pin and adjust the gap to 0.028-0.031 in. (0.7-0.8 mm) for
good ignition. Use a thickness gauge to check the gap.
NOTICE:
Keep the spark plug hole covered while the spark plug
is removed so that dirt does not enter the open hole. Dirt
entering the spark plug hole in the cylinder could damage
engine parts that move.
CHANGING/ADDING ENGINE LUBRICANT
Engine lubricant has a major inuence on engine perfor-
mance and service life. Engine lubricant level should be
checked before each use of the mini bike.
For best engine performance, change the lubricant every 20
to 40 hours of operation. In dirty and dusty areas, the lubricant
should be changed more often.
Reference the chart below for the appropriate engine lubricant
to use based on the temperature range in your area.
NOTE: In very cold weather [below 5°F (15°C)], use
SAE10W-50 for good starting and smooth operation.
ENGINE
LUBRICANT
°C -30 -20 -10 0 10 20 30 40
TEMP.
°F -22 -4 14 32 50 68 86 104
Always use a 4-stroke motor lubricant that meets or exceeds
the requirements for API service classication SJ. Check
lubricant level before each use.
NOTE: Non-detergent or 2-stroke engine lubricants will dam-
age the engine and should not be used.
To check lubricant level:
Park vehicle on level ground and lower side stand.
Unscrew the oil cap/dipstick and remove.
Wipe dipstick clean; re-seat and rethread in hole.
Remove the dipstick and inspect the lubricant level. Level
should be between the minimum and maximum marks on
the dipstick.
If lubricant is below minimum mark on dipstick, add lu-
bricant until level falls between minimum and maximum
marks on the dipstick.
To change engine lubricant:
Lubricant should be changed while the engine lubricant is still
warm, but not hot. This allows the lubricant to drain quickly
and completely.
WARNING:
Do not change engine lubricant while it is hot. Accidental
contact with hot engine lubricant could result in serious
burns.
SAE 10W-30
SAE 20W-40
SAE 10W-50
SAE 15W-40

14 — English
© 2014 Baja, Inc. All Rights Reserved.
CHECKING/CLEANING AIR FILTER
The air lter element must be kept clean to provide good
engine power. If you use your vehicle under normal, low-
tension conditions, you should service the air lter at the
intervals specied. If you ride in dusty, wet, or muddy con-
ditions, you will need to inspect the air lter element much
more frequently.
NOTICE:
Always check the air lter element after riding in severe
conditions and clean or replace as needed. Operating
the mini bike with a clogged air lter could cause engine
damage.
Air lter removal and cleaning:
Remove the Phillips head screw and set aside.
Remove the air lter cover and set aside.
Remove the air lter from the box.
Wash the element in a mild non-ammable solvent.
Squeeze out solvent by pressing the element between the
palms of both hands. Do not twist or wring the element or
it will develop cracks.
Immerse the element in oil, then squeeze as before to
remove excess. The element should be damp with oil but
not soaked.
Replace the air lter element in the box. Make sure the
element is securely in position and the air lter is properly
sealed.
Replace the air lter cover. Reinstall screw and tighten
securely.
NOTE: Do not operate the engine without the air lter ele-
ments in place. Rapid engine wear will result.
MAINTENANCE
Park vehicle on level ground and lower side stand.
Remove oil cap/dipstick.
Place a container underneath the oil drainage bolt to col-
lect used lubricant as it drains.
Unscrew the oil drainage bolt and remove the bolt and
washer.
Allow lubricant to drain completely.
Reinstall washer and oil drainage bolt. Torque oil drainage
bolt to 14-15 ft.lbs. (19-20 Nm).
Fill crankcase with specied lubricant as described in the
Operator’s Manual.
NOTICE:
Attempting to start the engine before it has been properly
lled with lubricant will result in equipment failure.
NOTE: Used lubricant should be disposed of at an approved
disposal site. See your local oil retailer for more information.

15 — English
© 2014 Baja, Inc. All Rights Reserved.
THROTTLE GRIP ADJUSTMENT
Inadequate throttle grip free distance could cause the engine
speed to rise suddenly when you turn the handlebars. The
correct throttle grip free play distance is between 0.078 in.
(2 mm) and 0.24 in. (6 mm). If more or less movement is
present, adjust the throttle grip as follows:
Pull back the rubber boot to gain access to the adjustment
nut.
Rotate the adjustment nut in or out to obtain the correct
play.
Recheck the throttle grip free distance. Readjust if it is
still not within the correct limits.
WARNING:
Do not operate the mini bike if the throttle grip free play
distance is less than 0.078 in. (2 mm) or more than
0.24 in. (6 mm). Operating the vehicle with an incorrect
amount of throttle grip free play could cause the rider to
lose control, resulting in serious personal injury.
IDLE SPEED ADJUSTMENT
Excessive engine wear can result when the idle speed is
incorrect. An idle speed that is too high could also cause the
mini bike to lurch forward when you start the engine.
NOTE: You must have a tachometer to adjust the idle speed.
If you don't have one, have this service performed by an
authorized service center.
To adjust idle speed:
Start the engine and allow it to warm up.
Turn the engine idle screw in or out until the engine idle
speed is between 1,440 and 1,760 r/min. on the tachom-
eter.
NOTICE:
Make sure the engine is fully warm before adjusting the
idle speed. Adjusting the idle speed before the engine is
warm could result in excessive engine wear.
MAINTENANCE
ADJUSTMENT
NUT

16 — English
© 2014 Baja, Inc. All Rights Reserved.
MAINTENANCE
INSPECTING DRIVE CHAIN/SPROCKETS
The condition and adjustment of the drive chain should be
checked before riding. Always follow the guidelines below for
inspecting and servicing the chain.
WARNING:
Always inspect the drive chain before riding the mini bike.
Failure to maintain the drive chain properly and/or riding
with the chain in poor condition could lead to an accident
resulting in serious personal injury.
Inspecting the drive chain:
When inspecting the drive chain, look for the following:
Loose pins
Damaged rollers
Dry or rusted links
Kinked or binding links
Excessive wear
If you nd anything wrong with the drive chain, solve the
problem by repairing or replacing the chain. If necessary,
consult your local authorized service center.
Inspecting the sprockets:
A worn chain can have an adverse affect on the sprockets,
therefore any time you nd damage to the drive chain, you
should also check the front and rear sprockets. When inspect-
ing the sprockets, look for the following:
Excessively worn teeth
Broken or damaged teeth
Loose sprocket mounting nuts
If you nd anything wrong with the sprockets, consult your
local authorized service center.
WARNING:
Failure to adjust the brakes so they lock the wheels se-
curely could result in serious personal injury.
ADJUSTING BRAKE
Measure the amount of free play in the brake lever. The
free play should be about 0.2-0.3 in. (5-7 mm).
Adjust the brakes by turning the adjustment nut clockwise
to loosen and counterclockwise to tighten brake tension.
Recheck the brake lever free distance. Readjust if it is still
not within the correct limits.
To make brake shoe adjustments, turn the adjusting bolt
clockwise to loosen and counterclockwise to tighten brake
tension.
Brake shoes should be replaced by a qualied service
technician once brake shoes are worn.
ADJUSTING
BOLT
GOOD WORN
ADJUSTMENT
NUT

17 — English
© 2014 Baja, Inc. All Rights Reserved.
MAINTENANCE
CLEANING/ADJUSTING DRIVE CHAIN
The drive chain should be cleaned, lubricated, and inspected
every time you ride the mini bike.
WARNING:
Always inspect the drive chain tension before you ride the
mini bike. Too much slack could allow the drive chain to
come off the sprockets, which could cause an accident
or result in serious damage to the mini bike.
Cleaning the drive chain:
Wash the drive chain with an approved chain cleaner.
Dry the chain, then lubricate with chain lubricant or the
equivalent.
TIRE MAINTENANCE
This mini bike is equipped with low pressure tubeless tires
of the size and type listed below:
Front Rear
Size 145x70-6 145x70-6
Tire Air Pressure
Check the air pressure in all tires before riding. Improper air
pressure will affect handling, steering response, traction, tire
life and rider comfort. Be sure tires are inated to the pres-
sures shown below.
NOTE: Tire pressure should only be measured or
adjusted when tires are cold.
Recommended Pressure
5 psi (34.5 kpa)
WARNING:
Check the tire pressure carefully while inating. Too much
air in the tire could cause the tire to burst, causing serious
personal injury.
WARNING:
Maintaining correct air pressure in the tires is very impor-
tant. Too little pressure could allow the tire to rotate off
the wheel rim. Too much pressure could cause the tire to
burst. Failure to maintain correct air pressure in the tires
could cause problems with vehicle operation and stability,
causing serious personal injury.
TIRE REPAIR
If a leak or at tire occurs due to a puncture, the tire may
be repaired using a plug-type patch. If the damage is from a
cut, or if the puncture cannot be repaired using a plug, the
tire should be replaced.
When operating your mini bike in areas where transportation
or service facilities are not readily available, keep a plug-type
repair kit and tire air pump with you.
REPLACING TIRES
When tires are worn, the traction of the vehicle will be
decreased, which increases the chance of having an acci-
dent. Tires should be replaced when the depth on the tread
is 0.16 in. (4 mm) or less. Always use identical replacement
tires. Using improper tires on the unit could cause loss of
control, which could increase your risk of accident.
Have tires replaced by an authorized service center or a
qualied tire repair station.

18 — English
© 2014 Baja, Inc. All Rights Reserved.
MAINTENANCE
CLUTCH MAINTENANCE
After every 5 hours of use, your clutch will need cleaning and
lubrication. If the clutch becomes too dirty or lacks lubrication,
the clutch will begin to stick, which could cause the mini bike
to move without the throttle being applied.
WARNING:
Failure to perform the clutch maintenance described
below can result in unintended movement of the mini bike
and cause serious personal injury.
To clean and lubricate the clutch:
Turn engine off and allow to cool completely.
Remove clutch cover.
Blow through holes in clutch cover and clutch drum using
compressed air to remove any dust and/or particles.
Locate the snap ring on the sprocket at the end of the
clutch. Add a few drops of 30W motor oil in the opening
between the snap ring ends to allow the oil to reach the
bushing located behind the snap ring. Do not allow oil to
get inside the clutch itself.
Push mini bike forward without starting to allow oil to ow
through bearing surface.
Replace clutch cover.
WARNING:
Do not start the mini bike with the clutch cover removed.
Starting the engine with the clutch cover removed could
allow you to come in contact with moving parts, causing
serious personal injury.
CLEANING
A thorough cleaning of the mini bike is a necessary part
of maintenance. It will help keep the mini bike looking and
performing at its best. Proper cleaning can also extend the
life of the mini bike.
Clean and inspect the mini bike after every ride, especially
if it is used in mud, brush, grass, water, salt water, or very
dusty conditions. The build-up of mud, brush, grass, etc.,
especially on the engine and exhaust system, can reduce
engine cooling ability, conceal damage, or increase wear of
certain parts. Remove all debris during cleaning.
The mini bike should be washed before any mud dries on
the unit. Avoid spraying or allowing water to ow over the
ignition switch, spark plug, fuel tank cap, carburetor, drive
chain, or air lter.
NOTE: Do not use high pressure washers such as those
found at car washes. They could cause mechanical, electri-
cal and other damage.
Hand wash the unit with mild soap or detergent and wa-
ter. Try to thoroughly remove all dirt and debris without
excessive water pressure. Cloth rags, washing mitts, or
cleaning brushes can be used, but be careful with brushes
as they can scratch plastic or painted surfaces.
Rinse the unit thoroughly with clean water.
Dry all areas using a chamois or soft absorbent cloth or
allow the unit to air dry.
Lubricate the chain and run the engine at idling speed for
a few minutes.
Follow the procedures in Pre-Ride Inspection to check
the unit for any problems that may have occurred during
your last ride.
After washing your mini bike, test your brakes by riding at
a slow speed. If necessary, apply brake several times to
let the friction dry out the brake linings. Wet brakes may
not provide as much stopping power as dry brakes.
WARNING:
Operating the mini bike at high speeds when the brakes
are wet could result in serious personal injury.
CLUTCH
COVER
CLUTCH BEARING
SNAP
RING

19 — English
© 2014 Baja, Inc. All Rights Reserved.
MAINTENANCE
TIRES:
Inate the tires to the normal pressure.
NOTE: Tire pressure should only be measured or
adjusted when tires are cold.
Recommended Pressure
5 psi (34.5 kpa)
WARNING:
Check the tire pressure carefully while inating. Too much
air in the tire could cause the tire to burst, causing serious
personal injury.
WARNING:
Maintaining correct air pressure in the tires is very impor-
tant. Too little pressure could allow the tire to rotate off
the wheel rim. Too much pressure could cause the tire to
burst. Failure to maintain correct air pressure in the tires
could cause problems with vehicle operation and stability,
causing serious personal injury.
VEHICLE:
Place the vehicle on level ground.
Wash the vehicle.
Spray all vinyl and rubber parts with rubber protection.
Spray unpainted surfaces with rust preventative.
Coat painted surfaces with car wax.
Store the mini bike up on wooden blocks with the two
wheels clearing the ground. Put the vehicle in a shady and
cool place free from humidity and direct sunlight. Cover it
properly (not with plastic or painted materials). If possible,
store in a garage.
PROCEDURE FOR RETURNING VEHICLE TO SERVICE:
Change engine lubricant if unit has been out of service
longer than 4 months.
Drain atomized anti-rust oil from the fuel tank and ll with
fresh gasoline.
Clean the entire vehicle.
Make sure the vehicle is properly lubricated.
Perform the Pre-Ride Inspection as listed previously.
STORING THE MINI BIKE
If you do not use the mini bike for a long time, it will need
special service requiring appropriate materials, equipment,
and skill. For this reason, we recommend you trust this
maintenance work to an authorized service center. If you
wish to service the machine for storage yourself, follow the
general guidelines.
ENGINE LUBRICANT:
Change the engine lubricant.
FUEL:
Drain the fuel from the fuel tank using a hand pump. Spray
atomized anti-rust oil onto the inside wall of the tank and
then close the tank.
Drain the fuel from the carburetor by releasing the carbu-
retor drain screw.
NOTE: Used fuel should be disposed of properly to comply
with local laws and ordinances and not adversely affect the
environment.
SPARK PLUG:
Take out the spark plug.
Pour approximately 0.5-0.68 oz. (15-20 ml) of clean engine
lubricant into the cylinder.
Pull the pull cord half way several times to distribute the
oil through the engine.
Replace the spark plug.
CARBURETOR
DRAIN SCREW

20 — English
© 2014 Baja, Inc. All Rights Reserved.
This troubleshooting guide is provided to help you nd the cause of some common complaints. If these solutions do not
solve the problem contact your authorized service dealer.
COMPLAINT: Engine is hard to start or does not start at all.
1. Check that the fuel valve is in the ON position.
2. Check that the choke lever is in the ON position.
3. Make sure there is adequate fuel in the fuel tank.
4. Drain fuel from tank and carburetor. Replenish with fresh gasoline.
5. Remove and inspect the spark plug. Clean, dry, gap, or replace as needed.
6. Take the mini bike to a qualied mechanic to replace or repair faulty components as needed.
COMPLAINT: Engine lacks power.
1. Follow the procedures in Checking/Cleaning the Air Filter to be sure the air lter is clean.
2. Check for correct position of choke lever.
3. Drain fuel from tank and carburetor. Replenish with fresh gasoline.
4. Check idle speed and adjust, if necessary, following the procedures in Idle Speed Adjustment.
5. Take the mini bike to a qualied mechanic to replace or repair faulty components as needed.
TROUBLESHOOTING
/