Page is loading ...

Lullaby Magic
Owner's Manual
Manual del propietario
IS0055.10ESF
©2013 Artsana USA, INC. 03/13
Read all instructions BEFORE
assembly and USE of product.
KEEP INSTRUCTIONS FOR
FUTURE USE.
Lea todas las instrucciones ANTES
de armar y USAR este producto.
CONSERVE LAS INSTRUCCIONES
PARA USO FUTURO.

2
• PLEASE READ THESE INSTRUCTIONS
CAREFULLY TO ENSURE THE SAFETY
OF YOUR CHILD.
• ALWAYS PROVIDE THE
SUPERVISION NECESSARY FOR
THE CONTINUED SAFETY OF YOUR
CHILD. WHEN USED FOR PLAYING,
NEVER LEAVE CHILD UNATTENDED.
• Playard MUST be fully assembled
with all top rails and center floor hub
locked into position prior to use or
attaching bassinet. Make sure latches
are secure.
• DO NOT place child in playard unless
all top rails and center floor hub are
securely locked into position and
floor pad is in proper place. Infant
may roll into space between pad and
loose mesh sides causing suffocation.
• Stop using this product when your
child reaches 35 inches (89 cm) in
height, weighs more than 30lbs
(14kg), or is able to climb out.
• DO NOT use the bassinet when a
child is in the playard.
• FALL HAZARD - To help prevent
falls, do not use bassinet when infant
begins to push up on hands and
knees or weighs over 15lbs. (6.8kg),
whichever comes rst.
• Child can become entrapped and die
when improvised netting or covers are
placed on top of product. Never add
such items to conne child in product.
• DO NOT use bassinet on a bed, oor
or other surfaces.
• The bassinet is designed for use ONLY
with this Chicco Lullaby Magic Playard.
• Stop using the changing table when
your child reaches 25lbs (11.4 kg).
• Never use this product if there are
any loose or missing fasteners, loose
joints, broken parts, or torn mesh/
fabric. Check before assembly and
periodically during use. Contact
Chicco for replacement parts
and instruction if needed. Never
substitute parts.
• Although Chicco DOES NOT
RECOMMEND renishing this
product, if you choose to renish,
use a nontoxic nish specied for
children's products.
SUFFOCATION HAZARDS - Infants
can suffocate:
• In gaps between extra padding and
product side, and
• On soft bedding.
• Use ONLY the mattress provided
by Chicco. Never add a pillow,
comforter, or another mattress for
padding.
• If a sheet is used with the pad, use
only a tted playard sheet specically
designed to t snug with at least 2”
(5cm) under all sides of the mattress.
The sheet must allow proper use of
the mattress retention straps.
Failure to follow these warnings and the instructions could result in
serious injury or death
WARNING

3
• DO NOT leave child in product with
any side lowered. Be sure all sides
are raised and locked in position
whenever child is in product.
• NEVER use plastic shipping bags as
mattress covers. Do not use plastic
lm as mattress cover unless sold and
intended for that purpose. They can
cause suffocation.
• DO NOT use a water mattress with
this product.
STRANGULATION HAZARDS:
• NEVER use additional mattresses,
padding, sheets, or other objects that
will permit your child to climb out,
fall and/or be injured. If you choose
to ignore this warning, then remove
additional padding, large toy, and
other objects that could serve as steps
for climbing out when your child is
able to pull to a standing position.
• STOP using Bassinet when child
can roll over or push up on hands
and knees or reaches 15lbs. (6.8 kg),
whichever comes rst.
• Strangulation Hazard: Child can lift
changing table and get neck trapped
between changing table and playard
frame.
• Never leave changing table in place
when child is in the playard.
• Strings can cause strangulation! DO
NOT place items with a string around
child’s neck (hood strings, pacier
cords,etc.) or attach strings to toys.
• DO NOT suspend strings into the
bassinet or playard.
• DO NOT place the playard near a
window where cords from blinds or
drapes can strangle a child.
• Never leave the bassinet in place
when child is in playard.
OTHER HAZARDS:
• Keep bassinet and playard away from
stoves, heaters, replaces and other
hazards which can cause injury to
your child.
• To reduce the risk of SIDS (Sudden
Infant Death Syndrome), pediatricians
recommend healthy infants be
placed on their back to sleep unless
otherwise advised by a physician.
• DO NOT place more than one child in
bassinet or playard.
• DO NOT move or fold bassinet or
playard with child in it - child could be
injured.
Failure to follow these warnings and the instructions could result in
serious injury or death
WARNING

7
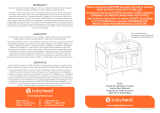
Parts List
Lista de las piezas
A. - Lullaby Magic Frame
A. - Estructura de Lullaby Magic
B. - Mattress Pad
B. - Colchoneta
C. - Bassinet
C. - Cuna
D. - Changing Pad
D. - Cambiador
A.
B.
C.
D.

10
Setting Up the Playard
Instalación del corralito
WARNING
Before use remove and dispose of
any plastic bags and keep them
out of reach of children to avoid the
danger of suffocation. Failure to
follow these warnings and
instructions could result in serious
injury or death. Make sure top rails
and center floor hub are locked and
secure before use. This product
requires adult assembly. Keep ngers
clear of top corners during setup.
ADVERTENCIA
Antes del uso, saque y deseche las
bolsas de plástico y manténgalas
alejadas del alcance de los niños
para evitar el peligro de asxia.
El incumplimiento de estas
advertencias e instrucciones puede
ocasionar lesiones graves o la muerte.
Asegúrese de que las barandas
superiores y la base central del piso
estén trabadas y jas antes de usar el
corralito. Este producto debe ser
ensamblado por un adulto.
Mantenga los dedos alejados de
las esquinas superiores durante el
montaje.

12
Setting Up the Playard
Instalación del corralito
2. With the Lullaby Magic Frame (A)
standing upright, pull the corners
apart as shown. The center floor hub
must be pulled up to allow the top
rails to lock. If needed, pull up on the
center floor hub release strap to lift
the floor.
2. Ponga la estructura de Lullaby
Magic (A) en posición vertical y
separe las esquinas como se muestra.
Debe tirarse de la base central del
piso hacia arriba para permitir que
las barandas superiores se traben. En
caso de ser necesario, tire de la correa
de liberación de la base central del
piso para levantarlo.
2

13
Setting Up the Playard
Instalación del corralito
“CLICK!”
“CLIC”
3. With the center hub even (or level)
with the 4 corners. Pull up on the top
rail center joint to "Click" lock them
into their open position. Both sides of
the center joint must lock for the top
rail to stay open. Repeat for all four
top rails. This step is very important for
the safety of your child. Make sure the
center hub is still pulled up during this
step or the side rails will not be able to
be latched.
3. La base central debe estar pareja
(o nivelada) con las 4 esquinas. Tire
hacia arriba en la junta del centro de
la baranda superior hasta escuchar el
clic que indica que se jó en posición
abierta. Para que la baranda superior
permanezca abierta se deben trabar
ambos lados de la junta central. Repita
para las cuatro barandas superiores.
Este paso es muy importante para la
seguridad del niño. Asegúrese de que
la base central esté todavía levantada
durante este paso o las barandas
laterales no se podrán trabar.
3
“CLICK!”
“CLIC”
“CLICK!”
“CLIC”
“CLICK!”
“CLIC”

14
Setting Up the Playard
Instalación del corralito
4. Push down on the center floor hub
until the bottom of the playard is flat.
4. Empuje la base central del piso
hacia abajo hasta que la base del
corralito esté plana.
4

15
Setting Up the Playard
Instalación del corralito
5. Install Mattress Pad (B), padded
side up. Do not use playard without
Mattress Pad and make sure to fold
strap underneath Mattress Pad
5. Instale la colchoneta (B), con el
lado acolchado hacia arriba. No use
el corralito sin la colchoneta.
5

16
Setting Up the Playard
Instalación del corralito
6. Locate 4 Mattress Pad strap holes
on the floor of the playard. Thread
the 4 hook and loop straps through
to the floor of the playard as shown.
6. Ubique los 4 oricios para las
correas de la colchoneta en el piso
del corralito. Pase las 4 correas
sujetadoras de velcro hasta el piso del
corralito como se muestra.
6

17
Setting Up the Playard
Instalación del corralito
7. Turn the playard on its side and pull
the straps through the floor of the
playard. Thread the straps through
the slot on the playard foot as shown.
Pull hook and loop strap tight and
then attach toghether to secure
Mattress Pad. Do this for all 4
mattress corners. Pull up on mattress
pad to make sure it is secure.
7. Ponga el corralito de lado y tire de
las correas hasta que pasen a través
del piso del corralito. Pase las correas
a través de la ranura de la pata del
corralito como muestra la imagen.
Suba las correas sujetadoras de velcro
y luego ajústelas para asegurar la
colchoneta. Haga esto en las 4
esquinas de la colchoneta. Tire de la
colchoneta hacia arriba para vericar
la jación asegurar para.
7

18
Setting Up the Bassinet
Instalación del la cuna
8. Undo the hook and loop straps
from the frame and remove Mattress
Pad from playard.
8. Afloje las correas sujetadoras de
velcro de la estructura y saque la
colchoneta del corralito.
8

20
9B
9B. Unfold the Bassinet ends over
the playard frame. Fit the 4 corners
of the Bassinet over the 4 corner
Bassinet Supports on the Lullaby
playard as shown 9C. Once the
Bassinet is resting on the supports
push down on the center joints on the
long sides of the Bassinet 9D. This
will secure the Bassinet into place.
Push down on Bassinet to be sure it is
secure.
9B. Abra los extremos de la cuna
sobre la estructura del corralito. Calce
las 4 esquinas de la cuna sobre los 4
soportes para cuna en las esquinas del
corralito Lullaby como se muestra en
9C. Una vez que la cuna esté apoyada
sobre los soportes, presione hacia abajo
las juntas centrales de los lados largos
de la cuna como se muestra en 9D.
Esto jará la cuna en su lugar. Empuje
la cuna hacia abajo para
asegurarse de que esté rme.
9C
Bassinet Supports
Admite cuna
9D
Setting Up the Bassinet
Instalación del la cuna

21
10. The Mattress Pad is slightly larger
than the opening of the Bassinet. Do
not fully open the Mattress Pad. Insert
the Mattress Pad on an angle and slide
it towards the side opposite of you.
Adjust the mattress to t the opposite
corners before inserting the end
closest to you. When the Mattress
Pad is fully inserted on the bottom you
can flatten it out. This will make the
sides taught and remove any slack in
the fabric. Always check to make sure
the hook and loop straps are folded
under the Mattress Pad.
10. La colchoneta es ligeramente más
grande que la apertura de la cuna. No
abra la colchoneta completamente.
Inserte la colchoneta en un ángulo y
deslícela hacia el lado opuesto a donde
usted se encuentra. Ajuste la
colchoneta para que calce en las
esquinas opuestas antes de insertar el
extremo que se encuentra más cerca
suyo. Cuando la colchoneta esté
completamente encajada sobre el
fondo puede aplanarla. Esto dejará los
lados rígidos y eliminará cualquier
parte oja en la tela. Siempre revise
que las correas sujetadoras de velcro
estén plegadas debajo de la
colchoneta.
10
WARNING
Do not place Bassinet on unit if a
child is in the playard. Make sure
playard is fully assembled.
ADVERTENCIA
No coloque la cuna en la unidad si hay
un niño en el corralito. Asegúrese de
que el corralito esté completamente
armado.
Setting Up the Bassinet
Instalación del la cuna

22
Attaching Accessory Caddy
Cómo fijar el bolsillo para accesorios
11. Attach the Accessory Caddy (I)
to the side top rail of the playard as
shown.
11. Fije el bolsillo para accesorios (I) en
la baranda lateral del corralito como
se muestra.
11

23
Changing Table Warnings
Advertencias para el cambiador
WARNING
FALL HAZARD - To prevent
death or serious injury, always
keep child within arm's reach.
• Never leave child unattended.
• Stop using the changing table
when your child reaches 25lbs
(11.4kg).
• Do not use on the oor, bed,
counter or other surfaces.
• Do not use changing table as a
sleeping or play area.
• Always remove the changing
table when your child is in the
playard.
• Do not use changing unit if it is
damaged or broken.
ADVERTENCIA
RIESGO DE CAÍDAS: para evitar
la muerte o lesiones graves,
mantenga siempre al niño al
alcance de la mano.
• Nunca deje al niño desatendido.
• Deje de utilizar el cambiador
cuando el niño pese 25 libras
(11.4kg).
• No lo use sobre el piso, la cama,
el mostrador u otras supercies.
• No use el cambiador como lugar
para jugar o dormir.
• Saque siempre el cambiador
cuando el niño esté en el corralito.
• No use el cambiador si está
dañado o roto.

24
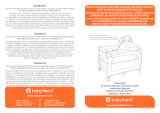
Assembling Changing Table
Cómo armar el cambiador
12. Locate the opening in the side of
the Changing Pad (D) and insert the
Changing Table Frame Bar (H). Both
ends and snap buttons should be
visible after assembling.
12. Ubique la abertura en el costado
del cambiador (D) e inserte la barra
de la estructura del cambiador (H).
Después del armado ambos extremos
y los botones de broche deben quedar
visibles.
12
Snap button
Botón de broche
Bottom of Changing pad
Parte inferior del cambiador

25
Assembling Changing Table
Cómo armar el cambiador
13. Attach the Changing Table Frame
End - Left (E) to the Changing Table
Frame Side (G) by lining up the tabs
and sliding the Frame End down until
it "Clicks" into place. Repeat for the
Changing Table Frame End - Right (F).
13. Fije el extremo de la estructura
del cambiador (izquierdo) (E) en
el costado de la estructura del
cambiador (G). Para ello alinee las
lengüetas y deslice el extremo de la
estructura hacia abajo hasta escuchar
el clic que indica que está en su lugar.
Repita para el extremo de la
estructura del cambiador
(derecho) (F).
13
“CLICK!”
“CLIC”

26
Assembling Changing Table
Cómo armar el cambiador
14. With the bottom of the Changing
Pad (D) facing up, push the ends of
the Changing Table Frame Bar (H) into
the changing table frame assembly
until it "Click" locks in place."
14. Con la parte inferior del cambiador
(D) hacia arriba, empuje los extremos
de la barra de la estructura del
cambiador (H) dentro de la estructura
del cambiador hasta escuchar el clic
que indica que se jó en su lugar.
14
“CLICK!”
“CLIC”
“CLICK!”
“CLIC”

27
Assembling Changing Table
Cómo armar el cambiador
15. Pull the fabric of the Changing Pad
(D) over and around the edges of the
changing table frame assembly as
shown.
15. Pase la tela del cambiador (D) por
encima y alrededor de los bordes de
la estructura del cambiador como se
muestra.
15
/