
www.wal-mart.com
Part No. 71271 (2/01)
Owner’s Guide
Model 106679
Important Safeguards ....................... 2
Service Information ........................... 5
Assembly .........................................6-7
Use ...................................................8-9
Automatic Suction Shut Off .............9
Maintenance..................................... 10
Warranty ...........................................11
Customer Order Form ..................... 13
For Customer Assistance Please Call: 1-877-207-0923
Household Type

To reduce the risk of fire, electric shock, or injury.
• Do not expose to rain. Store indoors.
• Do not leave vacuum cleaner when plugged in. Turn
off the switch and unplug the electrical cord when
not in use and before servicing.
• Do not allow to be used as a toy. Close attention is
necessary when used by or near children.
• Use only as described in this manual. Use only
manufacturer’s recommended attachments.
• Do not use with damaged cord or plug. If vacuum
cleaner is not working as it should, has been
dropped, damaged, left outdoors, or dropped into
water, return it to a service center before using.
• Do not pull or carry by cord, use cord as a handle,
close a door on cord, or pull cord around sharp
edges or corners. Do not run vacuum cleaner over
cord. Keep cord away from heated surfaces.
• Connect to a properly grounded outlet only (refer
to Grounding Instructions).
• Do not use extension cords or outlets with
inadequate current carrying capacity.
• Turn off all controls before unplugging.
• Do not unplug by pulling on cord. To unplug, grasp
the plug, not the cord.
• Do not handle plug or vacuum cleaner with wet
hands.
Vacuum Cleaner Safety
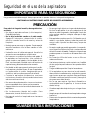
IMPORTANT SAFEGUARDS
When using an electrical appliance, basic precautions should always be followed, including the following:
READ ALL INSTRUCTIONS BEFORE USING THIS VACUUM CLEANER.
WARNING
SAVE THESE INSTRUCTIONS
2
• Do not put any object into openings. Do not use with
any opening blocked; keep free of dust, lint, hair, and
anything that may reduce airflow.
• This vacuum cleaner creates suction. Keep hair, loose
clothing, fingers, and all parts of body away from
openings and moving parts.
• Do not pick up anything that is burning or smoking,
such as cigarettes, matches, or hot fireplace or
barbeque ashes. Live sparks or embers could start a
fire in waste material inside the tank.
• Do not use without motor filter or with a damaged
filter.
• Use safety goggles to avoid the discharge air as
particles in the air could cause eye damage.
• Use extra care when cleaning on stairs.
• If the machine tips over during use, shut it off
immediately, set it upright, and wait for the motor to
stop completely. This allows the ball float to return
to normal position and permits proper airflow
through the cleaner.
• Do not use to pick up flammable or combustible
liquids such as gasoline, or use in areas where they
may be present.
• Store your cleaner indoors and in a cool, dry area.
• Keep your work area well lighted.
• Unplug electrical appliances before vacuuming them.
Page is loading ...

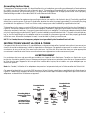
Grounding Instructions
This appliance must be grounded. If it should malfunction or breakdown, grounding provides a path of least resistance
for electric current to reduce the risk of electric shock. This appliance is equipped with a cord with an equipment-
grounding conductor and grounding plug. The plug must be plugged into an appropriate outlet that is properly
installed and grounded in accordance with all local codes and ordinances.
DANGER
Improper connection of an equipment-grounding conductor can result in risk of electric shock. Check with a qualified
electrician or service person if you are in doubt as to whether the outlet is properly grounded. Do not modify the plug
provided with the appliance. If it will not fit the outlet, have proper outlet installed by a qualified technician.
This appliance is for use on a nominal 120 volt circuit and has a grounding plug that looks like the plug illustrated in
Figure A. A temporary adapter which looks like the adapter illustrated in Figure B may be used to connect this plug to
a two-pole receptacle, as shown, if a properly grounded outlet is not available. The temporary adapter should be used
only until a properly grounded outlet, Figure A, can be installed by a qualified electrician. The green colored rigid ear,
lug, or the like extending from the adapter must be connected to a permanent ground such as a properly grounded
outlet box cover. Whenever the adapter is used, it must be held in place by a metal screw.
NOTE: In Canada, the use of a temporary adapter is not permitted by the Canadian Electrical Code.
INSTRUCTIONS VISANT LA MISE À TERRE
Cet appareil doit être mis à la terre. En cas défaillance ou de panne éventuelles, la mise à la terre fournit au courant un
chemin de moindre résistance qui réduit le risque de choc électrique. Cet appareil est pourvu d’un cordon muni d’un
conducteur de terre et d’une fiche avec broche de terre. La fiche doit être branchée dans une prise appropriée
correctement installée et mise à la terre conformément aux règlements et ordonnances municipaux.
AVERTISSEMENT
Un conducteur de terre mal raccordé peut entraîner un risque de choc électrique. Consulter un électricien ou un
technicien d’entretien qualifié si vous n’êtes pas certain que la prise est correctement mise à la terre. Ne pas modifier
la fiche fournie avec l’appareil-si elle ne eput être insérée dans la prise, faire installer une prise adéquate par un
électricien qualifié.
Note. Au Canada, l’utilisation d’un adaptateur temporaire n’est pas autorisée par le Code canadien de l’électricité.
Cet appareil est destiné à un circuit de 120V et est muni d’une fiche de mise à la terre semblable à celle illustrée par le
Figure A. S’assurer que l’appareil est branché à une prise de courant ayant la même configuration que la fiche. Aucun
adaptateur ne devrait être utilisé avec cet appareil.
Figure
A
Grounded Outlet
Box
Boîte de Prise de
Terre
Grounding Blade is
Longest of the Three
Blades
La Lame de Terre
Est La Plus Longue
Des Trois Lames
Figure
B
Grounded Outlet
Box
Boîte de Prise de
Terre
Adapter
Adaptateur
Metal
Screw
Vis de
Métal
Grounding
Tab
Taquet de
Terre
4

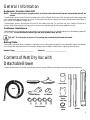
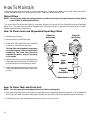
General Information
Automatic Suction Shut-Off
NOTE: The unit must be used in upright position at all times, otherwise the ball float will automatically shut-off the
suction.
The automatic suction shut-off functions when tank is full of liquid. As the tank fills, the ball float (inside cage) rises
until it seats itself against bottom of motor. This shuts off the suction causing the motor sound to become higher in
pitch. When this happens, empty tank.
The automatic suction shut-off also functions if the cleaner tips over. To continue use, turn cleaner off and set it
upright. Wait a few seconds to allow motor to come to a complete stop so ball drops; restart the motor.
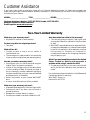
Customer Assistance
The instructions in this booklet serve as a guide to routine maintenance. For additional service information please call,
877-207-0923. You should know the model, type and serial numbers when you call.
DO NOT OIL the motor at any time. The bearings are permanently lubricated and sealed.
Rating Plate
The model, type, and serial numbers are indicated on the rating plate located on the underneath side of the blower.
For prompt and complete service information, always refer to these numbers when inquiring about service.
Model & Ty
pe__________________________ Serial No. _____________________________
5
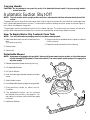
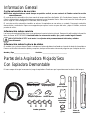
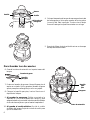
Contents of Wet/Dry Vac with
Detachable Blower
Unpack accessories from carton and remove vacuum cleaner. Additional accessories may be packed inside tank.
Hose
Disposable
Paper
Filter Bag
Swivel Casters
Rubber
Band
Wands
Foam Filter
Floor NozzleSqueegee
Blower Nozzle Air Diffuser

6
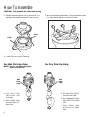
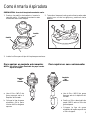
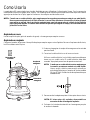
1. Squeeze latches together; lift to remove lid. The
package of accessories is stored inside the tank.
How To Assemble
CAUTION: Fully assemble the cleaner before using.
2. With tank placed upside down, firmly press swivel caster
into each socket. Be sure it snaps into place.
Latch
Latch
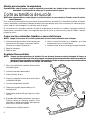
3. Install filters for type of cleaning.
a. Pull foam filter (WD-1)
over ball float cage.
b. Slide disposable paper
filter (WD-2) over foam
filter.
c. Place rubber band
around top of paper
filter.
Ball
Float
Cage
For Wet Pick-Up Only:
NOTE: Do not use disposable paper
filter for wet pick-up.
For Dry Pick-Up Only:
a. Pull foam filter
(WD-1)over ball
float cage.
b. Place rubber band
around bottom of
foam filter.
Ball
Float
Cage

7
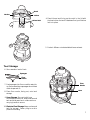
4. Place lid over tank lining up the notch in the lid with
the hose inlet on the tank. Press down firmly until latches
lock into place.
5. Push air diffuser onto detachable blower exhaust.
Hose Inlet
Tool Storage
<<
<<
<
Squeegee
Floor
Nozzle
6. Store wands on back of tank.
7. Push squeegee into floor nozzle for wet pick-
up. Remove and store squeegee alone to best
retain shape and fit.
8. Place floor nozzle, facing out, onto tank
storage.
9. Hose Storage. Store unit with hose
connected to hose inlet. Wrap hose around
tank and slide wand end underneath one
carrying handle to secure.
10. Electrical Cord Storage. Wrap cord around
tank for storage. Fasten plug to cord to
prevent unwinding.
Wands
Floor
Nozzle
Hose
Notch
Latches
Latches

8
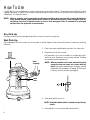
How To Use
The GE Wet/Dry Vac is designed for various cleaning chores around the home. The accessories are sufficient to clean
a garage, workshop, or patio. Yet, the cleaner is gentle enough to use in the home. It will quickly pick-up spills, water in
a basement, or kitchen accidents.
NOTE: When an extension cord is used, make sure the plug connections does not come into contact with the liquid.
Never operate vacuum cleaner without motor filter(s) or with defective filter(s). Never use paper filter for
wet pick-up. See How To Maintain section for care of foam and paper filters. If operated for a prolonged
period of time, ear protection is recommended.
Dry Pick-Up
Use floor nozzle (without squeegee attached) or hose for dry pick-up cleaning.
Wet Pick-Up
Place squeegee into floor nozzle to pick-up water or spilled liquids. Filters should be clean for maximum cleaning
efficiency.
1. Push hose coupling with twisting motion into hose inlet.
2. Plug electrical cord into outlet.
Use extension cord (not provided) for models with short
electrical cord. Extension cord must be marked “Suitable
for use with outdoor appliances”.
NOTE: When an extension cord is used, make sure the plug
connection does not come into contact with any
liquid. Use a grounded extension cord with 3-prong
plug and 3-pole receptacle; 16 gauge, SJTW-A type.
Loop the cords to prevent unplugging.
3. Push power switch to turn on.
NOTE: Detachable blower switch is located on top of blower
handle.
4. Place wand(s) onto hose and attach desired tool.
Power Switch
Hose
Coupling
Hose
Inlet

9
Carrying Handle
CAUTION: Do Not attempt to carry wet/dry vac by lid or detachable blower handle. Only use carrying handles
molded onto tank.
Automatic Suction Shut-Off
NOTE: The unit must be used in upright position at all times, otherwise the ball float will automatically shut-off the
suction.
The automatic suction shut-off functions when tank is full of liquid. As the tank fills, the ball float (inside cage) rises
until it seats itself against bottom of motor. This shuts off the suction causing the motor sound to become higher in
pitch. When this happens, empty tank.
The automatic suction shut-off also functions if the cleaner tips over. To continue use, turn cleaner off and set it
upright. Wait a few seconds to allow motor to come to a complete stop so ball drops; restart the motor.
How To Empty Wet or Dry Contents From Tank
NOTE: Turn off power switch and unplug electrical cord before emptying tank.
1. Raise hose above tank to drain excess liquid into
tank.
(For wet pick-up only.)
2. Remove hose.
3. Remove lid.
4. Empty contents into suitable drain for liquids or container
for dry contents.
5. Replace lid and hose and continue cleaning.
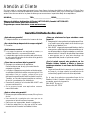
1. Release detachable blower latches by turning.
2. Lift detachable blower.
3. Pull off air diffuser.
4. Push and twist large diameter wand over blower
outlet.
5. Attach blower nozzle.
6. Hold detachable blower by large carrying handle.
7. Grasp auxiliary handle for better control,
if needed.
8. The detachable blower can be replaced
and latched onto the tank in any position. For
user safety, the blower outlet should aim away
from user.
9. Replace air diffuser.
Detachable Blower
NOTE: Always wear safety goggles (not provided). Never point blower toward people, animals, or objects that may be
injured/damaged by flying debris. These units must NOT be used to power a paint sprayer or to supply air to
any other sprayer.
1
2
3
4
5
6
7

10
How To Maintain
These instructions serve as a guide to routine maintenance. To avoid unnecessary service calls, clean motor filter,
change disposable paper filter, and empty tank often. Empty all liquids after each use.
Motor Filters
NOTE: Turn off power switch and unplug electrical cord before servicing. Never operate vacuum cleaner without
motor filter(s) or with defective filter(s).
The motor filter(s) must be kept clean for maximum efficiency and proper airflow. Periodically replace disposable
paper filter. The paper filter should be changed often when vacuuming fine particles like plaster dust or powder
substances which tend to clog filter(s).
1. Release motor housing.
2. Remove filters from ball float cage.
3. Shake foam filter vigorously over a suitable
container to remove loose particles.
The foam filter can be washed in soapy water
for further cleaning. Shake out water before
reinstalling. The foam filter should be
completely dry before using for dry pickup
or for storage.
4. Replace foam filter over ball float cage; place
rubber band around bottom of foam filter if
you plan wet pick-up otherwise go to step 5.
5. Install new disposable paper filter; secure with
rubber band around top of paper filter for dry
pick-up.
How To Clean Foam and Disposable Paper Bag Filters
How To Clean Tank and Store Unit
NOTE: Turn off power switch and unplug electrical cord before cleaning tank.
1. Empty tank of all liquids and rinse inside thoroughly before storing especially after picking up wet or sticky substances
other than plain water. Use warm, soapy water to clean tank and tools if wet sticky liquids have been vacuumed.
2. Clean and dry tank, hose, and accessories before storing in a cool, dry area.
Filters For
Wet Pick-up
Filters For
Dry Pick-up
Ball Float
Cage
Disposable
Paper
Filter (WD-2)
Foam
Filter
(WD-1)
Rubber Band

11
Customer Assistance
If you have a claim under this warranty, please call our Customer Assistance Number. For faster service please have
model, series, and type numbers ready for operator to assist you. These numbers can be found on the rating plate on
the bottom of your cleaner.
MODEL:______________________ TYPE:_____________________ SERIES:_________________
Customer Assistance Number, 1-877-207-0923; Canada, 1-877-556-0973
Keep this number for future reference!
E-mail inquiries:
www.wal-mart.com
Two-Year Limited Warranty
What does your warranty cover?
• Any defect in material or workmanship.
For how long after the original purchase?
• Two years.
What will we do?
• Provide you with a new, or at our option, a
reconditioned unit.
• The exchange unit is warranted for the remainder
of your product’s original two-year warranty period.
How do you make a warranty claim?
• Properly pack your unit. We recommend using the
original carton and packing materials.
• Include in the package a copy of the sales receipt
or other evidence of date of original purchase. If
the unit was a gift, provide a statement specifying
the date received. Also print your name and address
and a description of the defect.
• Return the product to your nearest WAL-MART
store.
• A new or reconditioned unit will be provided.
What does your warranty not cover?
• Disposable dust bags, belts, filters and light bulbs.
• Commercial use or any other use not found in
printed directions.
• Damage from misuse, abuse, or neglect.
• Products purchased or serviced outside the USA.
How does state law relate to this warranty?
• This warranty gives you specific legal rights, and
you may also have other rights which vary from state
to state.
• WAL-MART expressly disclaims all responsibility for
consequential damages or incidental losses caused
by use of this appliance. Some states do not allow
this exclusion or limitation of incidental or
consequential losses so the foregoing disclaimer
may not apply to you.
What if you purchased this product in the United
Sates, Canada or Mexico and encounter a
problem while using it outside the USA?
• The warranty is valid only in the country of purchase
and if you follow the warranty claim procedure as
noted.
For products purchased outside the United States and
Canada, see dealer for warranty.
WAL-MART Stores, Inc.
Bentonville, AR 72716

TO ORDER BY PHONE, PLEASE CALL:
1-877-207-0923 between 7 a.m. and 8 p.m.
Central Standard Time, Monday - Friday
or FAX to 1-309-823-5789.
S
O
L
D
T
O
S
H
I
P
T
O
NAME
ADDRESS (street address needed for UPS)
CITY
STATE
ZIP
DAYTIME PHONE
EVENING PHONE
FAX
E-MAIL
NAME
ADDRESS (street address needed for UPS)
CITY
STATE
ZIP
DAYTIME PHONE
EVENING PHONE
FAX
E-MAIL
IMPORTANT: Be sure to include your model, type, and serial number. These numbers may be found on the rating plate.
MODEL NUMBER: ____________________ TYPE: ____________ SERIAL NUMBER: ______________________
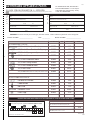
Part Number Qty. Price (USD) Total
ACCESSORIES/TOOLS:
1 1/4 inch Extension Wand 61479 1.49
1 1/4 inch Floor Nozzle with Squeegee 61480 4.39
1 1/4 inch Squeegee only 61481 1.49
1 1/4 inch Hose 61482 10.79
2 1/2 inch Extension Wand 61484 4.09
2 1/2 inch Utility Nozzle 61485 3.09
2 1/2 inch Blower Nozzle 61486 4.09
2 1/2 inch Hose 61487 14.19
2 1/2 inch Kit
(wand, hose, utility nozzle, blower nozzle) 61488 32.79
MISCELLANEOUS PARTS:
Exhaust Air Diffuser 61489 3.09
Caster Wheel 61490 1.39
Ball Float 61491 7.19
Extension Cord 61492 16.69
Filter Cage 61493 3.79
Printed in U.S.A.
71380
BY MAIL: Simply fill out this form and mail to address above. Please include day and evening phone numbers
Method of Payment:
Check or Money Order (payable to Authorized Appliance Parts)
Month
Exp. Date:
_
Year
Signature (full name as shown on acct.) _____________________________________________
TOTAL
(prices subject to change without notice)
TAX
(add state tax & local taxes as required by law)
POSTAGE & HANDLING CHARGE
(within U.S.A.)
TOTAL
(please no cash or C.O.D.s)
$5.50
AUTHORIZED APPLIANCE PARTS
P.O. BOX 2799, BLOOMINGTON, IL 61702-2799
2/01
PAPER FILTERS AND FOAM FILTERS MUST BE PURCHASED AT YOUR LOCAL WAL-MART STORE.
#
Page is loading ...
Page is loading ...
Page is loading ...
Page is loading ...
Page is loading ...
Page is loading ...
Page is loading ...
Page is loading ...
Page is loading ...
Page is loading ...
-
 1
1
-
 2
2
-
 3
3
-
 4
4
-
 5
5
-
 6
6
-
 7
7
-
 8
8
-
 9
9
-
 10
10
-
 11
11
-
 12
12
-
 13
13
-
 14
14
-
 15
15
-
 16
16
-
 17
17
-
 18
18
-
 19
19
-
 20
20
-
 21
21
-
 22
22


Ask a question and I''ll find the answer in the document
Finding information in a document is now easier with AI
in other languages
- español: GE 71271 Manual de usuario
Related papers
Other documents
-
Eureka 2800 Series User manual
-
MasterCraft 2012W Owner's manual
-
 Vertical Communications UV800B User manual
-
Powr-Flite PF25-39 Owner's manual
-
Shop-Vac P12S-2S100 User manual
-
ProTeam 107128 Owner's manual
-
-
ProTeam 1071280 Owner's manual
-
-
RIDGID WD1665 Owner's manual
