Rommelsbacher CT 3408/IN Owner's manual
- Category
- Hobs
- Type
- Owner's manual
This manual is also suitable for
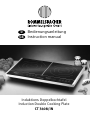
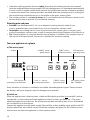
Rommelsbacher CT 3408/IN: This induction double cooking plate is a versatile and powerful kitchen appliance that offers a range of features to make cooking easier and more efficient. With 10 power levels and 10 temperature settings, you can precisely control the heat to suit your cooking needs. The induction technology heats the bottom of your cookware directly, so there is no wasted energy and your food cooks quickly and evenly. The cooking plate is also easy to clean, as the surface does not get hot during use.
Rommelsbacher CT 3408/IN: This induction double cooking plate is a versatile and powerful kitchen appliance that offers a range of features to make cooking easier and more efficient. With 10 power levels and 10 temperature settings, you can precisely control the heat to suit your cooking needs. The induction technology heats the bottom of your cookware directly, so there is no wasted energy and your food cooks quickly and evenly. The cooking plate is also easy to clean, as the surface does not get hot during use.


-
 1
1
-
 2
2
-
 3
3
-
 4
4
-
 5
5
-
 6
6
-
 7
7
-
 8
8
-
 9
9
-
 10
10
-
 11
11
-
 12
12
-
 13
13
-
 14
14
-
 15
15
-
 16
16


Rommelsbacher CT 3408/IN Owner's manual
- Category
- Hobs
- Type
- Owner's manual
- This manual is also suitable for
Rommelsbacher CT 3408/IN: This induction double cooking plate is a versatile and powerful kitchen appliance that offers a range of features to make cooking easier and more efficient. With 10 power levels and 10 temperature settings, you can precisely control the heat to suit your cooking needs. The induction technology heats the bottom of your cookware directly, so there is no wasted energy and your food cooks quickly and evenly. The cooking plate is also easy to clean, as the surface does not get hot during use.
Ask a question and I''ll find the answer in the document
Finding information in a document is now easier with AI
in other languages
Related papers
-
Rommelsbacher CT 2215 Owner's manual
-
-
-
-
-
-
-
-
-
Rommelsbacher EBC 3777/IN Owner's manual
Other documents
-
Airforce Onboard Flex User manual
-
Steba IK 60 E User manual
-
-
-
BOMANN EBKI 961 User manual
-
MIA IKP 2206 Owner's manual
-
Steba IK 750 User manual
-
Silvercrest SDI 3500 A1 Operating Instructions Manual
-
-