Brother HL-5350DN User manual

Category
Print & Scan
Type
User manual

The Brother HL-5350DN is a versatile printer designed for both home and office use, offering high-quality printing, copying, and scanning capabilities. With its fast print speeds, automatic duplex printing, and wireless connectivity, this printer is perfect for handling a variety of tasks. Additionally, the HL-5350DN features a user-friendly control panel, making it easy to operate and maintain.

The Brother HL-5350DN is a versatile printer designed for both home and office use, offering high-quality printing, copying, and scanning capabilities. With its fast print speeds, automatic duplex printing, and wireless connectivity, this printer is perfect for handling a variety of tasks. Additionally, the HL-5350DN features a user-friendly control panel, making it easy to operate and maintain.

1
Start Here
HL-5340D/HL-5350DN
Quick Setup Guide
(EU only)
Before you can use the printer, read this Quick Setup Guide for the correct setup and installation.
To view the Quick Setup Guide in other languages, please visit http://solutions.brother.com
/.
1
Unpack the printer and check the components
WARNING
Plastic bags are used in the packaging of your printer. To avoid danger of suffocation, please keep
these bags away from babies and children.
IMPORTANT
DO NOT connect the interface cable yet.
a Front Cover Release Button
b Control Panel
c Face-down Output Tray
Support Flap 1 (Support Flap 1)
d Front Cover
e Paper Tray
f Power Switch
g Face-down Output Tray
Support Flap 2 (Support Flap 2)
h Face-down Output Tray
i Multi-purpose Tray (MP Tray)
CD-ROM
(including User's Guide and
Network User's Guide)
Quick Setup Guide
Drum Unit and Toner
Cartridge Assembly
AC Power Cord
Note
Save all packing materials and the box in case for any reason you must ship your printer.
The interface cable is not a standard accessory. Buy the appropriate interface cable for the interface you
want to use (USB, Parallel or Network).
USB cable
Please make sure you use a USB 2.0 interface (Type A/B) cable that is no longer than 6 feet (2.0 meters).
When you use a USB cable, make sure you connect it to the USB port of your computer and not to a USB port on a
keyboard or non-powered USB hub.
Parallel cable
DO NOT use a parallel interface cable that is longer than 6 feet (2.0 meters).Use a shielded interface cable that is IEEE
1284-compliant.
Network cable (For HL-5350DN)
Use a straight-through Category5 (or greater) twisted-pair cable for 10BASE-T or 100BASE-TX Fast Ethernet Network.
1
1
2
3
5
8
6
7
9
4
EEU-ENG Version 1
2
Symbols used in this guide
2
Install the drum unit and
toner cartridge assembly
a Remove the packing tape from the outside of
the printer.
b Press the front cover release button and open
the front cover a.
c Unpack the drum unit and toner cartridge
assembly.
Note
Keep a minimum gap around the printer as shown in the illustration.
WARNING
WARNINGS tell you what to do to prevent possible personal injury.
CAUTION
CAUTIONS specify procedures you must follow or avoid to prevent possible minor
injuries.
IMPORTANT
IMPORTANT specify procedures you must follow or avoid to prevent possible damage
to the printer or other objects.
Electrical Hazard icons alert you to a possible electrical shock.
Hot Surface icons warn you not to touch machine parts that are hot.
Note
Notes tell you how you should respond to a situation that may arise or give tips about
how the current operation works with other features.
User's Guide
Network User's
Guide
Indicates reference to the User's Guide or Network User's Guide which is on the
CD-ROM we have supplied.
130mm
(5.12 in.)
100mm
(4 in.)
100mm
(4 in.)
100mm(4 in.)
IMPORTANT
DO NOT connect the interface cable yet.
1
1
3
d Gently shake it from side to side several times
to distribute the toner evenly inside the
assembly.
e Put the drum unit and toner cartridge assembly
into the printer until it clicks into place.
f Close the front cover of the printer.
3
Load paper in the paper
tray
a Pull the paper tray completely out of the printer.
b While pressing the blue paper-guide release
lever a, slide the paper guides to fit the paper
size you are loading in the tray. Make sure that
the guides are firmly in the slots.
c Fan the stack of paper well to avoid paper jams
and misfeeds.
d Put paper in the tray, and make sure that the
paper is below the maximum paper mark a.
The side to be printed on must be face down.
e Put the paper tray firmly back in the printer.
Make sure that it is completely inserted into the
printer.
IMPORTANT
Make sure the paper guides touch the sides of
the paper so it will feed properly.
1
1
1
1
4
4
Print a test page
a Make sure that the printer power switch is off.
Connect the AC power cord to the printer.
b Turn on the printer power switch.
c Unfold support flap1.
d After the printer has finished warming up, the
Status LED stops blinking and stays green.
e Press Go. The printer prints a test page. Check
that the test page has printed correctly.
Now go to
Go to the next page to install the printer driver.
IMPORTANT
DO NOT connect the interface cable yet.
Note
This function will not be available after the first
print job you send from your computer.
5
Windows
®
Windows
®
Macintosh
Parallel Wired Network
Windows
®
Macintosh
USB
3
5
Choose your connection type
For Parallel interface cable
Windows
®
, go to page 9
For Wired Network
Windows
®
, go to page 11
Macintosh, go to page 15
For USB interface cable
Windows
®
, go to page 6
Macintosh, go to page 8
6
Windows
®
USB
For USB Interface Cable Users
6
Install the printer driver
and connect the printer
to your computer
a Turn off the printer power switch.
b Make sure the USB interface cable is NOT
connected to the printer, and then begin
installing the printer driver. If you have already
connected the cable, remove it.
c Turn on your computer. (You must be logged
on with Administrator rights.)
d Put the supplied CD-ROM into your CD-ROM
drive. The opening screen will appear
automatically.
Choose your printer model and the language.
e Click Install Printer Driver on the menu
screen.
f Click USB cable users.
g When the License Agreement window
appears, click Yes if you agree to the License
Agreement.
h Remove the label covering the USB interface
connector.
IMPORTANT
DO NOT connect the USB interface cable yet.
Note
If the Found New Hardware Wizard appears on
your computer, click Cancel.
Note
For Windows Vista
®
, when the User Account
Control screen appears, click Continue.
If you want to install the PS driver (Brother’s
BR-Script Driver), choose Custom setup and
then follow the on-screen instructions. When
the Select Components screen appears,
check PS (PostScript Emulation) Driver, and
then continue following the on-screen
instructions.
7
Windows
®
USB
Windows
®
Macintosh
USB
i When this screen appears, make sure the
printer power switch is on.
Connect the USB cable to the USB connector
marked with a symbol, and then connect
the cable to the computer. Click Next.
j Click Finish.
Note
If you want to register your product on-line,
check On-Line Registration.
If you do not want to set your printer as Default
printer, uncheck Set as Default Printer.
If you want to disable the Status Monitor,
uncheck Enable Status Monitor.
Finish
The installation is now
complete.
Note
XML Paper Specification Printer Driver
The XML Paper Specification Printer Driver is the
most suitable driver when printing from the
applications that use the XML Paper Specification
documents. Please download the latest driver by
accessing the Brother Solutions Center at
http://solutions.brother.com/
.
8
MacintoshUSB
For USB Interface Cable Users
6
Connect the printer to
your Macintosh and
install the driver
a Remove the label covering the USB interface
connector.
b Connect the USB cable to the USB connector
marked with a symbol, and then connect
the cable to your Macintosh.
c Make sure the printer power switch is on.
d Turn on your Macintosh. Put the supplied CD-
ROM into your CD-ROM drive.
e Double-click the HL5300 icon on your desktop.
Double-click the Start Here icon. Follow the
on-screen instructions.
f Click Install Printer Driver on the menu
screen.
g Click USB cable users and follow the
on-screen instructions. Then, restart your
Macintosh.
h The Brother software will search for the Brother
printer. During this time the following screen
will appear.
i Choose the printer you wish to connect, and
then click OK.
j When this screen appears, click OK
16
IMPORTANT
DO NOT connect the printer to a USB port on
a keyboard or a non-powered USB hub.
Note
Please see the User’s Guide on the CD-ROM to
install the PS driver (Brother’s BR-Script Driver).
Finish
The installation is now
complete.
9
Windows
®
Parallel
Windows
®
Parallel
For Parallel Interface Cable Users
6
Install the driver and
connect the printer to
your computer
a Turn off the printer power switch.
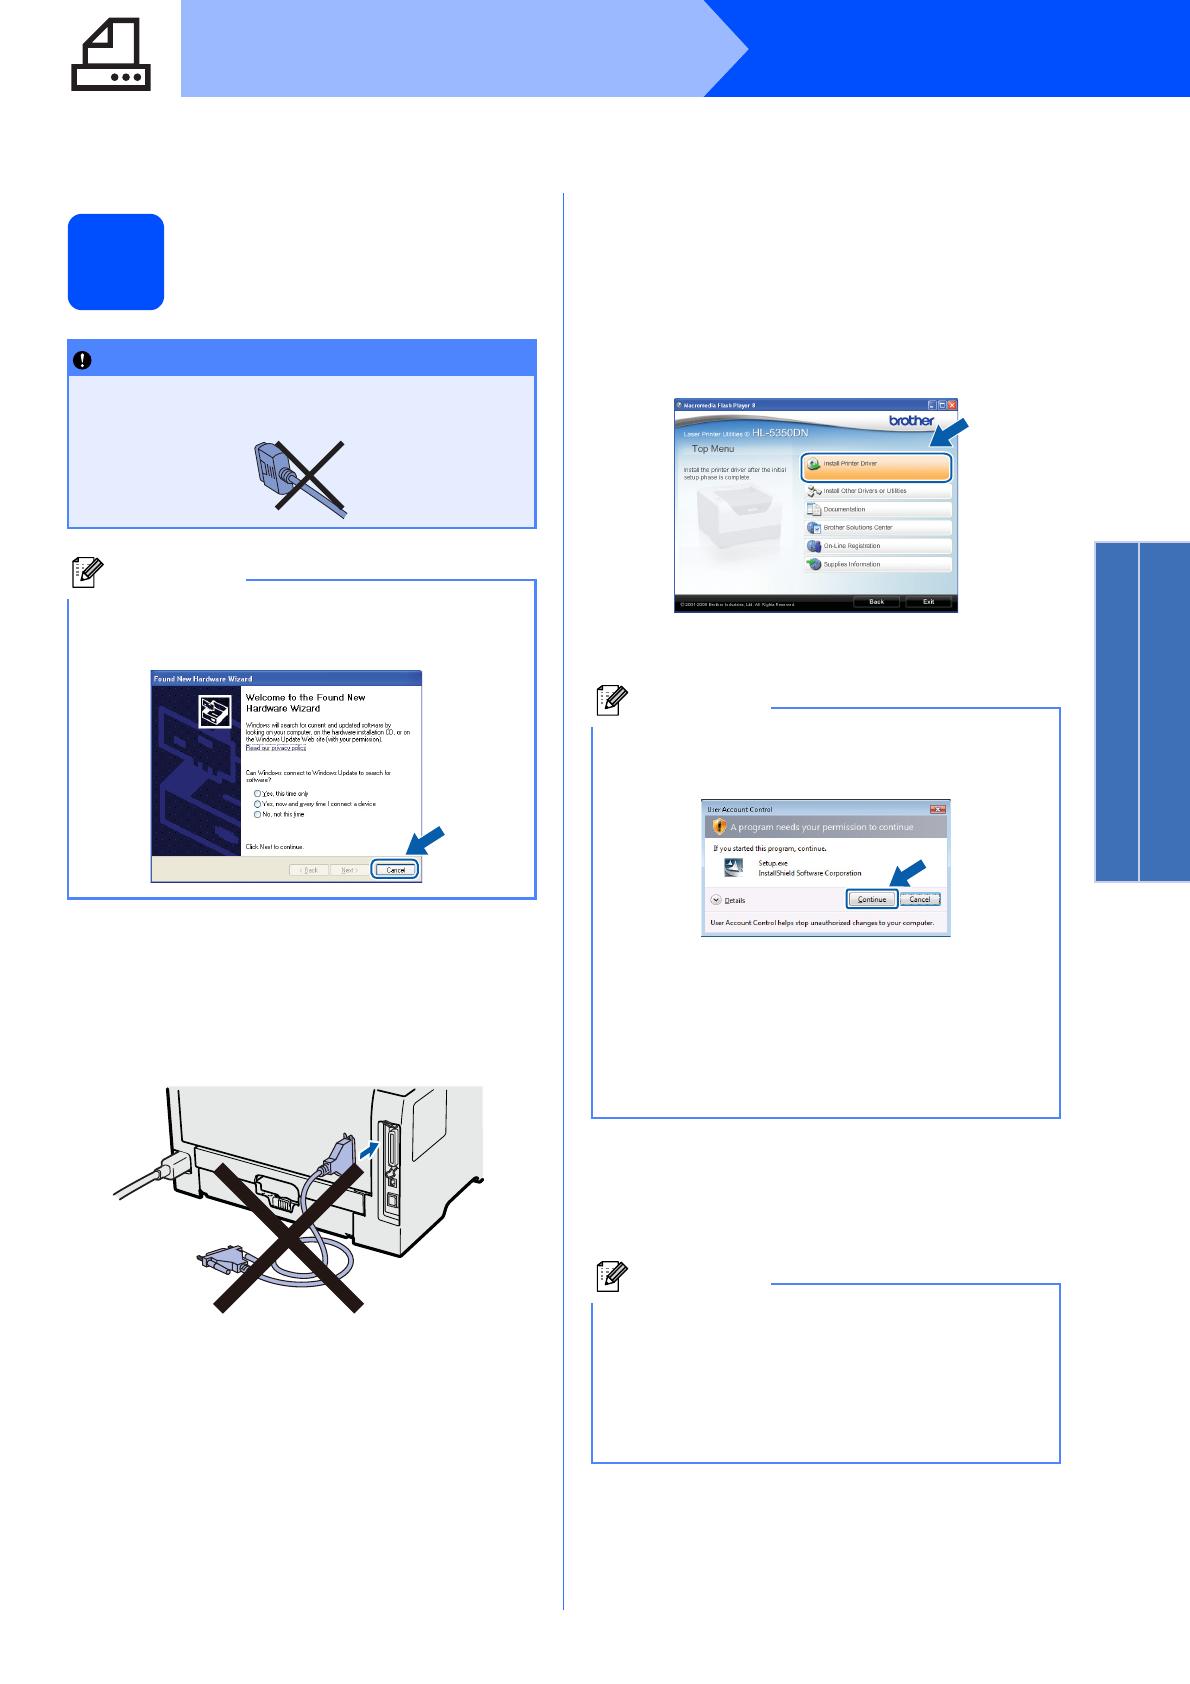
b Make sure the parallel interface cable is NOT
connected to the printer, and then begin
installing the printer driver. If you have already
connected the cable, remove it.
c Turn on your computer. (You must be logged
on with Administrator rights.)
d Put the supplied CD-ROM into your CD-ROM
drive. The opening screen will appear
automatically.
Choose your printer model and the language.
e Click Install Printer Driver on the Menu
screen.
f Click Parallel cable users.
g When the License Agreement window
appears, click Yes if you agree to the License
Agreement.
h Click Finish.
IMPORTANT
DO NOT connect the parallel interface cable
yet.
Note
If the Found New Hardware Wizard appears on
your computer, click Cancel.
Note
For Windows Vista
®
, when the User Account
Control screen appears, click Continue.
If you want to install the PS driver (Brother’s
BR-Script Driver), choose Custom setup and
then follow the on-screen instructions. When
the Select Components screen appears,
check PS (PostScript Emulation) Driver, and
then continue following the on-screen
instructions.
Note
If you want to register your product on-line,
check On-Line Registration.
If you do not want to set your printer as Default
printer, uncheck Set as Default Printer.
If you want to disable the Status Monitor,
uncheck Enable Status Monitor.
10
Windows
®
Parallel
i Connect the parallel interface cable to your
computer, and then connect it to your printer.
j Turn on the printer power switch.
Finish
The installation is now
complete.
Note
XML Paper Specification Printer Driver
The XML Paper Specification Printer Driver is the
most suitable driver when printing from the
applications that use the XML Paper Specification
documents. Please download the latest driver by
accessing the Brother Solutions Center at
http://solutions.brother.com/
.
11
Windows
®
Wired Network
Windows
®
Macintosh
Wired Network
For Wired Network Interface Cable Users (HL-5350DN only)
6
For Peer-to-Peer network
printer users
a Router
b Network printer
Connect the printer to your network and install
the driver
a Connect the network interface cable to the LAN
connector marked with a symbol and then
connect it to a free port on your hub.
b Make sure the printer power switch is on.
c Turn on your computer. (You must be logged
on with Administrator rights.)
d Put the supplied CD-ROM into your CD-ROM
drive. The opening screen will appear
automatically.
Choose your printer model and the language.
e Click Install Printer Driver on the menu
screen.
f Click Network cable users.
g When the License Agreement window
appears, click Yes if you agree to the License
Agreement.
h Choose Brother Peer-to-Peer Network
Printer, and then click Next.
Note
If you are using Windows
®
Firewall or a firewall
function of anti-spyware or antivirus applications,
temporarily disable them. Once you are sure that
you can print, configure the software settings
following the instructions.
TCP/IP
TCP/IP
2
1
Note
For Windows Vista
®
, when the User Account
Control screen appears, click Continue.
If you want to install the PS driver (Brother’s
BR-Script Driver), choose Custom setup and
then follow the on-screen instructions. When
the Select Components screen appears,
check PS (PostScript Emulation) Driver, and
then continue following the on-screen
instructions.
12
Windows
®
Wired Network
i Choose Search the network for devices and
choose from a list of discovered devices
(Recommended). Or enter your printer's IP
Address or its node name. Click Next.
j Choose your printer, and then click Next.
k Click Finish.
Note
You can find your printer’s IP Address and the
node name by printing out the Printer Settings
Page.
Note
If your printer takes a long time (about 1 minute)
to appear on the list, click Refresh.
Note
If you want to register your product on-line,
check On-Line Registration.
If you do not want to set your printer as Default
printer, uncheck Set as Default Printer.
If you want to disable the Status Monitor,
uncheck Enable Status Monitor.
If you disabled your Personal Firewall software
(e.g. Windows
®
Firewall), turn it back on.
Finish
The installation is now
complete.
Note
XML Paper Specification Printer Driver
The XML Paper Specification Printer Driver is the
most suitable driver when printing from the
applications that use the XML Paper Specification
documents. Please download the latest driver by
accessing the Brother Solutions Center at
http://solutions.brother.com/
.
13
Windows
®
Wired Network
Windows
®
Macintosh
Wired Network
6
For shared network printer
users
a Client computer
b Also known as “Server” or “Print server”
c TCP/IP or USB or Parallel
d Printer
Install the driver and choosing the correct printer
queue or share name
a Turn on your computer. (You must be logged
on with Administrator rights.)
b Put the supplied CD-ROM into your CD-ROM
drive. The opening screen will appear
automatically.
Choose your printer model and the language.
c Click Install Printer Driver on the menu
screen.
d Click Network cable users.
e When the License Agreement window
appears, click Yes if you agree to the License
Agreement.
f Choose Network Shared Printer, and then
click Next.
g Choose your printer's queue, and then click
OK.
Note
If you are going to connect to a shared printer on
your network, we recommend that you ask your
system administrator about the queue or share
name for the printer prior to installation.
TCP/IP
2
3
4
1
1
1
1
Note
For Windows Vista
®
, when the User Account
Control screen appears, click Continue.
If you want to install the PS driver (Brother’s
BR-Script Driver), choose Custom setup and
then follow the on-screen instructions. When
the Select Components screen appears,
check PS (PostScript Emulation) Driver, and
then continue following the on-screen
instructions.
Note
Contact your administrator if you do not know the
location or the name of the printer in the network.
14
Windows
®
Wired Network
h Click Finish.
Note
If you want to register your product on-line,
check On-Line Registration.
If you do not want to set your printer as Default
printer, uncheck Set as Default Printer.
If you want to disable the Status Monitor,
uncheck Enable Status Monitor.
Finish
The installation is now
complete.
Note
XML Paper Specification Printer Driver
The XML Paper Specification Printer Driver is the
most suitable driver when printing from the
applications that use the XML Paper Specification
documents. Please download the latest driver by
accessing the Brother Solutions Center at
http://solutions.brother.com/
.
15
MacintoshWired Network
Windows
®
Macintosh
Wired Network
For Wired Network Interface Cable Users (HL-5350DN only)
6
Connect the printer to
your Macintosh and
install the driver
a Connect the network interface cable to the LAN
connector marked with a symbol and then
connect it to a free port on your hub.
b Make sure the printer power switch is on.
c Turn on your Macintosh. Put the supplied CD-
ROM into your CD-ROM drive.
d Double-click the HL5300 icon on your desktop.
Double-click the Start Here icon. Follow the
on-screen instructions.
e Click Install Printer Driver on the menu
screen.
f Click Network cable users and follow the
on-screen instructions. Then, restart your
Macintosh.
g The Brother software will search for the Brother
printer. During this time the following screen
will appear.
h Choose the printer you wish to connect, and
then click OK.
i When this screen appears, click OK.
Note
Please see the User’s Guide on the CD-ROM to
install the PS driver (Brother’s BR-Script Driver).
Note
If there is more than one of the same printer
model connected on your network, the MAC
Address (Ethernet Address) will be displayed
after the model name.You can also confirm
your IP Address by scrolling to the right.
You can find your printer’s MAC Address
(Ethernet Address) and the IP Address by
printing out the Printer Settings Page.
Finish
The installation is now
complete.
16
Other Information
Safety precautions
To use the printer safely
If you DO NOT follow these safety instructions, there is a possibility of a fire, electrical shock, burn or
suffocation. Please keep these instructions for later reference and read them before attempting any
maintenance.
WARNING
There are high voltage electrodes inside the printer. Before you clean the inside of the printer, make
sure that you have turned off the power switch and unplugged the printer from the AC power outlet.
DO NOT handle the plug with wet hands. Doing this might cause an electrical shock.
Always make sure the plug is fully inserted.
Plastic bags are used in the packaging. To avoid danger of suffocation, keep these bags away from
babies and children.
DO NOT use flammable substances, any type of spray or any organic solvent/liquids containing
alcohol or ammonia to clean the inside or outside of the printer. Doing this may cause a fire or
electrical shock. Refer to Chapter 6 of the User's Guide for how to clean the printer.
DO NOT use a vacuum cleaner to clean up scattered toner. Doing this might cause the toner dust to
ignite inside the vacuum cleaner, potentially starting a fire. Carefully clean the toner dust with a dry,
lint-free cloth and dispose of it according to local regulations.
Cleaning the outside of the printer:
•Make sure that you have unplugged the printer from the AC power outlet.
•Use neutral detergents. Cleaning with volatile liquids such as thinner or benzine will damage the
outside surface of the printer.
•DO NOT use cleaning materials that contain ammonia.
17
Other Information
CAUTION
Lightning and power surges can damage this product! We recommend that you use a quality surge protection
device on the AC power outlet, or unplug the cords during a lightning storm.
After you have just used the printer, some internal parts of the printer will be extremely hot. When you open
the front or back cover (back output tray) of the printer, DO NOT touch the shaded parts shown in the
illustration.
Inside the printer
(Front View)
Inside the printer
(Back View)
IMPORTANT
DO NOT remove or damage the caution labels located on or around the fuser inside the printer.
18
Other Information
Regulations
EC Declaration of Conformity
International ENERGY STAR
®
Compliance
Statement
The purpose of the International ENERGY STAR
®
Program is to promote the development and
popularization of energy-efficient office equipment.
As an ENERGY STAR
®
Partner, Brother Industries,
Ltd. has determined that this product meets the
ENERGY STAR
®
guidelines for energy efficiency.
IEC 60825-1+A2:2001 Specification
This machine is a Class 1 laser product as defined in
IEC 60825-1+A2: 2001 specifications. The label
shown below is attached in countries where required.
This machine has a Class 3B Laser Diode which
emits invisible laser radiation in the Laser Unit. The
Laser Unit should not be opened under any
circumstances.
Use of controls or adjustments or performance of
procedures other than those specified in this manual
may result in hazardous invisible radiation exposure.
Internal laser radiation
WARNING
Maximum radiation power: 5 mW
Wave length: 770 - 810 nm
Laser class: Class 3B
CLASS 1 LASER PRODUCT
APPAREIL À LASER DE CLASSE 1
LASER KLASSE 1 PRODUKT
19
Other Information
EU Directive 2002/96/EC and EN50419
This equipment is marked with the above recycling
symbol. It means that at the end of the life of the
equipment you must dispose of it separately at an
appropriate collection point and not place it in the
normal domestic unsorted waste stream. This will
benefit the environment for all. (European Union only)
IMPORTANT - For Your Safety
To ensure safe operation, the supplied three-pin plug
must be inserted only into a standard three-pin power
outlet that is properly grounded through the normal
household wiring.
Extension cords used with this printer must be three-
pin plug type and correctly wired to provide proper
grounding. Incorrectly wired extension cords may
cause personal injury and equipment damage.
The fact that the equipment operates satisfactorily
does not imply that the power is grounded and that
the installation is completely safe. For your safety, if
in any doubt about the effective grounding of the
power, call a qualified electrician.
This product should be connected to an AC power
source within the range indicated on the rating label.
DO NOT connect it to a DC power source. If you are
not sure, contact a qualified electrician.
Disconnect device
This product must be installed near an AC power
outlet that is easily accessible. In case of
emergencies, you must disconnect the power cord
from the AC power outlet to shut off power completely.
LAN connection
(For Model HL-5350DN only)
DO NOT connect this product to a LAN connection
that is subject to over-voltages.
CAUTION
20
Other Information
Shipment of the printer
If for any reason you must ship your printer, carefully
package the printer to avoid any damage during
transit. We recommend that you save and use the
original packaging. The printer should also be
adequately insured with the carrier.
CAUTION
When shipping the printer, the DRUM UNIT and
TONER CARTRIDGE assembly must be removed
from the printer and put in a plastic bag. Failure to
remove the unit and put it in a plastic bag before
shipping may cause severe damage to the printer
and may VOID THE WARRANTY.
a Turn off the printer power switch, and then
unplug the AC power cord.
b Remove the drum unit and toner cartridge
assembly. Put it in a plastic bag and seal the
bag completely.
c Close the front cover.
d Repack the printer.
1 / 1

Brother HL-5350DN User manual

Category
Print & Scan
Type
User manual

The Brother HL-5350DN is a versatile printer designed for both home and office use, offering high-quality printing, copying, and scanning capabilities. With its fast print speeds, automatic duplex printing, and wireless connectivity, this printer is perfect for handling a variety of tasks. Additionally, the HL-5350DN features a user-friendly control panel, making it easy to operate and maintain.

Ask a question and I''ll find the answer in the document

Finding information in a document is now easier with AI

Ask the document