Epson PowerLite 7000XB User manual
- Category
- Data projectors
- Type
- User manual
This manual is also suitable for

EPSON
PowerLite
7000XB/5000XB
User’s Guide
®
™
pro-insd.fm Page i Friday, November 7, 1997 5:20 PM

ii
All rights reserved. No part of this publication may be reproduced, stored in a retrieval system, or transmitted in
any form or by any means, electronic, mechanical, photocopying, recording, or otherwise, without the prior
written permission of SEIKO EPSON CORPORATION. No patent liability is assumed with respect to the use
of the information contained herein. Neither is any liability assumed for damages resulting from the use of the
information contained herein.
Neither SEIKO EPSON CORPORATION nor its affiliates shall be liable to the purchaser of this product or third
parties for damages, losses, costs, or expenses incurred by purchaser or third parties as a result of: accident, misuse,
or abuse of this product or unauthorized modifications, repairs, or alterations to this product, or (excluding the
U.S.) failure to strictly comply with SEIKO EPSON CORPORATION’s operating and maintenance instruc-
tions.
SEIKO EPSON CORPORATION shall not be liable against any damages or problems arising from the use of
any options or any consumable products other than those designated as Original EPSON Products or EPSON
Approved Products by SEIKO EPSON CORPORATION.
EPSON is a registered trademark and PowerLite is a trademark of SEIKO EPSON CORPORATION.
General Notice: Other product names used herein are for identification purposes only and may be trademarks of
their respective owners. EPSON disclaims any and all rights in those marks.
Copyright © 1997 by Epson America, Inc. CPD-5864
Torrance, California, USA 7541264
11/97
pro-insd.fm Page ii Friday, November 7, 1997 5:20 PM

iii
Important Information About Your
PowerLite 7000XB/5000XB
Important Safety Information
WARNING: Never look into the projector lens when the lamp is turned on; the bright light can damage your eyes. Never
let children look into the lens when it is on. Never open any cover on the projector, except the lamp and filter covers.
Dangerous electrical voltages inside the projector can severely injure you. Except as specifically explained in this User’s
Guide, do not attempt to service this product yourself. Refer all servicing to qualified service personnel.
WARNING: The projector and its accessories come packaged in plastic bags. Keep plastic bags away from small children
to avoid any risk of suffocation.
Caution: When you replace the lamp, never touch the new lamp with your bare hands; the invisible residue left by the
oil on your hands may shorten the lamp life. Use a cloth or glove to handle the new lamp.
Remote Control Information
You can operate your projector by remote control via a line-of-sight infrared (IR) receiver at the front and rear of
the projector. The projector may not respond to remote control commands under the following conditions:
❐ There is an object between the remote control IR emitter and the IR receiver on the projector.
❐ Ambient light is too bright.
❐ Certain types of fluorescent lighting are used.
❐ A strong light source shines into the IR receiver.
❐ Other equipment that emits infrared energy, such as a radiant room heater, is in the room.
These conditions commonly cause problems for most infrared-controlled equipment. Try the following solutions:
❐ The remote control unit’s batteries may be low on power; replace them.
❐ Dim the ambient lighting and/or turn off any fluorescent lights.
❐ Close any window coverings and/or move the projector out of direct sunlight.
❐ Turn off other equipment that emits infrared energy.
If the remote control still does not work properly, remember you can always control your computer-based presen-
tation directly from the computer, even in an environment containing one of the conditions listed above.
pro-insd.fm Page iii Friday, November 7, 1997 5:20 PM

iv
FCC Compliance Statement
For United States Users
This equipment has been tested and found to comply with the limits for a Class B digital device, pursuant to Part
15 of the FCC Rules. These limits are designed to provide reasonable protection against harmful interference in a
residential installation. This equipment generates, uses, and can radiate radio frequency energy and, if not installed
and used in accordance with the instructions, may cause harmful interference to radio or television reception.
However, there is no guarantee that interference will not occur in a particular installation. If this equipment does
cause interference to radio and television reception, which can be determined by turning the equipment off and
on, the user is encouraged to try to correct the interference by one or more of the following measures.
❐ Reorient or relocate the receiving antenna.
❐ Increase the separation between the equipment and receiver.
❐ Connect the equipment into an outlet on a circuit different from that to which the receiver is connected.
❐ Consult the dealer or an experienced radio/TV technician for help.
WARNING
The connection of a non-shielded equipment interface cable to this equipment will invalidate the FCC Certifica-
tion of this device and may cause interference levels which exceed the limits established by the FCC for this equip-
ment. It is the responsibility of the user to obtain and use a shielded equipment interface cable with this device. If
this equipment has more than one interface connector, do not leave cables connected to unused interfaces. Chang-
es or modifications not expressly approved by the manufacturer could void the user's authority to operate the
equipment.
For Canadian Users
This Class B digital apparatus meets all requirements of the Canadian Interference-Causing Equipment
Regulations.
Cet appareil numérique de la classe B respecte toutes les exigences du Règlement sur le materiel brouilleur du
Canada.
pro-insd.fm Page iv Friday, November 7, 1997 5:20 PM

v
■
■
■
■
■
■
■
■
■
■
■
■
■
■
■
Contents
Introduction ix
Getting the Most Out of Your Projector . . . . . . . . . . . . . . . . . . . . . . . . . . . . . . . .xi
Optional Accessories . . . . . . . . . . . . . . . . . . . . . . . . . . . . . . . . . . . . . . . . . . . xii
About This Manual . . . . . . . . . . . . . . . . . . . . . . . . . . . . . . . . . . . . . . . . . . . . . . .xiii
Safety Instructions . . . . . . . . . . . . . . . . . . . . . . . . . . . . . . . . . . . . . . . . . . . . . . . .xiv
Where to Get Help . . . . . . . . . . . . . . . . . . . . . . . . . . . . . . . . . . . . . . . . . . . . . . .xvi
Electronic Support Services . . . . . . . . . . . . . . . . . . . . . . . . . . . . . . . . . . . . . .xvi
Automated Telephone Services . . . . . . . . . . . . . . . . . . . . . . . . . . . . . . . . . . xvii
1
Installation 1
Unpacking the Projector . . . . . . . . . . . . . . . . . . . . . . . . . . . . . . . . . . . . . . . . . . . .2
Additional Components . . . . . . . . . . . . . . . . . . . . . . . . . . . . . . . . . . . . . . . . .3
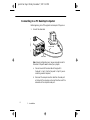
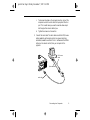
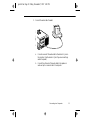
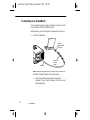
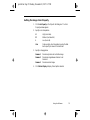
Setting Up the Projector . . . . . . . . . . . . . . . . . . . . . . . . . . . . . . . . . . . . . . . . . . . . .4
7000xbTOC.fm Page v Friday, November 7, 1997 5:21 PM

vi
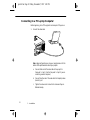
Connecting to a Computer . . . . . . . . . . . . . . . . . . . . . . . . . . . . . . . . . . . . . . . . . . .7
Connecting to a PC Desktop Computer . . . . . . . . . . . . . . . . . . . . . . . . . . . . .8
Connecting to a PC Laptop Computer . . . . . . . . . . . . . . . . . . . . . . . . . . . . . .12
Connecting to a Desktop Macintosh . . . . . . . . . . . . . . . . . . . . . . . . . . . . . . .16
Connecting to a PowerBook . . . . . . . . . . . . . . . . . . . . . . . . . . . . . . . . . . . . . .20
Connecting to a High-End Workstation . . . . . . . . . . . . . . . . . . . . . . . . . . . .24
Connecting to a Video Source . . . . . . . . . . . . . . . . . . . . . . . . . . . . . . . . . . . .24
Connecting to an External Speaker or PASystem . . . . . . . . . . . . . . . . . . . . . . . . .27
2
Using the Projector 29
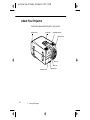
About Your Projector . . . . . . . . . . . . . . . . . . . . . . . . . . . . . . . . . . . . . . . . . . . . . .30
Turning the Equipment On and Off . . . . . . . . . . . . . . . . . . . . . . . . . . . . . . . . . .31
Turning the Projector On and Off . . . . . . . . . . . . . . . . . . . . . . . . . . . . . . . . .31
Focusing and Positioning the Screen Image . . . . . . . . . . . . . . . . . . . . . . . . . .33
Controlling the Projector . . . . . . . . . . . . . . . . . . . . . . . . . . . . . . . . . . . . . . . . . . .36
Using the Remote Control . . . . . . . . . . . . . . . . . . . . . . . . . . . . . . . . . . . . . . . . . .37
Using the Control Panel . . . . . . . . . . . . . . . . . . . . . . . . . . . . . . . . . . . . . . . . .39
Projector Status Indicators . . . . . . . . . . . . . . . . . . . . . . . . . . . . . . . . . . . . . . . . . .41
3
Using the Projector Menus 43
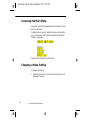
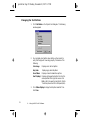
Accessing the Main Menu . . . . . . . . . . . . . . . . . . . . . . . . . . . . . . . . . . . . . . . . . . .44
Changing a Menu Setting . . . . . . . . . . . . . . . . . . . . . . . . . . . . . . . . . . . . . . . . . . .44
Menu Options . . . . . . . . . . . . . . . . . . . . . . . . . . . . . . . . . . . . . . . . . . . . . . . . . . .47
Video Menu (Image source = Computer) . . . . . . . . . . . . . . . . . . . . . . . . . . . .47
Video Menu (Image source = Video) . . . . . . . . . . . . . . . . . . . . . . . . . . . . . . .50
Audio Menu . . . . . . . . . . . . . . . . . . . . . . . . . . . . . . . . . . . . . . . . . . . . . . . . . .51
Options Menu . . . . . . . . . . . . . . . . . . . . . . . . . . . . . . . . . . . . . . . . . . . . . . . .52
Custom Menu . . . . . . . . . . . . . . . . . . . . . . . . . . . . . . . . . . . . . . . . . . . . . . . .54
7000xbTOC.fm Page vi Friday, November 7, 1997 5:21 PM

vii
4
Using the ELP Link II Software 59
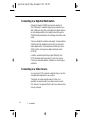
Installing the Software . . . . . . . . . . . . . . . . . . . . . . . . . . . . . . . . . . . . . . . . . . . . .60
Connecting Needed Cables . . . . . . . . . . . . . . . . . . . . . . . . . . . . . . . . . . . . . .60
Installing the Software from Windows 3.x . . . . . . . . . . . . . . . . . . . . . . . . . . .60
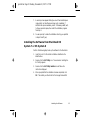
Installing the Software from Windows 95
and Windows NT 4.0 . . . . . . . . . . . . . . . . . . . . . . . . . . . . . . . . . . . . . . . . . .62
Installing the Software from Macintosh OS
System 7 or OS System 8 . . . . . . . . . . . . . . . . . . . . . . . . . . . . . . . . . . . . . . . .63
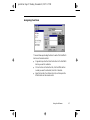
Launching the Software . . . . . . . . . . . . . . . . . . . . . . . . . . . . . . . . . . . . . . . . . . . .64
Using the Software . . . . . . . . . . . . . . . . . . . . . . . . . . . . . . . . . . . . . . . . . . . . . . . .64
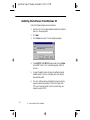
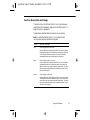
Customizing the Remote Control Effects Buttons . . . . . . . . . . . . . . . . . . . . .64
Controlling Projector Features . . . . . . . . . . . . . . . . . . . . . . . . . . . . . . . . . . . .72
5
Maintenance 81
Cleaning the Lens . . . . . . . . . . . . . . . . . . . . . . . . . . . . . . . . . . . . . . . . . . . . . . . . .82
Cleaning the Projector Case . . . . . . . . . . . . . . . . . . . . . . . . . . . . . . . . . . . . . . . . .82
Cleaning the Air Filter . . . . . . . . . . . . . . . . . . . . . . . . . . . . . . . . . . . . . . . . . . . . .83
Replacing the Lamp . . . . . . . . . . . . . . . . . . . . . . . . . . . . . . . . . . . . . . . . . . . . . . .84
6
Troubleshooting 87
Problems with the Projector . . . . . . . . . . . . . . . . . . . . . . . . . . . . . . . . . . . . . . . . .88
Problems with the Image or Sound . . . . . . . . . . . . . . . . . . . . . . . . . . . . . . . . . . .90
7
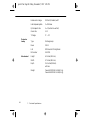
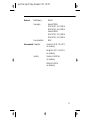
Technical Specifications 93
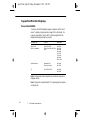
Supported Monitor Displays . . . . . . . . . . . . . . . . . . . . . . . . . . . . . . . . . . . . .96
Glossary 99
Index 101
7000xbTOC.fm Page vii Friday, November 7, 1997 5:21 PM

viii
7000xbTOC.fm Page viii Friday, November 7, 1997 5:21 PM

ix
■
■
■
■
■
■
■
■
■
■
■
■
■
■
■
Introduction
The EPSON
®
PowerLite
™
7000XB and PowerLite 5000XB are
compact, lightweight projectors that allow you to project full-color
images and video onto a large screen for presentations. You can
connect either projector simultaneously to three image sources: two
PC or Apple
®
Macintosh
®
computer image sources plus one video
source, such as a VCR or camcorder. You can also connect audio for
each image source.
If you have a PowerLite 7000XB, images are displayed in XGA
compatible full color (16,670,000 colors) at a resolution of 1024 x 768
pixels. The PowerLite 5000XB displays images in SVGA compatible
full color at a resolution of 800 x 600 pixels. Your projector produces
bright images that can be easily seen in rooms light enough to take
notes.
pro-int.fm Page ix Friday, November 7, 1997 5:22 PM

Introduction
x
Your projector’s two speakers employ a built-in Spatializer 3D Sound
System for rich, powerful audio output. You can even connect an
external speaker when further amplification is required.
A totally new, patent pending AVTSS system (Automatic Video
Tracking and Synchronization Sensing) provides automatic image
setup from a computer with a touch of a button, producing beautiful
images quickly and easily.
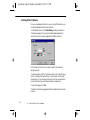
You control your projector through a hand-held remote control unit,
with menus provided for image source switching and image
adjustment. The remote control can also act as a wireless mouse to
control operations on your computer screen during presentations. The
projector’s ELP Link II software provides a number of add-on features
designed to make presentations more effective.
Your projector also features a new patented SizeWise chip for support
of VGA and SXGA output (PowerLite7000XB) or VGA and XGA
output (PowerLite5000XB). No matter what type of computer output
is used, the result is a full-size video image of outstanding clarity.
Both the PowerLite7000XB and PowerLite5000XB support IBM
®
compatible PCs and laptops, as well as Apple Macintosh, Power
Macintosh,™ and PowerBook™ computers. The video source can be
NTSC, PAL, or SECAM in composite video or S-Video format.
pro-int.fm Page x Friday, November 7, 1997 5:22 PM

Getting the Most Out of Your Projector
xi
Getting the Most Out of Your Projector
Your projector comes with a full set of features that enable you to
control the settings for the image display, video, and audio. To get the
most out of the projector, read this section for a quick summary of the
important features.
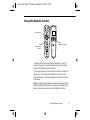
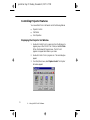
Remote Control
The buttons on the remote control enable you to turn the projector on
and off, and provide direct access to auto set up, blank, freeze, volume,
mute, and image source switching. Use the remote control buttons to
access custom functions (with the ELP Link II software) and the
projector’s menu system. You can even use the remote control to
control your computer in place of your computer’s mouse.
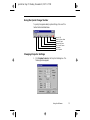
Sleep Mode
Sleep mode conserves electricity by automatically turning off the lamp
after the projector has not been used for 30 minutes. In sleep mode,
the projector remains on but the lamp is turned off, conserving
electricity, cooling the projector, and extending the life of the lamp.
Control Panel
The control panel buttons on the projector duplicate the remote
control buttons and let you perform additional functions, such as
adjusting the tracking and sync for computer images.
pro-int.fm Page xi Friday, November 7, 1997 5:22 PM

Introduction
xii
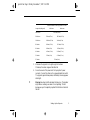
Optional Accessories
To enhance your use of the projector, EPSON provides the following
accessories:
●
Carrying cases especially designed for the projector and its cables.
Hard Carrying Case ELPKS06
Wheeled Soft Carrying Case ELPKS07
Soft Carrying Case ELPKS08
●
Replacement lamp and air filter.
Lamp with Filter ELPLP04
●
Remote control receiver module with a cable for rear and ceiling
mount projection. The infrared receiver allows wireless remote
control at up to 32.8 feet (10 meters).
Remote control receiver moduleELPST02
●
Communication cable set and computer cable so you can connect
your projector to a second computer. Also add a MAC adapter set
to connect to a second Macintosh, or a video cable to connect the
projector to a video source that supports S-Video.
ELP communication cable set ELPKC04
MAC adapter set 2023359
VGA-13WS video cable ELPKC06
VGA-BNC video cable ELPKC07
You can purchase these accessories from your dealer or by calling
EPSON Accessories at (800) 873-7766.
pro-int.fm Page xii Friday, November 7, 1997 5:22 PM

About This Manual
xiii
About This Manual
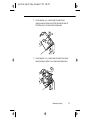
Chapter 1, “Installation,” gives step-by-step instructions on how to set
up your projector and connect it to your computer, video source, or
other optional equipment. Read the installation procedures that apply
to your environment.
Chapter 2, “Using the Projector,” describes how to turn on the
projector and control simple projector settings using the remote
control or the operation panel.
Chapter 3, “Using the Projector Menus,” describes how to use the
menus to adjust the color and image settings, change the display of the
projected image, and modify audio settings such as bass and treble.
Chapter 4, “Using the ELP Link II Software,” describes how to use the
ELP Link II software to control the computer and use the special
presentation functions.
Chapter 5, “Maintenance,” describes how to maintain your projector
in good working order.
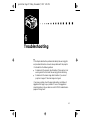
Chapter 6, “Troubleshooting,” describes how to interpret your
projector’s warning lights and gives helpful information for avoiding
errors, optimizing image quality, and solving problems.
Chapter 7, “Technical Specifications,” lists the technical specifications
for both the PowerLite7000XB and PowerLite5000XB projectors.
pro-int.fm Page xiii Friday, November 7, 1997 5:22 PM

Introduction
xiv
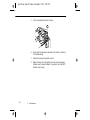
Safety Instructions
Follow these safety instructions when setting up and using the
projector:
1.Do not place the projector on an unstable cart, stand, or table.
2.Do not use the projector near water or sources of heat.
3.Use attachments only as recommended.
4.Use the type of power source indicated on the projector. If you are
not sure of the power available, consult your dealer or power
company.
5.Place the projector near a wall outlet where the plug can be easily
unplugged. Placez l’imprimante près d’une prise de contacte où la
fiche peut être débranchée facilement.
6.Insert the projector’s three-wire grounding-type plug into a
properly grounded outlet. If you have a two-prong outlet, contact
an electrician to replace it. Do not hold the plug with wet hands.
7.Take the following precautions for the plug. Failure to comply
with these precautions could result in sparks or fire.
●
Do not insert the plug into an outlet with dust present.
●
Insert the plug firmly into the outlet.
8.Do not overload wall outlets, extension cords, or integral
convenience receptacles. This can cause fire or electric shock.
9.Do not place the projector where the cord can be walked on. It
may result in fraying or damage to the plug.
pro-int.fm Page xiv Friday, November 7, 1997 5:22 PM

Safety Instructions
xv
10.Unplug the projector from the wall outlet before cleaning. Use a
damp cloth for cleaning. Do not use liquid or aerosol cleaners.
11.Do not block the slots and openings in the projector case. They
provide ventilation and prevent the projector from overheating.
Do not operate the projector on a sofa, rug, or other soft surface,
or in a closed-in cabinet unless proper ventilation is provided.
12.Never push objects of any kind through cabinet slots. Never spill
liquid of any kind into the projector.
13.Except as specifically explained in this User’s Guide, do not
attempt to service this product yourself. Refer all servicing to
qualified service personnel. Opening or removing covers may
expose you to dangerous voltages and other hazards.
14.Unplug the projector during lightning storms or when it will not
be used for extended periods.
15.Do not place the projector and remote control on top of
heat-producing equipment or in a heated place, such as a car.
16.Unplug the projector from the wall outlet and refer servicing to
qualified service personnel under the following conditions:
●
When the power cord or plug is damaged or frayed
●
If liquid has been spilled into the projector, or if it has been
exposed to rain or water
●
If it does not operate normally when you follow the operating
instructions, or if it exhibits a distinct change in performance,
indicating a need for service
●
If it has been dropped or the housing has been damaged
pro-int.fm Page xv Friday, November 7, 1997 5:22 PM

Introduction
xvi
Where to Get Help
EPSON provides customer support through the following services:
Electronic Support Services
You can access helpful tips, specifications, DIP switch or jumper
settings, drivers, Frequently Asked Questions (FAQs), sample files,
application notes, and EPSON product bulletins 24 hours a day, 7
days a week, using a modem and one of the on-line services below.
World Wide Web
From the Internet, you can reach EPSON’s Home Page at
http://www.epson.com
EPSON Internet FTP Site
If you have Internet FTP capability, use your Web browser (or other
software for FTP downloading) to log onto ftp.epson.com with the
user name anonymous and your e-mail address as the password.
EPSON Download Service
You can call the EPSON Download Service at (800) 442-2007. Set
your communications software to 8 data bits, 1 stop bit, no parity.
Modem speed can be up to 28.8 Kbps.
pro-int.fm Page xvi Friday, November 7, 1997 5:22 PM

Where to Get Help
xvii
EPSON Forum on CompuServe
®
Members of CompuServe can type GO EPSON at the menu prompt
to reach CompuServe’s Epson America Forum. As an owner of an
EPSON product, you are eligible for a free introductory CompuServe
membership, which entitles you to an introductory credit and your
own user ID and password. To take advantage of this offer in the U.S.
or Canada, call (800) 848-8199 and ask for representative #529
Automated Telephone Services
EPSON FaxAdvice
™
You can access EPSON’s technical information library by calling
(800)442-2110 and selecting the appropriate phone option. You must
provide a return fax number to use EPSON FaxAdvice.
EPSON SoundAdvice
™
For pre-recorded answers to commonly asked questions about EPSON
products 24 hours a day, seven days a week, call (800)442-2110.
EPSON also provides technical support and information on the
installation, configuration, and operation of EPSON products. Dial
(800)922-8911, (310)782-2600 (U.S.), or (905)709-9475
(Canada), 6 A.M. to 6 P.M., Pacific Time, Monday through Friday.
pro-int.fm Page xvii Friday, November 7, 1997 5:22 PM

Introduction
xviii
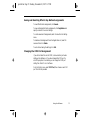
Before you call, please have the following information ready:
● Product name
● Product serial number
●
Computer configuration
●
Description of the problem
You can purchase ink cartridges, paper, manuals, accessories, and parts
from EPSON Accessories at (800)873-7766 (U.S. sales only). In
Canada, please call (800)873-7766 for dealer referral..
Note:
If you need help using software with an EPSON product, see the
documentation for that program for technical support information.
pro-int.fm Page xviii Friday, November 7, 1997 5:22 PM

1
■
■
■
■
■
■
■
■
■
■
■
■
■
■
■
1
Installation
T
his chapter describes how to unpack, set up, and connect your
projector to other equipment. The projector must be connected to a
computer or a video source such as a VCR, camcorder, or laser disc
player. For example, you may want to connect the projector to both
your computer and a video source, or set up the projector for one or
more of the following:
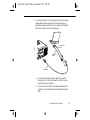
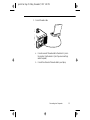
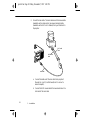
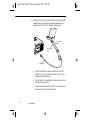
●
Connect the mouse cable to use the remote control as a wireless
mouse.
●
Provide audio for one or both image sources. The audio source can
be the computer, video source, or another device such as a stereo.
●
Connect to an external speaker or PA system to amplify the audio.
pro-ch1.fm Page 1 Friday, November 7, 1997 5:22 PM

1 • Installation
2
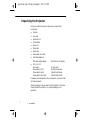
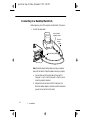
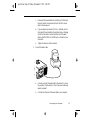
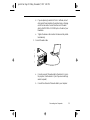
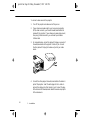
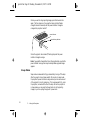
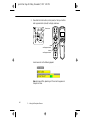
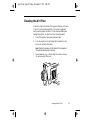
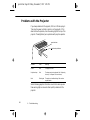
Unpacking the Projector
When you unpack the projector, make sure you have all these
components:
● Projector
●
Lens cover
● Remote control
● 2 AA batteries
●
Power cord
● Video cable
●
Audio cable
●
Audio/visual (A/V) cable
●
Macintosh adapter set
Macintosh desktop adapter Macintosh monitor adapter
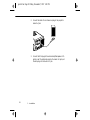
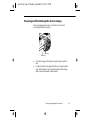
●
ELP Link II Kit
Main cable PC serial cable
Mouse cable for PS/2 Macintosh serial cable
Mouse cable for serial Diskette for Windows
Mouse cable for Macintosh Diskette for Macintosh
Depending on the configuration of your equipment, you may not need
all these components.
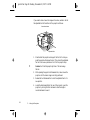
Save all packaging in case you need to ship the projector in the future.
Always transport the projector in its original packaging or the
equivalent.
pro-ch1.fm Page 2 Friday, November 7, 1997 5:22 PM
Page is loading ...
Page is loading ...
Page is loading ...
Page is loading ...
Page is loading ...
Page is loading ...
Page is loading ...
Page is loading ...
Page is loading ...
Page is loading ...
Page is loading ...
Page is loading ...
Page is loading ...
Page is loading ...
Page is loading ...
Page is loading ...
Page is loading ...
Page is loading ...
Page is loading ...
Page is loading ...
Page is loading ...
Page is loading ...
Page is loading ...
Page is loading ...
Page is loading ...
Page is loading ...
Page is loading ...
Page is loading ...
Page is loading ...
Page is loading ...
Page is loading ...
Page is loading ...
Page is loading ...
Page is loading ...
Page is loading ...
Page is loading ...
Page is loading ...
Page is loading ...
Page is loading ...
Page is loading ...
Page is loading ...
Page is loading ...
Page is loading ...
Page is loading ...
Page is loading ...
Page is loading ...
Page is loading ...
Page is loading ...
Page is loading ...
Page is loading ...
Page is loading ...
Page is loading ...
Page is loading ...
Page is loading ...
Page is loading ...
Page is loading ...
Page is loading ...
Page is loading ...
Page is loading ...
Page is loading ...
Page is loading ...
Page is loading ...
Page is loading ...
Page is loading ...
Page is loading ...
Page is loading ...
Page is loading ...
Page is loading ...
Page is loading ...
Page is loading ...
Page is loading ...
Page is loading ...
Page is loading ...
Page is loading ...
Page is loading ...
Page is loading ...
Page is loading ...
Page is loading ...
Page is loading ...
Page is loading ...
Page is loading ...
Page is loading ...
Page is loading ...
Page is loading ...
Page is loading ...
Page is loading ...
Page is loading ...
Page is loading ...
Page is loading ...
Page is loading ...
Page is loading ...
Page is loading ...
Page is loading ...
Page is loading ...
Page is loading ...
Page is loading ...
Page is loading ...
Page is loading ...
Page is loading ...
Page is loading ...
Page is loading ...
Page is loading ...
Page is loading ...
Page is loading ...
-
 1
1
-
 2
2
-
 3
3
-
 4
4
-
 5
5
-
 6
6
-
 7
7
-
 8
8
-
 9
9
-
 10
10
-
 11
11
-
 12
12
-
 13
13
-
 14
14
-
 15
15
-
 16
16
-
 17
17
-
 18
18
-
 19
19
-
 20
20
-
 21
21
-
 22
22
-
 23
23
-
 24
24
-
 25
25
-
 26
26
-
 27
27
-
 28
28
-
 29
29
-
 30
30
-
 31
31
-
 32
32
-
 33
33
-
 34
34
-
 35
35
-
 36
36
-
 37
37
-
 38
38
-
 39
39
-
 40
40
-
 41
41
-
 42
42
-
 43
43
-
 44
44
-
 45
45
-
 46
46
-
 47
47
-
 48
48
-
 49
49
-
 50
50
-
 51
51
-
 52
52
-
 53
53
-
 54
54
-
 55
55
-
 56
56
-
 57
57
-
 58
58
-
 59
59
-
 60
60
-
 61
61
-
 62
62
-
 63
63
-
 64
64
-
 65
65
-
 66
66
-
 67
67
-
 68
68
-
 69
69
-
 70
70
-
 71
71
-
 72
72
-
 73
73
-
 74
74
-
 75
75
-
 76
76
-
 77
77
-
 78
78
-
 79
79
-
 80
80
-
 81
81
-
 82
82
-
 83
83
-
 84
84
-
 85
85
-
 86
86
-
 87
87
-
 88
88
-
 89
89
-
 90
90
-
 91
91
-
 92
92
-
 93
93
-
 94
94
-
 95
95
-
 96
96
-
 97
97
-
 98
98
-
 99
99
-
 100
100
-
 101
101
-
 102
102
-
 103
103
-
 104
104
-
 105
105
-
 106
106
-
 107
107
-
 108
108
-
 109
109
-
 110
110
-
 111
111
-
 112
112
-
 113
113
-
 114
114
-
 115
115
-
 116
116
-
 117
117
-
 118
118
-
 119
119
-
 120
120
-
 121
121
-
 122
122
-
 123
123
-
 124
124


Epson PowerLite 7000XB User manual
- Category
- Data projectors
- Type
- User manual
- This manual is also suitable for
Ask a question and I''ll find the answer in the document
Finding information in a document is now easier with AI
Related papers
-
Epson ELP-3300 User Setup Information
-
Epson PowerLite 9300i User manual
-
Epson EMP 703 - XGA LCD Projector User manual
-
Epson Elp-3500 User manual
-
-
Epson Elp-3000 User manual
-
-
-
-
Epson PowerLite 5000 User guide