Aldes VEX 740T Assembly & Maintenance Manual

Type
Assembly & Maintenance Manual

This manual is also suitable for

www.aldes.com
VEX 720T / 725T / 740T /
750T / 760T / 770T / 780T / 790T
Assembly &
Maintenance Guide
EN
2
1. Recommendations and safety setpoints. ..................................................................................................................3
2. Check List .....................................................................................................................................................................4
3. Unit Components..........................................................................................................................................................5
4. Unit Confi guration ........................................................................................................................................................6
5. Dimensions ...................................................................................................................................................................7
6. Installation .....................................................................................................................................................................8
7. Electrical Connection .................................................................................................................................................11
8. Selection of Electrical Cable Cross-Section ............................................................................................................13
9. Maintenance ...............................................................................................................................................................14
10. Pressostat - Installation and operating instructions .............................................................................................16
11. Differential pressure transmitter .............................................................................................................................16
TABLE OF CONTENTS
3
PROHIBITED
!
ATTENTION
1. RECOMMENDATIONS AND SAFETY
SETPOINTS
Connect the product properly to the ground.(Malfunctioning or power leaks can cause electrical shock.)
Electrical connection should be made by authorized and trained technical personnel.
Water connections should be done before the electrical connection is made. Before starting electrical connection, be sure
water connection is made tightly.
Electrical wiring connections must be made according to the speci ed electrical wiring diagram.
There should not be any changes to the electrical connections that is made at the factory.
Cables used in network connection must conform to speci ed standards and earth connection must be made.
A circuit breaker should be placed between the network and unit. The circuit breaker should be selected according to the
total power and current value speci ed on the label.
Overcurrent fuse is recommended for the unit.
The power must be switched off before any maintenance or cleaning procedure.
Ensure that the unit can’t be started accidentally.
NOTE:
The installations, which is not available for installation and operation manual, is out of guarantee.
This unit has to be used under proper conditions according to its technical speci cation and design purpose. (Otherwise
responsibility belongs to practitioner)
Unauthorized personnel must not interfere in unit and/or must not use unoriginal spare parts. (Otherwise responsibility of
failure that may occur belongs to practitioner)
Do not install this product in a refrigerated warehouse, heated swimming pool or other location where temperature and
humidity are signi cantly different.(Failure to heed this warning may result in electrical shock or malfunctioning.) Unit
should not be subjected to excessive vibration and shock while transporting.
If the unit is damaged due to any transporting etc. reasons, it should not be mounted.
There should be avoided to put any material on to the unit that may cause any damage.
Do not install this product in a location where acid, alkali or organic solvent vapors, paints or other toxic gases, gases
containing corrosive components or high concentrations of oily smoke are present (Failure to heed this warning may result
not only in malfunctioning but also  re, power leakage and electrical shock.)
Do not use this product outside the range of its rated voltage and control capacity.
Install this product in an environment where the temperature ranges from -20 °C to +45 °C. If outdoor air is too cold and
can cause condensation, pre-heater should be used to prevent.
Select an adequately sturdy position for installing the product and install it properly and securely.(The unit can cause
injuries in case of fall.)
The surface of the unit must be able to carry the weight of the unit.
Use electric cables speci ed in the manual to connect the room control board and check the connection strength (Otherwise
re may occur).
Where ducts pass through the building and in the area which is connection with building construction, pay attention that
ducts never touch any metal parts and any electrical contact.
The outside ducts must be tilted at a gradient (1/30 or more) downwards toward the outdoor area from the main unit, and
properly insulated.
Gloves should be worn while installation. (Failure to heed this warning may result in injury.)
A dedicated circuit breaker must be installed at the origin of mains power supply. This circuit breaker must be provided
with a means for locking (lock and key).
The body of the unit, the control room panels and cables must be at least 3 meters away from high electro-magnetic  eld
forming equipment or cables.
The spigots must be connected to the ventilation network.
This product must not be disassembled under any circumstances. Only authorized repair technicans are quali ed to con-
duct disassembly and repairs. (Failure to heed this warning may result in  re, electrical shock or injury).
4
2. CHECK LIST
Make sure that the unit receives power and electrical grounding is made!
Make sure that the electricity cables are drawn from in the correct cross section!
(Please check whether there is heating on cables or not.)
Please check whether the cables in unit control panel are shielded (shielded magnetic
eld) or not; make sure shielding is grounded. If not, please change them!
Make sure that fresh air and exhaust air lters are clean and they do not block the
ow of air!
Please check whether the diameter of the air duct connection of the unit and the
diameter of the spigot are the same. If the duct connection is smaller, change it with
the correct one.
Make sure the electrical connections of the unit are made as suggested on the unit
and in this guide, check if there is incorrect connection.
Make sure during the installation of the unit there is enough space for the service and
if there is not enough space, re-install again.
After installing the unit, make sure that it does not create an abnormal sound or
vibration, if there is, make sure that rubber pads are used.
Controls
In the event of unit failure and pre-commissioning checks to be made are determined as follows; after checking this information,
please contact our company in case failure continues.
5
5
5
4
2
6
3
1
3
2
5
5
3. UNIT COMPONENTS
VEX700T Series Units
3
Rotary energy recovery
Exhaust and supply
air fans
Exhaust and supply
air filters
1
2
3
Control
Duct connections
Pre-filter (Optional)
4
5
6
6
2XWGRRUDLU2$
6XSSO\DLU6$ 5HWXUQDLU5$ ([KDXVWDLU($
5LJKW+DQG7\SH /HIW+DQG7\SH
VEX700T Series Units
Right-Hand Type Left-Hand Type
4. UNIT CONFIGURATION
7
D
E
HxK
A
B C
F G
C
D
E
M
S
H
K
The M quotation represents the space
requiered for the maintenance of the unit
(substitution of fans,  lters...).The S quotation
represents the space requiered to change the
heat exchanger.
VEX720T VEX725T VEX740T VEX750T VEX760T VEX770T VEX780T VEX790T
A
705 705 805 955 1055 1185 1405 705
B
740 740 840 1010 1110 1240 1460 740
C
1630 1630 1630 1580 1580 1580 1930 1630
D
1010 1010 1110 1145 1245 1245 1405 1010
E
1245 1245 1345 1380 1480 1480 1680 1245
F
- - - 690 690 860 690 690
G
- - - 890 890 890 1070 1070
HxK
400x200 400x200 400x250 400x350 400x400 400x450 550x500 550x500
S
750 750 850 1000 1100 1250 1350 1350
M
700 700 800 950 1050 1200 1300 1300
Weight (Kg)
250 250 280 340 370 410 485 500
*All measurement values are mm.
*Front view*Front view*Side view
*Top view
VEX700T Series Units
5. DIMENSIONS
One-section version
Two-section version
8
Figure-1-1
Figure-1-2
Figure-1-3
Figure-1
Figure-2
Disassembly of bi-blocs VEX700T Units
- Remove the rain protection cover which is assembled
on the unit.
- Unscrew the bolts of connecting parts of the blocs.
(Figure-1-3)
- Unscrew the bolts of connecting parts of the bloc base
frame.
Blocs can be separated from each other (Figure-2)
The following information is available for Multi-blocs VEX750T/760T/770t/780T/790T series.
6. INSTALLATION
Bloc connection
9
Figure-4-2
Figure-4-1
Figure-4
Figure-3
The following information is available for Multi-blocs VEX750T/760T/770T/780T/790T series.
- Prepare the installation parts.
- Remove shipping bolts on the mounting surface.
- Assemble the contact surfaces of the unit with
the help of sealing as shown in Figure 3.
- Check the seals in between the blocs. Change if
it damaged.
- Assemble the blocs.
- Screw the bolts of connecting parts of the bloc base frame.
(Figure-4-1)
- Screw the bolts of connecting parts of the bloc. (Figure-4-2)
Bloc connection
10
&QPQVNKHVVJGWPKVYJGPKVKUYKPF[CPFYJKNGCRGTUQPPGNKUYQTMKPIWPFGTVJGWPKV
7UGNKHVKPIEJCKPCUUJQYPDGNQY.KHVKPIEJCKPUOWUVDGECRCDNGQHUWRRQTVKPIVJGGPVKTGYGKIJVQHVJGFGXKEG
.KHVKPIEJCKPUOC[PQVDGVJGUCOGNGPIVJ5GVNKHVKPIEJCKPUVQDCNCPEGVJGFGXKEG
+HRQUUKDNGETGCVGCRCTCNNGNNQQRUVTCRUVQVJGCKTHNQYFKTGEVKQP
(QT[QWTUCHGV[YJGPWPKVKUNKHVGFWR[QWOC[WUGCRRTQRTKCVGGSWKROGPVOGVJQFUWEJCUDGNVUUVTCRU
&GVGTOKPGEGPVGTQHITCXKV[QHWPKVCPFVGUVKVD[NKHVKPIWRCDQWVOO+HNKHVKPIRQKPVKUPQVCRRTQRTKCVGTGFGVGTOKPGKVVQRTGXGPVHCNNU
0QVNKHVKPIVJGWPKVRTQRGTN[OC[ECWUGUGTKQWUKPLWT[GXGPFGCVJ
(CKNWTGVQHQNNQYVJGKPUVTWEVKQPUCDQXGOC[ECWUGFCOCIGQHGSWKROGPVUGTKQWUKPLWT[QTGXGPFGCVJ
5WDCUUGODNKGUCPFRCTVUQHWPKVCTGGSWKRRGFCUUJKRRGFHTQOVJGHCEVQT[
(QTWPKVUVJCVCTGFKURCVEJGFCUOQFWNCTRNGCUGCHHKZRK
R
KPVQJQNGUYJKEJCTGNQECVGFQPVJGWPKVUCPFECTT[
Y
TQRGUCUKVKUUJQYPKPILJXUHE
(QTWPKVUVJCVCTGFKURCVEJGFCUQPG
RKGEGRNGCUGRNCEGOKPKOWORKRGU
KPVQECTT[KPIJQNGUYJKEJCTGNQECVGF
QP VJG WPKV CPF CHHKZ VJGO VQ VJG
ECTT[KPIJCPFNGVJGPECTT[VJGWPKVU
CUKVKUUJQYPKPILJXUHD
)LJXUHE
)LJXUHD
Lifting Considerations
- Do not lift the unit when it is windy and while a personnel is working under the unit.
- Use lifting chain as shown below. Lifting chains must be capable of supporting the entire weight of the device.
- Lifting chains may not be the same length. Set lifting chains to balance the device.
- If possible, create a parallel loop straps to the air  ow direction.
- For your safety, when unit is lifted up, you may use appropriate equipment method such as belts, straps.
- Determine center of gravity of unit and test it by lifting up about 500 mm. If lifting point is not appropriate, re-determine it to
prevent falls.
Not lifting the unit properly may cause serious injury even death.
Failure to follow the instructions above may cause damage of equipment, serious injury, or even death.Subassemblies
and parts of unit are equipped as shipped from the factory.
For units that are dispatched as one
piece, please place minimum 4 pipes
into carrying holes which are located
on the unit and af x them to
the carrying handle then carry
the units as it is shown
in gure a.
For units that are dispatched as bi-blocs, please af x pipes
into holes which are located on the units and carry with
ropes as it is shown in gure b.
11
24V
GO
TRAFO
24V
T
GO
S
R
N
PE
PPR
14
11
1X4A
FUSE
FUSE
1X4A
FUSE
Q13
Q14
Q23
X1
M
X2
X3
M
X4
D1
M
D2
D3
M
D4
RS485
B
REF
A
CE-
CE+
Y1
M
Y2
24V
X5
M
X6
X7
M
X8
D5
M
Q24
Q33
Q34
Q43
Q44
Q53
Q54
Q63
Q64
Phase
Protection
Relay
3X10A
K1
5/L3
6/T3
3/L2
4/T2
1/L1
2/T1
ROTOR
FUSE
R S T
3X1A
K1
24VAC
ON/OFF ROTOR CONTROL
SRC
AI
GND
+10V
+24V
GND
COM
DI1
DI2
DI3
DI4
DI5
UVW
ROTOR
ABB ACS310
DRV
0.37 KW
17
18
19
20
21
22
PE
(2)
(2)
(3)
(4)
(9)
(10)
(11)
(12)
(13)
(14)
(15)
(16)
FUSE
3X1A
PROPORTIONAL ROTOR CONTROL
ON/OFF ROTOR CONTROL
ROTOR
ROTOR
FUSE
3X1A
1X4A
FUSE
1X4A
FUSE
FUSE
3X10A
FUSE
3X1A
TERRE
System Connections
Considerations During Electricity Network Connection
1- Cut the gaskets in cable connection hole from the center.
2- Pass the on/off switch cables through the cable connection hole.
3- Connect the main power cable and ground wires to the terminals in the junction box.
4- Use cable tie to hold the cables tightly.
5- After making cable connections, insulate the cable connection hole against entering water and impurity.
1- Electrical connection must be done by an authorized personnel.
2- All kinds of safety measures should be taken by the technician during installation.
3- Electrical wiring must be done according to the speci ed electrical diagram. Any electrical connection which is made by the
factory should not be changed.
4- Cables to be used during network connection must conform to the speci ed standards and should be connected to a grounded
power supply.
5- A circuit breaker should be placed between the unit and network. Circuit breaker must be selected according to the total power
and current value speci ed on+ the nameplate.
6- Over current protection is recommended for the units.
7. ELECTRICAL CONNECTION
12
24V
GND
LN
PE
N
PE
L
PPR
14
11
1X4A
1X4A
Q13
Q14
Q23
X1
M
X2
X3
M
X4
D1
M
D2
D3
M
D4
RS485
B
REF
A
CE-
CE+
Y1
M
Y2
24V
X5
M
X6
X7
M
X8
D5
M
Q24
Q33
Q34
Q43
Q44
Q53
Q54
Q63
Q64
K1
24VAC
LN
PE
N
PE
L
K1
R S T
R1
R1
12 22
11 21
Q1
Q2
13 23
2414
R1
21
22
834567 910111213
14
15 16 17 18 19
20 21 22 23 24 25 26 27 28 29 30 31 32 33 34 35 36
TRAFO
24V
T
GND
S
R
N
PE
0-10V
GND
24V
GND
24V
0-10V
GND
24V
0-10V
0-10V
GND
0-10V
GND
Heater Battery Control
Extract Air Pressure Flow
Cooling Battery Control
FUSE
B
RE
F
A
MODBUS RS485
SUPPLY FAN EXHAUST FAN ROTOR
Outdoor Temperature Sensor
Supply Temperature Sensor
Extract Temperature Sensor
Filter Guard
Extract Fan Proportionally Control
Supply Fan Proportionally Control
Phase
Protection
Relay
FUSE
Supply Fan Fault
Exhaust Fan Fault
Rotor Alarm
Fire Alarm
X5 : Extract Air Pressure Flow /
Cooling Battery Control.
X6 : Rotor Proportionally Control /
C0
2 Sensor
X7 : Rotor Proportionally Control
Control Panel
Rotor status
2X4A
FUSE
2X4A
FUSE
X1
FUSE
3X10A
FUSE
Supply Air Pressure Flow
CO
2 Sensor
5/L3
6/T3
3/L2
4/T2
1/L1
2/T1
Electrical connection
This electrical diagram is a general document. Please refer to the electrical diagram located on the unit.
13
Electrical Cable Selection of Energy Recovery Unit - 400V 3 phase + Neutral + ground
Unit Model
Power
(kW)
Current
(A)
Fuse
(A)
VEX
720T
1 2 3 x 3
725T
1 2 3 x 3
740T
1,5 3 3 x 4
750T
2,4 4,7 3 x 6
760T
3,5 7 3 x 10
770T
5,8 11,5 3 x 16
780T
7 13,9 3 x 16
790T
10,8 21,4 3 x 25
8. SELECTION OF ELECTRICAL CABLE
CROSS-SECTION
14
Figure-8-1
Figure-9-1
Figure-9-2
Figure-6
Figure-7
Figure-8
Figure-9
Filter Maintenance
Heat Exchanger Maintenance
Fan maintenance
To clean up G class  lters;
- Turn off the unit.
- Remove dirty  lters.
- Use a vacuum cleaner to clean the dust from the air  lter.
- Place the  lters in the  lter slots.
- Close the service cover and be sure it is closed tightly.
- Turn off the power of the unit.
- Remove the electrical connection of rotary
heat exchanger.
- Remove rotary heat exchanger carefully out
of the unit.
- Clean  ns of storage medium with
compressed air.
- Check tension of the drive belt and be sure
the belt is running properly.
- Turn off the power of the unit.
- Remove the fan out of the unit carefully.
Clean the fan with vacuum cleaner.
- Clean the dirty areas of the fan with warm
water with natural detergent or soap powder.
Dry wet surfaces to
prevent corrosion on metal surfaces.
- Place cleaned fan in the slots.
To clean up F / M class  lters:
- Turn off the unit.
- Remove dirty  lters.
- Place new bag  lters in the  lter slots.
- Close the service cover and be sure it is closed tightly.
Vacuum cleaner
Filtre
9. MAINTENANCE
15
Maintenance Period
Every year:
- Check tension of the drive belt and be sure the belt is running properly (for units with rotary type heat exchanger)
- Paint the exterior surface of casing to prevent corrosion on metal surfaces of the unit.
- Clean fan propeller and fan shaft of the fan.
- If the unit has damper, check the connection of damper, set screw and rigging.
- Check all electrical connections and isolation.
- Check if there is any damaged cable connections.
- Check if there is any damaged on all gaskets around door and buffer. Check the situation of all isolation materials. Check all
connections to prevent fracture and leakage, and if there is any repair it.
Every 3-6 months:
- Check all electrical connections.
- Check the accumulated dirt on coils.
- If the unit has damper, clean damper and its components.
- Clean or change clogged or dirty  lters.
16
The Series aDpS adjustable Differential pressure Switch is de-
signed for overpressure, vacuum, and differential pressure applica-
tions. The scaled adjustment knob allows changes to the switching
pressure to be made without a pressure gage. The ADPS is available
with settings from 0.08˝ w.c. (20 Pa) to 20˝ w.c. (5000 Pa). The sili-
cone diaphragm and PA 6.6 body make the Series ADPS perfect for
use with air and other noncombustible gases. The Series ADPS can
be used in monitoring air fi lters, ventilators, and industrial cooling-air
circuits along with controlling air and fi re-protection fl aps and many
other applications.
Use only with mediums such as air, or other noncombustible or non-
aggressive gases. Otherwise operating faults or accidents may occur.
Mounting Switch
First check the pressure switch to ascertain whether any damage is
visible on the housing. If the housing is leaky because of damage, the
pressure switch must not be used.
Switching pressure specifi cations apply to vertical installation which
is also the recommended position with pressure connections pointing
downwards.
Only if there is no potential for condensate forming can you mount
the pressure switch horizontally. In this case, however, the switching
values are approximately 0.08 in w.c. (20 Pa) higher as indicated
on the scale. In the horizontal position, the pressure switch should
be mounted ‘lying down’ only (that is to say with the electrical con-
nections pointing upwards). Do not mount the pressure switch in a
hanging position (that is to say, not ‘overhead’ with the electrical
connections pointing downwards). Otherwise the device will function
inaccurately.
a) Mounting with screws or brackets
1. To mount the pressure switch, L-shaped A-288 and S-shaped
A-289 mounting brackets can be ordered separately. To secure
the device on the rear side of the housing, only use the sheet
metal screws (3.5 x 8 mm) which are supplied together with
the mounting brackets. Under no circumstances must you use
longer screws. Otherwise, the base of the housing could be
punctured resulting in the pressure switch leaking.
2. You can also mount the pressure switch directly on a wall. To
do this use screws with a maximum diameter of 0.315˝ (8.0
mm), if you use the outer mounting lugs to screw the device
in place. Do not tighten the screws so much that the base of
the device is deformed. Otherwise, the pressure switch can be
shifted out of position, or leak.
SPECIFICATIONS
Service: Air and noncombustible, compatible gases.
Wetted Materials: Diaphragm material: Silicone; Housing material &
switch body: POM and PA 6.6; Cover: Polystyrene.
Temperature Limits: Process ambient temperature from -4 to 185˚F
(-20 to 85˚C).
Pressure Limits: Max. Operating Pressure: 40” W.C. (10 kPa) for all
pressure ranges.
Switch type: Single-pole double-throw (SPDT).
Repeatability: ±15% FS.
Electrical Rating: Standard: Max., 1.5A/250 VAC, max. switching
rate: 6 cycles/min.; Gold Contact Option: 0.1 A/ 24 VDC.
Electrical connections: Push-on screw terminals. M20x1.5 with
cable strain relief or optional 1/2˝ NPT connection.
Process connections: 5/16˝ (7.94 mm) outside diameter tubing,
1/4˝ (6.0 mm) inside diameter tubing.
Mounting orientation: Vertically, with pressure connections pointing
downwards.
Mechanical Working Life: Over 106 switching operations.
Weight: 5.6 oz (160 g).
Enclosure Rating: IP54.
Agency approvals: CE, RoHS.
Installing Hoses
Important: Pressure tubing cannot be kinked. Pay particular atten-
tion to this point if you run hoses over an edge. It is better to form a
loop. If the hoses are kinked, the device cannot function accurately.
a) For connection to the pressure switch two fi ttings inherent in the
housing are provided for hoses with an internal diameter of 1/4˝
(6.0 mm).
1. Connect a hose with the higher pressure to socket P1 which is
located on the lower section of the housing.
2. Connect a hose with the lower pressure to socket P2 which is
located on the middle section of the housing.
After you have installed the hoses, it is absolutely essential to check
them for tightness of fi t at the connection points and to make sure
that they run without any kinks.
Ø11/64
[Ø4.5]
21/64
[8.5]
2-17/64
[57.5]
7/8
[22]
2-21/64
[59]
19/64
[7.5]
51/64
[18]
-
(P2)
+
(P1)
Ø15/64
[Ø6]
2-9/16
[65]
1-31/32
[50]
10. PRESSOSTAT - INSTALLATION AND
OPERATING INSTRUCTIONS
17
Electrical connection
Work on electrical installations must only be carried out by electri-
cians who are specifi cally trained for this purpose.
CAUTION
First make sure that there is no voltage on the
connecting cable while you are working on the
electrical connections. Otherwise, a possible electric shock may re-
sult and the connected equipment may be damaged. The connecting
cable can be run to the pressure switch from three sides, according
to choice. The screw cable connection has a plug-in design for this
purpose. Rotate protective cover accordingly.
For cable gland models, the seal in the screw cable connection is
designed for cables with alternative sheath diameters of 0.275˝ (7
mm) or 0.393˝ (10 mm). Only use these sizes – otherwise the screw
cable connection cannot seal adequately.
1. If using a 0.275˝ (7 mm) connecting cable, you can line up
the press nut, the plain washer and the sealing ring directly
on the cable.
2. If using a 0.393˝ (10 mm) connecting cable, you must fi rst
break the inner rubber ring out of the sealing ring directly on
the cable. Then line up the press nut, the plain washer and the
sealing ring on the cable.
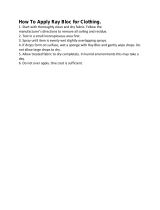
Wiring
The switching device in this pressure switch is designed as a
change-over contact as can be seen from the wiring diagram (Figure
1). The rest position is shown in Figure 1 (pressure below the activa-
tion switch point on dial).
1. In the instance where pole 3 (COM) closes to Pole 2, the pres-
sure is increasing (NO).
2. In the instance where pole 3 (COM) closes to Pole 1, the pres-
sure is decreasing (NC).
Protect the feed line (to pole 3) by fuse, either in control system or
along the line, and do so with:
1. Max. 1.5 A / 250 VAC, if you are loading the contact with an
resistive load;
2. Max 0.4 A / 250 VAC, if you are loading the contact with an
inductive load (such as relay);
3. Max. 0.1 A / 24 VDC, if you are using the pressure switch in the
weak current version with gold-plated contacts.
The connections are intended for crimp-type sockets, 0.25 in (6.3 mm).
1. Make sure the crimp connection is perfect, and that the cable
lugs fi t properly on to the connections.
2. If you do not have any crimp-type sockets available, you can
also use the cable lugs which are supplied with mounted screw
terminals. However, these are only intended for rigid copper
wire.
3. On fl ex, it is either necessary to crimp on strand end sleeves –
and then you can also screw the strands on – or to crimp cable
lugs on directly as previously described.
Setting the pressure Range
Make absolutely certain that there is no voltage on the electrical con-
nections before you carry out any setting on the pressure switch.
Otherwise, it could be fatal if you accidentally touch the electrical
connections or the metal adjusting screw while you are performing
the settings.
a) Use the adjustment dial to set the pressure which should trip the
switch on an increase of pressure.
1. The indications on the dial are only correct for the vertical
mounting position.
2. When the pressure falls, the switch returns to its resting posi-
tion as soon as the pressure falls below the dead band.
Attaching cover
a) Insert the screw cable connection into the recess provided for this
purpose on the housing.
b) Then place the housing cover in position and screw it down evenly
on to the pressure switch.
Testing the Setting
Do not operate the system until the housing is closed. Otherwise
there is the possibility of an electric shock if you accidentally touch
live parts.
Check the trip and reset pressures by slowly increasing the pressure
and then allowing it to fall again.
IMPORTANT: Observe the maximum permissible operating pressure
of 40˝ w.c. (10 kPa) which is indicated in the data sheet. Otherwise
the pressure switch may be damaged.
MAINTENANCE
Upon fi nal installation of the Series ADPS Adjustable Differential Pres-
sure Switch, no routine maintenance is required. A periodic check
of system operation is recommended. The Series ADPS is not fi eld
serviceable and should be returned if repair is needed (fi eld repair
should not be attempted and may void warranty). Be sure to include
a brief description of the problem plus any relevant application notes.
Contact customer service to receive a return goods authorization
number before shipping.
1
23
2 NO
1 NC
P
3 COM
Figure 1
1. Break Contact
2. Operating Contact
3. Power Supply Line
18
The SERIES MS2 Magnesense
®
II Differential Pressure Transmitter com-
bines the proven stable piezo technology and the versatility of our original
Series MS with additional features to reduce installation time and simplify
ordering. Like the original Series MS, the second generation transmitter
can be used as a linear pressure output or a linear velocity output with
the square root extraction done in the transmitter. Additional parameters
have been included to expand the square root capability to include  ow
measurements.
FEATURES/BENEFITS
Field selectable ranges and output signal reduce inventory and the
chances of ordering an incorrect part
BACnet or Modbus serial communications reduce wiring cost by dai-
sy-chaining the transmitters
Our integral  eld-upgradeable display or plug-in remote display tool
save upfront material cost and allow for local viewing of measurements.
APPLICATIONS
Filter monitoring in air handler units
Building pressure in pharmaceutical-semi-conductor clean rooms
Duct static pressure in commercial buildings
Air velocity/ ow in VAV systems
SPÉCIFICATIONS
Supported Baud Rates: 9600, 19200, 38400, 57600, 76800, 115200.
Data Size: 8.
Parity:
None.
Stop Bits: 1.
Service: Air and non-combustible, compatible gases.
Wetted Materials: Consult factory. Typical Accuracy: ±1% FS for 0.15
in w.c. (40 Pa), 0.25 in w.c. (50 Pa), 0.5 in w.c. (125 Pa), 2 in w.c. (500 Pa),
3 in w.c. (750 Pa), 5 in w.c. (1250 Pa), 10 in w.c. (2 kPa), 15 in w.c. (3 kPa),
25 in w.c. (5 kPa), 28 in w.c. (6.975 kPa); ±2% FS for 0.1 in w.c. (25 Pa),
1 in w.c. (250 Pa), and all bi-directional ranges.
Stability: ±1% / year FSO.
Temperature Limits: 0 to 150°F (-18 to 66°C).
Pressure Limits: 1 psi max., operation; 10 psi burst.
Power Requirements: 10 to 35 VDC (2-wire), 17 to 36 VDC or isolated
21.6 to 33 VAC (3-wire).
Output Signals: 4 to 20 mA (2-wire), 0 to 5 VDC, 0 to 10 VDC (3-wire).
Response Time: Adjustable: 0.5 to 15 sec. time constant. Provides a
95% response time of 1.5 to 45 seconds.
Zero & Span Adjustments: Digital push buttons.
Loop Resistance: Current output: 0 to 1250 Ω max; Voltage output: Min.
load resistance 1 kΩ.
Current Consumption: 40 mA max.
Display (Optional): 5 digit LCD.
Electrical Connections: 3-wire removable European style terminal block
for 16 to 22 AWG.
Electrical Entry: 1/2˝ NPS thread.
Process Connection: 3/16˝ ID tubing (5 mm ID); Max. OD 9 mm.
Enclosure Rating: IP66.
Mounting Orientation: Diaphragm in vertical position.
Weight: 8.0 oz (230 g).
Agency Approvals: BTL, CE.
11. DIFFERENTIAL PRESSURE
TRANSMITTER
MAGNESENSE
®
II DIFFERENTIAL PRESSURE TRANSMITTER
Monitors Pressure, Air Velocity and Air Flow, BACnet/Modbus
®
Communications
Ø3-7/16
[Ø87.31]
2-41/64
[67.07]
1/2 NPS
21/32
[16.67]
21/32
[16.67]
29/32
[23.02]
1/2
[12.70]
57/64
[22.62]
(3) 3/16 [4.76] HOLES
EQUALLY SPACED ON
A
4.115 [104.52] BC
2-11/64
[55.17]
2-9/16
[65.09]
Ø3-7/16
[Ø87.31]
1/2 NPS
25/64
[9.96]
1-41/64
[41.71]
2-41/64
[67.24]
21/32
[16.67]
57/64
[22.62]
21/32
[16.67]
29/32
[23.02]
1/2
[12.70]
2-11/64
[55.17]
3-11/32
[84.84]
3-1/2
[88.90]
7-3/4
[196.77]
3/8
[9.53]
Wall Mount Bracket
Duct Mount Bracket
DIN Mount Bracket
Ø3-7/16
[Ø87.31]
19
Model chart
Model
in w.c. Pa mm w.c. kPa
MS2-W101
0.10, 0.15, 0.25, 0.50 25, 40, 50, 125 2.5, 4, 6, 10 0.025, 0.04, 0.05, 0.125
MS2-W111
±0.10, ±0.15, ±0.25,
±0.50
±25, ±40, ±50, ±125 ±2.5, ±4, ±6, ±10
±0.025, ±0.04, ±0.05,
±0.125
MS2-W102
1, 2, 3, 5
±1, ±2, ±3, ±5
250, 500, 750, 1250
±250, ±500, ±750, ±1250
25, 50, 75, 125
25, 50, 75, 125
0.25, 0.5, 0.75, 1.25
0.25, 0.5, 0.75, 1.25
MS2-W103
10, 15, 25, 28
±10, ±15, ±25, ±28
2500, 3500, 5000, 6975
±2500, ±3500, ±5000,
±6975
250, 350, 500, 697.5
±250, ±350, ±500, ±697.5
2.5, 3.5, 5.0, 6.975
±2.5, ±3.5, ±5.0, ±6.975
Note: For duct mount static probe change W to D. Example: MS2-D101
For DIN rail mounting change W to N. Example: MS2-N101
Options
To order add suffix: Description
-LCD Units with display
Example: MS2-W101-LCD
-BC BACnet Communications
Example: MS2-W101-BC
-MC Modbus
®
Communications
Example: MS2-W101-MC
-NIST NIST traceable calibration certi cate
Example: MS2-W101-NIST
-FC Factory calibration certi cate
Example: MS2-W101-FC
Accessories
Model Description
A-151 Cable gland for 5 to 10 mm diameter cable
A-MS2-LCD Field upgradeable display
A-435-A Remote display tool
A-480 Plastic static pressure tip
A-481
Installer kit; includes 2 plastic static
pressure tips and 7 ft (2.1 m) of PVC tubing
A-489
4˝ 303 SS straight static pressure tip with
ange
A-302F-A
4˝ 303 SS static pressure tip with mounting
ange; for 3/16˝ ID rubber or plastic tubing
SCD-PS
100 to 240 VAC/VDC to 24 VDC power
supply
Modbus
®
is a registered trademark of Schneider Automation, Inc.
www.aldes.com
11072606-A - 07/2018 - RCS 956 506 828 - Printed in France
  • Page 1 1
  • Page 2 2
  • Page 3 3
  • Page 4 4
  • Page 5 5
  • Page 6 6
  • Page 7 7
  • Page 8 8
  • Page 9 9
  • Page 10 10
  • Page 11 11
  • Page 12 12
  • Page 13 13
  • Page 14 14
  • Page 15 15
  • Page 16 16
  • Page 17 17
  • Page 18 18
  • Page 19 19
  • Page 20 20

Aldes VEX 740T Assembly & Maintenance Manual

Type
Assembly & Maintenance Manual
This manual is also suitable for

Ask a question and I''ll find the answer in the document

Finding information in a document is now easier with AI