Page is loading ...

©1995 Lionel Trains, Inc., Chesterfield, MI 48051-2493
WINDMILL
ASSEMBLYAND WIRING INSTRUCTIONS
This motorized windmill simulates the action of a real windmill with its spinning fan blades and swivel top.
LUBRICATION
71-2889-250
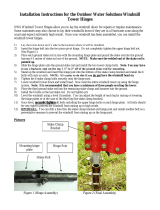
FAN
SWIVEL FAN DRIVE
DRIVE SHAFT
NOTE: Remove
the protective foam
block that covers
the drive shaft. PLATFORM
SHAFT
The Fan and Swivel Fan Drive are packaged sepa-
rately. To assemble them to the upper platform, first
remove the protective foam block that covers the drive
shaft. Next, carefully press the fan onto the swivel fan
drive shaft. Now press the swivel fan drive and fan
onto the platform shaft. (See Figure 1).
If your windmill starts oper-
ating sluggishly or stalls, it
may be necessary to apply
powdered graphite to the
rubber driving washer.
Graphite should be used
sparingly, using a small
paint brush. (See Figure 2
and 2A).
FIGURE 1
FIGURE 2
FIGURE 2A
1-TOWER ASSEMBLY W/ BASE & PLATFORM
1-SWIVEL FAN DRIVE & MOTOR HOUSING
1-FAN
1-CONTROL BUTTON # 600-0190-001
3-WIRES
PARTS LIST

SERVICE
WIRING
This product is proudly offered by Lionel Trains, Inc. and it carries a warranty to support its continued reliable operation. You
may choose to have the Lionel Service Department service your item even after its warranty expires.If so, a reasonable ser-
vice fee will be charged. In either event, please follow the directions below.
If service is required within the warranty period, bring the item to the nearest authorized Lionel Trains Service Station along
with the warranty card. If you prefer to send it back to the factory, you must first call (810)-949-4100, Fax (810)-949-5429 or
write to Customer Service, P.O. Box 748 New Baltimore, MI 48047-0748 stating what the item is, when it was purchased and
what seems to be the problem. You will be sent a return authorization letter and label to assure your merchandise will be
properly handled upon receipt.
CAUTION: Make sure the item is packed so as to prevent damage to the merchandise. The shipment must be prepaid and we
recommend that it be insured.
Please make sure you have followed the instructions carefully before returning any merchandise for service. This warranty
gives you specific legal rights and you may have others that vary from state to state.
TO TRANSFORMER (POWER AND GROUND)
10-15 volts A. C.
Have an adult strip one quarter inch of insulation from both ends of the three wires included with the Windmill, if they have
not already been stripped. (See Figure 4). Connect one wire to a terminal clip on the underside of the windmill base and
the other end to the control button as shown above. take another wire and connect it to the other terminal of the control
button and connect the other end to the transformer. Attach a third wire to the other terminal clip on the underside of the
windmill base and attach the other end to the transformer. To connect the wires to the terminal clips, press down the
springy upper half of the metal loop until the lower part projects through the slot, insert the bare wire end into the loop,
and release the upper part of the clip. Spring tension will hold the wire tight. (See Figure 5).
UNDERSIDE OF WINDMILL PLATFORM
CONTROL SWITCH #600-0190-001
FIGURE 3
FIGURE 4
FIGURE 5
/