Onyx BLACL DIAMOND SERIES User manual
- Category
- Floor Machine
- Type
- User manual
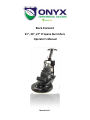
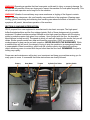
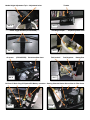
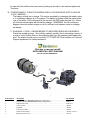
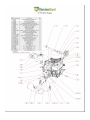
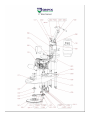
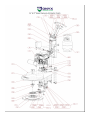
Onyx BLACL DIAMOND SERIES is a professional-grade propane floor care equipment designed for high-speed buffing, burnishing, and polishing. With its powerful 18hp Kawasaki engine and 1400 RPM pad speed, it delivers superior high gloss floor finishes. The machine's compact design and portability make it ideal for both commercial and residential use.
Onyx BLACL DIAMOND SERIES is a professional-grade propane floor care equipment designed for high-speed buffing, burnishing, and polishing. With its powerful 18hp Kawasaki engine and 1400 RPM pad speed, it delivers superior high gloss floor finishes. The machine's compact design and portability make it ideal for both commercial and residential use.


-
 1
1
-
 2
2
-
 3
3
-
 4
4
-
 5
5
-
 6
6
-
 7
7
-
 8
8
-
 9
9
-
 10
10
-
 11
11
-
 12
12
-
 13
13
-
 14
14
-
 15
15
-
 16
16
-
 17
17
-
 18
18
-
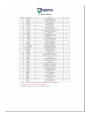 19
19
-
 20
20
-
 21
21
-
 22
22
-
 23
23
-
 24
24
-
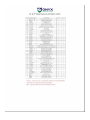 25
25


Onyx BLACL DIAMOND SERIES User manual
- Category
- Floor Machine
- Type
- User manual
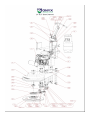
Onyx BLACL DIAMOND SERIES is a professional-grade propane floor care equipment designed for high-speed buffing, burnishing, and polishing. With its powerful 18hp Kawasaki engine and 1400 RPM pad speed, it delivers superior high gloss floor finishes. The machine's compact design and portability make it ideal for both commercial and residential use.
Ask a question and I''ll find the answer in the document
Finding information in a document is now easier with AI
Related papers
Other documents
-
Minuteman Propane Burnisher User manual
-
MasterCraft MBS-2000EF Owner's manual
-
-
-
Nilfisk-Advance BU800 How-To Manual
-
 Xtreme Power 62029 Owner's manual
-
Samsung DW60M9990AP Installation guide
-
Windsor Lightning BDP Propane Burnisher Owner's manual
-
Clarke 08992B User manual
-
