Page is loading ...

LVU2800 Series
Ultrasonic Level Transmitter

2of23

3of23
INTRODUCTION/TABLEOFCONTENTS StepOne
TheLVU2800Seriesisageneral‐purposeultrasonicleveltransmitterthatprovidesalooppowered4‐20mA
output.The4‐20mAoutputcanbeusedtoprovidetheproportionallevelofliquidinanytankorvessel.The
signalcanbeconnectedtoanydevicethatacceptsalooppowered4‐20mAsignal,suchasaPLC,SCADA,DCS,
display,controller,etc.
NewFeatures
Simpleconfigurationwithpushbuttonconfiguration
AdjustableLoopFail‐Safe,HoldLast,Empty,Full,21mA,22mA
EasytoreversemAoutput,4‐20mAto20‐4mA
Increasedoutputfiltering
TableofContents
Introduction ...................................................................................................................................................3
Specifications ...................................................................................................................................................4
Dimensions ...................................................................................................................................................4
Aboutthismanual.............................................................................................................................................5
Wiring ...................................................................................................................................................7
GettingStarted..................................................................................................................................................9
FeatureGuide.......................................................................................................................................9
GettingAround...................................................................................................................................10
HowtoentertheMENU.....................................................................................................................11
HowtoconfigureUNITS......................................................................................................................11
HowtoconfiguretheDISPLAY............................................................................................................12
Howtoconfiguretheoperationalrange(Height&Fill‐H).................................................................13
Howtoreversethecurrentoutput(RevmA).....................................................................................14
HowtosettheFail‐Safe(SAFE)settings.............................................................................................14
HowtosetTargetCalibration(TGCAL)..............................................................................................15
Installation .................................................................................................................................................16
MountingGuide..................................................................................................................................16
FittingSelection..................................................................................................................................17
Appendix .................................................................................................................................................20
SETUP .................................................................................................................................................20
Diagnostic(DIAG)parameters............................................................................................................20
Reset .................................................................................................................................................20
UserSettings.......................................................................................................................................20
Troubleshooting..................................................................................................................................21

4of23
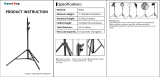
SPECIFICATIONS/DIMENSIONS StepTwo
Range: LVU2810:4"to9.8'
(10cmto3m)
LVU2818:8"to18.0'
(20cmto5.5m)
LVU2826:8"to26.4'
(20cmto8m)
LVU2832:12"to32.8'
(30cmto10m)
Accuracy:±0.2%ofrange
Resolution: LVU2810:0.019”(0.5mm)
LVU2818/2826:0.039”(1mm)
LVU2832:0.078”(2mm)
Deadband: LVU2810:4”(10cm)
LVU2818/2826:8”(20cm)
LVU2832:12”(30cm)
Beamwidth: LVU2810:2”(5cm)
LVU2818/2826/2832:
3"(7.6cm)dia.
Configuration: Pushbutton
Memory: Non‐volatile
Displaytype: LCD,6‐digit
Displayunits: Inch,cm,Feet,morpercent
Supplyvoltage: 12‐28VDC
Loopresist.: 500Ohms@24VDC
Signaloutput: 4‐20mA,two‐wire
Signalinvert: 4‐20mA/20‐4mA
Signalfail‐safe: 4mA,20mA,21mA,22mA,
holdlast
Processtemp.: F:‐4°to140°
C:‐20°to60°
Temp.comp.: Automatic
Ambienttemp.: F:‐31°to140°
C:‐35°to60°
Pressure: MWP=30PSI
Enclosurerating: NEMA4X(IP65)
Encl.material: PC/ABSFR
Encl.hardware: Brassandstainless
Enclosurevent: Watertightmembrane
Conduitentrance:Dual,1/2”NPT
Trans.material: PVDF
Processmount: LVU2810: 1”NPT/1”G
LVU2818/2826/2832:
2”NPT/2”G
Mount.gasket: FKM
Classification: Generalpurpose
Compliance: CE,RoHS
Dimensions:
SideView/LVU2810Series
SideView/LVU2818,LVU2826andLVU2832
Series

5of23
SAFETYPRECAUTIONS StepThree
AboutthisManual:PLEASEREADTHEENTIREMANUALPRIORTOINSTALLINGORUSINGTHISPRODUCT.This
manual includes information on the LVU2800 Series Ultrasonic Level Switch from OMEGA ENGINEERING.
Pleaserefertothepartnumberlocatedontheswitchlabeltoverifytheexactmodelconfiguration,whichyou
havepurchased.
User’s
Responsibility for Safety:OMEGA ENGINEERING manufactures a broad range of level sensing
technologies. While each of these sensors is designed to operate in a wide variety of applications, it is the
user’sresponsibilitytoselectasensormodelthatisappropriatefortheapplication,installitproperly,perform
tests of
the installed system, and maintain all components. The failure to do so could result in property
damageorseriousinjury.
ProperInstallationandHandling:Onlyprofessional staffshouldinstall and/orrepairthisproduct.Installthe
switch with the included FKM gasket and never over tighten the switch within the fitting.Always check for
leakspriortosystemstart‐up.
WiringandElectrical:Asupplyvoltageof12to28VDCisusedtopowertheLVU2800Series.Electricalwiring
ofthetransmittershouldbeperformedinaccordancewithallapplicablenational,state,andlocalcodes.
Material Compatibility:The enclosure is made of Polycarbonate (PC).The transducer is made of
PolyvinylideneFluoride(PVDF).Makesurethatthemodel,whichyouhaveselected,ischemicallycompatible
withtheapplicationmedia.
Enclosure: Whilethe switchhousingisliquid‐resistanttheLVU2800Seriesisnotdesignedtobeoperational
when immersed.It should be mounted in such a way that the enclosure and transducer do not come into
contactwiththeapplicationmediaundernormaloperationalconditions.
The enclosure has a flip cover with dual 1/2” NPT female conduit ports and an internal terminal strip for
wiring.Toopentheenclosure,youwillneedasmallinsertiontoolsuchasascrewdriver.Loosenthelocking
screwlocatedatthetopfrontoftheenclosure.Rotatethehingedcover upfor135°accesstothefaceplate
andterminalstrips.Beforeclosingtheenclosure,makesurethattheenclosuregasketisproperlyseated,and
thatanyconduitfittings,
cableconnectorsorplugsareinstalledcorrectlyandsealed.
HandlingStatic‐SensitiveCircuits/Devices:Whenhandlingthetransmitter,thetechnicianshouldfollowthese
guidelines to reduce any possible electrostatic charge build‐up on the technician’s body and the electronic
part.
1. Always touch a known good ground source before handling the part. This should be repeated while
handling the part andmorefrequently aftersittingdownfromastandingposition,slidingacross the
seatorwalkingadistance.
2. Avoidtouchingelectricalterminalsofthepartunlessmakingconnections.
3. DONOTopentheunitcoveruntilitistimetocalibrate.

6of23
SAFETYPRECAUTIONS StepThree
MakeaFail‐SafeSystem:Designafail‐safesystemthataccommodatesthepossibilityofswitchand/orpower
failure.OMEGAENGINEERINGrecommends the useofredundant backupsystemsand alarmsinaddition to
theprimarysystem.
Flammable,ExplosiveorHazardousApplications:LVU2800Seriesshouldnotbeusedwithinclassified
hazardousenvironments.
Warning:AlwaysusetheFKMgasketwheninstallingtheLVU2800Series,andmakesurethatallelectrical
wiringoftheswitchisinaccordancewithapplicablecodes.
Components:LVU2800Seriesisofferedinthreedifferentmodels.Dependingonthemodelpurchased,you
mayormaynothavebeenshippedallthecomponentsshownbelow.Youdohowever,needanLVU2800
SeriesandFKMgaskettoconfigure,installandoperateLVU2800Series.
LVU2800Series
o LVU2810 –9.8’(3m)range, Type4Xencl., 1”NPT
o LVU2818 –18.0’(5.5m)range, Type4Xencl., 2”NPT
o LVU2826 –26.2’(8m)range, Type4Xencl., 2”NPT
o LVU2832 –32.8’(10m)range, Type4Xencl., 2”NPT
FKMGasket
o Part#220128–forLVU2810seriesonly
o Part#220129–forLVU2818,LVU2826andLVU2832series
QuickStartGuide

7of23
WIRING StepFour
BelowisaquickreviewofwiringtheLVU2800Seriestocommondisplay,controllersandPLC’s.
ProportionalLevelController
LVCN‐51Series
JWAmode(FactorySetting)
ProportionalLevelController
LVCN‐51Series
JWBmode
GenericLoop
PoweredDisplay
GenericPLC

8of23
WIRING(continued) StepFour
Generalnotesforelectricalconnections,usageandsafety:
Wherepersonalsafetyorsignificantpropertydamagecanoccurduetoaspill,theinstallationmust
havearedundantbackupsafetysysteminstalled.
Wiringshouldalwaysbecompletedbyalicensedelectrician.
Supplyvoltageshouldneverexceed28VDC.
Thesensormaterialsmustbechemicallycompatiblewiththeliquidstobemeasured.
Designafail‐safesystemforpossiblesensorand/orpowerfailure.
NeverusethesensorinenvironmentsclassifiedasHazardous.
VoltageOutput
LVU2800Seriescanbeusedasa0to5or0to10VDCoutputdevice.Aresistorwillneedtobeaddedtothe
circuittoenableavoltageoutput(refertothewiringdiagrambelow).
0‐5VDCoutput
o Adda250Ohmresistor
o Actualoutputwillbe0.8to5VDC
0‐10VDCoutput
o Adda500Ohmresistor
o Actualoutputwillbe2to10VDC

9of23
GETTINGSTARTED StepFive
LVU2800Seriescanbeconfiguredbeforeinstallation.Theswitchfeaturesnon‐volatilememory,sotheset
pointsconfiguredbeforeinstallationwillnotbelostwhentheswitchispowereddown.Tostart,allyouneed
isthefollowinginformation:
BasicTankInformation:
o HEIGHT–Distancefromthetransducerfacetothebottomof
thetank.
o FILL‐H–Maximumfillheightoftheliquidfromthebottomof
thetank.
o Thesevalueswillallbeinthesamedistancevalue(inches,
centimeters,feetormeters)andwillallbemeasuredfromthe
bottomofthetank.
Power:
o Provide12to28VDCinputpowertotheLVU2800Series.
FeatureGuide:
FEATURE ACCESSBY
EasytouseMENU PressandholdSELECTkeyuntilMENUisdisplayed
approximately5seconds.TheMENUitemswillrotate
throughdisplay,pressSELECTtochangeanitem.
ManyUNITSof
measurement.
IntheMENUmode,pressSELECTwhenUNITSisdisplay,
thenselectINCHES,CM(centimeter),FEET,METERSor
PERCENT.
Nocumbersomemeasure
required.Setpoint
distancesarerelativeto
thetankbottom.
InMENUmode,selecttheTANKitemandsetthe
HEIGHTofthetankfromthetransducerfacetothe
bottomofthetank.SettheFillHeight(FILL‐H)tothe
maximumfillheightoftheliquidfromthebottomofthe
tank.Nowallofthesetpointsarefromthebottomof
thetankup.
OptionalTargetCalibration Usethisfeatureifthetankisattheemptyorfullsetting.
Thiswillacceptthecurrentlevelaseitherempty(TG
CALEMPTY)offull(TGCALFULL).
Fail‐Safety UsetheSAFEfunctiontopresettheoutputtoeither
Empty(4mA),Full(20mA,21mAor22mA)orHold
LastValueincasethetransmitterlosesitssignal(LOST).

10of23
GETTINGSTARTED(continued) StepFive
GettingAround:
LVU2800Seriesisconfiguredbytheuseofthreepushbuttons(UP,DOWNandSELECT)andaLCDdisplay.As
alockoutfeature,thebuttonsareinactiveuntiltheSELECTbuttonishelddownfor5seconds,andthenthe
displaywillbegintoscrollthroughthetopleveloftheconfigurationmenu.
StepsforBasicConfiguration:
1. SelectandSettheunitsofoperationintheUNITSmenu.
2. ConfiguretheSensorHeightandFill‐HundertheTANKmenu.
3. SettheSAFEvalue.
TopLevel
TheConfigurationmenuwillcontinuetoscrollthroughtheitemsbelowuntiltheSELECTbuttonispressed.
UNITS–TANK–SAFE–TGCAL–VALUES‐HELP–RUN.
ToreturntotheOperationalmodeofLVU2800Series,pressSELECTwhileRUNappearsinthedisplay.
UNITS–Allowsendusertoselecttheunitsforconfigurationandoperation.SelectbetweenInches,
Centimeters,Feet,MetersorPercent.PressEXITtoreturntotheTopLevelmenu.
TANK–Allowstheendusertoconfiguretheoperationalrangefortheswitch.
o HEIGHT–Distancefromthetransducerfacetothebottomofthetank.
o FILL‐H–Maximumfillheightoftheliquidfromthebottomofthetank.
o REVMA–Allowsthetransmittertoreversethecurrentoutputsuchthat4mAisatFULLand20
mAisatEMPTY.
o PressExittoreturntotheToplevelMenu.
o Note:ifUNITSissettoPercent,thenTANKwillnotappear.ToviewTANK,setUNITStoanyofthe
following:Inches,Centimeters,FeetorMeters.
SAFE–Thefail‐safefortheLVU2800Seriescanbepresettothecustomer’srequirement.
o 22mA–Overfillfail‐safesetting.
o 21mA–Overfillfail‐safesetting.
o 20mA–Fullfail‐safesetting.
o 4mA–Emptyfail‐safesetting.
o HOLD–Keepstheoutputatitslastcurrentreadingwhenfail‐safeconditionoccurs.
TGCAL–TargetCalibration(allowsforthe
sensortoacceptthecurrentlevelaseitherEMPTYorFULL.
VALUES–Providessetupinformation,theabilitytoresettheLVU2800Seriesandasimulationmodeto
testtherelayfunction.
o SETUP–WilldisplaythesettingforallfunctionsofLVU2800Series.
o DIAG–Thisis
aproductiontestfeatureusedbythefactorytoconfirmoperation.Thismode
shouldonlybeusedwhensupervisedbyanOmegaEngineeringrepresentative.
o RESET–WillresettheLVU2800Seriesbacktoitsoriginalfactorysetting.
HELP–ProvidesinformationforcontactingOmegaEngineeringno‐line.
RUN–Returnstheunittonormalmeasurementandcontrolmode.

11of23
GETTINGSTARTED(continued) StepFive
HowtoentertheMENU:
1. PressandholdSELECTkey(approximately5seconds)untilMENUisdisplayed.
2. Themenuitemswillrotatethroughdisplay.
3. PressSELECTtochangeanitem.
HowtoconfigureUNITS:
1. IntheMENUmode,pressselectwhenUNITSisdisplay.
2. PressSELECTtochoosebetweenINCHES,CM(centimeter),
FEET,METERSorPERCENT.
3. SelectEXITtoreturntotheTopLevelMenu.
Note:ReadingthelevelofliquidinPercent:
OmegaEngineeringrecommendsthatwhenselectingPERCENT,configuretheHEIGHTandFILL‐H
settingsbeforeselectingPERCENTinordertospantheLVU2800Seriesforyourapplication
requirements.
WheninPERCENT,theoperationalspanwillbebaseduponthelastTANKsettings,typicallythefactory
settingsforHEIGHTandFILL‐H.
LVU2800Series HEIGHT FILL‐H
LVU2810Series 118.1”(300cm) 114.1”(290cm)
LVU2818Series 216.5”(550cm) 208.5”(530cm)
LVU2826Series 314.9”(800cm) 307.1”(780cm)
LVU2832Series 393.7”(1000cm) 381.9”(970cm)
WhenPERCENTisselected,theTANKsettings(HEIGHTandFILL‐H)willbedisabled.

12of23
GETTINGSTARTED(continued) StepFive
DISPLAY‐AIRModevs.LIQUIDMode:
Thedisplaycanbemadetodisplayeithertheheightofliquidinthe
tank(LIQUIDmode)ortheamountofairinthetank(AIRmode).
AIRmode–Willdisplaythedistancefromthebottomofthesensorto
thesurfaceoftheliquid.
LIQUIDmode–Willdisplaytheheightofliquidmeasuredfromthe
bottomofthetank.
Howtochangethedisplaymode:
1. IntheMENUmode,pressselectwhenUNITSisdisplay.
2. PressSELECTwhenDISPLAYappears.
3. PressSELECTtochoosebetweenAIRorLIQUID.
4. WhenEXITappears,pressSELECTreturntoTopLevelMenu.

13of23
GETTINGSTARTED(continued) StepFive
HowtoconfiguretheOperationalrangeofLVU2800Series:
NocumbersomemeasurementisrequiredviaTargetCalibrationto
establishsetpoints.Setpointdistancesarerelativetothetank
bottom.
1. InMENUmode,selecttheTANKitem.
2. WhenHEIGHTappears,pressSELECT.
3. UsingtheUPandDOWNbuttons,settheHEIGHTofthetank
fromthetransducerfacetothebottomofthe tank.
4. Toenterthevalue,pressandholdSELECT(Approximately2
seconds)untilSAVEDisdisplayed.
5. WhenFILL‐Happears,pressSELECT.
6. UsingtheUPandDOWNbuttons,settheFillHeight(FILL‐H)to
themaximumfillheightoftheliquidfromthebottomofthe
tank.
7. PressandholdSELECT(2seconds)toenterthevalue.
8. WhenEXITappears,pressSELECTreturntoTopLevelMenu.
SensorHeight
Fill‐Height
Note:
OmegaEngineering
recommendsthatwhenselectingPERCENT,configuretheHeightandFill‐Hsettings
beforeselectingPERCENTinordertospantheLVU2800Seriesforyourapplicationrequirements.
WhenPERCENTisselected,theTANKsettings(HeightandFill‐H)willbedisabled.

14of23
GETTINGSTARTED(continued) StepFive
HowtosetaReversetheCurrentOutput:
ThedefaultforLVU2800Seriesistohave4mAatEmptyand20mAat
Full.Thisisthenormal(NORM)setting.Theoutputcanbereversed
(REV)with20mAatEmptyand4mAatFull.
1. InMENUmode,selecttheTANKitem.
2. WhenREVMAappears,pressSELECT.
3. WhenREVappears,pressSELECT.
4. WhenEXITappears,pressSELECTreturntoTopLevelMenu.
LVU2800SeriesisnowintheReversemode.Toswitchbacktothe
Normalmode,followtheinstructionsaboveandselectNORMunder
step3.
HowtosettheSAFEsetting:
ThedefaultforFail‐Safety(LOST)canbepreset.Thechoicesare4mA,
20mA,21mA,22mAandHOLD.
1. InMENUmode,selecttheSAFEitem.
2. Whentherequiredsettingappears,pressSELECT.
3. WhenEXITappears,pressSELECTreturntoTopLevelMenu.

15of23
GETTINGSTARTED(continued) StepFive
HowtosetusingTargetCalibration(Empty):
InsteadofmeasuringforEmptytank,theEmptydistancecanbeset
automatically.ThismethodrequiresthatthetankbeEmptyoratthe
levelthatisconsideredEmptyintheapplication.TosetTGEmpty,
followtheinstructionsbelow.
1.
Beforebeginning,makesurethelevelistankisattheEmpty
level.
2. InMENUmode,selecttheTGCALitem.
3. WhenEMPTYappears,pressSELECT.Thissetsthecurrent
distanceasthenewEmptysetting.
4. WhenEXITappears,pressSELECTreturntoTopLevelMenu.
How
tosetusingTargetCalibration(Full):
InsteadofmeasuringforFulltank,theFulldistancecanbeset
automatically.ThismethodrequiresthatthetankbeFulloratthe
levelthatisconsideredFullintheapplication.TosetTGFull,follow
theinstructionsbelow.
1. Before
beginning,makesurethelevelistankisattheFulllevel.
2. InMENUmode,selecttheTGCALitem.
3. WhenFULLappears,pressSELECT.Thissetsthecurrent
distanceasthenewFullsetting.
4. WhenEXITappears,pressSELECTreturntoTopLevelMenu.
Note:WhensettingeithertheTGEMPTYorTGFULL,makesurethereflectivesurfaceisperpendiculartothe
LVU2800Seriesandnotatanangle.Becarefulifthetankhasaslopedorconebottomandthebottomofthe
tankisexposedtoair.

16of23
INSTALLATION StepSix
TheLVU2800Seriesshouldalwaysbemountedperpendiculartotheliquidsurfaceandinstalledusingthe
providedFKMmountinggasket.Makesurethatthefittingandtransmitterthreadsarenotdamagedorworn.
Alwayshand‐tightenthetransmitterwithinthefitting.Performaninstalledleaktestundernormalprocess
conditionspriortosystemstartup.Note:ThepreferredmountingfittingfortheLVU2810seriesisaplastic2”
thread(orslip)x1”threadreducerbushing.
MountingGuide
1. Donotmountatanangle
2. Liquidshouldneverenterthedeadband
3. SideWall:
a. ForLVU2810Series‐mountatleast2”fromthesidewall
b. ForLVU2818,LVU2826&LVU2832Series‐mountatleast3”fromthesidewall
4. Donotmountwhereobstacleswillintrudeonsensor’sbeamwidth
a. SeeSpecificationsonpage3
5. Donotmountinavacuum
6. Avoidmountinginthecenterofadometoptank.
7. Inconebottomtank,positionthesensoroverthedeepestpartofthetank.
Donotinstallat
anglerelativetothe
liquid.
Donotinstallwithin
3”oftanksidewall.
Donotinstallwith
objectsinthebeam.
Donotinstallin
applicationswith
vacuum.
Installationinexistingfittings
IftheexistingfittingislargerthanthethreadsoftheLVU2800Series,selectareducerbushingsuchasa2”
threadx1”thread,a2”slipx1”thread,3”threadx2”threador3”slipx2”thread.
MetalTanks(LVU2810seriesonly)
OmegaEngineeringultrasonictransmittershavebeenoptimizedforuseinnon‐metallicfittings.
1. Forbestperformance,avoidtheuseofmetallicfittings.
a. Useaplastic2”x1”reducerbushing,oraplastic1”flange(SeeFittingSelectiononnextpage).
2. Whileinstallationsdirectlyintoa1”
metalfittingarenotrecommended,acceptableresultsmaybe
obtainedifthe1”fittingisahalfcouplinginformandtheouterdiameterofthecouplingistightly
wrappedinvinyltapetodampenvibrations.

17of23
INSTALLATION(continued) StepSix
FittingSelection:Checkthepartnumbertodeterminetherequiredfittingmountsizeandthreadtype.
LVU2800Seriesiscommonlyinstalledintankadapters,flanges,bracketsorstandpipes.Note:Alwaysinclude
thegasketwheninstallingtheLVU2800Series.
1. TankAdapter:Selectatankadapterfitting,suchasa1”
adapterfortheLVU2810seriesora2”
adapterfortheLVU2818,LVU2826&LVU2832series.
a. Forbestresults,selecta2”tankadapterandadda2”x1”reducerbushing.
b. Avoidtankadapter(threadxthread)stylesand/orpipestopsforwardoftheinstalled
transducer.
c. Always
mountthetankadaptersothemajorityoffittingisoutsidethetank.
i. Nevermountthetankadapterupsidedownorthebulkofthematerialisinsidethe
tank.
2”TankAdapter
SocketxThread
TankAdapter
w/2”x1”ReducerBushing
TankAdapter
ThreadxThread
Donotusethreadxthread
2. Riser:Installationswithtall,narrowriserscanimpedetheacousticsignal.
a. LVU2818,LVU2826&LVU2832Series:2”(5cm)diameterrisersshouldbenotallerthan5”
(12.7cm).Largerdiameterrisersshouldbenotallerthan12”(30.5cm).
b. LVU2810Series:
Note:Donotexceedthedimensionslistedabove

18of23
INSTALLATION(continued) StepSix
3. Flange(LVU2810series):Ifinstallingonaflange,selectaflangewithathreadthatisabovetheplane
oftheflange.
a. TheLVU2818,LVU2826&LVU2832seriesworkswellwithFlangeinstallations.
b. Avoidtheuseofblindflangeswithtappedthreadsorflangeswherethethreadsareevenwith
theplaneoftheflange,suchastheBanjo1"PolyANSIFlange(seriesAF100).
c. Useaflangewitha2”threadandadda2”to1”reducerbushingtocompletetheinstallation.
2”Flangew/
threadoutofplane
2”Flangew/
threadinplane
2”Flangew/
ReducerBushing
Donotusethreadinplane
4. SideMountBracket:Forinstallationsinopentanksandsumps,usetheLVM‐30seriessidemount
bracket.
a. FortheLVU2810series,ordertheLVM‐30witha2”x1”ReducerBushing.
b. FortheLVU2818,LVU2826&LVU2832,series,ordertheLVM‐30sidemountbracket.

19of23
INSTALLATION(continued) StepSix
5. StandPipe:Astandpipemaybeusedtodampenturbulenceorwhenfoamispresentinthe
application.
a. Pipecanbemadeofanymaterial.
b. Selectaminimum3”IDpipeforthestandpipe.
i. A2”pipeisusablewiththeLVU2810series,butistheminimum.
ii. Pipeslargerthan3”canalsobeused.
c. UseacouplingandreducerbushingtoattachtheLVU2800Seriestothepipe.
i. WiththeLVU2810series,besuretouseaplasticreducingbushing2”Threadx1”
Threadfittingor2”Slipx1”Threadfitting.
d. Thepipelengthshouldrunthemeasurementspanandthebottomofthepipeshouldremain
submergedatalltimestopreventfoamfromenteringthepipe.
e. Cuta45°notchatthebottomofthepipeanddrilla1/4”pressureequalizationholeinthedead
band.
f. Thepumpsshouldnotdriveliquidpasttheopenendofthestandpipewhichcausestheliquid
inthepipetooscillate.

20of23
APPENDIX StepSeven
Setup:
YoucanviewhowtheLVU2800Seriesisconfigured.
1. FromthemainMENUlevel,pressSETUPwhenVALUESappears.
2. WhenSETUPappears,presstheSELECTkey.
3. Setupwilldisplaythefollowinginformation:
a. Units,Display,RevmA,Safe,Height,Fill‐H
4. Whencompleted,pressSELECTwhenEXITappearstoreturntothemainprogramlevel.
Diagnostics(DIAG)Parameters:
ThismoderunsdiagnosticteststhatconfirmoperationofLVU2800Series.Thismodeshouldonlybeused
whensupervisedbyanOmegaEngineeringrepresentative.
Reset:
LVU2800Seriesenablestheendusertoresettheentireconfigurationbacktotheoriginalfactorysettings.
FollowtheinstructionsbelowtoresetLVU2800Series:
1. FromthemainMENUlevel,pressSELECTwhenVALUESappears.
2. WhenRESETappears,presstheSELECTkey.
3. WhenYESappears,pressSELECTkeytoresetLVU2800Series.
a. Tocancelthereset,pressSELECTwhenNOappears.
4. Whencompleted,pressSELECTwhenEXITappearstoreturntothemainprogramlevel.
FactorySettings:
LVU2800Series HEIGHT FILL‐H
LVU2810Series 118.1”(300cm) 114.1”(290cm)
LVU2818Series 216.5”(550cm) 208.5”(530cm)
LVU2826Series 314.9”(800cm) 307.1”(780cm)
LVU2832Series 393.7”(1000cm) 381.9”(970cm)
UserSettings:
Filloutthechartbelowandkeepasarecordofyourconfiguration.
Tank
Height = Fill-H =
Norm Reverse
Units
Inches Feet cm Meter Percent
Air Liquid
Safe
22mA 21 mA 20mA Hold Last 4mA
/