Page is loading ...

INSTALLATION INSTRUCTIONS
For Model 72121-PL
READ AND SAVE THESE INSTRUCTIONS
WAR N IN G ! SH UT POWER OF F AT FU SE OR CIRCU IT BRE AK ER .
Fig.1
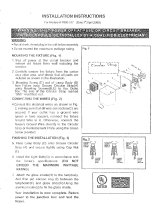
MOUNTING THE BACKPLATE (Fig.1)
1. Shut off the power at the circuit breaker and remove old fixture, including the crossbar.
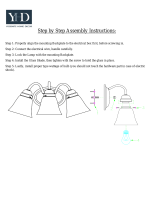
2. Carefully unpack your new fixture and lay out all the parts on a clear area. Take care not
to lose any small parts necessary for installation, next unthread the four screws (E) and
take the Fixture Body (F) off. (Fig. 1)
3. The Circular strap (A) contains several pairs of threaded holes, find the pair of holes that
match the hole spacing in your fixture Backplate (D) and threading the two Studs (C)
Part Way into the Circular strap (A).
4. Place the Circular strap (A) onto the outlet box, the side of the Circular strap (A) marked
“GND” must face out. Hold the Circular strap in place; secure it to the outlet box by
threading the two outlet box Screws (B) until snug.
CONNECTING THE WIRES (Fig. 2)
1. At the point, connect the electrical wires as follows; connect the black wire from the
fixture to the black house (hot) wire. Connect the white wire from the fixture to the white
(neutral) house wire. Make sure all wire nuts are secured. You may wrap the
connections with electrical tape. If your outlet has a ground wire (green or bare copper),
connect fixture’s ground wire to it. Otherwise connect fixture’s ground wire directly to the
Circular strap using the green screw provided.
MOUNTING FIXTURE (Fig.1)
1. After the wires are connected, tuck them carefully inside the outlet box and then place
the Backplate (D) onto the Circular strap (A). Adjust the hole of the Backplate (D) fit for
the studs(C), and then secures them with two ball nuts (I) until snug.
2. To prevent moisture from entering the outlet box and causing a short, use clear
caulking (i.e. Indoor/Outdoor Silicone Sealant) to outline the outside of fixture backplate
where it meets the wall leaving a space at bottom to allow moisture escape (Fig. 4)
3. Install the CFL bulb in accordance with the fixture’s specification (Max 13W/ spiral CFL/
GU24 included) (DO NOT EXCEED THE MAXIMUM WATTAGE RATING!!) The color
correlated Temperature (CCT) for replacing the enclosed lamp is (2700K). (Warning:
When re-lamping, please use a self ballast CFLtype of bulb that complies with UL 1993)
4. The ballast in each of these models can be replaced by a qualified electrician without
cutting of wires and without damage to the housing, trim, decorative elements or
carpentry to which the fixture is attached. See installation steps for more detail. (Fig.3)
5. For installing bulb or replacing bulb at a later date, loosen Photocell Washer (G) and
Plastic washer (H), unthread the four screws (E) and then take the Fixture Body (F) off.
Install CFL bulb to socket. After installation, replace the Fixture Body (F), the Plastic
Washer (H), the photocell washer (G) and the four screws (E). (Fig. 1)
6. For replacing the Glass (J) & (K), follow step five which will also allow you access to the
glass (Fig. 1)
7. This fixture contains an integrated photo sensor that automatically prevents operating
during daylight hours.
8. This fixture is rated for a minimum start temperature of -17° Celsius.
9. This fixture is UL Listed for Wet Location applications.
Your installation is now complete. Return power to the junction box and test the
fixture.
LIMITED 2 YEARS WARRANTY
The Fixture is covered by a Limited 2 year Warranty from the Manufacturer, effective
from the date of purchase. This fixture is warranted against defects in the quality of the
housing, trims, diffuser, shades, and electrical components. Fixture finishes and/or
lamps (bulbs) are expressly excluded from this warranty; refer to bulb manufacturer for
lamp warranty. This Fixture, if supplied with an automatic shut off sensor, motion
control sensor, or photocell, cannot be installed in conjunction with any other device
without voiding warranty. Modifying this fixture or use of another non-provided control
will also void Product Warranty and UL listing.
GND
/