Brevi Car seat KIMI Isofix tt Owner's manual
- Category
- Car seats
- Type
- Owner's manual
This manual is also suitable for
Page is loading ...

2
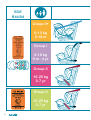
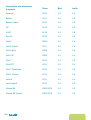
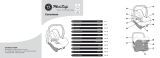
Group 0+
0-13 kg
0-18 m
ECE
R44/04
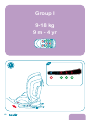
Group I
9-18 kg
9 m - 4 yr
Group II
15-25 kg
3-7 yr
Group II
15-25 kg
3-7 yr
< 18 m
< 13 kg
3
2
1
4
3
2
1
4
3
2
1
4
3
2
1
4
Page is loading ...

4
A
B
C
D
E
F
G
H
I
L
M
N
K
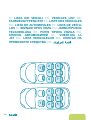
IT- COMPONENTI EN- COMPONENTS DE- BESTANDTEILE FR- COMPOSANTS ES-
COMPONENTES PT- COMPONENTES SI- SESTAVNI DELI HU- RÉSZEK HR- DIJELOVI
RU- КОМПОНЕНТЫ NL- BESTANDDELEN RO- COMPONENTE BG- СЪСТАВНИ
ЧАСТИ AR-
O
P
Q
R S
T
U
V
Z
W
Page is loading ...

6
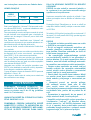
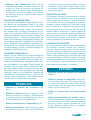
saggio diversi da quelli descritti nelle istru-
zioni e contrassegnati sul seggiolino.
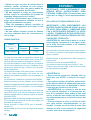
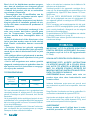
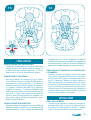
OMOLOGAZIONE
BREVI
seggiolino auto
per bambini
KIMI cod.533
Gruppo
0+,I,II 0-25kg
Peso
Questo è un seggiolino auto per bambini di ritenuta “Uni-
versale”, omologato secondo la normativa ECE R44/04 e
può essere installato sulla maggior parte dei veicoli, ma
non su tutti.
Per una corretta installazione vericare sul manuale del vei-
colo che sia dichiarato adatto per l’installazione di seggiolini
auto per bambini di categoria “Universale” per il Gruppo di
età corrispondente.
Questo dispositivo di ritenuta e stato classicato “Univer-
sale” secondo criteri di omologazione più severi rispetto a
modelli precedenti che non dispongono del presente avviso.
In caso di dubbio, contattare il rivenditore oppure il produt-
tore.
Adatto unicamente per l’utilizzo su autoveicoli provvisti di
cinture di sicurezza approvate secondo il regolamento UN/
ECE n°16 o equivalente, a 3 punti statiche o con arroto-
latore.
Questo è un seggiolino auto per bambini. E’ approvato
secondo ECE R44/04 e la seie di emendamenti per uso
generale in veicoli dotati di sistemi di ancoraggio ISOFIX.
Adatto ad essere in veicoli che hanno posti omologati ISO-
FIX (vedere manuale del veicolo), in funzione della catego-
ria e del modello del seggiolino.
Gruppo di massa e classe ISOFIX per questo dispositivo:
Gruppo I, B1.
Non installare in direzione opposta alla marcia su sedili an-
teriori dotati di airbag.
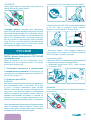
ENGLISH
CAR SEAT FOR CHILDREN GROUP 0+/1/2
IMPORTANT: READ THE INSTRUCTIONS CA-
REFULLY BEFORE USING THE CAR SEAT.
OBSERVE CAREFULLY THE DRAWINGS
DURING THE INSTALLATION, FOLLOWING
CLOSELY THE DIFFERENT STAGES. KEEP
THESE INSTRUCTIONS FOR THE ENTIRE PE-
RIOD OF USE.
WARNING: This car seat is a safe product but
only if the instructions in the user manual are
followed correctly.
Incorrect installation may cause serious injury. In this case,
the manufacturer shall not be considered responsible, either
directly or indirectly.
Dear Customer, thank you for choosing a Brevi product.
It complies with the safety standard ECE R44.
This product is suitable for children from 0 up to 25kg, from
0 up to 7 years approx. Once the child exceeds 25kg, this
car seat cannot be used safely any longer.
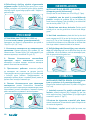
WARNING
• This product can only be used on vehicle
with ISOFIX and safety belt.
• To avoid danger of suffocation remove this
plastic cover before using this article. This
cover shall be destroyed or kept away from
children.
• Do not use the car seat on front passen-
ger seats provided with air bag. If the car is
equipped with airbag the child car seat must
be installed in the backseat of the car.
• Always place your baby in the car seat, even
on short trips. Always fasten your child with
safety belts when you use the car seat even
when out of the car.
• Never leave the child unattended. Never lea-
ve the child unattended in the car seat, faste-
ned with seat belts.
• Safety belts should adjust to the child’s
position. Any straps holding the restraint to
the vehicle should be tight. Any straps re-
straining the child should be adjusted to the
child’s body, and that straps should not be
twisted.
• It is important to ensure that any lap strap is
worn low down, so that the pelvis is rmly
engaged, shall be stressed.
• The car seat should always be tted with
3-point “roll-up” or xed seat belts or/and
ISOFIX, even when not in use. A non xed car
seat could cause injury to other passengers
in the event of sudden braking.
• Any luggage or other objects liable to cau-
se injuries in the event of a collision shall be
properly secured.
• The device should be changed when it
has been subject to violent stresses in an
accident. The violent stresses to which it is
subjected in these cases can alter its structu-

7
re and solidity, thus compromising its safety.
• The child restraint must not be used without
the cover. The seat cover should not be re-
placed with any other than the one recom-
mended by Brevi srl or the retailer, because
the cover constitutes an integral part of the
restraint performance.
• Do not use the product if any components
are broken or missing.
• No modication or addition can be made
to the car seat without specic approval of
Brevi srl.
• If you experience any problem of use or in-
stallation, do not use the car seat but contact
the manufacturer or dealer.
• When placing the car seat in the car, make
sure that during use none of its components
is blocked by any moveable part of the seat or
the door of the car.
• The child car seat should be kept away from
sunlight, otherwise it might get too hot for
the child’s skin and the plastic parts could
get overheated.
• Check regularly during use, that your child
and the car seat itself are properly positioned
and that the car seat is rmly and properly
attached.
• All passengers must be instructed on how to
free the child in case of an accident.
• It is not allowed to use any load bearing con-
tact points other than those described in the
instructions and marked in the child restraint.
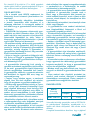
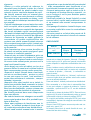
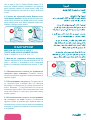
HOMOLOGATION
BREVI
child safety seat
KIMI cod.533
Group
0+,I,II 0-25kg
Weight
This is a “Universal” child restraint. It is approved to regu-
lation No. 44, 04 series of amendments, for general use in
vehicles and it will t most, but not all, car seats.
A correct t is likely if the vehicle manufacturer has declared
in the vehicle handbook that the vehicle is capable of accep-
ting a “Universal” child restraint for this age group.
This child restraint has been classied as “Universal” under
more stringent conditions than those which applied to earlier
designs which do not carry this notice.
If in doubt, consult either the child restraint manufacturer
or the retailer.
Only suitable for use in the listed vehicles tted with 3 point
with retractor safety-belts, approved to ECE Regulation No.
16 or other equivalent standards.
This is an ISOFIX CHILD RESTRAINT SYSTEM. It is appro-
ved to regulation No. 44, 04 series of amendments for gene-
ral use in vehicles tted with ISOFIX anchorages systems.
It will t vehicles with positions approved as ISOFIX posi-
tions (as detailed in the vehicle handbook), depending on
the category of the child seat and of the xture.
The mass group and the ISOFIX size class for which this
device is intended is: I group ,B1.
DO not place rear-facing child seat on frontseats with ai-
rbags.
DEUTSCH
WICHTIG: SORGFÄLTIG LESEN. FÜR SPÄTE-
RES NACHLESEN AUFBEWAHREN. Geeignet
für Kinder von 0 bis 25 kg (ca. 0-7 Jahre).
AUTOKINDERSITZ FÜR GRUPPEN 0+/1/2
WICHTIG: BITTE LESEN SIE VOR GE-
BRAUCH DES AUTOKINDERSITZES DIE AN-
LEITUNG UND BEFOLGEN SIE BEIM EINBAU
DIE ABBILDUNGEN. BEWAHREN SIE DIESE
ANLEITUNG BITTE WÄHREND DER GESAM-
TEN NUTZUNGSZEIT AUF.
WARNUNG: Dieser Autokindersitz ist nur
dann ein sicheres Produkt, wenn die Gebrau-
chsanleitung befolgt und strikt eingehalten
wird.
Ein fehlerhafter Einbau kann die Ursache schwerer Ver-
letzungen sein. In diesem Fall lehnt der Hersteller jegliche
Haftung für direkte oder indirekte Schäden ab.
Sehr geehrter Kunde, vielen Dank, dass Sie sich für ein
Brevi Produkt entschieden haben.
Es erfüllt die Sicherheitsnorm ECE R44.
Dieses Produkt ist für Kinder von 0-25 kg und 0-7 Jahren
geeignet. Wiegt das Kind mehr als 25 kg, ist die sichere
Benutzung des Kindersitzes nicht mehr gewährleistet.
WARNUNG
• Dieses Produkt kann im Fahrzeug nur mit
ISOFIX-Befestigungssystem und Sicherhei-
tsgurt benutzt werden.
• Entfernen Sie vor Verwendung dieses Arti-
kels die Kunststoffhülle, da Erstickungsge-
fahr besteht. Diese Hülle muss vernichtet
Page is loading ...
Page is loading ...
Page is loading ...
Page is loading ...
Page is loading ...
Page is loading ...
Page is loading ...
Page is loading ...
Page is loading ...
Page is loading ...
Page is loading ...
Page is loading ...
Page is loading ...
Page is loading ...
Page is loading ...
Page is loading ...
Page is loading ...
Page is loading ...
Page is loading ...
Page is loading ...
Page is loading ...
Page is loading ...
Page is loading ...
Page is loading ...

32
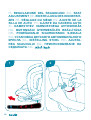
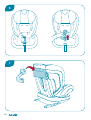
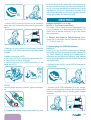
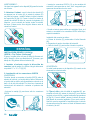
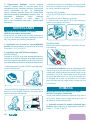
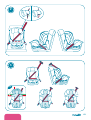
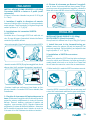
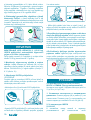
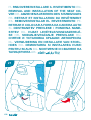
REMOVE THE HARNESS
• Remove the shoulder straps from the connector (Z)
(g.2). Remove the harness: pull out the belt (D) from
the connection plate (Q) as shown (g.3, 4). Remove the
seat cover: undo the snap-fasteners and take off the seat
cover from the seat (g.5). Adjust the car seat in position
“4”, raise the seat padding, remove the buckle and place
it in the back pocket (g.6, 7). Pull out the two buckle
components from harness, place them in the back pocket
and x the harness as shown (g. 8). Reassemble the
cover, crotch strap, harness and shoulder straps.
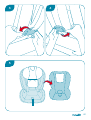
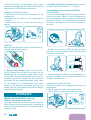
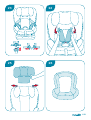
HEADREST ADJUSTMENT
• Adjusting the height of the headrest to the child’s height,
the shoulder straps and the seat belt will be adjusted syn-
chronously. Pull the headrest adjustment handle (A), and
move the headrest to the right height (g.9). Ensure that
the headrest is adjusted to the right position so that the
lower part of the headrest is at the same level or slightly
above the child’s shoulder (g.10).
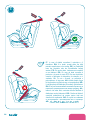
ADJUST CHILD SAFETY SEAT BELTS
• Press the adjustment button (K) and pull the belt (G) to
the maximum length (g.11). Release the safety buckle
(E), and put the belt on the side of the cover (g.12). Place
the child on the seat, lock the safety buckle (E), and fa-
sten the seat belt by pulling the adjustment belt (G) to
proper tightness (g.13). Warning: it is important for the
safety of the child to adjust the harness, so that there
should be less than a nger gap between the harness
and child (g.14). Note: the safety belt must not be lo-
osened or twisted.
DEUTSCH
EINSTELLUNG DES KINDERSITZES
• Der Sitz kann mit dem Griff (1) in 4 Positionen verstellt
werden (Abb. 1). Hinweis: Wird der Sitz für die Gruppe
0+ verwendet, muss er in Position „4“ verstellt werden.
Für ein Kind unter 18 Monaten ist eine Sitzverkleinerung
zu verwenden.
ENTFERNEN DES KINDERSICHERHEI-
TSGURTS
• Lösen Sie die Schultergurte vom Verbindungsteil (Z)
(Abb.2). Entfernen des Kindersicherheitsgurts: Lösen Sie
den Gurt (D) von der Verbindungsplatte (Q), wie gezeigt
(Abb. 3, 4). Abziehen des Sitzbezuges: Öffnen Sie die
Druckknöpfe des Bezuges und ziehen Sie ihn vom Sitz
ab (Abb.5). Verstellen Sie den Kindersitz in Position „4“,
heben Sie die Sitzpolsterung hoch, entfernen Sie das
Gurtschloss und stecken Sie es in die rückseitige Tasche
(Abb. 6, 7). Ziehen Sie die beiden Schlossteile vom Kin-
dersicherheitsgurt ab, stecken Sie sie in die rückseitige
Tasche und bringen Sie den Kindersicherheitsgurt wie
gezeigt unter (Abb. 8). Remontieren Sie Bezug, Schrit-
tgurt, Kindersicherheitsgurt und Schultergurte.
VERSTELLEN DER KOPFSTÜTZE
• Bei der Höhenverstellung der Kopfstütze entsprechend
der Körpergröße des Kindes werden die Schultergurte
und der Kindersicherheitsgurt gleichzeitig automatisch
eingestellt. Ziehen Sie den Verstellgriff (A) der Kopfstütze
und verschieben Sie sie auf die richtige Höhe (Abb. 9).
Überprüfen Sie, dass sich die Kopfstütze in der richtigen
Position bendet: Die Unterkante muss sich knapp über
der Schulter des Kindes oder etwas darüber benden
(Abb.10).
EINSTELLEN DES KINDERSICHERHEI-
TSGURTS
• Drücken Sie den Knopf der Verstelleinrichtung (K) und
ziehen Sie das Gurtband (G) bis zur maximalen Länge
heraus (Abb.11). Öffnen Sie das Gurtschloss (E) und
legen Sie die Teile des Kindersicherheitsgurts seitlich
auseinander (Abb. 12). Setzen Sie das Kind in den Sitz,
schließen Sie das Gurtschloss (E), straffen Sie den
Kindersicherheitsgurt richtig mit dem Gurtband der Ver-
stelleinrichtung (G) (Fig.13). Achtung: Für die Sicherheit
ist es wichtig, den Gurt so zu straffen, dass der Raum
zwischen Gurt und Kind weniger als eine Fingerbreite
beträgt (Abb.14). Hinweis: Der Kindersicherheitsgurt darf
weder gelockert noch verdreht sein.
FRANÇAIS
RÉGLAGE DU SIÈGE
• Le siège peut être incliné selon 4 positions au moyen
du levier (I) (g.1). Remarque : en cas d’utilisation pour
le groupe 0+, placer le siège en position 4 et utiliser le
réducteur pour les enfants de moins de 18 mois.
RETIRER LA CEINTURE
• Détacher le harnais du connecteur (Z) (g.2).
Retirer la ceinture : détacher la sangle (D) de la plaque
de connexion (Q), voir (g.3, 4). Retirer le revêtement :
ouvrir les boutons pression du revêtement et retirer ce
dernier (g.5). Régler le siège en position 4, soulever
le garnissage de l’assise, retirer la boucle et l’introduire
dans la poche arrière (g.6, 7). Retirer les deux compo-
sants de la boucle de la ceinture et les placer dans la
poche arrière, installer la ceinture comme sur la (g.8).
Remettre le revêtement, l’écarteur jambe, la ceinture et
le harnais en place.
Page is loading ...
Page is loading ...
Page is loading ...
Page is loading ...
Page is loading ...

38
1
13
3
2
1
4
Group 0+
0-13 kg
0-18 m
Page is loading ...
Page is loading ...

41
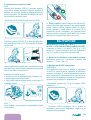
ITALIANO
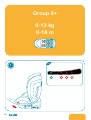
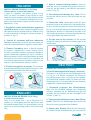
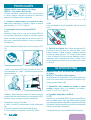
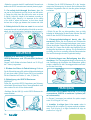
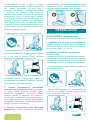
INSTALLAZIONE GRUPPO 0+ (0-13kg)
Cintura auto a 3 punti (universale)
Il gruppo 0+ è destinato a un bambino di peso 0-13 kg
(circa 0-18 mesi). Per bambini di peso inferiore a 9 kg il
sedile deve essere installato rivolto nella direzione opposta
a quella di marcia. Si raccomanda l’installazione con seg-
giolino rivolto nella direzione opposta a quella di marcia per
bambini no a 13 kg.
1. Seggiolino rivolto nella direzione opposta a
quella di marcia: quando si installa il seggiolino rivolto
nella direzione opposta a quella di marcia, utilizzare il ridut-
tore (M) e azionando la maniglia (I) reclinare la seduta in
posizione “4” (g.13).
2. Cinture di sicurezza dell’auto attraverso
la base: estrarre tutta la cintura di sicurezza, passare la
cintura di sicurezza attraverso il seggiolino come mostrato.
3. Fissare il bambino: aprire la bbia di sicurezza
(E), premere il regolatore (K) e tirare il cinturino (D) no
ad avere la lunghezza massima; posizionare il bambino e
regolare l’altezza del poggiatesta (A) (g.14). Chiudere la
bbia e tensionare il cinturino di sicurezza tirando la cinghia
del regolatore (G) in modo corretto (Fig.13). Attenzione: per
la sicurezza è importante tirare il cinturino in modo che ci sia
meno di un dito di distanza tra cinturino e bambino.
4. Fissare il seggiolino al veicolo: Tirare la cintura
di sicurezza dell’auto attraverso il sedile di sicurezza e inse-
rire la linguetta della bbia nella bbia del veicolo.
ENGLISH
INSTALLATION AS GROUP 0+ (0-13kg)
3 point belt (Universal)
Group 0+ is for children form 0 up to 13kg (about 0-18
months). For child weighting less than 9kg the seat must
be installed rearward facing. It is recommended to use the
product in the rearward facing position till the child weight
13kg.
1. Seat in rearward facing position: when you
install the seat in the rearward facing position, use the re-
ducer (M), pull the handle (I) and adjust the seat angle to
position “4” (g.13).
2. Car safety belts through the base: Pull out
the seat belt entirely, pass the seat belt through the seat
as shown.
3. Fasten the child: release safety buckle (E), press
the button (K) pull out the harness (D) to the maximum leng-
th; place the child and adjust the height of the headrest (A)
(g.14). Lock the buckle and pull the retractor belt (G) to the
right tightness. Warning: it is important for the safety of the
child to adjust the harness, so that there should be less than
a nger gap between the harness and child .
4. Fix the seat to the vehicle: Pull the seat belt
through the safety seat and insert the buckle tongue in the
vehicle buckle.
DEUTSCH
EINBAU ALS GRUPPE 0+ (0-13 kg)
3-Punkt-Fahrzeugsicherheitsgurt (universal)
Die Gruppe 0+ ist für Kinder mit einem Körpergewicht von
0-13 kg (ca. 0-18 Monate) vorgesehen. Für Kinder mit
einem Körpergewicht unter 9 kg muss der Sitz entgegen
der Fahrtrichtung eingebaut werden. Für Kinder mit einem
Körpergewicht bis zu 13 kg wird empfohlen, den Kindersitz
entgegen der Fahrtrichtung einzubauen.
1. Kindersitz entgegen der Fahrtrichtung:
Wenn Sie den Kindersitz entgegen der Fahrtrichtung
einbauen, verwenden Sie die Sitzverkleinerung (M) und
verstellen Sie den Kindersitz mit dem Verstellgriff (I) auf
Position „4“ (Abb. 13).
2. Fahrzeugsicherheitsgurt durch das Sitzun-
terteil: Ziehen Sie den Sicherheitsgurt ganz heraus und
führen Sie ihn wie gezeigt durch den Kindersitz.
3. Sichern des Kindes: Öffnen Sie das Gurtschloss
(E), drücken Sie die Verstelleinrichtung (K) und ziehen Sie
Page is loading ...
Page is loading ...
Page is loading ...
Page is loading ...
Page is loading ...
Page is loading ...
Page is loading ...
Page is loading ...

50
ITALIANO
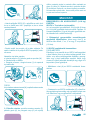
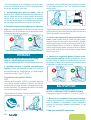
INSTALLAZIONE GRUPPO I (9-18kg)
ISOFIX + Top tether (universale)
Il gruppo I è per bambini con peso 9-18 kg (da 9 mesi a
4 anni). Attenzione: bambini sotto i 18 mesi e sotto 13kg
devono utilizzare l’inserto (M).
1. Installare il sedile secondo la direzione di
marcia: tirare la maniglia (I) e regolare l’angolo di seduta
in posizione “1” o “2” o “3” (g.15).
2. Installazione dei connettori ISOFIX:
AVVERTENZA
Controllare dove sono l’ancoraggio ISOFIX sul sedile del
veicolo e l’ancoraggio del top tether. Riferimento: l’ancorag-
gio del top tether è generalmente posizionato nel baule o
sul pavimento del veicolo. Si prega di leggere il manuale di
istruzioni dell’auto o contattare il produttore dell’auto.
• Azionare la maniglia (H) per far fuoriuscire i connettori
ISOFIX.
B
1
• Inserire i connettori ISOFIX (R) negli ancoraggi dell’auto,
no ad udire un chiaro “click”: assicurarsi che appaiano i
segnali verdi.
• Scuotere il sedile per vericare se è ben ssato; se il se-
dile non è stabile o i connettori ISOFIX sono allentati, rifare
l’installazione.
Installazione del connettore top tether:
a. Estrarre il cinturino (S), premendo il pulsante di rilascio (W)
b. Agganciare il gancio sull’ancoraggio dell’auto.
c. Tirare il cinturino (Y) per tensionare il cinturino top tether.
AVVERTENZA:
Appare un segnale verde sul dispositivo (W) quando si è
raggiunta la tensione corretta.
3. Fissare il bambino: aprire la bbia di sicu-
rezza (E), premendo il tasto (K) estrarre il cinturino
(D) alla lunghezza massima; posizione il bambino e
regolare l’altezza del poggiatesta (A) (g.16). Chiu-
dere la bbia e tensionare il cinturino di sicurezza ti-
rando la cinghia del regolatore (G) in modo corretto
Attenzione: per la sicurezza è importante tirare il cinturino
in modo che ci sia meno di un dito di distanza tra cinturino
e bambino.
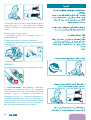
ENGLISH
INSTALLATION AS GROUP I (9-18kg)
ISOFIX+Top tether (Universal)
Group I seat is for children from 9 up to18kg (9 months to 4
years). Attention: children under 18 months and under 13kg
must use the reducer (M).
1. Install the seat in the forward facing posi-
tion: pull the handle (I) and adjust the seat angle to posi-
tion “1” or “2” or “3”(g.15).
2. Installation of ISOFIX connectors:
NOTICE
Please check where the ISOFIX and top tether ancho-
rages are on the vehicle seat. Reference: top tether an-
chorage is usually placed in the trunk or on the car oor.
Please read the car instruction manual or contact the car
manufacturer.
• Pull the handle (H) to make the ISOFIX connectors come out.

51
B
1
• Insert the ISOFIX connectors (R) into the car anchorage,
until a clear “click”can be heard: make sure the green marks
appear.
• Shake the car seat to check if it is well locked; if the seat
is not stable or the ISOFIX connectors are loosened, please
try again.
Installation of top tether LATCH:
a. Pull out the LATCH (S), pressing the release button (W)
b. Hang the hook on the car anchorage.
c. Hold the other end of the LATCH to pull back (Y) and
tighten the LATCH.
NOTICE:
Once the proper tightness is reached, a green mark appe-
ars.
3. Fasten the child: release safety buckle (E), press
the button (K) pull out the harness (D) to the maximum leng-
th; place the child and adjust the height of the headrest (A)
(g.16). Lock the buckle and pull the retractor belt (G) to the
right tightness. Warning: it is important for the safety of the
child to adjust the harness, so that there should be less than
a nger gap between the harness and child.
DEUTSCH
EINBAU GRUPPE I (9-18 kg)
ISOFIX + Top Tether (universal)
Die Gruppe I ist für Kinder mit einem Körpergewicht von
9-18 kg (9 Monate bis 4 Jahre) vorgesehen. Achtung: Für
Kinder unter 18 Monaten und unter 13 kg ist der Einsatz
(M) zu verwenden.
1. Einbau des Sitzes in Fahrtrichtung: Ziehen
Sie am Griff (I) und stellen Sie den Sitzwinkel auf Position
„1“, „2“ oder „3“ (Abb. 15).
2. Befestigung der ISOFIX-Rastarme:
WARNUNG
Prüfen Sie, wo sich die ISOFIX-Verankerung am Fahrzeug-
sitz und die Top Tether-Verankerung benden. Hinweis: Die
Top Tether Verankerung bendet sich normalerweise im
Kofferraum oder am Boden des Fahrzeugs. Bitte schlagen
Sie im Fahrzeughandbuch nach oder wenden Sie sich an
den Autohersteller.
• Betätigen Sie den Griff (H), um die ISOFIX-Rastarme he-
rauszuschieben.
B
1
• Schieben Sie die ISOFIX-Rastarme (R) in die Veranke-
rungen des Fahrzeugs ein, bis sie mit einem hörbaren Klick
einrasten: Vergewissern Sie sich, das die grünen Anzeigen
erscheinen.
Page is loading ...
Page is loading ...
Page is loading ...
Page is loading ...
Page is loading ...
Page is loading ...
Page is loading ...
Page is loading ...
Page is loading ...
Page is loading ...

62
1
17
3
2
1
4
Group II
15-25 kg
3-7 yr
Page is loading ...
Page is loading ...

65
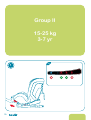
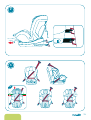
ITALIANO
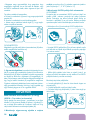
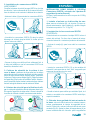
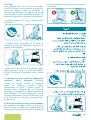
INSTALLAZIONE COME GRUPPO II (15-25kg)
Cinghia a 3 punti (universale)
Il Gruppo II è riservato ai bambini con peso di 15-25 kg (da
3 a 7 anni).
1. Installare il sedile in direzione di marcia:
rimuovere il riduttore (M) e il cinturino (D) come precedente-
mente spiegato. Tirare la maniglia (I) e regolare l’angolo del
sedile in posizione “3” (g.17).
2. Cinghia di sicurezza dell’auto attraverso la
base: posizionare il seggiolino sulla la dei sedili posterio-
ri, estrarre completamente la cintura di sicurezza dell’auto.
3. Fissare il bambino: posizionare il bambino nel
seggiolino, come mostrato (g.18). Regolare l’altezza del
poggiatesta (A) in base all’altezza del bambino. Attenzione:
per la sicurezza è importante tirare il cinturino in modo che
ci sia meno di un dito di distanza tra cinturino e bambino.
4. Cintura di sicurezza per ssare il seggioli-
no: la cintura di sicurezza dell’auto deve passare nel gui-
da-cintura rosso del poggiatesta del seggiolino; chiudere la
bbia della cintura dell’auto e tirare la cintura efcacemente.
ENGLISH
INSTALLATION AS GROUP II (15-25kg)
3 point belt (Universal)
Group II seat is for children from 15 up to 25kg (3 to 7 years).
1. Install the seat in the forward facing po-
sition: remove the reducer (M) and the harness (D) as
previously explained. Pull the handle (I) and adjust the seat
angle to position “3” (g.17).
2. Car safety belt through the base: place the
car seat on the backseats, pull out the car seat belt entirely.
3. Fasten the child: place the child on the seat, as
shown in (g.18). Adjust the height of the headrest (A) ac-
cording to the child’s height. Warning: it is important for the
safety of the child to adjust the harness, so that there should
be less than a nger gap between the harness and child.
4. Safety belt to x the car seat: the car seat belt
must pass through the red belt guide of the child car seat he-
adrest; lock the car belt buckle, and tighten the belt properly.
DEUTSCH
EINBAU ALS GRUPPE II (15-25 kg)
ISOFIX und 3-Punkt-Gurt (universal)
Gruppe II ist für Kinder mit einem Gewicht von 15-25 kg (3
bis 7 Jahren) vorgesehen.
1. Einbau des Sitzes in Fahrtrichtung: Entfernen
Sie die Sitzverkleinerung (M) und den Kindersicherheitsgurt
(D), wie oben erklärt. Ziehen Sie am Griff (I) und verstellen
Sie den Sitzwinkel auf Position „3“ (Abb. 17).
2. Fahrzeugsicherheitsgurt durch das Sitzun-
terteil: Stellen Sie den Kindersitz auf die Rücksitzreihe
und ziehen Sie den Fahrzeugsicherheitsgurt ganz heraus.
3. Sichern des Kindes: Setzen Sie das Kind wie
gezeigt in den Sitz (Abb. 18). Passen Sie die Höhe der
Kopfstütze (A) der Körpergröße des Kindes an. Achtung:
Für die Sicherheit ist es wichtig, den Gurt so zu straffen,
dass der Raum zwischen Gurt und Kind weniger als eine
Fingerbreite beträgt.
4. Sicherheitsgurt zur Befestigung des Kin-
dersitzes: Der Fahrzeugsicherheitsgurt muss durch die
rote Gurtführung der Kopfstütze des Kindersitzes geführt
werden; schließen Sie das Fahrzeuggurtschloss und straf-
fen Sie den Gurt richtig.
Page is loading ...
Page is loading ...
Page is loading ...
Page is loading ...

70
1
19
3
2
1
4
Group II
15-25 kg
3-7 yr
Page is loading ...
Page is loading ...

73
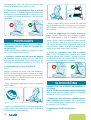
ITALIANO
INSTALLAZIONE COME GRUPPO II (15-25kg)
Connettori ISOFIX e cintura a 3 punti (semi-
universale)
Il Gruppo II è riservato ai bambini con peso di 15-25 kg (da
3 a 7 anni).
1. Installare il sedile in direzione di marcia:
rimuovere il riduttore (M) e il cinturino (D) come precedente-
mente spiegato. Tirare la maniglia (I) e regolare l’angolo del
sedile in posizione “2” o “3” (g.19).
2. Installazione dei connettori ISOFIX:
AVVERTENZA
Controllare dove è l’ancoraggio ISOFIX sul sedile del vei-
colo. Si prega di leggere il manuale di istruzioni dell’auto o
contattare il produttore dell’auto.
• Azionare la maniglia (H) per far fuoriuscire i connettori ISOFIX.
B
1
• Inserire i connettori ISOFIX (R) negli ancoraggi dell’auto, no ad
udire un chiaro “click”: assicurarsi che appaiano i segnali verdi.
• Scuotere il sedile per vericare se è ben ssato; se il se-
dile non è stabile o i connettori ISOFIX sono allentati, rifare
l’installazione.
3. Cinghia di sicurezza dell’auto attraverso la
base: posizionare il seggiolino sulla la dei sedili posteriori
posteriore, estrarre completamente la cintura di sicurezza
dell’auto. Fissare il bambino: posizionare il bambino nel
seggiolino, come mostrato (g.20). Regolare l’altezza del
poggiatesta (A) in base all’altezza del bambino. Attenzione:
per la sicurezza è importante tirare il cinturino in modo che
ci sia meno di un dito di distanza tra cinturino e bambino.
4. Cintura di sicurezza per ssare il seggioli-
no: la cintura di sicurezza dell’auto deve passare nel gui-
da-cintura rosso del poggiatesta del seggiolino; chiudere la
bbia della cintura dell’auto e tirare la cintura efcacemente.
ENGLISH
INSTALLATION AS GROUP II (15-25kg)
ISOFIX+BELTS (Semi-Universal)
Group II seat is for children from 15 up to 25kg (3 to 7years).
1. Install the seat in the forward facing po-
sition: remove the reducer (M) and the harness (D) as
previously explained. Pull the handle (I) and adjust the seat
angle to position “2” or “3” (g.19).
2. Installation of ISOFIX connectors:
NOTICE
Please check where the ISOFIX and top tether anchorages
are on the vehicle seat. Reference: top tether anchorage is
usually placed in the trunk or on the car oor. Please read
the car instruction manual or contact the car manufacturer.
• Pull the handle (H) to make the ISOFIX connectors come out.
B
1
• Insert the ISOFIX connectors (R) into the car anchorage, until
a clear “click”can be heard: make sure the green marks appear.

74
• Shake the car seat to check if it is well locked; if the seat is not
stable or the ISOFIX connectors are loosened, please try again.
3. Car safety belt through the base: place the
car seat on the backseats, pull out the car seat belt entire-
ly. Fasten the child: place the child on the seat, as shown
in (g.20). Adjust the height of the headrest according to
the child’s height. Warning: it is important for the safety
of the child to adjust the harness, so that there should
be less than a nger gap between the harness and child.
4. Safety belt to x the car seat: the car seat belt
must pass through the red belt guide of the child car seat he-
adrest; lock the car belt buckle, and tighten the belt properly.
DEUTSCH
EINBAU ALS GRUPPE II (15-25 kg)
ISOFIX-Rastarme und 3-Punkt-Gurt (halbuni-
versal)
Gruppe II ist für Kinder mit einem Gewicht von 15-25 kg (3
bis 7 Jahren) vorgesehen.
1. Einbau des Sitzes in Fahrtrichtung: Entfernen
Sie die Sitzverkleinerung (M) und den Kindersicherheitsgurt
(D), wie oben erklärt. Ziehen Sie am Griff (I) und verstellen
Sie den Sitzwinkel auf Position „2“ oder „3“ (Abb.19).
2. Befestigung der ISOFIX-Rastarme:
WARNUNG
Prüfen Sie, wo sich die ISOFIX-Verankerung am Fahrzeug-
sitz bendet. Bitte schlagen Sie im Fahrzeughandbuch nach
oder wenden Sie sich an den Autohersteller.
• Betätigen Sie den Griff (H), um die ISOFIX-Rastarme he-
rauszuschieben.
B
1
• Schieben Sie die ISOFIX-Rastarme (R) in die Veranke-
rungen des Fahrzeugs ein, bis sie mit einem hörbaren Klick
einrasten: Vergewissern Sie sich, das die grünen Anzeigen
erscheinen.
• Rütteln Sie am Sitz, um sicherzustellen, dass er richtig
befestigt ist. Wiederholen Sie den Einbau, falls der Sitz nicht
stabil ist oder die ISOFIX-Rastarme locker sitzen.
3. Fahrzeugsicherheitsgurt durch das Sit-
zunterteil: Stellen Sie den Kindersitz auf Rücksitzreihe
und ziehen Sie den Fahrzeugsicherheitsgurt ganz heraus.
Sichern des Kindes: Setzen Sie das Kind wie gezeigt in den
Sitz (Abb. 20). Passen Sie die Höhe der Kopfstütze (A) der
Körpergröße des Kindes an. Achtung: Für die Sicherheit ist
es wichtig, den Gurt so zu straffen, dass der Raum zwischen
Gurt und Kind weniger als eine Fingerbreite beträgt.
4. Sicherheitsgurt zur Befestigung des Kin-
dersitzes: Der Fahrzeugsicherheitsgurt muss durch die
rote Gurtführung der Kopfstütze des Kindersitzes geführt
werden; schließen Sie das Fahrzeuggurtschloss und straf-
fen Sie den Gurt richtig.
FRANÇAIS
INSTALLATION COMME GROUPE II (15-25 kg)
connecteurs ISOFIX et ceinture 3 points (se-
mi-universelle)
Le Groupe II correspond aux enfants d’un poids compris
entre 15 et 25 kg (de 3 à 7 ans).
1. Installer le siège face à la route: retirer le
réducteur (M) et la ceinture (D) comme expliqué précédem-
ment. Tirer le levier (I) et régler l’inclinaison du siège en
position 2 ou 3 (g.19).
Page is loading ...
Page is loading ...
Page is loading ...
Page is loading ...
Page is loading ...
Page is loading ...
Page is loading ...
Page is loading ...
Page is loading ...
Page is loading ...

85
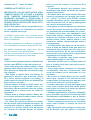
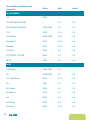
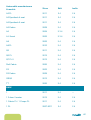
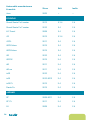
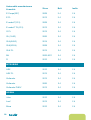
IT- Questo è un elenco dei modelli
delle autovetture dotate di siste-
ma d’aggancio ISOFIX sulle quali
è stato testato questo seggiolino.
EN- This is a list of the models of
vehicles with ISOFIX anchorage
systems and on which this child
car seat has been tested.
DE- Dies ist eine Liste der mit dem
ISOFIX-Verankerungssystem au-
sgestatteten Fahrzeugtypen, auf
denen dieser Kindersitz getestet
wurde.
FR- On trouvera ci-dessous la
liste des modèles de véhicules
équipés de systèmes de xation
ISOFIX sur lesquels ce siège en-
fant a été testé.
ES- Este es un elenco de los mo-
delos de vehículos con enganche
ISOFIX sobre los cuales ha sido
probada esta silla de auto.
PT- Esta é uma lista dos modelos
de carros com sistema ISOFIX e
nos quais foi testada esta cadeira
auto.
SI- To je seznam modelov vozil s
sistemom pritrditve ISOFIX in na
katerih je bil testiran ta otroški
avto sedež.
HU- Az alábbi lista tartalmazza az
ISOFIX rögzítő rendszerrel felsze-
relt járműmodelleket, amelyekbe
beszerelhető ez a biztonsági gyer-
mekülés.
HR- Sljedeći popis sadrži modele
automobila opskrbljenih ISOFIX
pričvrsnim sustavom u koje se
može ugraditi ovo sigurnosno
dječje sjedalo.
RU- Это список моделей
транспортных средств с
системами крепления ISOFIX и
на которых было проверено это
детское автокресло.
NL- Dit is een lijst van voertuig-
modellen met ISOFIX ankersyte-
em waarop het autostoeltje is
getest.
RO- Aceasta este o listă a mode-
lelor de vehicule cu sisteme de
ancorare ISOFIX si pe care a fost
testat acest scaun de masină pen-
tru copii.
BG- Това е списък на моделите
превозни средства с ISOFIX
система за закрепване, на които
това столче за кола може да
бъде изпробвано.
AR-

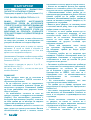
86
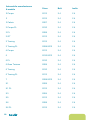
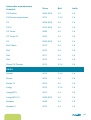
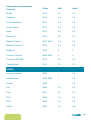
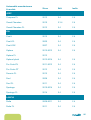
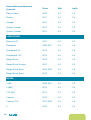
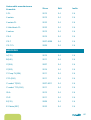
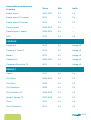
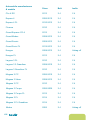
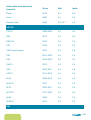
Automobile manufacturers
& models
Since Belt Isofix
147 2005 -- --
156 CROSS WAGON -- 2 4 2 4
156 SPORT WAGON 1997-2005 2 4 2 4
159 2005 2 3 4 2 4
159 saloon 2006-2008 2 3 4 2 4
Guiletta FL 2013 2 3 4 2 4
Giuletta 2010 2 3 4 2 4
159 SW 2005 2 4 2 4
GT SPORT COUPE 2004 2 4 2 4
MITO 2008 2 4 2 4
100C4(A6) 1994-1997 2 4 --
A2 1999-2005 2 4 2 4
A 3, Sportback 2004 2 3 4 2 4
A3 1996 2 4 2 4
A3 Cabrio 2008 2 4 2 4
A3 Saloon 2013 2 4 2 4
A4 2008 2 4 2 4
A4 Cabrio 2002 2 4 2 4
A4 Avant 2008 2 3 4 2 4
ALFA ROMEO
AUDI

87
Automobile manufacturers
& models
Since Belt Isofix
A5 FL 2011 2 4 2 4
A5 Sportback 4 seat 2011 2 4 2 4
A5 Sportback 5 seat 2011 2 4 2 4
A5 Cabrio 2009 2 4 2 4
A6 2004 2 3 4 2 4
A 6 Avant 2005 2 3 4 2 4
A8 2005 2 4 2 4
A8 FL 2010 2 4 2 4
Q3 2011 2 4 2 4
Q5 FL 2012 2 4 2 4
Q7 FL II 2013 2 4 2 4
Rs4 Cabrio 2006 2 4 2 4
S3 2003 2 4 2 4
S5 Cabrio 2009 2 4 2 4
GSQ5 2013 2 4 2 4
TT 2006 2 4 2 4
BMW
1 2011 2 4 --
1 3-door 5 seater 2012 2 4 2 4
1 Cabrio FL / 1 Coupe FL 2011 2 4 2 4
1 FL 2007-2011 2 4 2 4

88
Automobile manufacturers
& models
Since Belt Isofix
2 Coupe 2013 2 4 2 4
3 2012 2 4 2 4
3 Cabrio 2007 2 4 2 4
3 Coupe FL 2010 2 4 2 4
3 FL 2008 2 4 2 4
3 GT 2013 2 4 2 4
3 Touring 2012 2 4 2 4
3 Touring FL 2008-2012 2 4 2 4
4 Coupe 2013 2 4 2 4
5 2010-2013 2 4 2 4
5 FL 2010 2 4 2 4
5 Gran Turismo 2009 2 4 2 4
5 Touring 2010 2 4 2 4
5 Touring FL 2013 2 4 2 4
7 2008-2012 2 4 2 4
X1 2009 2 4 2 4
X1 FL 2012 2 4 2 4
X3 2004 2 4 2 4
X5 2013 2 4 2 4
X6 2008 2 4 2 4
X6 FL 2012 2 4 2 4

89
Automobile manufacturers
& models
Since Belt Isofix
MINI Cooper 1994-1997 2 4 2 4
MINI Cooper Cabrio 2006 2 4 2 4
Mini Club Man 2007 2 4 2 4
Mini 2ND GEN. 2006 2 4 2 4
CADILLAC
CTS 2007 2 4 2 4
CHEVROLET
Aveo 2011 2 4 2 4
Aveo hatchback 2011 2 4 2 4
Captiva 2006-2011 2 4 2 4
Captiva FL 2011 2 4 2 4
Captiva FL2 2013 2 4 2 4
Cruze 2011 2 4 2 4
Cruze SW 2012 2 4 2 4
Epica 2006-2010 2 4 2 4
Malibu 2012 2 4 2 4
Orlando 2011 2 4 2 4
Spark 2010-2013 2 4 2 4
Spark FL 2013 2 4 2 4
TRAX 2010-2013 2 4 2 4
Volt 2011 2 4 2 4

90
Automobile manufacturers
& models
Since Belt Isofix
CHRYSLER
300 2004 2 4 2 4
300C 2008 2 4 2 4
Dodge caliber 2006 2 4 2 4
Dodge journey 2008 2 4 2 4
Dodge nitro 2006 2 3 4 2 4
Dodge eam(1500) 2006-2008 2 4 2 4
Jeep cherokee 2002 2 4 2 4
Jeep grand ch. 2005 2 4 2 4
PT Cruiser 2000 2 4 2 4
Sebring cabrio 2007 2 4 2 4
Voyager 2001 -- --
CITROEN
C -Crosser 2007-2013 2 4 2 4
C3 2010-2013 2 4 2 4
C3 FL 2013 2 4 2 4
C3 FL 5 door 2005-2009 2 4 2 4
C4 2004-2010 2 4 2 4
C4 3 door 2004-2010 2 4 2 4
C4 Aircross 2012 2 4 2 4
C4 II 2010 2 4 2 4
Page is loading ...
Page is loading ...
Page is loading ...
Page is loading ...
Page is loading ...
Page is loading ...
Page is loading ...
Page is loading ...
Page is loading ...
Page is loading ...
Page is loading ...
Page is loading ...
Page is loading ...
Page is loading ...
Page is loading ...
Page is loading ...
Page is loading ...
Page is loading ...
Page is loading ...
Page is loading ...
Page is loading ...
Page is loading ...
Page is loading ...
Page is loading ...
Page is loading ...
Page is loading ...
-
 1
1
-
 2
2
-
 3
3
-
 4
4
-
 5
5
-
 6
6
-
 7
7
-
 8
8
-
 9
9
-
 10
10
-
 11
11
-
 12
12
-
 13
13
-
 14
14
-
 15
15
-
 16
16
-
 17
17
-
 18
18
-
 19
19
-
 20
20
-
 21
21
-
 22
22
-
 23
23
-
 24
24
-
 25
25
-
 26
26
-
 27
27
-
 28
28
-
 29
29
-
 30
30
-
 31
31
-
 32
32
-
 33
33
-
 34
34
-
 35
35
-
 36
36
-
 37
37
-
 38
38
-
 39
39
-
 40
40
-
 41
41
-
 42
42
-
 43
43
-
 44
44
-
 45
45
-
 46
46
-
 47
47
-
 48
48
-
 49
49
-
 50
50
-
 51
51
-
 52
52
-
 53
53
-
 54
54
-
 55
55
-
 56
56
-
 57
57
-
 58
58
-
 59
59
-
 60
60
-
 61
61
-
 62
62
-
 63
63
-
 64
64
-
 65
65
-
 66
66
-
 67
67
-
 68
68
-
 69
69
-
 70
70
-
 71
71
-
 72
72
-
 73
73
-
 74
74
-
 75
75
-
 76
76
-
 77
77
-
 78
78
-
 79
79
-
 80
80
-
 81
81
-
 82
82
-
 83
83
-
 84
84
-
 85
85
-
 86
86
-
 87
87
-
 88
88
-
 89
89
-
 90
90
-
 91
91
-
 92
92
-
 93
93
-
 94
94
-
 95
95
-
 96
96
-
 97
97
-
 98
98
-
 99
99
-
 100
100
-
 101
101
-
 102
102
-
 103
103
-
 104
104
-
 105
105
-
 106
106
-
 107
107
-
 108
108
-
 109
109
-
 110
110
-
 111
111
-
 112
112
-
 113
113
-
 114
114
-
 115
115
-
 116
116


Brevi Car seat KIMI Isofix tt Owner's manual
- Category
- Car seats
- Type
- Owner's manual
- This manual is also suitable for
Ask a question and I''ll find the answer in the document
Finding information in a document is now easier with AI
in other languages
- italiano: Brevi Car seat KIMI Isofix tt Manuale del proprietario
- français: Brevi Car seat KIMI Isofix tt Le manuel du propriétaire
- español: Brevi Car seat KIMI Isofix tt El manual del propietario
- Deutsch: Brevi Car seat KIMI Isofix tt Bedienungsanleitung
- русский: Brevi Car seat KIMI Isofix tt Инструкция по применению
- Nederlands: Brevi Car seat KIMI Isofix tt de handleiding
- português: Brevi Car seat KIMI Isofix tt Manual do proprietário
- română: Brevi Car seat KIMI Isofix tt Manualul proprietarului
Related papers
-
Brevi Alain i-Size Owner's manual
-
Brevi Tazio Isofix tt Owner's manual
-
-
-
-
-
-
-
-
Other documents
-
Joie Spin 360TM Child Restraint User manual
-
mothercare Chicco_Car Seat YOUNIVERSE FIX 1-2-3 User guide
-
mothercare SIRIO Owner's manual
-
mothercare Chicco_Car Seat UNICO User guide
-
-
 Medisafe MediSafe Cocomoon User manual
-
Axkid Rekid User manual
-
CYBEX JUNO M-FIX User manual
-
CYBEX SOLUTION M-FIX User manual
-
