
Operating Instructions EB-GD35
Digital Cellular Telephone
Before operating this equipment please read these instructions
completely.
@

Quick Reference
This Quick Reference guide is intended to enable you to utilize the
most basic features of the phone instantly without having to search
through specific details in this manual.
Power On/Off
Press and hold E
Make a Call
Use the keypad to enter the
area code and telephone
number you require, then
press D
Correcting an Error
Press C once to erase the
previous character
Press and hold C to
remove all characters
entered
Redial Last Number
Press DD
End a Call
Press E to end a call
Answer a Call
Press any key except E,
g or A
Adjust Ear Volume
Press e during a call
Access WAP Browser
Press and hold P
Make Emergency Call
Press 112 D
International Dialling
Press and hold 0, until +
appears in the display, use
e to select the appropriate
country, then press B
Add a Phonebook Entry
Enter phone number and
press A. Press B, enter
name and press B twice
Dial a Phonebook Entry
Press A, then use e to
select the desired number,
then press D
What is My Number ?
This function is SIM
dependent. Press B25
and the number of your
phone is displayed
Set Key Guard
In the idle mode press B
three times and the keys are
locked to avoid accidental
presses
Disable Key Guard
When Free is displayed in
the main option area, press
B twice to remove the Key
Guard

Contents
Getting Started ..........................1
Fitting the SIM .........................1
Fitting the Battery .......................2
Charging the Battery......................3
Getting to Know Your Phone .................4
Basic Operation .........................7
Switching the Phone On/Off ..................7
Making a Call .........................7
Automatic Redial .......................8
Ending a Call .........................8
Answering a Call........................8
Earpiece Volume Control ...................9
Locking the Phone.......................9
Setting Vibration Alert ....................10
Setting Ring and Key Volume ................10
Phonebook ...........................11
Store a Number .......................11
Browsing Phonebook.....................11
Retrieve/Edit Phonebook Entries...............12
Using Alert Profiles......................13
Hot Key Phone Numbers...................13
Review the Phonebook....................13
My Numbers .........................14
Personalising Your Phone ...................15
Add a Start-up Greeting ...................15
Displaying Animations ....................15
Changing the Ring Tone ...................15
Disabling all Tones ......................16
Changing the Language ...................16
Restoring the Default Phone Settings ............16
Disabling Warning Tones ..................16
Phone Security .........................17
Using the PIN ........................17
Using Key Guard .......................17
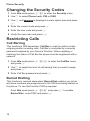
Changing the Security Codes ................18
Restricting Calls .......................18
Applications ...........................20
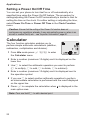
Clock .............................20
Calculator ..........................22
Game ............................23

Short Text Messages ......................24
Setting the Phone for Text Messages ............24
Sending a Text Message...................24
Receiving Text Messages ..................25
Message Options.......................25
Using Pre-defined Messages ................26
Manage Messages Lists ...................26
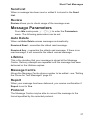
Message Parameters ....................27
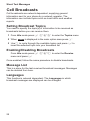
Cell Broadcasts .......................28
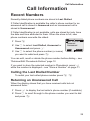
Call Information .........................29
Recent Numbers .......................29
Call Identification .......................30
Call Duration .........................30
Service Charges .......................31
Advanced Operation ......................33
Diverting Calls ........................33
Cancelling Diverted Calls ..................33
Holding Calls and Call Waiting ................33
Multi-party Calls .......................35
Call Transfer .........................36
Changing to a New Network .................36
Line Selection ........................37
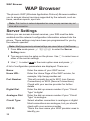
WAP Browser ..........................38
Server Settings........................38
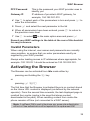
Activating the Browser ....................39
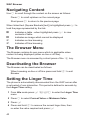
Navigating Content......................40
The Browser Menu ......................40
Deactivating the Browser...................40
Setting the Linger Time ...................40
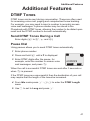
Additional Features .......................41
DTMF Tones .........................41
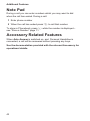
Note Pad ...........................42
Accessory Related Features .................42
Text Entry ............................43
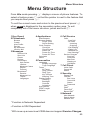
Menu Structure .........................45
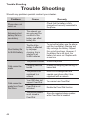
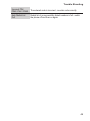
Trouble Shooting ........................46
Important Error Messages ..................48
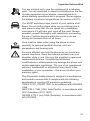
Important Information......................50
Safety Considerations ....................50
Care and Maintenance .....................52
Glossary of Terms .......................53
Specifications ..........................55
EU Warranty ...........................56
Notes ...............................62

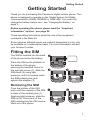
Getting Started
Thank you for purchasing this Panasonic digital cellular phone. This
phone is designed to operate on the Global System for Mobile
Communications (GSM), GSM900 or GSM1800. You must fully
charge the battery before use - see “Charging the Battery” on
page 3.
Before operating this phone please read the “Important
Information” section - see page 50.
These operating instructions detail the use of the equipment
contained in the Main Kit.
Some services detailed herein are network dependent or may only
be available on a subscription basis. For more information contact
your Service Provider.
Fitting the SIM
The SIM is inserted into the back
of the phone below the battery.
Place the SIM on the platform at
the bottom of the phone,
ensuring the bevelled corner is
the top right corner (1). Slide the
SIM down (2) using light
pressure, until it is located under
the SIM retaining bar and
against the stopper (3).
Removing the SIM
From the bottom of the SIM,
push until the majority of the SIM
is clear of the retaining bar (1).
Applying light pressure, slide the
SIM up (2). Once clear of the
SIM retaining bar the SIM can be
lifted out of the phone.
1
Getting Started

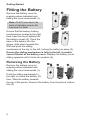
Fitting the Battery
Remove the battery cover by
pressing where indicated and
sliding the cover downwards (1).
Note
: DO NOT press hard in the
centre of the battery cover as this
may cause it to break.
Ensure that the battery locking
mechanism is located to the right
then insert the top of battery into
the battery recess (2). Place the
base of the battery into the
phone, slide down towards the
SIM and push the sliding
mechanism at the top, to the left, locking the battery in place (3).
Ensure the sliding mechanism is fully to the left, to enable
correct fitment of the battery cover. Replace the battery cover,
sliding upwards until it clicks into position (4).
Removing the Battery
Remove the battery cover by
pressing where indicated and
sliding the cover downwards (1).
Push the sliding mechanism to
the right to unlock the battery (2),
then Slide the battery towards
the top of the phone. Remove the battery from the phone, bottom
first (3).
2
Getting Started

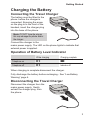
Charging the Battery
Connecting the Travel Charger
The battery must be fitted to the
phone before the charger is
connected. Ensuring the arrow
on the plug is to the front of the
handset, insert the charger plug
into the base of the phone.
Note
: DO NOT force the plug as
this may damage the phone and/or
the charger.
Connect the charger to the
mains power supply. The LED on the phone lights to indicate that
external power is applied.
Operation of Battery Level Indicator
While charging Charging complete
Telephone on KH
Telephone off K Indicator off
When charging is complete disconnect the charger.
Fully discharge the battery before recharging - See “Low Battery
Warning” page 4.
Disconnecting the Travel Charger
Disconnect the charger from the
mains power supply. Gently
extract the charger plug from
the phone.
3
Getting Started

Low Battery Warning
You are notified of low battery power by a blinking
LOW BATTERY message and a warning tone. If
this occurs during a call, end your call
immediately. The power is automatically shut off
shortly after the warning tone. Fully charge the
battery before using the phone again. (Calls can be made and
received while the phone is charging).
It is recommended that the battery is fully discharged between
charges to maintain battery life and performance.
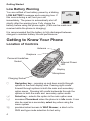
Getting to Know Your Phone
Location of Controls
g Navigation key – pressing up and down scrolls through
options in the main display area. Pressing right scrolls
forward through options in both the main and secondary
option areas. Pressing left scrolls backwards through the
options in both the main and secondary option areas.
B Select key – selects the option in the main option area
A accesses Phonebook when the phone is in idle mode. It can
also be used as a secondary select key when using the
menu system
P provides instant access to WAP Browser, a short cut to
SMS and type mode selection for text entry.
4
Getting Started
P
a
nasonic
Antenna
Earpiece
Personal Handsfree
Socket
Charging Socket
Microphone
External Power
LED
Display
LOW
BATTERY
Menu
Names

D makes a call or recalls recently dialed phone numbers
C clears the last digit entered or clears all digits when pressed
and held. Also returns to previous screen
E ends a call or switches the phone on/off when pressed
and held
1 Digit keys 0 to 9, * and #. The # key switches
vibration alert on and off
The Menu System
The menu system provides the means for accessing all the functions
which do not have dedicated buttons on the keypad.
During a call a restricted menu will be available.
Shortcuts
When you are familiar with the layout of the menu you can use the
keypad to enter the Menu Number to quickly obtain the required
function. For example, from Idle mode pressing B to enter the
menu and then 523 takes you directly to the menu for
changing the ring tone. Examples in these instructions use the
shortcuts to gain access to the relevant functions or to the sub-menu
under which other functions are located.
Display Icons
Following some operations the display automatically clears after
three seconds or after pressing any key.
5
Getting Started
Navigation Prompt
Main Display
Main Option Area
Status Icons /
Information Area
Secondary Option Area
ABC
ABC

Status Icons
The status icons are displayed according to the currently activated
functions. The Antenna, Signal and Battery icons are always
displayed when the handset is switched on and connected to a
network.
Y is displayed when you are registered to a non-home network
- roaming
t is displayed when call divert is enabled
] is displayed when vibration alert is enabled
[ is displayed when all tones or ring volume is off
N blinks when an unread message is stored or lights up when
message area is full
O is displayed when phone lock is enabled
S indicates that it is possible to make emergency calls
T indicates the received signal strength: \ - weak signal,
T - strong signal
H indicates the battery level: H - full, G (blinking) - low
battery
Information Area
This area displays the current top level menu, the sub-menu number,
text entry mode or the Phonebook location number, depending on
the current mode of operation.
Navigation Prompt
p This icon indicates the available directions in which the
Navigation Key can be pressed according to the current
mode of operation
Alarm Set
? The Alarm Set Icon will appear next to the clock display
when the alarm has been set
Option Areas
The Option Areas display the available options which can be
selected. Options in the main option area can be selected by
pressing B. Options in the secondary option area can be
selected by pressing A
6
Getting Started

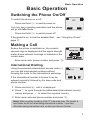
Basic Operation
Switching the Phone On/Off
To switch the phone on or off.
Press and hold E to switch power on
You may see a greeting animation and the phone
will go into Idle mode.
Press and hold E to switch power off
If Keyguard is on, it must be disabled first - see “Using Key Guard”
page 17.
Making a Call
Ensure the phone is switched on, the network
operator logo is displayed and the signal strength
meter shows network coverage is available in the
current area.
Enter area code, phone number and press D
International Dialling
Using the automatic international access code (+)
you can dial international numbers without
knowing the code for the international exchange.
If the international number is known it can be
entered manually followed by the area code and
phone number.
1 Press and hold 0 until + is displayed
2 Press e to cycle through the abbreviated international country
names and press B to select the required country
3 Enter area code and phone number and press D
Note:
Many countries include an initial “0” in the area code. This should, in
most cases, be left out when dialing international numbers. If you have
difficulties making international calls, contact your Service Provider.
7
Basic Operation
GSM
Menu
Names
Country:
UK
Ok
Back

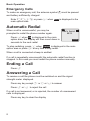
Emergency Calls
To make an emergency call, the antenna symbol (S) must be present
and battery sufficiently charged.
Enter 112 D or press B when SOS is displayed in the
main option area
Automatic Redial
When a call is unsuccessful, you may be
prompted to redial the phone number again.
Press B when Ok is displayed in the main
option area, the display will then count down in
seconds to the next redial
To stop redialing, press B when Cancel is displayed in the main
option area or press E at any time during redial.
When a call is connected a beep is emitted.
If a call is repeatedly unsuccessful the automatic redial function is
stopped. In this case you must redial the phone number manually.
Ending a Call
Press E
Answering a Call
To receive a call the phone must be switched on and the signal
strength meter displayed.
Press any key except E or g or A to answer
Press E or A to reject the call
If a call is not answered, or is rejected, the number of unanswered
calls is displayed.
Press any key to clear the display
8
Basic Operation
Auto Redial
00:24
Cancel

Caller Identification
This feature allows you to identify incoming calls
and accept or reject them. The caller’s phone
number (and name if stored in the Phonebook) are
displayed.
Note:
Caller Identification may not always be available.
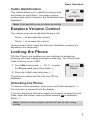
Earpiece Volume Control
The volume level can be adjusted during a call:
Press a to decrease the volume
Press b to increase the volume
Volume control when using the Personal Handsfree accessory is
adjusted in the same way.
Locking the Phone
With the Phone Lock enabled you are restricted to answering
incoming calls and making emergency calls only. The Phone Lock
Code is factory set to “0000”.
1 From Idle mode press B81to enter
the Phone Lock menu then press B
2 Enter the 4-digit code and press B
The phone is locked and the lock icon (O)is
displayed.
Unlocking the Phone
To restore normal operation, enter your Lock Code and press B.
The lock icon is removed from the display.
If you turn the phone off and on again you need to re-enter the Lock
Code, when the correct code has been entered Ok is displayed.
Press B.
Note:
There will not be any display indication that the lock code is being
entered
9
Basic Operation
Phone Lock
Enabled
Home
+0123456789
Accept
Reject

Disabling Phone Lock
1 From Idle mode press B8to enter the Security menu.
2
Use f to select Disable in the main option area and press B
3 Enter the Lock Code and press B
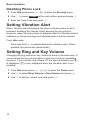
Setting Vibration Alert
When vibration alert is enabled, the phone vibrates when a call is
received. Enabling the vibration alert silences the ring volume.
However, when the ring volume is adjusted after the vibration alert is
switched on, the phone rings and vibrates when a call is received.
From Idle mode:
Press and hold # to enable/disable the vibration alert. When
enabled, the phone will vibrate briefly
Setting Ring and Key Volume
Changing the ring volume or key volume is done in the same way. If
you increase the ring volume above maximum it sets an escalating
ring tone. If you turn the ring volume off, the silent indicator icon ([)
is displayed. ([) is only displayed when the vibration alert is not
enabled.
1 From Idle mode press B52to enter the Tones menu
2 Use e to select Ring Volume or Key Volume and press B
3 Use e to set the volume level and press B
10
Basic Operation

Phonebook
Phone numbers can be stored in the Phonebook for quick recall. The
Phonebook is an area on the SIM allocated for storing phone
numbers . Therefore the number of locations, length of name and
number of phone numbers are SIM dependent.
Store a Number
To Store a Number in the Phonebook
1 From Idle mode enter the phone number and
press A
2 Confirm phone number and press B
3 Enter the name – see “Text Entry” page 43,
and press B
4 Enter location number and press B
If you choose not to enter a location number, the entry is placed in
the next available location. When Any is displayed in the main option
area, simply press B
Overwrite Protection
If a location is occupied you are prompted to confirm that you want to
overwrite the current information.
Press B to overwrite the selected location
Press C to choose another location number
Browsing Phonebook
You can search the Phonebook either by name or location. The
default setting for browsing is by name. When browsing by name
pressing a lettered key takes you to the first entry starting with that
letter.
1 From Idle mode press B2 to enter the Phonebook menu
2
Use f to navigate between Names or Loc’ns display mode and
press B
11
Phonebook
Location:
(1-50)
Any
Back
0-9

Retrieve/Edit Phonebook Entries
From Idle mode:
1 Press A
2 Use e to browse through the Phonebook
Once you have selected a phone number or name, there are several
actions you can perform.
To dial the selected number press D
You can also, View, Recall, Edit, Delete or Create entries in the
Phonebook.
With a phone number or name displayed:
3
Use f to cycle through View, Recall, Create, Edit or Delete in
the option areas
4 Press B or A to select an option
View Displays an individual name and phone number in the
Names list or allows you to scroll through your phonebook
entries by name only using e. You may also call the number
when s is displayed next to a name
Recall Displays the phone number, enabling you to either change it
or call the number
Create Creates a new entry in the Phonebook
Edit Displays the entry allowing you to make changes as
required. PressB to save any changes
Delete Deletes the entry from the Phonebook
Speed Dial a Number Stored in Phonebook
1 Enter location number – leading zeros may be left out
2 Press # and then D
12
Phonebook

Using Alert Profiles
Alert Profile enables you to identify callers with a particular ring tone,
making it easier to distinguish between callers.
Creating an Alert Profile
1 From Idle mode press B23to enter the Alert Profile
menu
2 Press B to insert a new profile
3 Recall the phone number from the Phonebook – see
“Retrieve/Edit Phonebook Entries” page 12 and press B
4 Use e to select the ring tone that you want to use for this profile
and press B
Hot Key Phone Numbers
It is possible to dial the phone numbers stored in locations 1-9 in the
Phonebook very quickly.
1 Press and hold a digit key 1 to 9
2 Press D
Review the Phonebook
The Review function in the Phonebook menu shows how many
locations are available and how many locations have been used.
1 From Idle mode press B24to enter the Review menu
A summary of the Phonebook is displayed.
2 Use e to see a detailed view of the Phonebook locations.
Occupied locations are shown with “w”
13
Phonebook

My Numbers
This function is SIM dependent. My Numbers is a convenient part of
Phonebook where your phone number (s) can be stored and
viewed.
Adding Numbers
1 From Idle mode press B25to enter the My Numbers
menu
2
Use f until Create is displayed in main option area and press
B
3 Enter the phone number and press B
4 Enter the name - see “Text Entry” page 43, and press B
5 Enter location number and press B
Viewing Stored Numbers
From Idle mode press B25to enter the My Numbers
menu
If more than one number is available, use e to view the listed
numbers.
14
Phonebook

Personalising Your Phone
Add a Start-up Greeting
A personalised greeting can be programmed for when the phone is
switched on.
1 From Idle mode press B 531 to enter the Greeting
menu
2 Use the text entry facility to add your greeting and press B -
see “Text Entry” page 43.
Displaying Animations
Animations can be displayed when the phone is
switched on.
1 From Idle mode press B 534 to
enter the Animation menu
2 Use e to view theme options and press B to select either the
desired theme, or disable the animation
Changing the Ring Tone
The ring tones of the phone can be changed to one of many
pre-defined sounds.
Setting up a Pre-defined Ring Tone
You can choose from a selection of tones and
melodies.
1 From Idle mode press B 523 to
enter the Ring Type menu
2 Use e to select the call type to be changed and press B
3 Press e to select the desired ring tone and press B
15
Personalising Your Phone
Animation
Theme 1
Ok
Cancel
Voice Calls:
Type 3
Ok
Cancel

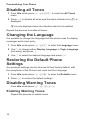
Disabling all Tones
1 From Idle mode press B 521 to enter the All Tones
menu
2 Press B to disable all tones and the silent indicator icon ([)is
displayed
([) is only displayed when the vibration alert is not enabled
Repeat the process to enable all tones.
Changing the Language
It is possible to change the language that the phone uses for display
messages and/or text entry.
1 From Idle mode press B51to enter the Language menu
2 Use e to change either Display Language or Tegic Language
(text entry) and press B
3 Use e to select the desired language and press B
Restoring the Default Phone
Settings
Any personal settings can be returned to their factory default, with
the exceptions of the Phone Lock code and the Language.
1 From Idle mode press B56to enter the Defaults menu
2 Press B to restore the default settings
Disabling Warning Tones
From Idle mode press B 525 B
Enabling Warning Tones
Repeat the process to enable tones.
16
Personalising Your Phone
Page is loading ...
Page is loading ...
Page is loading ...
Page is loading ...
Page is loading ...
Page is loading ...
Page is loading ...
Page is loading ...
Page is loading ...
Page is loading ...
Page is loading ...
Page is loading ...
Page is loading ...
Page is loading ...
Page is loading ...
Page is loading ...
Page is loading ...
Page is loading ...
Page is loading ...
Page is loading ...
Page is loading ...
Page is loading ...
Page is loading ...
Page is loading ...
Page is loading ...
Page is loading ...
Page is loading ...
Page is loading ...
Page is loading ...
Page is loading ...
Page is loading ...
Page is loading ...
Page is loading ...
Page is loading ...
Page is loading ...
Page is loading ...
Page is loading ...
Page is loading ...
Page is loading ...
Page is loading ...
Page is loading ...
Page is loading ...
Page is loading ...
Page is loading ...
Page is loading ...
Page is loading ...
Page is loading ...
Page is loading ...
Page is loading ...
Page is loading ...
-
 1
1
-
 2
2
-
 3
3
-
 4
4
-
 5
5
-
 6
6
-
 7
7
-
 8
8
-
 9
9
-
 10
10
-
 11
11
-
 12
12
-
 13
13
-
 14
14
-
 15
15
-
 16
16
-
 17
17
-
 18
18
-
 19
19
-
 20
20
-
 21
21
-
 22
22
-
 23
23
-
 24
24
-
 25
25
-
 26
26
-
 27
27
-
 28
28
-
 29
29
-
 30
30
-
 31
31
-
 32
32
-
 33
33
-
 34
34
-
 35
35
-
 36
36
-
 37
37
-
 38
38
-
 39
39
-
 40
40
-
 41
41
-
 42
42
-
 43
43
-
 44
44
-
 45
45
-
 46
46
-
 47
47
-
 48
48
-
 49
49
-
 50
50
-
 51
51
-
 52
52
-
 53
53
-
 54
54
-
 55
55
-
 56
56
-
 57
57
-
 58
58
-
 59
59
-
 60
60
-
 61
61
-
 62
62
-
 63
63
-
 64
64
-
 65
65
-
 66
66
-
 67
67
-
 68
68
-
 69
69
-
 70
70


Panasonic GD35 User manual
- Category
- Mobile phones
- Type
- User manual
Ask a question and I''ll find the answer in the document
Finding information in a document is now easier with AI
Related papers
Other documents
-
Motorola C155 - Cell Phone - GSM User manual
-
-
Samsung SGH-Q200SA User manual
-
-
-
-
-
-
-