Marcy NS-40501E Owner's manual
- Type
- Owner's manual

NOTE:
Please read all instructions
carefully before using this
product
Veuillez lire attentivement les
instructions du présent manuel
avant d’utiliser ce produit.
Table of Contents / Table des
matières
Safety Notice / Avis sur la
sécurité
Important Assembly Information
/ Renseignements importants
liés à l’assemblage
Care and Maintenance /
Entretien
Parts List / Liste des pièces
Warranty / Garantie
Ordering Parts / Commander
des pièces
Model / Modèle
NS-40501E
Retain This Manual for
Reference /
Conserverce manuel
comme référence
230419
OWNER'S
MANUAL /
MANUEL DU
PROPRIÉTAIRE
Magnetic-Resistance
Elliptical Exerciser / Exerciceur
elliptique à résistance magnétique
NS-40501E
IMPEX® INC.
2801 S. Towne Ave, Pomona, CA 91766
Tel: (800) 999-8899 Fax: (626) 961-9966
www.marcypro.com
support@impex-fitness.com

© IMPEX INC. www.impex-fitness.com
1
TABLE OF CONTENTS
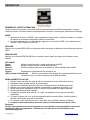
BEFORE YOU BEGIN
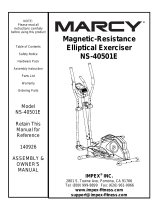
Thank you for selecting the MARCY Magnetic-Resistance Elliptical Exerciser
NS-40501E by IMPEX® INC. For your safety and benefit, read this manual
carefully before using the bike. As a manufacturer, we are committed to provide
you complete customer satisfaction. If you have any questions, or find there are
missing or damaged parts, we guarantee you complete satisfaction through
direct assistance from our factory. To avoid unnecessary delays, please call our
TOLL-FREE customer service number. Our Customer Service Agents will
provide immediate assistance to you.
BEFORE YOU BEGIN
1
IMPORANT SAFETY NOTICES
2
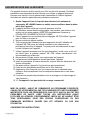
WARNING LABEL PLACEMENT
3
HARDWARE PACK
4
ASSEMBLY INSTRUCTION
7
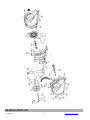
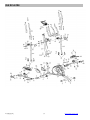
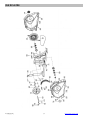
EXPLODED DIAGRAM
15
PARTS LIST
17
CARE AND MAINTANENCE AND STORAGE
19
OPERATING NOTES
19
COMPUTER
20
WARRANTY
21
ORDERING PARTS
21
Toll-Free Customer Service Number
1-800-999-8899
Mon. - Fri. 9 a.m. - 5 p.m. PST
www.impex-fitness.com
support@impex-fitness.com

© IMPEX INC. www.impex-fitness.com
2
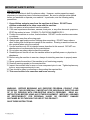
IMPORTANT SAFETY NOTICE
PRECAUTIONS
This exercise machine is built for optimum safety. However, certain precautions apply
whenever you operate a piece of exercise equipment. Be sure to read the entire manual
before you assemble or operate your machine. In particular, note the following safety
precautions:
1. Keep children and pets away from the machine at all times. DO NOT leave
children unattended in the same room with the machine.
2. Only one person at a time should use the machine.
3. If the user experiences dizziness, nausea, chest pain, or any other abnormal symptoms,
STOP the workout at once. CONSULT A PHYSICIAN IMMEDIATELY.
4. Position the machine on a clear, leveled surface. DO NOT use the machine near water
or outdoors.
5. Keep hands away from all moving parts.
6. Always wear appropriate workout clothing when exercising. DO NOT wear robes or
other clothing that could become caught in the machine. Running or aerobic shoes are
also required when using the machine.
7. Use the machine only for its intended use as described in this manual. DO NOT use
attachments not recommended by the manufacturer.
8. Do not place any sharp object around the machine.
9. Disabled person should not use the machine without a qualified person or physician in
attendance.
10. Before using the machine to exercise, always do stretching exercises to properly warm
up.
11. Never operate the machine if the machine is not functioning properly.
12. Read all warnings posted on the exercise bike.
13. Inspect the exercise bike for worn or loose component prior to use. Tighten/replace any
loose or wore components prior to use.
14. Care should be taken in mounting or dismounting the exercise bike.
15. This exercise bike is for consumer and home use only.
WARNING: BEFORE BEGINNING ANY EXERCISE PROGRAM, CONSULT YOUR
PHYSICIAN. THIS IS ESPECIALLY IMPORTANT FOR INDIVIDUALS OVER THE AGE
OF 35 OR PERSONS WITH PRE-EXISTING HEALTH PROBLEMS. READ ALL
INSTRUCTIONS BEFORE USING ANY FITNESS EQUIPMENT. IMPEX INC. ASSUMES
NO RESPONSIBILITY FOR PERSONAL INJURY OR PROPERTY DAMAGE
SUSTAINED BY OR THROUGH THE USE OF THIS PRODUCT.
SAVE THESE INSTRUCTIONS.


© IMPEX INC. www.impex-fitness.com
4
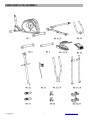
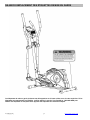
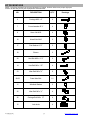
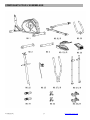
HARDWARE PACK
NOTE: The following parts are not drawn to scale. Please use your own ruler to measure the size.
NO. DESCRIPTION Q’TY Drawings
6 Carriage M10 x 3” 4
7 Curved washer Ø ⅞” 4
8 Acorn Nut M10 4
16 Aircraft Nut M10 2
17 Flat Washer Ø ¾” 2
18 Sleeve 2
20 Hex Bolt M10 x 3 ⅛” 2
14 Hex Bolt M8 x 1 ¾” 4
23 Allen Bolt M8 x ⅝” 6
10L/R Pedal Axle Bolt 1/1
11 Wrinkled Washer 2
35 Allen Bolt M6 x ½” 4
36 Carriage Bolt M6 x ¾” 4
15 Lock knob 4


© IMPEX INC. www.impex-fitness.com
7
ASSEMBLY INSTRUCTION
• Tools Required For Assembling the Machine: One Crossing Wrench and Allen Wrench,
provided by manufacturer.
• NOTE: It is strongly recommended that two or more people assemble this machine to
avoid possible injury.
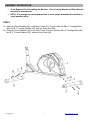
STEP-1
A.) Attach the Rear Stabilizer (#2) to the Main Frame (#1). Secure it with two M8 x 3” Carriage Bolts
(#6), two Ø ⅞” Curved Washers (#7), and two Acorn Nuts (#8).
B.) Attach the Front Stabilizer (#3) to the Main Frame. Secure it with two M8 x 3” Carriage Bolts (#6),
two Ø ⅞” Curved Washers (#7), and two Acorn Nuts (#8).

© IMPEX INC. www.impex-fitness.com
8
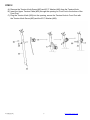
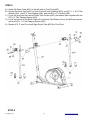
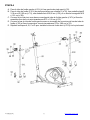
STEP-2
A.) Remove the Tension Knob Screw (#50) and Ø ½” Washer (#49) from the Tension Knob.
B.) Insert the Upper Tension Cable (#25) through the opening on Front Post to the bottom of the
Front Post.
C.) Plug the Tension Knob (#25) into the opening, secure the Tension Knob to Front Post with
the Tension Knob Screw (#50) and the Ø ½” Washer (#49).

© IMPEX INC. www.impex-fitness.com
9
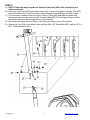
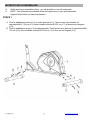
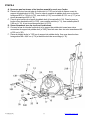
STEP-3
A.) NOTE: Extra help may be needed to hold the Front Post (#22) while connecting the
cables and wires.
B.) Attach the Front Post (#22) to the Main Frame (#1). Connect the Upper Computer Wire (#26)
from the bottom of the Front Post to the Lower Computer Wire (#28) from the Main Frame.
C.) Pull the tension connector from the Upper Tension Cable (#25) and slide in between the
opening on the connector on the Lower Tension Cable (#27). Pull the Upper Tension Cable
upward and slide the wire through the slot on the bracket.
D.) Drop down the Upper Tension Cable so the fitting sits firmly on top of the bracket.
E.) Secure the Front Post to the Main Frame with four M8 x 5/8” Allen Bolts (#23), and four Ø ¾” x
Ø ⅜” Curved Washers (#41).

© IMPEX INC. www.impex-fitness.com
10
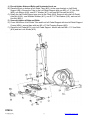
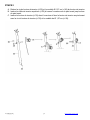
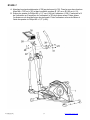
STEP-4
A.) Attach left Stride Tube (#21L) to the left axle on Front Post (#22).
B.) Secure the Stride Tube (#21L) to Front Post with one D Washer (#32), one Ø 1 ¼” x Ø ⅜” Flat
Washer (#31), one Ø ⅜” Lock Washer (#30), and one M10 x ¾” Hex Bolt (#29).
C.) Cover the pivot joint with two left Stride Tube Covers (#47L) and secure them together with two
ST5 x ⅝” Self Tapping Screws (#33).
D.) Cover the bottom of Left Stride Tube with one Stride Tube Bottom Cover Set (#52) and secure
with two ST4 x 1 ⅛” Self Tapping Screws (#53)
E.) Repeat A, B, C, and D to install Right Stride Tube (#21R) to Front Post.
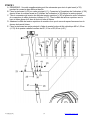
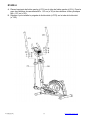
STEP-5

© IMPEX INC. www.impex-fitness.com
11
A.) Do not tighten Nuts and Bolts until instructed to do so.
B.) Place the pivot on bottom of left Stride Tube (#21L) to the open bracket on Left Pedal
Support (#9L). Secure the Tube to the Left Pedal Support with one M10 x 3 ⅛” Hex Bolt
(#20), one Sleeve (#18), one Ø ¾” Washer (#17), and one M10 Aircraft Nut (#16).
C.) Attach the Left Pedal Support rear pivot to the Crank (#24). Secure it with one Left Pedal
Axle Bolt (#10L), one Wrinkled Washer (#11), one Ø 1 ⅛” Flat Washer (#12), and one left
Hex Nut (#51L).
D.) Securely tighten all Nuts and Bolts.
E.) Cover the bottom of left Stride Tube and front Left Pedal Support with two left Pedal Support
Covers (#54L), secure them with two M5 x ⅜” Self Tapping Screws (#55).
F.) Place the Left Pedal (#13L) onto Left Pedal Support, secure with two M8 x 1 ¾” Hex Bolts
(#14) and two Lock Knobs (#15).
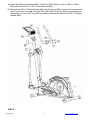
STEP-6

© IMPEX INC. www.impex-fitness.com
12
A.) Do not tighten Nuts and Bolts and Nuts until instructed to so.
B.) Place the pivot on bottom of right Stride Tube (#21R) to the open bracket on Right Pedal
Support (#9R). Secure the Tube to the right Pedal Support with one M10 x 3 ⅛” Hex Bolt
(#20), one Sleeve (#18), one Ø ¾” Washer (#17), and one M10 Aircraft Nut (#16).
C.) Attach the Right Pedal Support rear pivot to the Crank (#24). Secure it with one Right Pedal
Axle Bolt (#10R), one Wrinkled Washer (#11), one Ø 1 ⅛” Flat Washer (#12), and one right
Hex Nut (#51R).
D.) Securely tighten all Nuts and Bolts.
E.) Cover the bottom of right Stride Tube and front Right Pedal Support with two right Pedal
Support Covers (#54R), secure them with two M5 x ⅜” Self Tapping Screws (#55).
F.) Pace the Right Pedal (#13R) onto the Right Pedal Support, secure with two M8 x 1 ¾” Hex
Bolts (#14) and two Lock Knobs (#15).
STEP-7

© IMPEX INC. www.impex-fitness.com
13
A.) Attach the Stationary Handle (#39) to Front Post (#22). Secure it with two M8 x ⅝” Allen
Bolts (#23) and two Ø ¾” x Ø ⅜” Curve Washers (#41).
B.) Remove four M5 x ½”Philips Screws (#48) from Computer (#38). Connect the computer wire
from Computer to the Upper Computer Wire (#26) from Front Post. Slide the computer onto
the bracket on Front Post. Secure the Computer to the bracket with the four M5 x ½”Philips
Screws (#48).
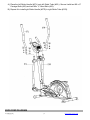
STEP-8


© IMPEX INC. www.impex-fitness.com
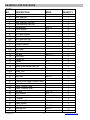
17
PART
NO.
DESCRIPTION
SPEC.
QUANTITY
1
Main Frame
1
2
Rear Stabilizer
1
3
Front Stabilizer
1
4
Rear Stabilizer End Cap
2
5
Front Stabilizer End Cap
2
6
Carriage Bolt
M10 x 3”
4
7
Curve Washer
Ø ⅞”
4
8
Acorn Nut
M10
4
9L
Left Pedal Support
1
9R
Right Pedal Support
1
10L
Left Pedal Axle Bolt
1
10R
Right Pedal Axle Bolt
1
11
Wrinkled Washer
2
12
Flat Washer
Ø 1 ⅛”
2
13L
Left Pedal
1
13R
Right Pedal
1
14
Hex Bolt
M8 x 1 ¾”
4
15
Lock Knob
4
16
Aircraft Nut
M10
2
17
Washer
Ø ¾”
2
18
Sleeve
2
19
Upper Stride Handle End Cap
2
20
Hex Bolt
M10 x 3 ⅛”
2
21L/R
Stride Tube
1/1
22
Front Post
1
23
Allen Bolt
M8 x ⅝”
6
24
Crank
1
25
Tension Knob/Upper Tension Cable
1
26
Upper Computer Wire
1
27
Lower Tension Cable
1
28
Lower Computer Wire
1
29
Hex Bolt
M10 x ¾”
2
30
Lock Washer
Ø ⅜”
2
31
Flat Washer
Ø 1 ¼” x Ø ⅜”
2
32
D Washer
2
33
Self Tapping Screw
ST5 x ⅝”
4
34
Plastic Spacer
2
35
Allen Bolt
M6 x ½”
4
36
Carriage Bolt
M6 x ¾”
4
37L/R
Stride Handle
1/1
38
Computer
1

© IMPEX INC. www.impex-fitness.com
18
39
Stationary Handle
1
40
Stationary Handle End Cap
Ø 1”
2
41
Curve Washer
Ø ¾” Ø ⅜”
6
42
Counter Sunk Self Tapping Screw
ST5 x ⅝”
2
43
Flat Self Tapping Screw
ST5 x ⅝”
2
44
Stationary Handle Grip
2
45
Stride Handle Grip
2
46L/R
Front Post Cover
1/1
47L/R
Stride Tube Cover
2/2
48
Philips Screw
M5 x ½”
4
49
Washer
Ø ½”
1
50
Tension Knob Screw
M5 x 1 ⅝”
1
51L/R
Hex Nut
1/1
52
Stride Tube Bottom Cover Set
2
53
Self Tapping Screw
ST4 x 1 ⅛”
4
54L/R
Pedal Support Cover
2/2
55
Philips Screw
M5 x ⅜”
4
56
Self Tapping Screw
ST4 x ⅝”
2
57
Hardware Pack
1
58
Button Head Self Tapping Screw
ST5 x ⅝”
8
59
Flat Head Self Tapping Screw
ST5 x ⅝”
4
60
Nylon Nut
M6
2
61
Flywheel Axle Lock Washer
2
62
Flywheel Axle
1
63
Hex Bolt
M8 x 4 ⅛:
1
64
Magnet Assembly Bushing
2
65
Magnet Assembly
1
66
Ball Bearing Set
1
67
Belt
1
68
Computer Wire Sensing Base
1
69
Magnet Assembly Spring
1
70
Hex Bolt
M6 x 1”
1
71
Hex Nut
M6
2
72
Nylon Nut
M8
1
73
Main Frame Cover L/R
1/1
74
Crank End Cover
2
75
Flywheel
1
76
Flange Nut
2
77
Ring Bolt
2
78
Locking Clamp
2
CARE, MAINTENANCE AND STORAGE

© IMPEX INC. www.impex-fitness.com
19
1. Inspect and tighten all parts each time you use the machine. Replace any worn parts
immediately.
2. The machine can be cleaned using a damp cloth and mild non-abrasive detergent. Do not use
solvents.
3. Store the bike IN-DOOR. Excess moisture and water would cause rust on the frame.
4. The Bike shall be placed at least 24 inches away from the wall or/and any other object such as
furniture to provide safe access to and passage around the machine.
5. To avoid possible injury, the help of two or more people are needed when moving the machine
around.
6. Disposal Instructions – The equipment can be safely disassembled and disposed without
unreasonable hazards. Call your local recycle agency regarding details of recycling.
7. The maximum user weight is 300 lbs.
8. Assembled Dimension: 49” x 24” x 64.25”
OPERATING NOTES
Tension Adjustment
Use the Tension Knob on Front Post to adjust the exercising resistance.
FOOT POSITIONING
Step with both feet on the two Pedals and hold the Stride Handles with two hands, and then
start to exercise. NOTE: DO not stand on one Pedal with both feet, or just step one foot
on one Pedal during exercise.
TRANSPORT
The Bike has a pair of roller wheels on Front Stabilizer End Cap.
To move, carefully hold and tilt the machine, and roll.
COMPUTER
Page is loading ...
Page is loading ...
Page is loading ...
Page is loading ...
Page is loading ...
Page is loading ...
Page is loading ...
Page is loading ...
Page is loading ...
Page is loading ...
Page is loading ...
Page is loading ...
Page is loading ...
Page is loading ...
Page is loading ...
Page is loading ...
Page is loading ...
Page is loading ...
Page is loading ...
Page is loading ...
Page is loading ...
Page is loading ...
Page is loading ...
-
 1
1
-
 2
2
-
 3
3
-
 4
4
-
 5
5
-
 6
6
-
 7
7
-
 8
8
-
 9
9
-
 10
10
-
 11
11
-
 12
12
-
 13
13
-
 14
14
-
 15
15
-
 16
16
-
 17
17
-
 18
18
-
 19
19
-
 20
20
-
 21
21
-
 22
22
-
 23
23
-
 24
24
-
 25
25
-
 26
26
-
 27
27
-
 28
28
-
 29
29
-
 30
30
-
 31
31
-
 32
32
-
 33
33
-
 34
34
-
 35
35
-
 36
36
-
 37
37
-
 38
38
-
 39
39
-
 40
40
-
 41
41
-
 42
42
-
 43
43


Marcy NS-40501E Owner's manual
- Type
- Owner's manual
Ask a question and I''ll find the answer in the document
Finding information in a document is now easier with AI
in other languages
Related papers
Other documents
-
 Impex NS-40501E Owner's manual
-
 Impex XJ-3220 Owner's manual
-
 Impex AIR-1 User manual
-
 Impex NS-1201U Owner's manual
-
 Impex NS-652 User manual
-
 Impex ME-709 Owner's manual
-
 Impex NS-653 Owner's manual
-
 Impex MWB-26780 User manual
-
Soozier A90-281 Assembly Instructions
-


