Page is loading ...

037/039
DENTAL CHAIR
3.E
INSTALLATION
and
OPERATION
INSTRUCTIONS

TABLE OF CONTENTS
Page
Overall View and Major Components..................................................................... 1
Dimensions and Specifications................................................................................ 2
Dimensions and Specifications (Europe Type) ..................................................... 2A
Installation Procedures ............................................................................................ 3
Operation Procedures .............................................................................................. 4
Adjustment of Auto Positioning ............................................................................. 6B
Care and Maintenance ............................................................................................ 6B

1. 037/039 OVERALL VIEW AND MAJOR COMPONENTS
1
2
3
4
5
6
7
8
12 11 10 9
037 CHAIR
039 CHAIR
1
(1) ARTICULATING HEADREST (7) ARMREST BLOCK
(1') POWER HEADREST (8) CHAIR PRESET PANEL
(2) BACKREST (9) BELLOWS
(3) ARMREST (10)BASE PLATE
(4) SEAT (11)ROTATION LOCK PEDAL
(5) LEGREST (12)FOOT SWITCH (CHAIR)
(6) RETRACTABLE FOOTREST (13)FOOT SWITCH (HEADREST)
Fig. 1-1 OVERALL VIEW
1'
2
3
4
5
6
7
8
12 11 10 9
13

2
2. DIMENSIONS AND SPECIFICATIONS
520
675
210(037)
220(039)
500
600
575
450
500
10
20
90
30
95
3
455
385
395
475(037)
455(039) 560 615
1650(037)
1630(039)
220
500
1120(037)
1100(039)
15
CHAIR WEIGHT 150 kg (037)
154 kg (039)
INITIAL HEIGHT 455 mm
SEAT ELEVATION STROKE 260 mm
HEADREST EXTENSION 120 mm (039)
LEGREST EXTENSION 230 mm
BASE DIMENSION 555 mm x 570 mm x 15 mm
HYDRAULIC FLUID 900 cc
(10W NON-DETERGENT HYDRAULIC OIL)
TYPE OF MOTOR PUMP 5 LP
POWER CONSUMPTION 600/500W at 50/60Hz
RANGE OF HEADREST ANGLE 64 dig. (037)
38 dig. (039)

2A
557
712
210(037)
220(039)
500
600
575
450
500
10
20
90
30
95
3
487
422
432
475(037)
455(039) 560 615
1650(037)
1630(039)
220
500
1157(037)
1137(039)
15
CHAIR WEIGHT 150 kg (037)
154 kg (039)
INITIAL HEIGHT 487 mm
SEAT ELEVATION STROKE 300 mm
HEADREST EXTENSION 120 mm (039)
LEGREST EXTENSION 230 mm
BASE DIMENSION 555 mm x 570 mm x 15 mm
HYDRAULIC FLUID 900 cc
(10W NON-DETERGENT HYDRAULIC OIL)
TYPE OF MOTOR PUMP 5 LP
POWER CONSUMPTION 600/500W at 50/60Hz
RANGE OF HEADREST ANGLE 64 dig. (037)
38 dig. (039)
039 : After Ser. No. DDA080219
037 : From 1997 October Production
DIMENSIONS AND SPECIFICATIONS (EUROPE TYPE)

3. INSTALLATION PROCEDURES
1) Place chair crate just behind the planned location for the chair.
2) Open the crate and remove all packing materials.
(Do not use sharp instrument that can damage upholstery.)
Slide the chair off palette into the place.
DO NOT LIFT THE CHAIR BY ARMRESTS OR BACKREST.
3) Once the chair is located, but BEFORE PLUGGING INTO POWER, do the followings ;
(1) Remove red bolt with a caution tag located on chair seat-plate.
(2) Grasping red tag on bellows, pull out rubber plug of oil reservoir.
(3) Save above red bolt and rubber plug in case the chair is ever reshipped in the future.
4) Remove 3 nuts and washers under the seat.
Attach the seat on seat-plate and fix it by screwing the nuts and washers from
underneath the seat-plate.
5) Attach bellows to bellows support.
(1) Loosen and remove 4 Phillips screws on bellows support-rear, then remove the bellows
support-rear from the chair.
(2) Hang the top plate of bellows on the edge of bellows support-front, and hang the
top-rear plate of bellows on the edge of bellows support-rear.
(3) Reattach bellows support-rear with hanging bellows on to the chair by screwing 4
Phillips screws.
6) Unpack the small carton containing accessories. Check following items in it.
Headrest Assembly (037) .............................. 1 pce.
Foot Switch (039).......................................... 1 pce.
Flat Head Wood Screw (Pie.4.8 - 40) ............4 pcs.
Anchor Plug (7 x 30) ......................................4 pcs.
For an 037 chair, slide headrest into slide mount on top of backrest.
7) Plug the chair into an appropriate electric power source.
8) Turn on the Main Switch located on left side of Pump Cover. (See Fig. 2-1.)
3
21
3
2
1
3
MAIN SWITCH
FUSE (6.3 A)
POWER CORD
Fig. 2-1 Main Switch Panel
AFTER INSTALLATION
Once the chair is installed according to above steps, check the all chair functions
following the operation procedures in this booklet.

4
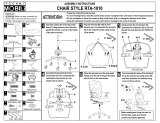
4. OPERATION PROCEDURES
The Belmont 037/039 chair was designed for maximum simplicity of operation. However,taking a few moments
to familiarise yourself with the operation of the chair will make it's operation comfortable and simple for you
and your patients.
Basic Control Function:
Chair manual control functions are duplicated on both sides of the pump cover. Chair auto control functions
are equipped on rear side of the pump cover. A separate foot control is used with the power headrest (039).
1) Chair Manual Controls (See Fig. 3-l.)
(1) Seat Height Control
To raise : Move either side mounted foot switch up.
To lower : Move either side mounted foot switch down.
(2) Backrest Control
To raise : Move either side mounted switch right.
To reclining : Move either side mounted switch left.
2) Chair Auto-mode Controls (See Fig. 3-l.)
(1)Preset Mode Controls
037/039 chair has two preset positions and last position memory. To place the
chair in each position with footrest extension. Momentarily move the foot switch
located on rear side of the pump cover.
Preset 1 : Move rear mounted switch left.
Preset 2 : Move rear mounted switch right.
LP : Move rear mounted switch up.
(2)Auto-return Control
To return the chair to the patient entry position (fully lowered with the footrest retracted), momentarily
move rear mounted foot switch down.
3) Power Headrest Controls (039) (See Fig. 3-1.)
(1)To extend : Press down upper area of foot control disc.
To retract : Press down lower area of foot control disc.
(2)To move back : Press down right side of foot control disc.
To move forward : Press down left side of foot control disc.
4) Articulating twin axis prosthetic headrest adjustments (037) (See Fig. 3-2.)
Articulating twin axis prosthetic headrest adjusts to match patient's anatomy, looks securely in any desired
position.
To extend : Simply pull up to desired position.
To retract : Depress to desired position.
5) Safety Stop
Automatic travel in all automatic mode can be instantly cancelled at any time by momentarily pressing any
control switch.
6) Armrest Rotation (See Fig. 3-3.)
Either armrest can be rotated outward by pulling.
7) Chair Rotation (See Fig.3-l.)
Release rotation lock by pressing "N" footpad and lock chair in desired position by pressing "L" footpad.

5
EXTEND
HEADREST
HEADREST BACK
RETRACT
HEADREST
HEADREST
FORWAD
HEADREST FOOTSWITCH (039 ONLY)
RAISE CHAIR
LOWER CHAIR
RAISE
BACKREST
RECLINE
BACKREST
CHAIR FUNCTIONS
L P
AUTO-RETURN
PRESET
2
PRESET
1
PRESET / AUTO-RETURN CHAIR BASE
NEUTRAL
LOCK
ROTATION LOCK PEDAL
Fig. 3-3 Armrest Rotation
Fig. 3-1 Control Switch Location & Function
Fig. 3-2 Headrest Adjustment

6B
5. CARE AND MAINTENANCE
Other than cleaning, no scheduled maintenance of the chair is required.
Painted metal parts and vinyl upholstery should be cleaned with a mild detergent followed by disinfecting
with alcohol.
The area around control switches can be cleaned with the same agent, however be sure to use only a
moistened cloth to avoid getting contaminants into switch mechanism. NOTE: For safety reasons, the
switch on this chair operate at low voltage.
POWER
LOCK OFF
MODE
STORE
Fig.4-1 Chair Preset Panel
8) Preset Position Adjustment (Fig.4-1)
Two Preset positions can be programmed.
Procedure 1.
1. Set seat and backrest in the desired position
by manual control switches.
2. Keep depressing STORE button on chair preset
panel until buzzer sounds Pi-,Pi-,Pi-.
3. While buzzer is sounding, press (1) button on
doctor table or assistant side control panel so that
the position is memorized to PRESET 1, then the
buzzer sound ceases.
4. PRESET 2 is memorized by pressing (22
22
2) button as following 1 to 3.
Procedure 2.
1. Set seat and backrest in the desired position by manual control switches.
2. Keep depressing (1) button on doctor table or assistant side control panel until buzzer sounds
so that the position is memorized to PRESET 1, then the buzzer sound ceases.
3. PRESET 2 is memorized by pressing (22
22
2) button as following 1 to 2.
9) Mouth Rinsing Backrest Position Adjustment (Fig.4-1)
The desired mouth rinsing backrest position can be programmed as last position memory operation.
Procedure 1.
1. Set backrest in the desired position for mouth rinsing by manual control switch.
2. Keep depressing STORE button on chair preset panel until buzzer sounds Pi-,Pi-,Pi-.
3.While buzzer is sounding, press (LP) button on doctor table or assistant side control panel
so that the position is memorized to mouth rinsing position then the buzzer sound ceases.
Procedure 2.
1. Set backrest in the desired position by manual control switches.
2. Keep depressing (LP) button on doctor table or assistant side control panel until buzzer sounds
so that the position is memorized to mouth rinsing position, then the buzzer sound ceases.
Note ; When chair electric power is ON, the POWER L.E.D. illuminates in green.
When chair safety lock system is not working, the LOCK OFF L.E.D. illuminates in green.
When the LOCK OFF L.E.D. is OFF, chair can not be operated at all.

TAKARA BELMONT CORPORATION
1-1, Higashi-shinsaibashi 2-Chome,Chuo-ku,Osaka 542-0083,Japan
TEL. : 0081(6) 6213-5945 TELEFAX : 0081(6) 6212-3680
Memo
Printed in Japan 3.E 0506.MA
/